
Overview & Concepts
The Recipe Database in EasyBuilder Pro is used to store and manage groups of related parameters that define how a machine or process operates. Each recipe contains a set of values—such as speeds, timers, or setpoints—that are linked to specific HMI memory or PLC registers.
Recipes are organized like a simple table:
- Recipe (record) → one complete setup (e.g., Product A)
- Parameters (fields) → individual values within that setup
- Address mapping → each value is tied to an HMI or PLC register
When a recipe is selected, the HMI writes all of its values to the mapped registers at once. This allows a full machine setup to be applied instantly instead of entering values manually.
The Recipe Database also supports basic data interaction:
- Load recipe → send stored values to the machine
- Save recipe → store current machine values
- Edit recipes → adjust values from the HMI
- Import/export → manage recipes externally (e.g., CSV)
In practice, recipes make it easier to:
- Switch between product or batch configurations
- Reduce manual entry errors
- Keep consistent, repeatable machine settings
Overall, the Recipe Database provides a simple and reliable way to manage and apply machine configurations.

Implementation
In EasyBuilder Pro, open [Data/History] » [Recipe Database] to define recipes, set transfer method and edit recipe data.
Definition Tab
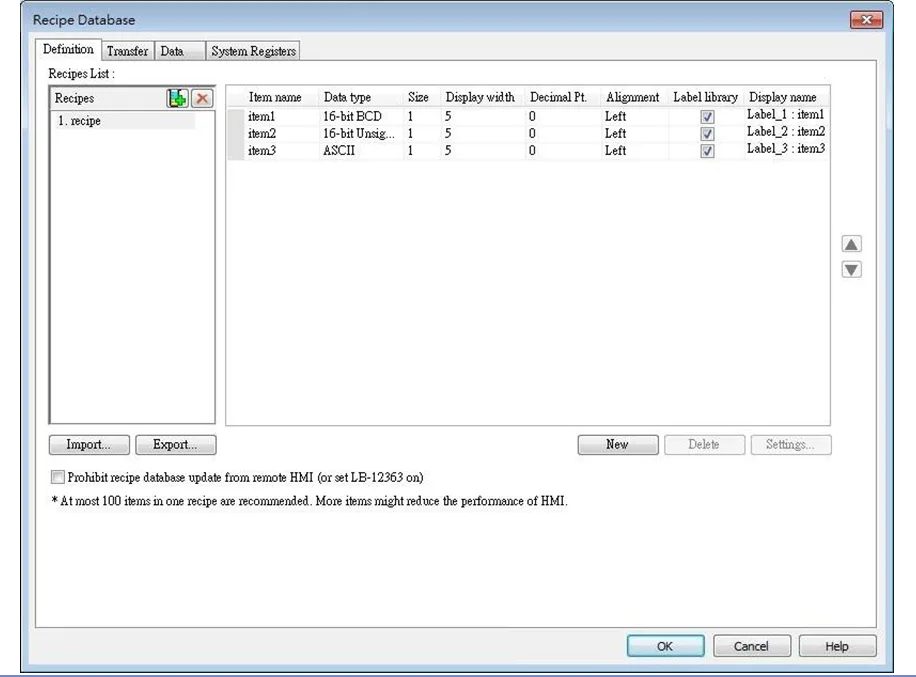
| Setting | Description |
|---|---|
| Recipes List | Add or delete a recipe, the maximum is 100 recipes. |
| New | Add a new item, the maximum is 1000 items. |
| Settings | Configure recipe settings, see the following description. |
| Delete | Delete the selected items. |
| Import | Import recipe definition. |
| Export | Export recipe definition. The exported file will not contain recipe records. |
Click [Settings] to define the settings for that specific recipe:
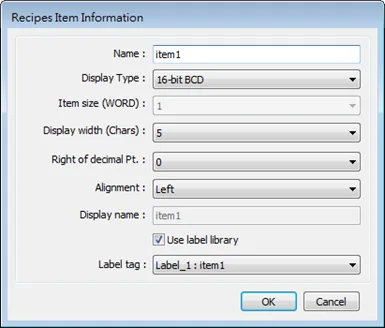
| Setting | Description |
|---|---|
| Name | Enter recipe item name. |
| Display Type | Setting item data type. |
| Item size (WORD) | Setting the size of the item. |
| Display width (Chars) | Setting the number of characters of the item to be displayed. |
| Right of decimal pt. | Setting the decimal place when displaying data. |
| Alignment | Setting the alignment when displaying data. [Align left], [Align center], and [Align right] can be selected. |
| Use label library | On cMT / cMT X series, setting display name is possible. The display name is by default the same as the item name or it may be a tag from Label Tag Library. |
Transfer Tab
Transfer tab contains the settings for transferring records between the recipe database and designated destinations.
Bulk Transfer
Transfer destinations of a record are consecutive addresses starting from the designated address.
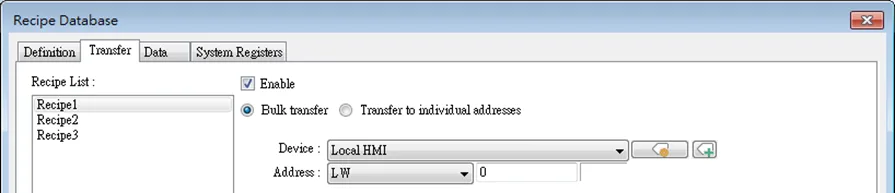
Under this mode, the data type settings of destination addresses must follow those of the recipe items. The following table shows the bulk transfer result when LW-0 is designated as the starting address given settings in the following figure.

| Item Name | Destination | Data Type of Dest. Address |
|---|---|---|
| item1 | LW-0 | 16-bit Unsigned |
| item2 | LW-1 | 32-bit Signed |
| item3 | LW-3 | 32-bit Float |
Transfer to Individual Addresses
Transfer destination of each item within a record is configured individually.

Under this mode, the data type setting of each destination addresses must also follow those of the corresponding recipe item. In the settings shown above, the data type of address 4x-1 should be 16-bit Signed, and 4x-100 should be 32-bit Signed, and so on.
Data Tab
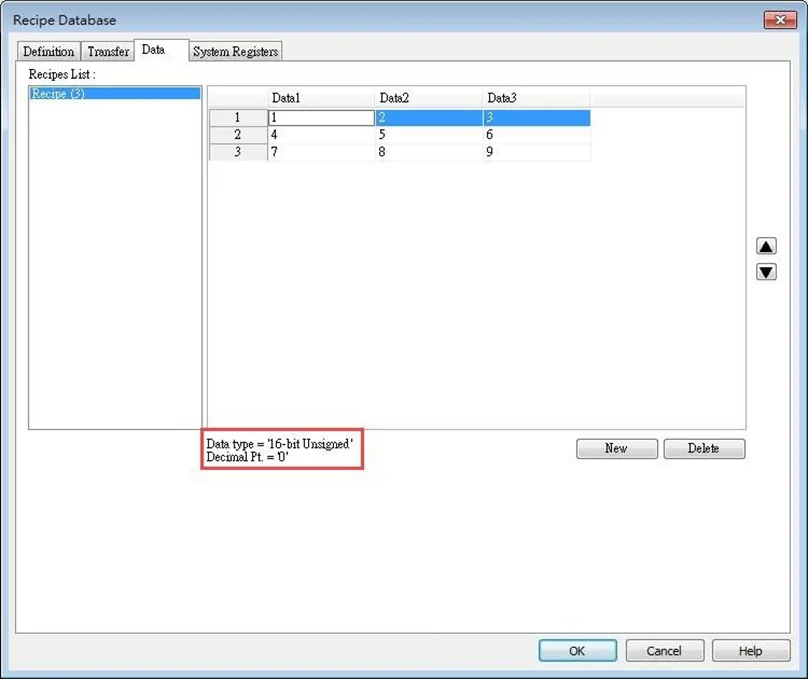
Data tab contains an editor for recipe content. Before recipe content can be edited in this tab, the data type of the items should be set in Definition tab.
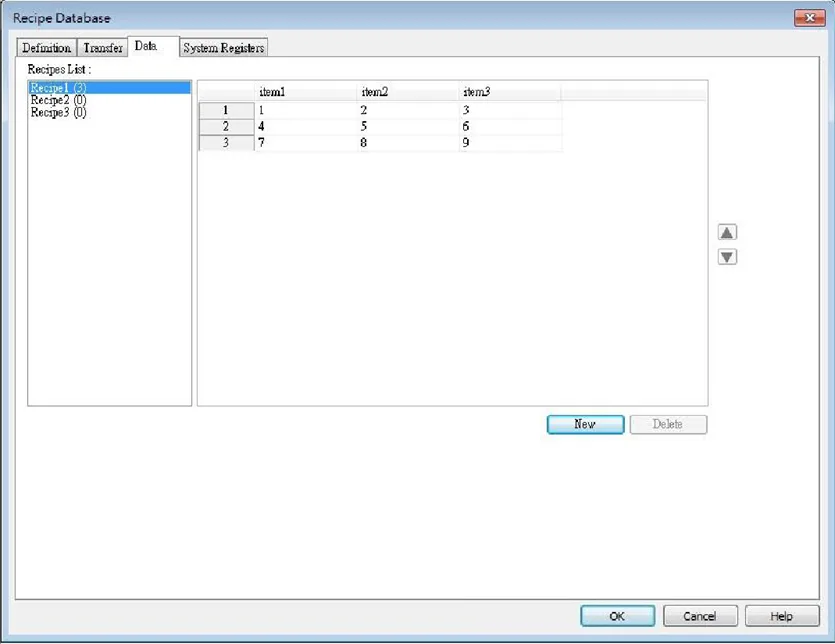
In the example shown above, Recipe created in the Definition tab can be found. Items shown on the right hand side come from item names added in Definition tab. Data of each item name can be configured in this tab following the data type defined in the Definition tab.
| Setting | Description |
|---|---|
| Recipes: | The recipes created in Definition tab. The number enclosed in brackets shows the total number of records in the corresponding recipe. |
| Add | Adds records into the recipe according to the defined data type. |
| Delete | Deletes the edited content. |
| Up / Down Arrows | Moves the selected record upward / downward. |
To define recipes according to the specified data type, click [Add] button above the record list to insert a new record and start editing each item. When click on the item, the item’s data type will be shown under the record list. This helps users to fill in each item with appropriate value. Click [OK] to confirm and save the records.
System Registers Tab
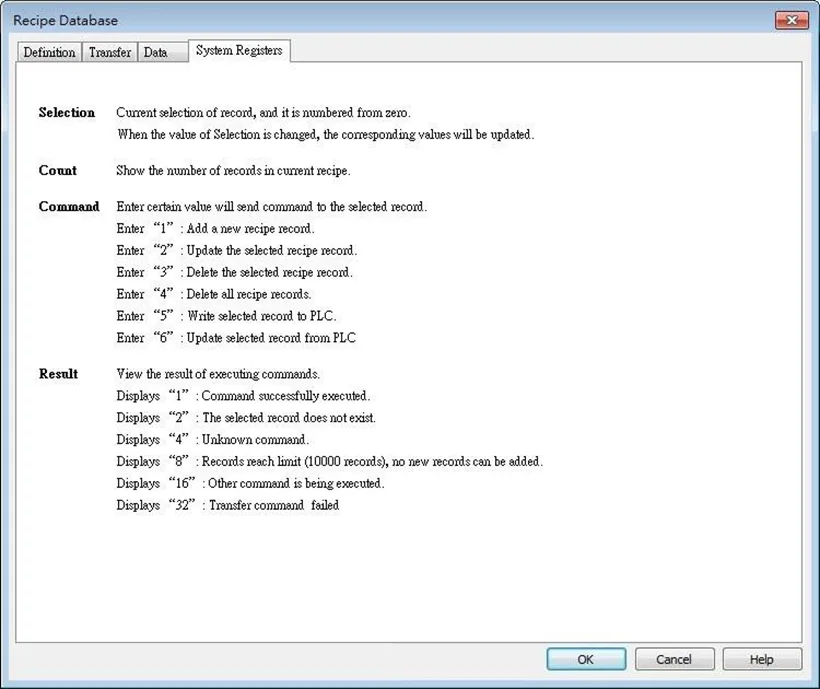
In System Register tab, a list of recipe database related control addresses and their descriptions can be found.
Notes:
- The maximum number of Recipe Database acceptable in a project file is 100 Recipe Databases. A Recipe Database can contain 1000 items.
- Each recipe can hold a maximum of 10000 records.
- The maximum data length acceptable in a Recipe Database is 2000 words. Exceeding the limit can lead to compilation failure.
- The name of Recipe Database and recipe items should be in alphanumeric.
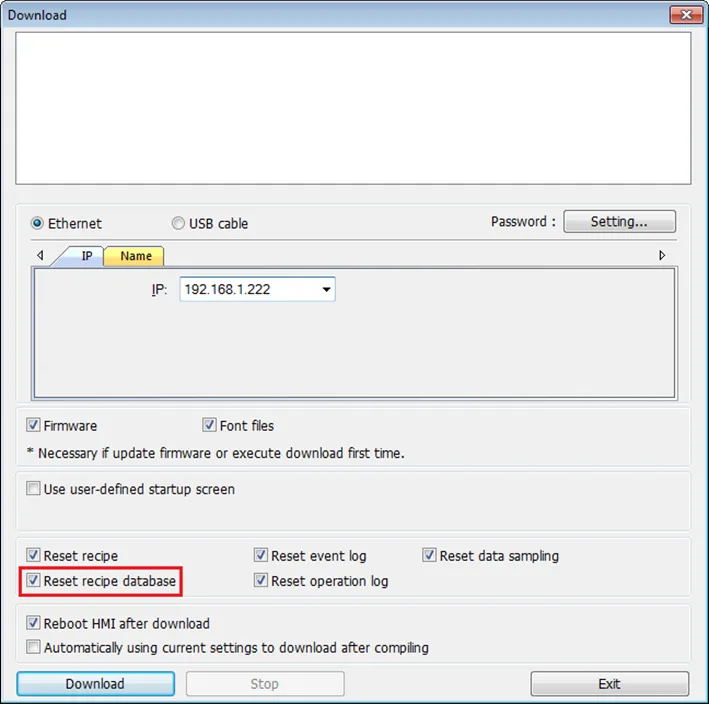
- The recipe records will be stored in the .exob file after compilation and will be downloaded to HMI. These recipes cannot be shared with other project files. If users need to modify the recipe contents and download them to the HMI, make sure that [Reset recipe database] check box is selected during download. If not, the recipe database in the HMI will not be updated.

Implementation: Recipe View Object
The Recipe View Object allows for a specific recipe to be viewed on the HMI screen. All items and values of the recipe can be viewed using this object.
Note:
- The Recipe View Object requires at least one recipe to be created prior to implementing the object. If there is not at least one existing recipe, EasyBuilder Pro will prompt you to create one:

Click the Recipe View icon on the toolbar to open a Recipe View object property dialog box. Set up the properties, press OK button, and a new Recipe View object will be created.
General Tab
Note:
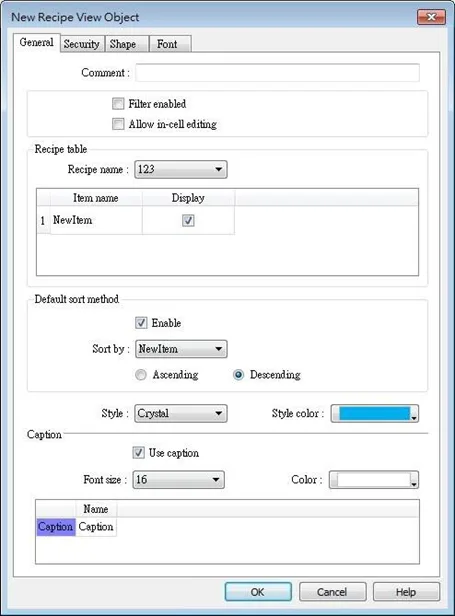
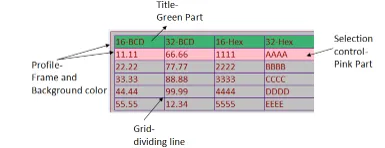
- The name of each part of the Recipe View object is shown in the following figure:
| Setting | Description |
|---|---|
| Filter enabled | When selected, entering keywords in Recipe View to search for specific text is possible. |
| Allow in-cell editing | When selected, editing Recipe Database directly in Recipe View is possible. |
| Refresh data automatically | When selected, the system will automatically refresh Recipe View when recipe is changed; otherwise, Recipe View will be refreshed after window change. |
| Recipe table | Recipe name Choose the recipe name or look for other recipes from the drop-down list. Display Choose an item to be displayed by selecting its checkbox. |
| Default sort method | Configure how the items are sorted. [Ascending] and [Descending] can be selected. |
| Style (cMT / cMT X Series only) | Available styles are: Default, Crystal, and Flat. |
| Caption (cMT / cMT X Series only) | With [Use caption] enabled, the text, font size, color, and name of the caption can be specified. (Use caption is only available when the selected style is Crystal or Flat.) |
| Title | The item name assigned in [Data/History] » [Recipe Database]. Transparent If selected, the title row has no shading; the color selection is not available. |
| Profile | The frame and background color of the object can be set. Transparent Select to hide the background, the color selection is not available. |
| Grid | The dividing lines between columns and rows. Enable Select to show the grid. Auto fit short column (cMT / cMT X Series Default style) The column width automatically adjusts to the size of the content. |
| Selection Control | Shading color of the selected row. |
Manipulating Recipe Database Values during HMI Runtime
There are 4 system registers that can be used to view/update/add/delete recipe database:
- Selection
- Count
- Command
- Result
Selection
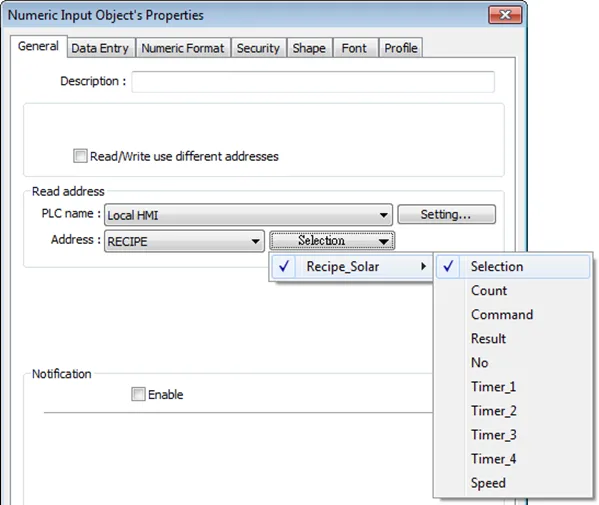
Current selection of record in Recipe View object, and it is numbered from zero. If the first record is chosen, the value of Selection will be 0. When the value of Selection is changed, the corresponding values will be updated, such as “No”, “Timer_1”, “Timer_2”, as shown in the following figure.
Count
Show the number of records in current recipe.
Command
Enter certain value will send command to the selected record.
- Enter “1”: Add a new recipe record.
- Enter “2”: Update the selected recipe record.
- Enter “3”: Delete the selected recipe record.
- Enter “4”: Delete all recipe records.
- Enter “5”: Write the selected recipe record to PLC.
- Enter “6”: Update the recipe record selected from PLC.
Result
View the result of executing commands.
- Displays “1”: Command successfully executed.
- Displays “2”: The selected record does not exist.
- Displays “4”: Unknown command.
- Displays “8”: Records reach limit (10000 records), no new records can be added.
- Display “16”: Another command is being executed.
- Display “32”: Transfer command failed.
Example 1
In this example, a recipe database is created to be displayed by Recipe View object. When you select a recipe record on Recipe View object, the value of [Selection] and the corresponding values will change accordingly. When finish designing, you can modify the recipe database by entering a value in [Command].
Instructions: Example 1
Create a Recipe
Create a recipe as shown in the following figure: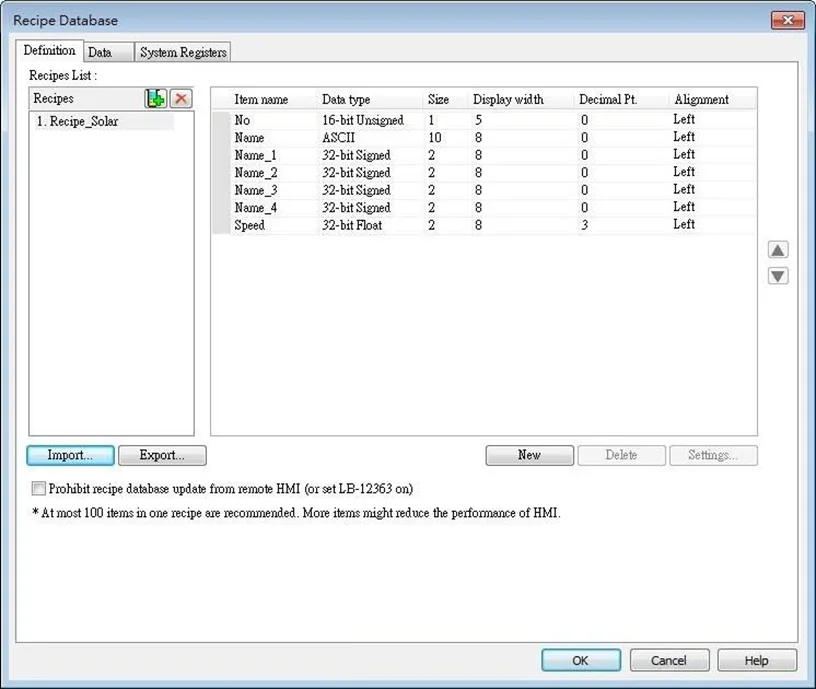
Create Records within the recipe
In Data tab create a number of records as shown in the following figure.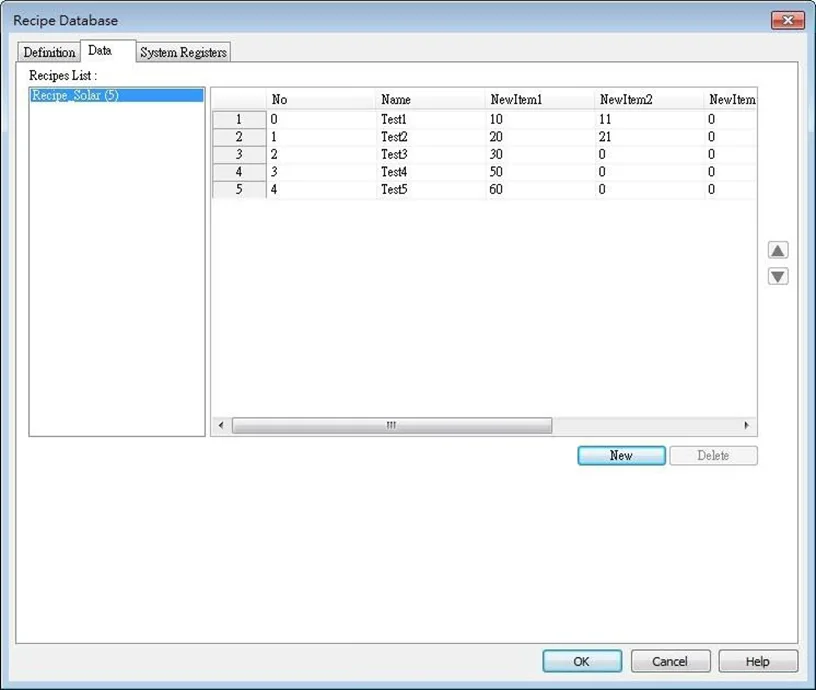
Create Recipe View Object
Create a Recipe View object and use the recipe database created in the preceding steps.Create record references (Recipe Control system registers)
Create 4 Numeric objects using registers “Selection”, “Count”, “Command”, and “Result”.Create record references (Recipe element registers)
Create corresponding input objects for “No”, “Name”, “Timer_1”, …, “Timer_4”, “Speed”.For example, “Name” is an ASCII item with size “10”. Create an ASCII object and set device type to “RECIPE” » “Name”.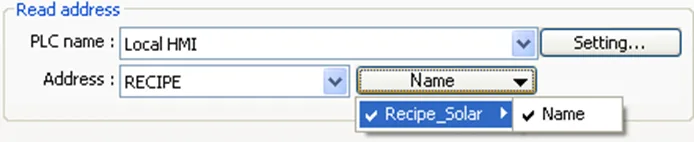
Done!
Now you can edit elements of the recipe database during runtime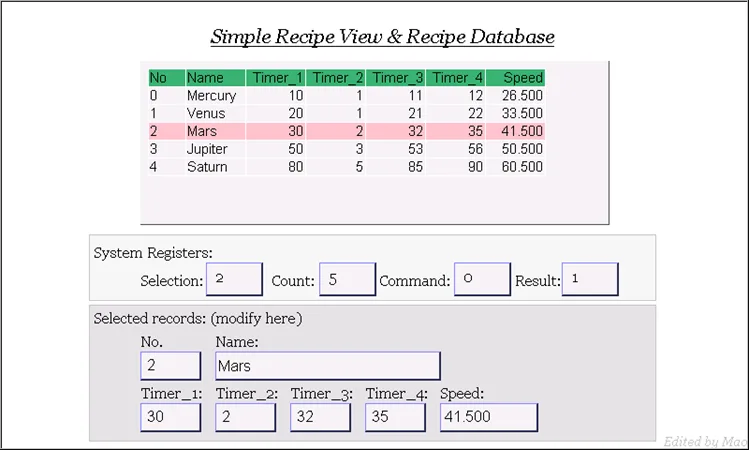
As shown above, “Mars” is selected and the corresponding items are also updated.
There are 5 records so the “Count” displays “5”.
Try selecting different rows of the Recipe View object. Fields “Name”, “Timer_1”, …will change accordingly.
Try the following operations:
Add: To add current data as a new record, enter “1” in “Command”.
Update: To update recipe database, enter “2” in “Command”.
Delete: To delete the selected record, enter “3” in “Command”.
Sort the items.
Click the title to change the order.
Example 2
In this example, [RECIPE_Bit] can be used to read / write individual bits of Recipe dd
Although BOOL type items cannot be added to Recipe Database, individual bit access of 16bit / 32bit data is possible.
As shown in the following figure, select [RECIPE_Bit] for the read address of Bit object and point to the target item, and then the available Bit selections will be displayed. In this manner, Recipe Database can be used to record, read, and write bit data.
![select [RECIPE_Bit] for the read address of Bit object and point to the target item, and then the available Bit selections will be displayed. In this manner, Recipe Database can be used to record, read, and write bit data.](https://media.maplesystems.com/wp-content/uploads/2026/04/image-846.webp "Using Recipe_Bit to edit bit level data to recipes")

Recipe Database Editor Tool
EasyBuilder Pro
Within EasyBuilder Pro software, you can import and export existing recipe database through the Tools menu, Recipe Database Editor tool.
Utility Manager
Within the Data Conversion Tab of the Utility Manager software you can do the same thing.
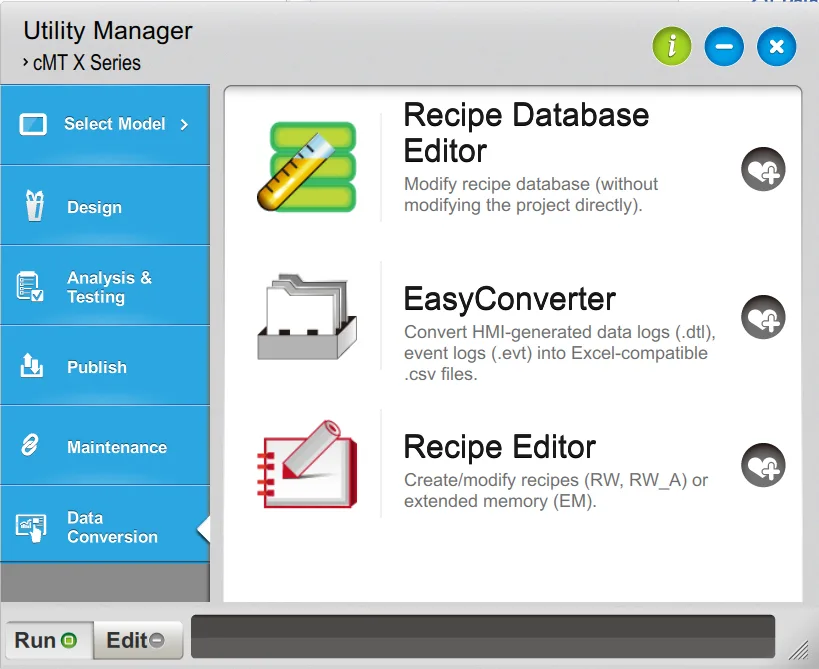
The Recipe Database Editor allows you to modify the recipe database without modifying the project directly. This is done by uploading the recipe.db file from the HMI so you can make changes to it. There are no changes made to the recipes themselves, or the database loaded into the HMI unless and until the updated recipe database file is downloaded into the HMI separately.