
Overview & Concepts
JavaScript (JS) Object
The JavaScript (JS) Object in EasyBuilder Pro allows developers to execute JavaScript code directly within an HMI project, providing a flexible way to create dynamic and customized behavior beyond standard object capabilities.
As described below, the JS Object operates within the HMI runtime environment and is typically used to handle data processing, logic execution, and interaction with web-based content. It enables the HMI to run scripts that can read and write data, manipulate values, and respond to events in real time.
The JS Object is particularly useful for:
- Performing advanced calculations or data formatting
- Creating dynamic behaviors that are difficult to achieve with standard objects
- Interfacing with web technologies or external services
- Handling asynchronous or event-driven logic
JavaScript code within the object can interact with HMI data through defined variables and system functions, allowing it to influence how information is displayed or processed. This makes it a powerful tool for extending the functionality of the HMI without relying solely on macros or built-in features.
Implementation
JS objects provide powerful customization features, but using them incorrectly can result in system error or performance degredation. Please use JS objects carefully.
Use the built-in features in EasyBuilder Pro where possible, and use JS objects only when the requirements are difficult or impossible to fulfill by using the built-in features.
Hardware and Software Requirements
- EasyBuilder Pro V6.05.01 or later
- Applicable JavaScript version: ECMAScript 2017 (Not including SharedArrayBuffer and Atomics)
- Eligible HMI model: cMT X Series
- JS objects are not supported on 32-bit Android devices.
JS Object
Config Tab
JS object property configuration may contain the following types of data:
- Address
- Subscription
- The parameters defined by users according to the needs to determine the runtime behavior of a JS object.
Configuration will be wrapped into a JavaScript object: ‘config’ and injected to the JS object at runtime: this.config.
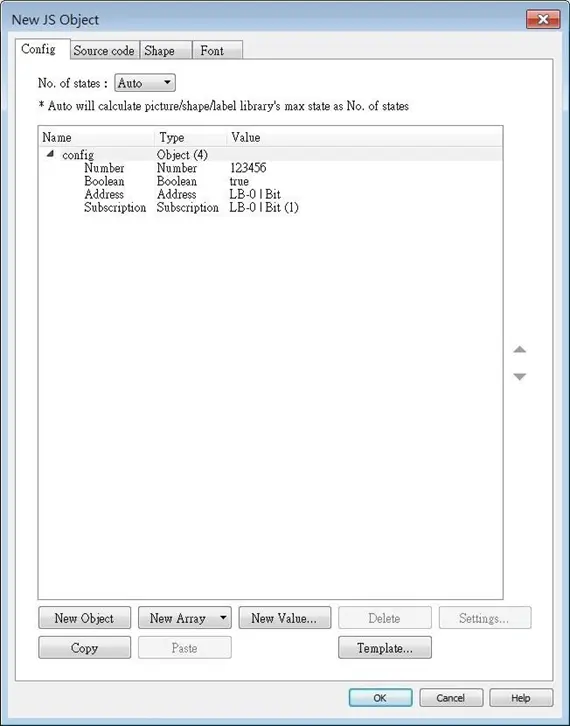
| Setting | Description |
|---|---|
| New Object | Add a new JavaScript object which can have multiple properties and each property has a name and a value. |
| New Array | Add a new array. |
| New Value | Add a new property with the following data types to choose from: String Maximum allowable size is 1000 words. Number Supports 64-bit float. Boolean May be True or False. Address The address of the device. Subscription Address subscription. Address subscription is used to monitor data change of designated device data. Once data changes, the system will notify the subscriber through the callback function registered in Subscription.onResponse method. |
| Delete | Delete a selected item. |
| Settings | Edit a selected item. |
| Copy | Copy the selected item. |
| Paste | Paste the copied item to the selected place. |
| Template | Show current configuration in JSON format in an editing window. After editing the JSON content and then clicking the [OK] button, the (JSON) content will be parsed and converted back to the configuration. Users who are familiar with JSON can expedite configuration process using this. |
Source Code Tab
The source code is written in JavaScript and it determines the runtime behavior of the JS object.
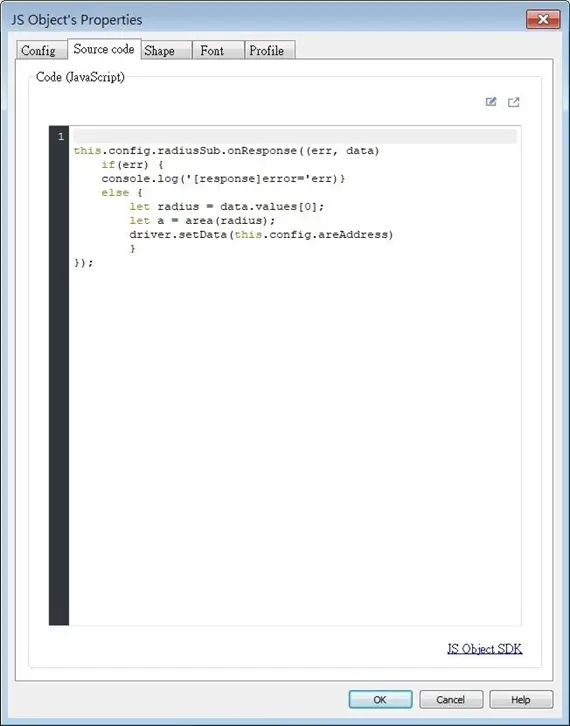
| Setting | Description |
|---|---|
| Compile | Compile the source code to check if it works properly. |
| (Popup icon) | Edit the source code in a separate pop-up window. |
| JS Object SDK | Open the JS Object SDK Documentation link, which provides assistance to developers in creating and writing JS objects. |
JS Resource
When using external JS modules for JS objects, please add the JS modules into EasyBuilder Pro project’s JS Resource first, and then the modules can be imported in the [source code] of JS objects.
The screenshot below shows an example of JS Resource, and the settings are explained in the table below.
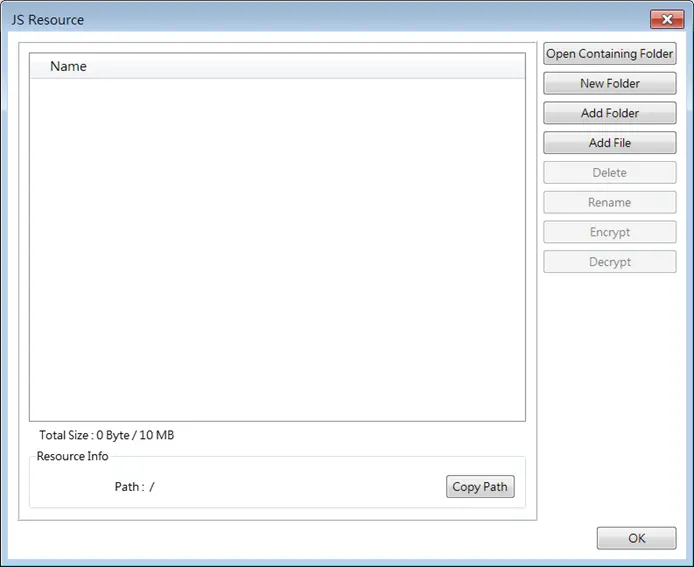
| Setting | Description |
|---|---|
| Open Containing Folder | When opening a project, EasyBuilder Pro will create a temporary folder and extract JS Resource content in this folder. When saving a project, EasyBuilder Pro will synchronize the content in this folder to the project. |
| New Folder | Create a new folder. |
| Add Folder | Import a folder. |
| Add File | Import a file. |
| Delete | Delete a file or a folder. |
| Rename | Rename the folder or JS Resource. |
| Encrypt | Encrypt imported .js files into .js.enc files. Opening the encrypted file directly will display garbled text. |
| Decrypt | Decrypt .js.enc files using the password set during encryption to restore the original content. |
| Copy Path | Copy a selected path of a file or a folder for use in the source code of JS object. |
Notes:
- Size limit of JS Resource: 10MB.
- The containing folder is generated automatically when opening the project, and is deleted automatically when closing the project.
- The name of the containing folder is not fixed and is randomly generated when opening the project.
- Making changes in the containing folder will turn the project into Modified state and the content in this folder will only be synchronized to the project when the user saves the project.
- The maximum password length for encryption: 32 Bytes.
Usage Examples
Mimic a [Toggle Switch] object
This section aims to familiarize users with the configuration by making JS objects work as Toggle Switches. The configuration steps are as below:
- Design a JS object that can read the designated address and invert signal.
- Enable the ability to set the designated address ON for the JS object.
- Enable the ability to set the designated address OFF for the JS object.
- Enable the ability to invert the state of the designated address for the JS object.
- Enable momentary control feature for the JS object.
To design a JS object to achieve the functions of a Toggle Switch, the property names of the JS object that correspond to the settings of a Toggle Switch are shown below:
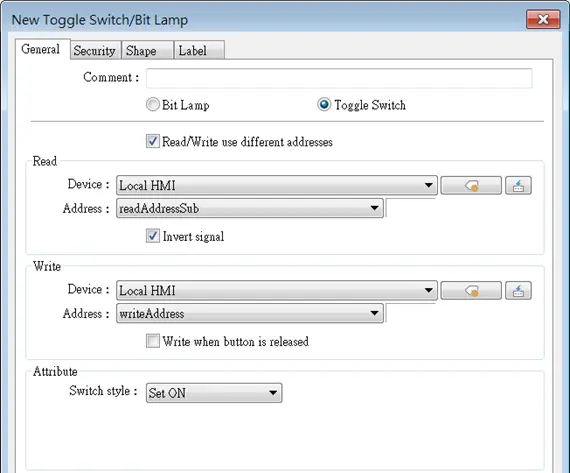
JS Object that Reads Address and Invert Signal
This section explains how to create a JS object to read the designated address and invert signal. To achieve the goal, two properties should be added: readAddressSub and invertSignal.
Config Tab
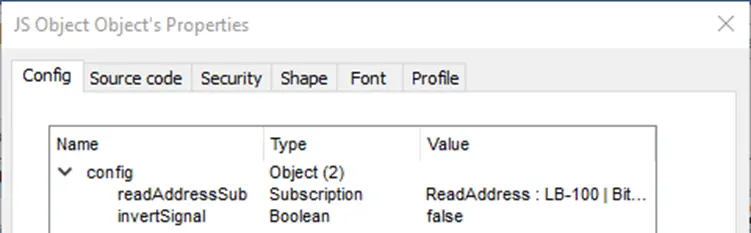
| Setting | Description |
|---|---|
| readAddressSub | Read the state of the designated bit address. Set [Type] to [Subscription], set [Value Type] to [Bit], and set address to [LB-100]. |
| invertSignal | Select whether or not to invert signal. Set [Type] to [Boolean], set [Value] to [false] (don’t invert signal) |
Source Code Tab
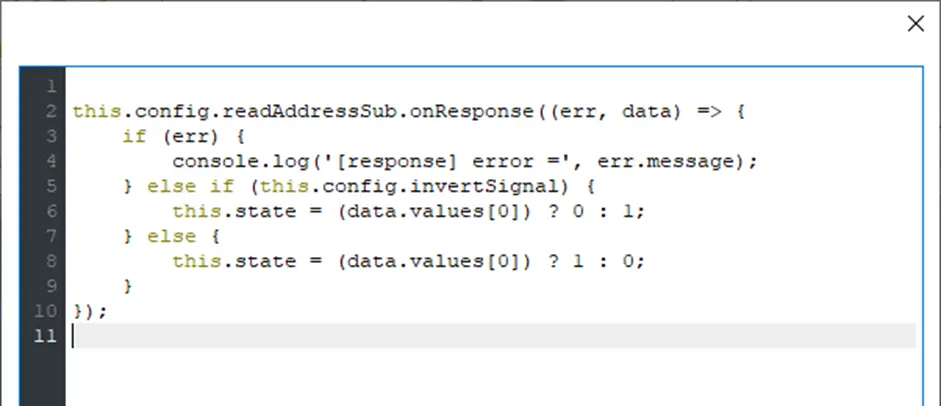
- Line2: ‘this’ is the JS object. Through ‘this.config’<object> to obtain the value (‘readAddressSub’ and ‘invertSignal’) added in [Config] tab.
- Line2: Call ‘onResponse’ function of the ‘this.config.readAddressSub’ < Subscription > and register response callback to get notification when the value of the read address changes.
- Line 3~9: Act according to the response callback.
- Line 3~4: Check whether an error has occurred. Output an error message to the debugging console if an error has occurred (variable err has meaningful value).
- Line 5~8: If variable err is Null, it means that reading from the Read Address is successful and change in data has been detected. Then, set JS object state according to the data read and the ‘invertSignal’ property.
| Data in Read Address | Invert Signal | JS Object State |
| 0 | False | 0 |
| 1 | False | 1 |
| 0 | True | 1 |
| 1 | True | 0 |
Toggle Switch ON Mode
Following the preceding section, this section explains how to make a JS object work as a Toggle Switch that can set ON. To achieve the goal, another two properties should be added:
- writeAddress
- switchStyle.
Config Tab
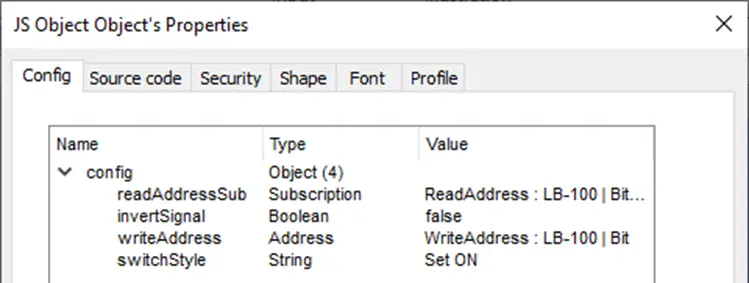
| Setting | Description |
|---|---|
| readAddressSub | Read the state of the designated address. |
| invertSignal | Invert output signal. |
| writeAddress | Set the address to write to. When the user presses this object, the value will be written to this address according to the value of ‘switchStyle’. |
| switchStyle | Set the switch mode and set [Value] to [Set ON]. |
Source Code Tab
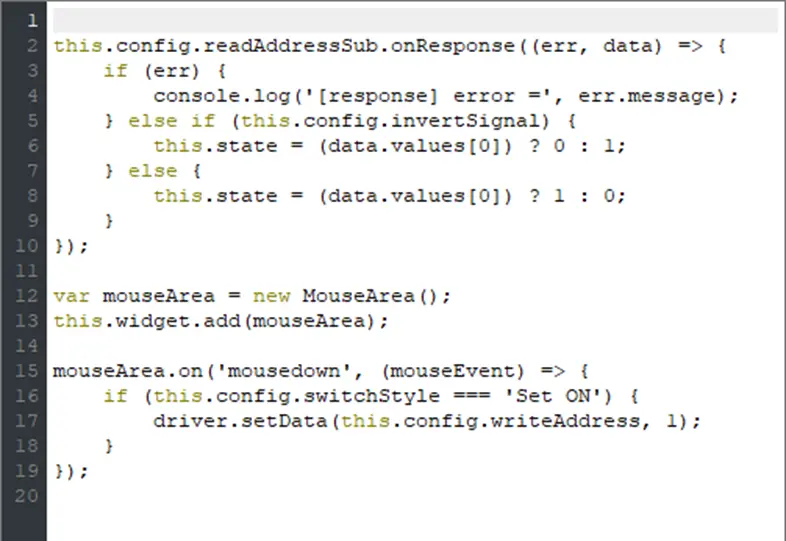
Use MouseArea object to carry out write operation when the object is pressed or released.
- Line 1~11: Please see Ch43.4.1.1 in this user manual.
- Line 12: Create a MouseArea object named ‘mouseArea’.
- Line 13: The ‘this.widget’ <Container> represents the graphical widget of JS object. This widget is responsible for image display and user interaction.
- Line 13: Add ‘mouseArea’ to JS object.
- Line 15: Register ‘mousedown’ event listener with ‘mouseArea’. When the user presses the object, ‘mouseArea’ will notify the listener with a MouseEvent object.
- Line 15~19: The listener to ‘mousedown’ event.
- Line 16~18: When [Switch Style] is ‘Set ON’, value 1 will be written into [Write address] using driver module’s setData Method.
Toggle Switch OFF Mode
Config Tab
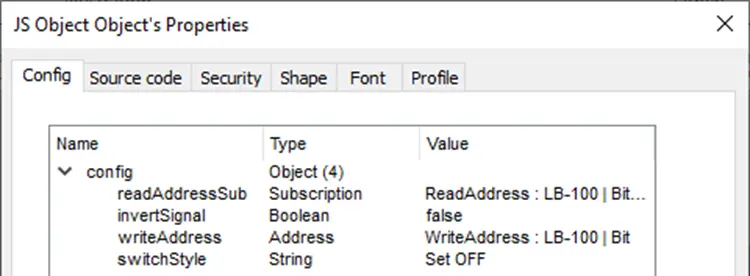
| Setting | Description |
|---|---|
| readAddressSub | Read the state of the designated address. |
| invertSignal | Invert output signal. |
| writeAddress | Set the address to write to. When the user presses this object, the value will be written to this address according to the value of ‘switchStyle’. |
| switchStyle | Set the switch style and set [Value] to [Set OFF]. |
Source Code Tab
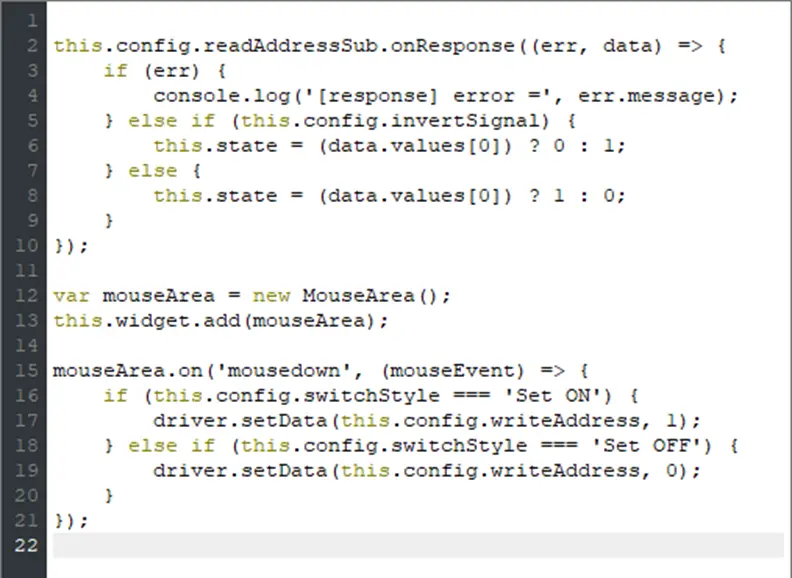
- Line 1~17: Please see Ch43.4.1.2 in this user manual.
- Line 18~19: When [Switch Style] is ‘Set OFF’, value 0 will be written into [Write address].
Toggle Switch Toggle Mode
Following the preceding sections, this section explains how to make a JS object work as a Toggle Switch in Toggle mode, which inverts the state of the designated address.
Config Tab
| Setting | Description |
|---|---|
| readAddressSub | Read the state of the designated address. |
| invertSignal | Invert output signal. |
| writeAddress | Set the address to write to. When the user presses this object, the value will be written to this address according to the state of ‘readAddressSub’ and the value of ‘switchStyle’. |
| switchStyle | Set the switch style and set [Value] to [Toggle]. |
Source Code Tab
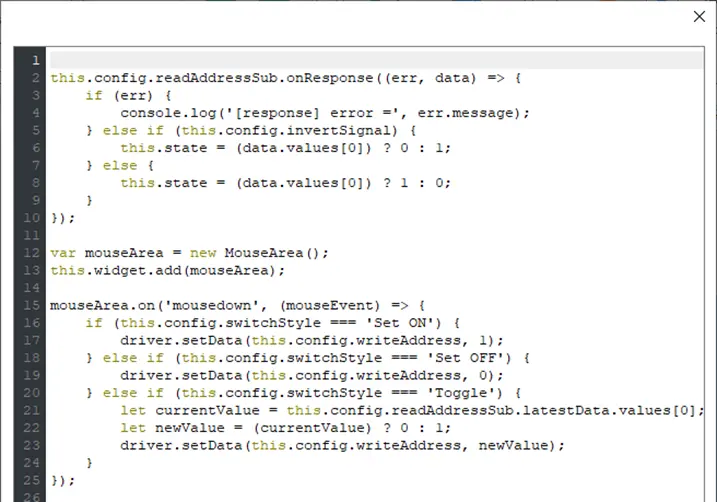
- Line 1~19: Please see Ch43.4.1.3 in this user manual.
- Line 20~23: When [Switch Style] is ‘Toggle’, [Write address] will be set to an inverted state.
Toggle Switch Momentary Mode
Following the preceding sections, this section explains how to make a JS object work as a Toggle Switch in Momentary mode.
| Setting | Description |
|---|---|
| readAddressSub | Read the state of the designated address. |
| invertSignal | Invert output signal. |
| writeAddress | Set the address to write to. When the user presses this object, the value will be written to this address according to the state of ‘readAddressSub’ and the value of ‘switchStyle’. |
| switchStyle | Set the switch style and set [Value] to [Momentary]. |
Source Code Tab
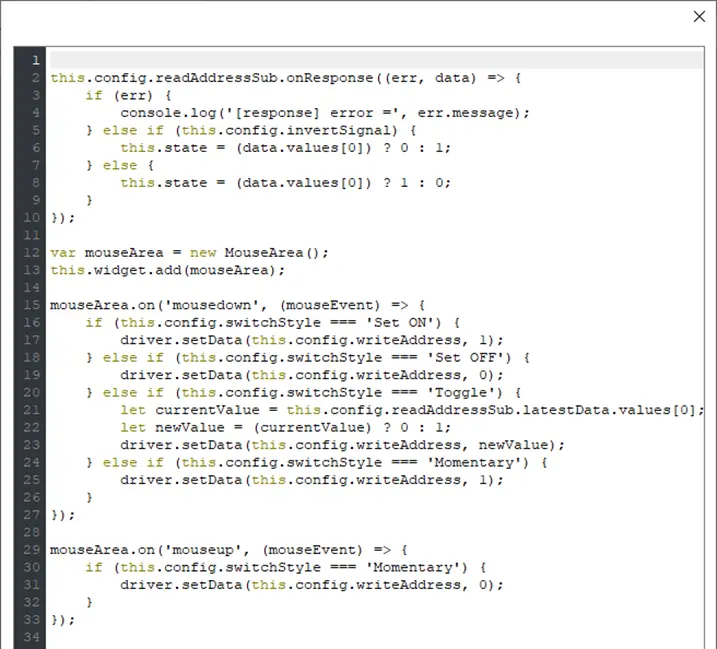
- Line 1~23: Please see Ch43.4.1.4 in this user manual.
- Line 24~25: When [Switch Style] is ‘Momentary’, value 1 will be written into [Write address].
- Line 29~33: When the user releases the object, value 0 will be written into [Write address].
Examples of JS Resource Usage
This section aims to familiarize users with the ways to import JS module in JS Resource using JS objects.
JS object supports the following ways to import modules:
- ES6 dynamic import: Use import() function. Please note that ES6 static import is not supported by JS object.
- CommonJS: Use require() function.
ES6 Dynamic Import
The following demonstration shows how to import JS modules using ES6 dynamic import.
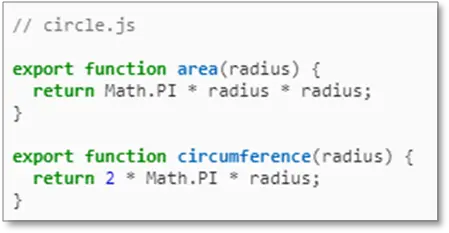
In the JS object, when radius changes, the area and circumference of the circle can be calculated using the area and circumference functions in JS module (circle.js), and the result is output to the designated addresses.
The program code of circle.js:
JS Object settings:
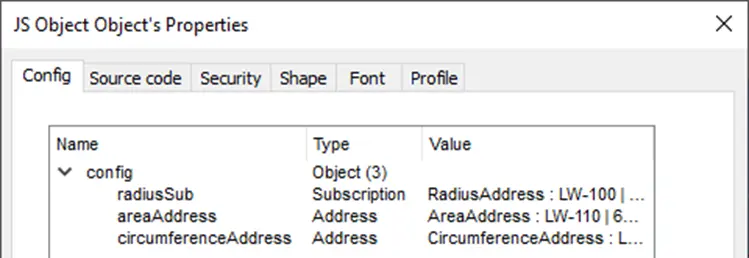
| Setting | Description |
|---|---|
| radiusSub | Obtains current radius value and monitors its changes. (Select LW-100, 64-bit Double) |
| areaAddress | The address for outputting the calculation result of the area of the circle. (Select LW-110, 64-bit Double) |
| circumferenceAddress | The address for outputting the calculation result of the circumference of the circle. (Select LW-120, 64-bit Double) |
Edit the program code as shown below in [Source code] settings page:
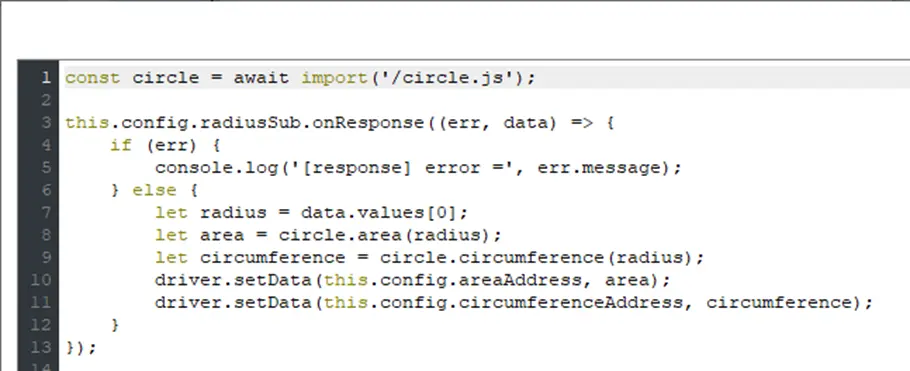
- Line 1: Import the ‘/circle.js’ file in JS Resource and bind the result to the circle.
- Line 3: Call ‘this.config.radiusSub’ ‘onResponse’ function to register response callback for notification of changes in [circle radius].
- Line 8: Calculate area of the circle by calling the method in circle.js and store the result in area variable.
- Line 9: Calculate circumference of the circle by calling the method in circle.js and store the result in circumference variable.
- Line 10~11: Output the calculation result of the area and the circumference of the circle respectively to ‘areaAddress’ and ‘circumferenceAddress’.
In the project, create three Numeric objects (64-bit Double) and set the address to LW-100 (Radius), LW-110 (Area), and LW-120 (Circumference).
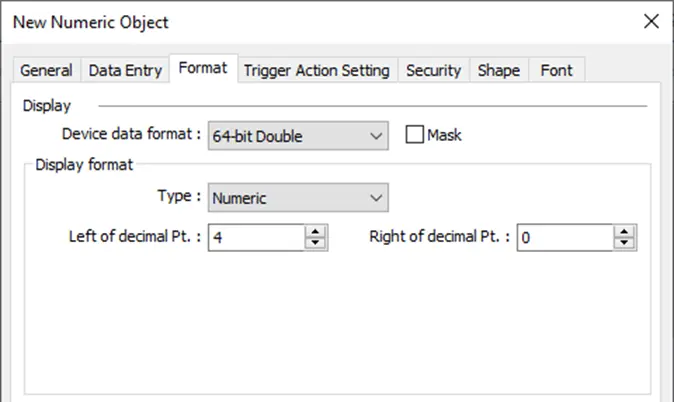
When values are entered in LW-100 (Radius), the results are automatically updated at LW-110 (Area), and LW-120 (Circumference).
To import JS module’s “default export”, please refer to the code below.

CommonJS Import
The following demonstration shows how to import JS modules using require() function. This JS object behaves the same as using ES6 but in this section the external JS module is imported using CommonJS.
The program code of circle.js:
Property settings are the same as explained in the preceding section.
Edit the program code as shown below in [Source code] settings page:
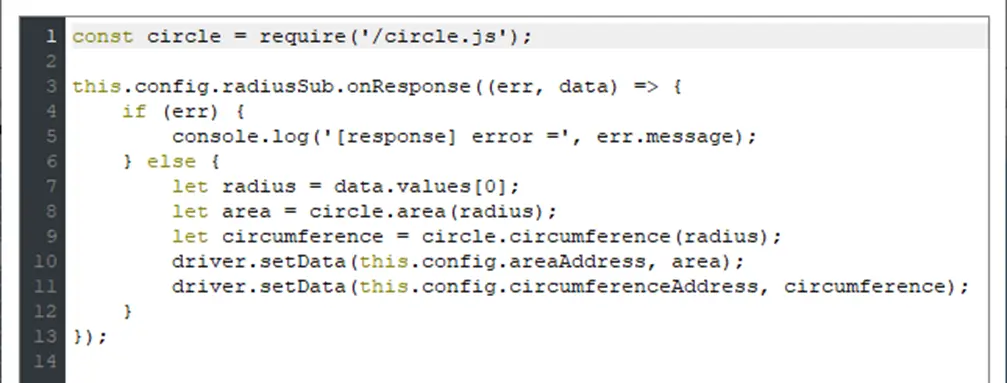
- Line 1: Import the ‘/circle.js’ file in JS Resource and bind the result to the circle.
- Line 3~13: See Ch43.4.2.1 in this user manual.
In the project, create three Numeric objects (64-bit Double) and set the address to LW-100 (Radius), LW-110 (Area), and LW-120 (Circumference).
When values are entered in LW-100 (Radius), the results are automatically updated at LW-110 (Area), and LW-120 (Circumference).
Limitations
- Size limit of a JS object’s source code: 100 KB.
- Size limit of a JS Resource file: 10MB
- Size limit of the memory usage of a JS context(*): 20 MB.
(*) A JS context is a sandboxed execution context with its own set of built-in objects and functions. And, all the JS objects in the same window share one JS context, that is, share the same memory heap and global object.
How a JS object operates behind the scenes
- Create JS context.
- Create JS object.
- Initialize JS object ‘config’ (this.config).
- Initialize JS object ‘widget’ (this.widget).
- Wait for the reply from all Subscriptions.
- Wrap JS object source code into an async. function and call it.