Overview & Concepts
The Operation Log feature in EasyBuilder Pro records operator actions and system interactions that occur during runtime. It provides a traceable record of how the HMI interface is used, allowing users to review when specific operations were performed and which actions were taken. This helps support system troubleshooting, auditing, and operational transparency.
Operation Log entries are generated when configured objects are operated or when defined system actions occur. Each entry typically records information such as the time of the operation and the description of the action performed.
Typical items recorded in an Operation Log include:
- Operator interaction with control objects (buttons, switches, etc.)
- System operations triggered within the HMI project
- Login or logout activity related to user accounts
By maintaining a record of system interactions, the Operation Log allows operators, engineers, and supervisors to review historical activity and verify how the system was used during operation.

Implementation
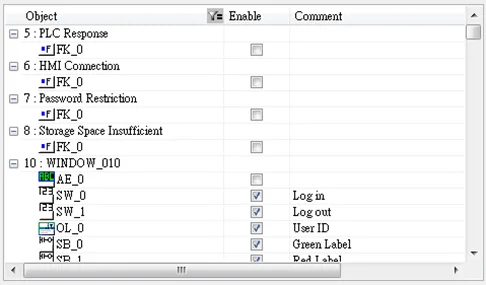
Select the objects to be recorded. Click [Data/History] » [Operation Log Setting], and then select [Enable operation log function] check box.
Objects Tab
![Select the objects to be recorded. Click [Data/History] » [Operation Log Setting], and then select [Enable operation log function] check box.](https://media.maplesystems.com/wp-content/uploads/2026/04/image-321.webp "EBPro Operation Log, Objects tab.")
| Setting | Description |
|---|---|
| Object | With Operation Log function enabled, user login/logout activities and the objects that can be recorded are listed in the setting dialog box sorted by window numbers.[Filter]: By clicking [Object filter…], all recordable objects are listed. Users can use the filter to more easily locate the desired objects. |
| Enable | The selected objects are recorded by Operation Log. |
| Comment source | From object’s comment The content in the [Comment] field of the Operation Log is sourced from the object’s comment setting. Customize Users can customize the content in the [Comment] field of the Operation Log by clicking [Watch…]. Use label library The [Comment] field supports the utilization of a label library, enabling the content to be recorded with translated text in different languages. |
| Settings | When the comment source is set to [Customize] or [Use label library], users can configure the watch addresses by clicking [Watch…]. When a label library is used as the comment source, the watch address syntax should be defined within the label content. Up to four addresses can be simultaneously watched. |
| Select all | Selects all the listed objects. If [Object filter] is used, clicking [Select all] only selects the objects in the list. |
| Discard all | Discards all the selected objects. If [Object filter] is used, clicking [Discard all] only discards the objects in the list. |
| Automatically enable operation log for new objects | With this option selected, new objects created will automatically be enabled for Operation Log. |
History / Control Tab
![Select the objects to be recorded. Click [Data/History] » [Operation Log Setting], and then select [Enable operation log function] check box. History/Control tab allows for history and control register operations to be configured.](https://media.maplesystems.com/wp-content/uploads/2026/04/image-324.webp "EBPro Operation Log, History/Control tab")
| Setting | Description |
|---|---|
| Storage settings | Sets the way the records are stored. Limit write frequency to HMI flash drive When enabled, the system will store operation logs on the HMI at intervals of 10 seconds. To prevent the loss of operation log data between two storage actions caused by power-off, EasyBuilder Pro provides the system register LB-9034. By sending an ON signal to this register, the system will initiate a data storage process. Maximum record no. in HMI memory Sets the maximum number of records that can be stored in HMI memory. Sync. to external devices / database Stores backup data to SD card or USB disk. Backup data can be synchronized to database (cMT / cMT X Series). Behavior when HMI space is insufficient When HMI memory space is insufficient, two options are provided: [Stop saving operation log]: Stops saving new records in order to keep the earlier records.[Synchronize to external device]: Stores the Operation Log to external device. When the device does not exist, the HMI clears the oldest records in its memory. |
| Control address | Entering different values in the control address sends corresponding commands to Operation Log and returns the result of executing the command.If control address is LW-n (where n is an arbitrary number), the address that returns the result of executing the command is LW-n+1. Control address (LW-n): (1) – Clear all records. (2) – Copy the records to the USB disk. (3) – Copy the records to the SD card. (4) – Copy the records to the USB disk and clear the records in HMI memory. (5) – Copy the records to the SD card and clear the records in HMI memory. (6) – Enable Operation Log. (7) – Disable Operation Log. (8) – Use history data stored in USB disk after changing HMI. (9) – Use history data stored in SD card after changing HMI. (10) – Copy the records to the database server. (cMT / cMT X Series) (11) – Copy the records to the database server and clear the records in HMI memory. (cMT / cMT X Series) (12) – Use existing historical data in database after changing to another HMI. (cMT / cMT X Series) Execution result (LW-n+1): (0) – Processing. (1) – Execution succeeded. (2) – The device does not exist. (3) – The record does not exist. (4) – Unknown error. |
Notes:
- Operation Log can only record the operation of the objects that are manually triggered. Objects that cannot be manually triggered are not recorded, such as Time Based Data Transfer object.
- When running off-line or on-line simulation, Operation Log is stored under EasyBuilder installation directory: HMI_memoryoperationlogoperationlog.db
- Triggering Macro with a Set Bit object generates two records, the triggering of bit and the triggering of Macro.

Implementation: Operation Log View
Prior to creating an Operation Log View Object, an Operation Log must be configured. Please follow the steps described in the preceding section to configure the Operation Log itself.
Click [Data/History], and then click [Operation Log View].
General Tab
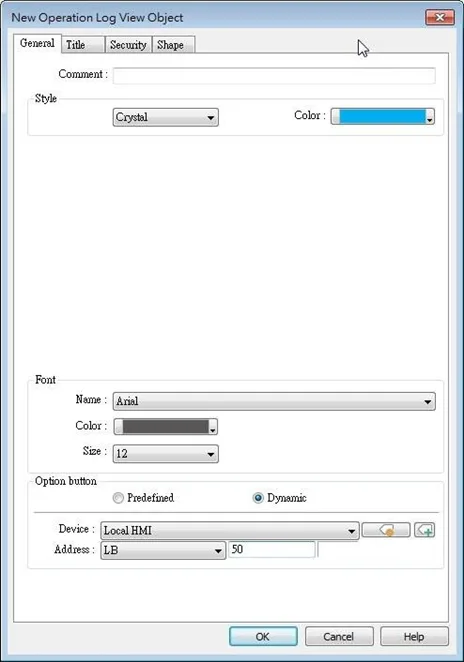
| Setting | Description |
|---|---|
| Style | The style of Operation Log View object can be selected from Default, Crystal, and Flat. |
| Title/Profile/Grid/Selection control | These attributes can be configured when the chosen style is Default. |
| Font | Sets the color, font, and font size of the text displayed in Operation Log View object. |
| Option button visibility (cMT / cMT X Series) | Show or hide the option button. Predefined Select [Enable] to show the option button. Dynamic Designate a bit address to control option button visibility. |
Title Tab
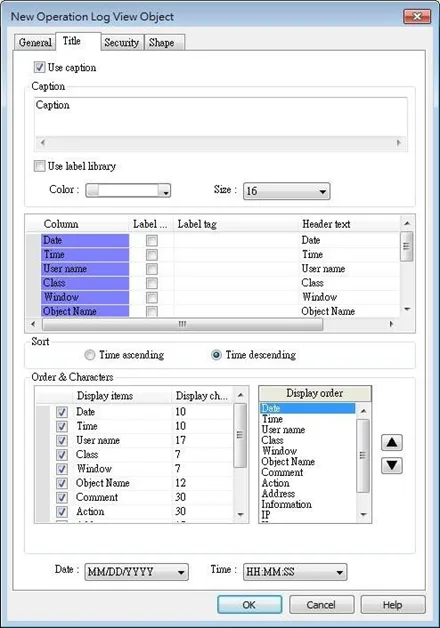
| Setting | Description |
|---|---|
| Use Caption | Sets the caption displayed in Operation Log View object. |
| Title | Sets the title name of the columns displayed in Operation Log View object. |
| Sort | Sorts the records in time ascending or descending order. |
| Display order | Sets the order of the displayed item. If [Display chars.] is 0, all characters are displayed. |
| Date / Time | Sets the format of date and time displayed in Operation Log View object. |

Implementation: Operation Log Printing
Select “Enable [Operation Log] printing” check box and click [Settings] button to open the Operation Log Printing dialog box.
![Select “Enable [Operation Log] printing” check box and click [Settings] button to open the Operation Log Printing dialog box.](https://media.maplesystems.com/wp-content/uploads/2026/04/image-335.webp "Enable Operation Log Printing")
General Tab
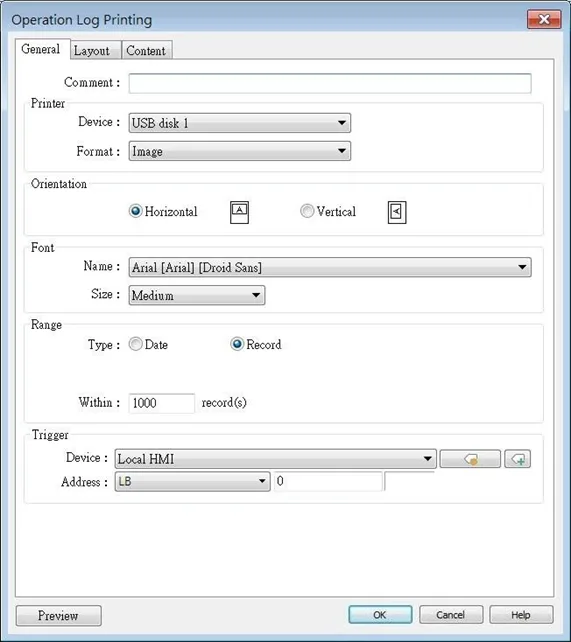
| Setting | Description |
|---|---|
| Printer | Select the device to save the Operation Log sheet. If a printer is selected, the paper size should be A4. If an external device is selected, the Operation Log sheet is saved as a JPEG / PNG file. The system generates a folder named “operationlogsheet“, and the files saved in the folder are named “print date_sequence number“. For example, the first JPEG file saved on 2013/05/08 is named 130508_0000 and so on. Format Available formats include: [Image] and [PDF]. With [Image] selected, cMT/cMT X HMIs will generate PNG files, while other models will generate JPEG files. The [PDF] option is only supported on cMT/cMT X HMIs. |
| Orientation | Sets the layout of the Operation Log sheet to be horizontal or vertical. |
| Font | Sets the font and the font size of the Operation Log sheet. The following table lists the corresponding size. Size – Title – Content Large – 20 pt. – 16 pt. Middle – 16 pt. – 12 pt. Small – 12 pt. – 8 pt. |
| Range | Sets the range of the Operation Log to be included in the sheet. Date Sets the range by date, counted from the start day through the number of days entered. The maximum available range is 180 days. Record Sets the range by the number of records. The maximum available range is 10000 records. |
| Trigger address | Sets the register to control Operation Log Printing. When the register is set ON, it starts printing. When the printing is done, the register is set OFF automatically. |
| Preview | Preview the result before generating the Operation Log sheet. |
Layout Tab
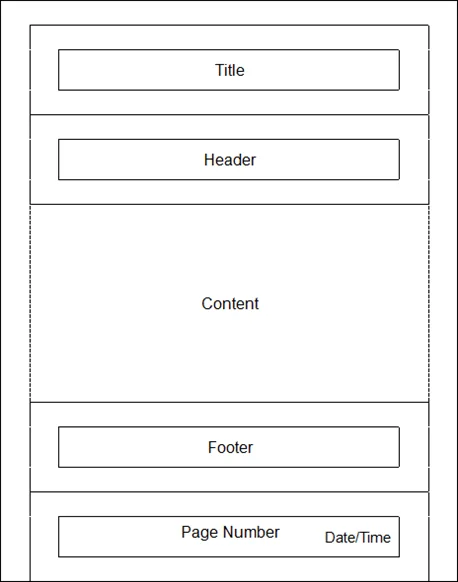
The layout of each part is shown in the figure below:
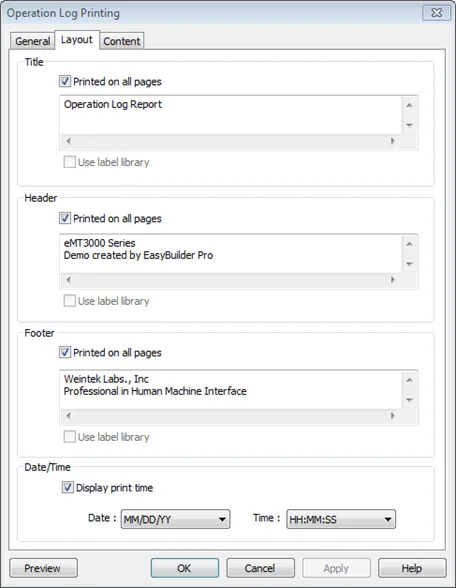
| Setting | Description |
|---|---|
| Title | Sets the content of the title. The title is limited to one line. Printed on all pages If selected, the title is shown on each page; otherwise, the title is shown on the first page. |
| Header | Sets the content of the header. The header can have 5 lines in maximum. Printed on all pages If selected, the header is shown on each page; otherwise, the header is shown on the first page. |
| Footer | Sets the content of the footer. The footer can have 5 lines in maximum. Printed on all pages If selected, the footer is shown on each page; otherwise, the footer is shown on the last page. |
| Date/Time | If selected, the date/time in the sheet is shown on the lower-right corner of each page; otherwise, the date/time is not shown. |
| Page number | Shown on each page. |
Content Tab
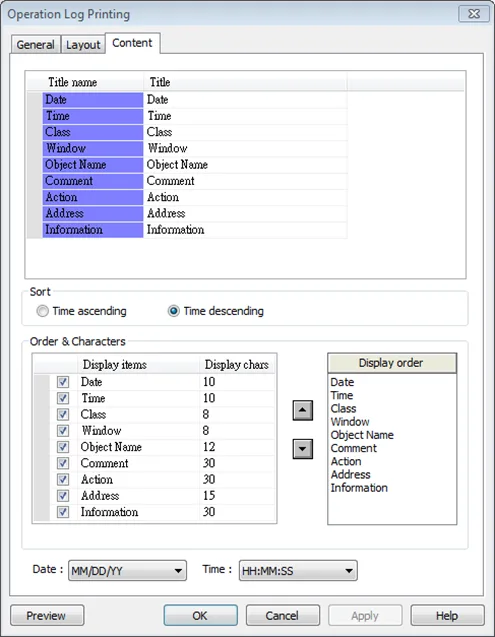
| Setting | Description |
|---|---|
| Title | Sets the title displayed. |
| Sort | Time ascending The latest record is placed at the bottom. Time descending The latest record is placed at the top. |
| Date/Time | Sets the format of date and time displayed. |
Implementation Examples
Example 1: View Operation Log on HMI
Create a Toggle Switch object and a Numeric object on window number 10.
Go to Operation Log Settings; enable the Toggle Switch object and Numeric object on window number 10.
Create an Operation Log View object and finish relevant settings.
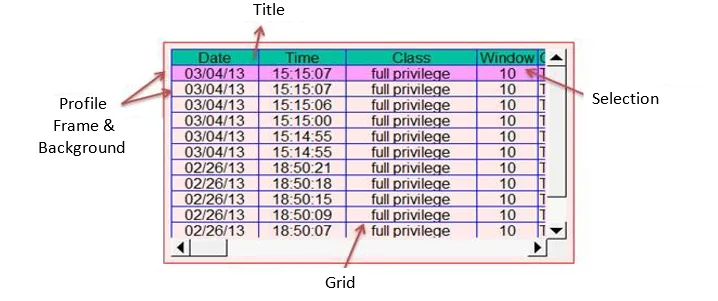
Run off-line simulation, trigger Toggle Switch and Numeric object. Operation Log is displayed by Operation Log View object

Example 2
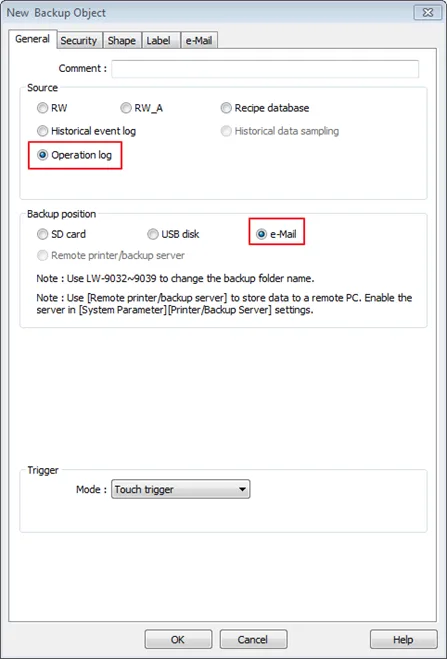
Upload Operation Log to PC by using Utility Manager or use Backup object to send the file by email.
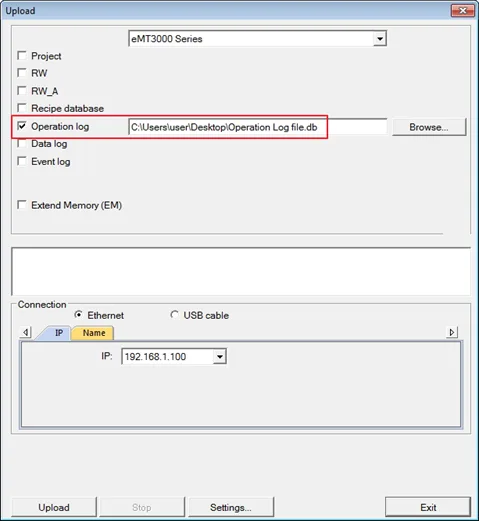
Use Utility Manager program to upload the Operation Log:
- Open Utility Manager, click [Upload].
- Select [Operation log], enter file name and HMI IP, and then click [Upload].
Send the sheet via E-Mail:
- Create a Backup object, under [Source] select [Operation log], and under [Backup position] select [e-Mail].
- Open [System Parameter Settings] » [e-Mail] tab. Set e-mail server and the address of recipient and sender.