Overview & Concepts
The VNC Viewer object in EasyBuilder Pro allows an HMI to display the screen of another device that supports VNC (Virtual Network Computing). By connecting to a remote VNC server, the HMI can show the graphical interface of another system within an HMI window. This allows operators to monitor or interact with a remote device directly from the HMI interface.
The VNC Viewer object is configured by defining the network address of the remote device running the VNC server. When the HMI opens the window containing the object, it establishes a connection to the specified server and displays the remote screen.
Key characteristics of the VNC Viewer object include:
- Displays the graphical interface of a remote device running a VNC server
- Connects using the device’s IP address over an Ethernet network
- Allows monitoring or interaction with the remote system from the HMI
Typical uses include:
- Viewing the screen of another HMI or industrial device
- Accessing diagnostic interfaces hosted on remote equipment
- Centralizing control or monitoring from a single operator interface
By embedding remote screens within the HMI interface, the VNC Viewer object allows multiple systems to be monitored or accessed from a single display location.
Note:
VNC server must me installed on the remote device for the HMI to successfully connect.

Implementation
Click on the VNC Viewer icon on the toolbar or select [Objects] » [Media] » [VNC Viewer] to open the settings dialog box.
Configure the parameters and click OK; a VNC Viewer object will be created.
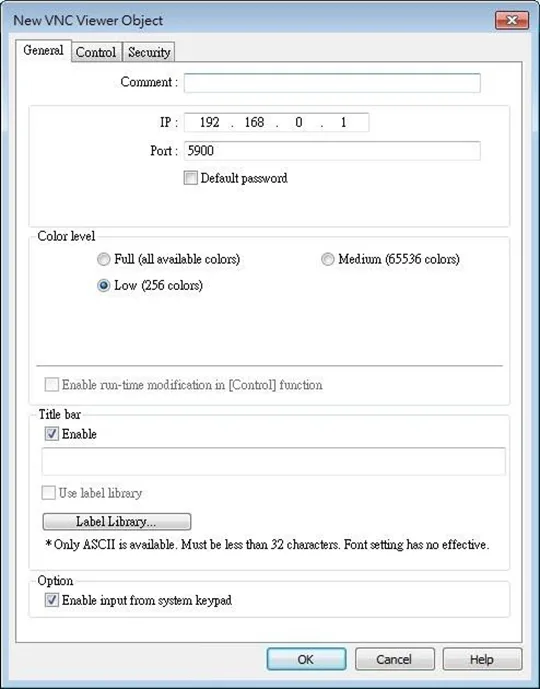
General Tab
| Setting | Description |
|---|---|
| IP | Enter the IP address of the remote device to be connected. |
| Port | Enter the port number of the remote device to be connected. |
| Default Password | Enter the VNC password to log in the VNC server of the remote device. If Default Password is enabled, when connecting the remote device, VNC Viewer will automatically use the password specified here to log in, and the user doesn’t need to enter the password. |
| Color level | Select from four color levels: Full (all available colors), Medium (256 colors), Low (64 colors), Very low (8 colors). Auto select (not all servers support this function) Allow VNC Viewer to automatically detect and select the color level supported by the server used. Enable run-time modification in [Control] function Select color level or decide whether to enable [Auto select] in HMI runtime using the control addresses that can be specified in the Control tab in the VNC Viewer settings dialog box. |
| Title bar | Enable When [Enable] is selected, a field shows for entering the caption in the title bar. The caption is limited to ASCII characters, and the font cannot be customized. The caption can be selected from Label Tag Library. Only when the title bar is enabled can the VNC Viewer window be moved or resized by dragging. |
| Option | Enable input from system keypad With this option selected, a keypad icon shows in the upper right corner of the VNC Viewer object, and the system keypad can be opened by clicking this icon. |
Notes:
- cMT / cMT X Series: VNC Viewer is supported only on cMT series HMI screen accessed locally, and for OS version 20180928 or later. It is not supported via cMT Viewer application.
- VNC Viewer cannot be simulated in on-line simulation mode.
- VNC Viewer only mirrors the actual resolution of the VNC server device and does not support scaling.
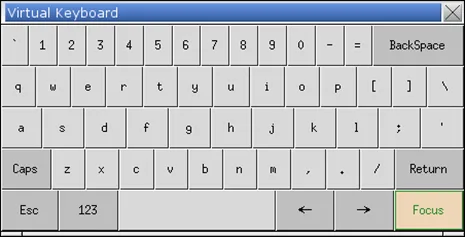
- When [Default password] is selected, HMI’s Virtual Keyboard can only be called out manually. If [Default password] is not selected, the Virtual Keyboard can pop up automatically.
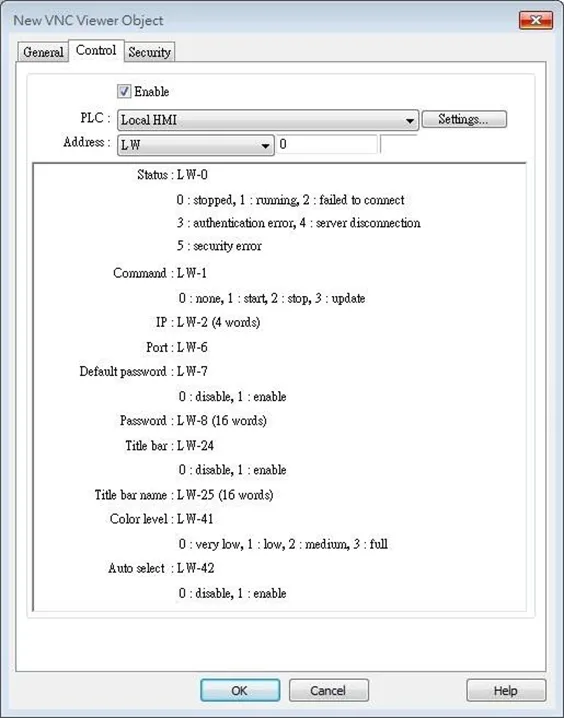
Control Tab
| Setting | Description |
|---|---|
| IP | A set of word addresses can be specified to control VNC Viewer as well to display the connection status. Control address: Shows the connection status 0 – Stopped 1 – Running 2 – Failed to connect 3 – Authentication error 4 – Server disconnection error 5 – Security error Control address + 1: Command 0 – None 1 – Start 2 – Stop Control address+2~+5: IP Control address+6: Port Number Control address+7: Default Password 0 – Disable 1 – Enable Control address+8: Password (16 words) Control address+24: Title bar 0 – Disable 1 – Enable Control address+25: Title bar name (16 words) Control address +41: Color level 0 – Very low 1 – Low 2 – Medium 3 – Full Control address +42: Auto select 0 – Disable 1 – Enable |
Notes:
- The allowable value range that can be entered in Control Address+6 is 0~99. The actual Port Number will be the value entered in Control Address+6 plus 5900.
- For example, if the user enters 1 in Control Address+6, the actual Port Number will be 5901. However, if the user enters 100 in Control Address+6, the value will not be added by 5900, and the actual Port Number will be 100.
- In VNC Viewer, to use the HMI built-in Virtual Keyboard, please tap the Focus button on the Virtual Keyboard first, and then tap VNC Viewer screen. This will change the input target.