
Overview & Concepts
EasyWatch is a monitoring tool used with EasyBuilder Pro that allows users to observe register values in real time while an HMI project is running. It provides a simple interface for viewing data from PLC devices or Local HMI memory without modifying the project screens. This makes it useful for verifying communication, checking register values, and troubleshooting system behavior during development or testing.
EasyWatch works by connecting to the running HMI project and displaying selected register addresses. Engineers can add registers to the watch list and monitor their values as they change during operation.
Key capabilities of EasyWatch include:
- Monitoring PLC registers or Local HMI memory values in real time
- Verifying device communication during project testing
- Observing value changes without adding display objects to the project
EasyWatch is commonly used during project development, commissioning, and troubleshooting. By allowing direct observation of register values, it helps engineers confirm that devices are communicating correctly and that system logic is functioning as expected.
Implementation
EasyWatch allows users to monitor values in HMI / PLC addresses via Ethernet from a PC, and it can be used for macro debugging and remote monitoring.
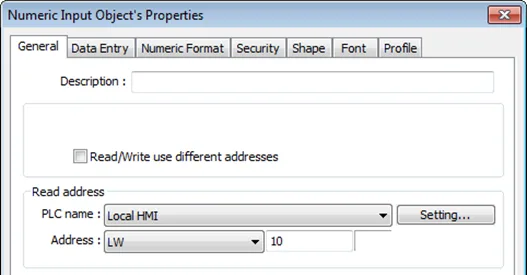
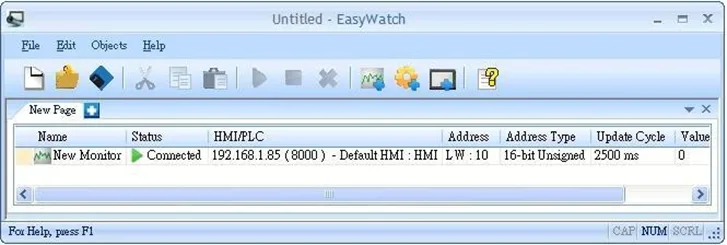
As shown in the example below, In EasyBuilder Pro, after creating a Numeric Input Object, you can set its address to LW-10, and set the same address in EasyWatch. The value of LW-10 will be shown in EasyWatch when connected.
Notes:
- Monitoring using EasyWatch will not be possible when the system register [LB-9044 (disable remote control)] or [System Parameter Settings] » [System Setting] » [Prohibit remote HMI connecting to this machine] is enabled.
- To connect EasyWatch from a cMT / cMT X HMI, go to [System Parameter Settings] » [Model] tab, select [Support iP/iE/XE/eMT/mTV communication protocol and EasyWatch] option, and then use the port number specified here
Configuration
Basic Functions
| Item | Description |
|---|---|
| File | New: Opens a new EasyWatch file. Open: Opens an existing EasyWatch file. Save: Saves an EasyWatch file. Save As: Saves an EasyWatch file to .ewt format. Exit: Exits EasyWatch. |
| Edit | Cut: Relocates the selected items to the clipboard. Copy: Copies the selected items to the clipboard. Paste: Pastes the items in the clipboard at the selected location. |
| Objects | Add Object: Adds new Monitor or Macro objects. Delete Objects: Selects the objects to be deleted; a dialog box appears, click [Yes] to delete. Modify Object: Changes the settings of the selected object. HMI Manager: Adds, modifies, or removes HMI settings. Run: Executes the selected object. Stop: Stops execution of the selected object. |
| Help | Help Topics: Reference of how to operate EasyWatch. About EasyWatch: EasyWatch version information. |
Quick Selection Tools

| Item | Description |
|---|---|
| New | Opens a new EasyWatch file. |
| Open | Opens an existing EasyWatch file. |
| Save | Saves an EasyWatch file. |
| Cut | Relocates the selected items to the clipboard. |
| Copy | Copies the selected items to the clipboard. |
| Paste | Pastes the items in the clipboard at the selected location. |
| Run | Executes the selected object. |
| Stop | Stops executing the selected object. |
| Delete | Deletes the selected object. |
| Add Monitor | Adds a new address monitor. |
| Add Macro | Adds a new macro. |
| HMI | Opens HMI Manager to add, modify, or remove HMI settings. |
| Help Topics | Reference of how to operate EasyWatch. |
Monitor Settings
Adding a Monitor
There are two ways to create a Monitor Object:
- Select from the toolbar: [Objects] » [Add Object] » [Add Monitor].
- Select from the quick selection toolbar: [Add new address monitor].
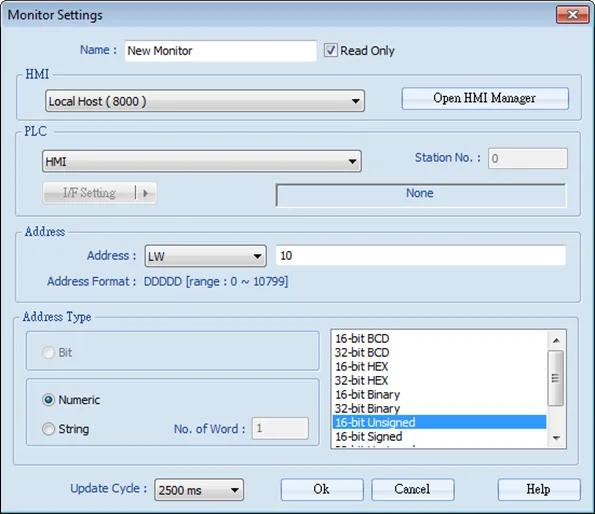
Monitor Configuration Settings
| Setting | Description |
|---|---|
| Name | Enters an object name which is a unique name. Read Only: If an object is set to read only, its address value can’t be edited. |
| HMI | Select a HMI to monitor. |
| PLC | Selects the desired PLC to monitor and sets its type, station number, and connection method. |
| Address | Selects the desired object address to monitor and sets its address type. |
| Address Type | When the address type is set, the available formats of the address can be selected. When executing, the address will be displayed according to the selected format. |
| Update Cycle | Sets the update interval of the monitoring object. If many objects are executed simultaneously, errors or delays may appear. |
Steps to Add a New Monitor
Follow these steps to add a new monitor.
Instructions: Steps to Add a New Monitor
Select a HMI to monitor (target HMI)
Select a target HMI. If the target HMI does not exist, click [Open HMI Manager] and click [Add] to search the HMI for adding. Or, select [Use Local HMI] checkbox to use the project on PC as a monitoring device.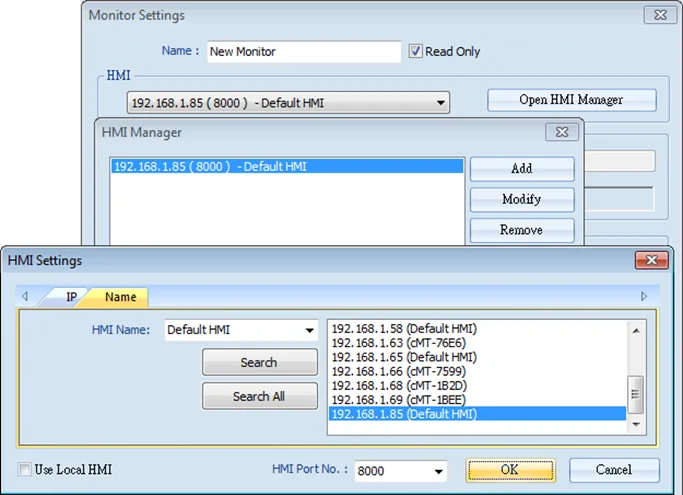
(Optional) Select a target PLC
Select a target HMI or PLC. If one HMI is selected, you can directly control the local HMI.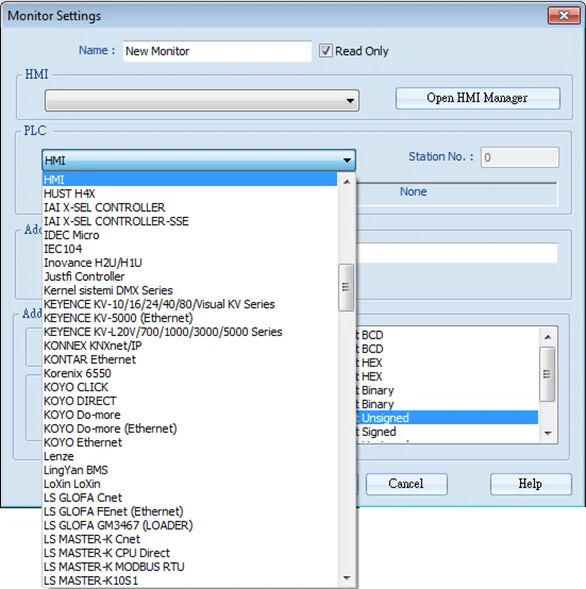
If one PLC, choose serial COM port
If one PLC is selected, click [I/F Setting] and select [Com Port] to choose a COM port.![If one PLC is selected, click [I/F Setting] and select [Com Port] to choose a COM port.](https://media.maplesystems.com/wp-content/uploads/2026/04/image-437.webp "Choose COM port for one PLC")
Or Use Ethernet instead of serial COM
Or, click [I/F Setting] and select [Ethernet] to set the IP address.![Or, click [I/F Setting] and select [Ethernet] to set the IP address.](https://media.maplesystems.com/wp-content/uploads/2026/04/image-438.webp "Using Ethernet instead of COM")
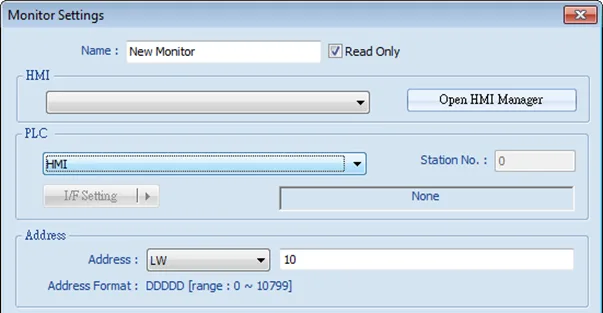
Select Object and address type for being monitored.
Set the object address and its address type for being monitored.When a Word address is selected, set the address type to [Numeric] or [String]. [Numeric]: Select the data format of the monitor address.
[String]: Select the data format from [ANSI], [UNICODE], and [High/Reversed]. Set [No. of Word] for reading the number of WORD.
Set Update interval
Set the update interval of the monitor object. The range can be set from 500ms to 5000ms.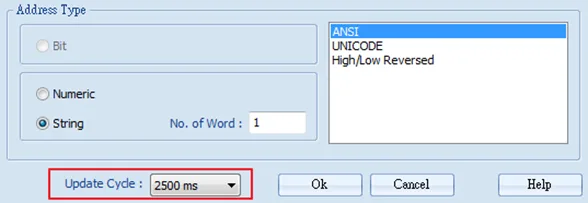
Macro Settings
Adding a Macro
There are two ways to create a Macro Object:
- Select from the toolbar: [Objects] » [Add Object] » [Add Macro].
- Select from the quick selection toolbar: [Add new macro].
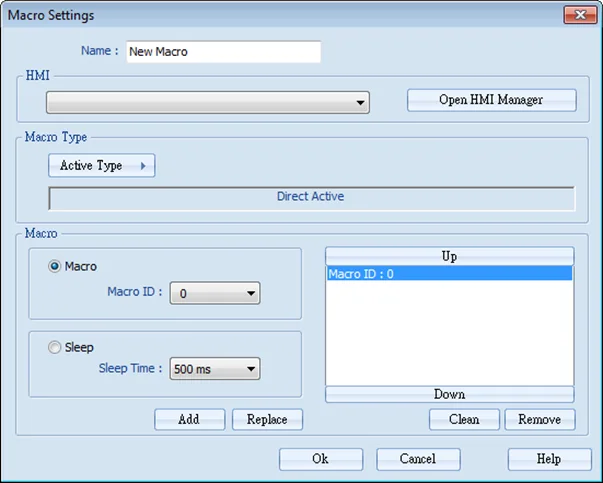
Settings
| Setting | Description |
|---|---|
| Name | Enters an object name which is a unique name. |
| HMI | Selects a HMI to monitor. |
| Macro Type | The ways to execute the Macro include Direct Active and Cycle Active. |
| Macro | Each Macro Object can execute multiple macros. The time interval between the executions of two macros can be changed. |
Steps to Add a New Macro
Follow these steps to add a new macro in EasyWatch.
Instructions: Steps to Add a New Macro
Select a target HMI.
Select a target HMI. If the target HMI does not exist, add a new device (See the “add new Monitor” section aboveDefine Macro Type
Set Active Type under Macro Type to [Direct Active] or [Cycle Active].
[Direct Active]: Directly executes Macro once.
[Cycle Active]: Set the interval of executing Macro.
For example: If [Direct Active] is selected, the macro will execute one time whereas if [Cycle Active] is set to 5 seconds, when executing a macro, the next time to execute the macro object will be 5 seconds later.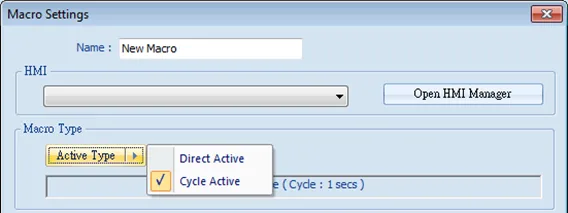
Configure macro behavior
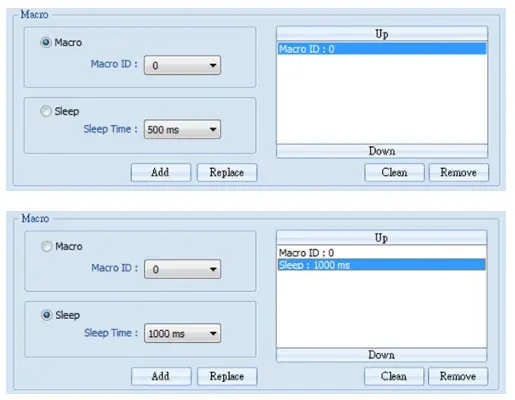
Set Macro to [Macro] or [Sleep].
[Macro]: Select the Macro ID for execution, and click [Add] to add the Macro to the list
[Sleep]: Set the time interval between the executions of two Macros. Click [Add] or [Replace] to add or replace the Macros from the list.
HMI Manager
Open HMI Settings
There are two ways to open the HMI Settings Manager:
- Select from the toolbar: [Objects] » [HMI Manager].
- Select from the quick selection toolbar: [Open HMI manager].
HMI Manager
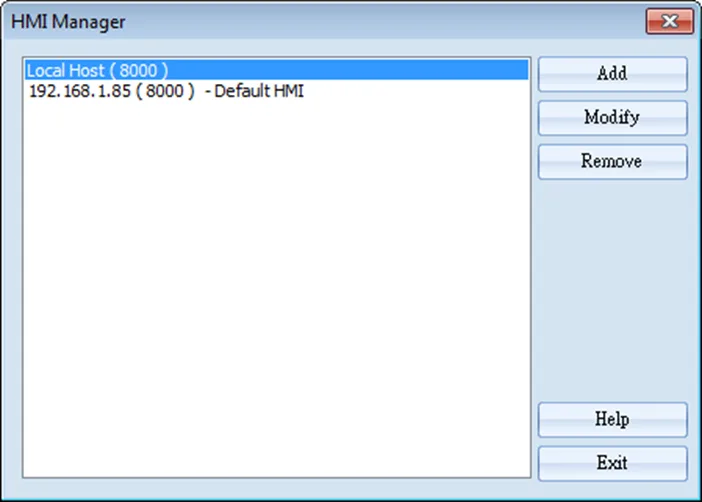
| Setting | Description |
|---|---|
| Add | Select a target HMI. If the target HMI does not exist, add a new device. |
| Modify | Modify the settings of the HMI. |
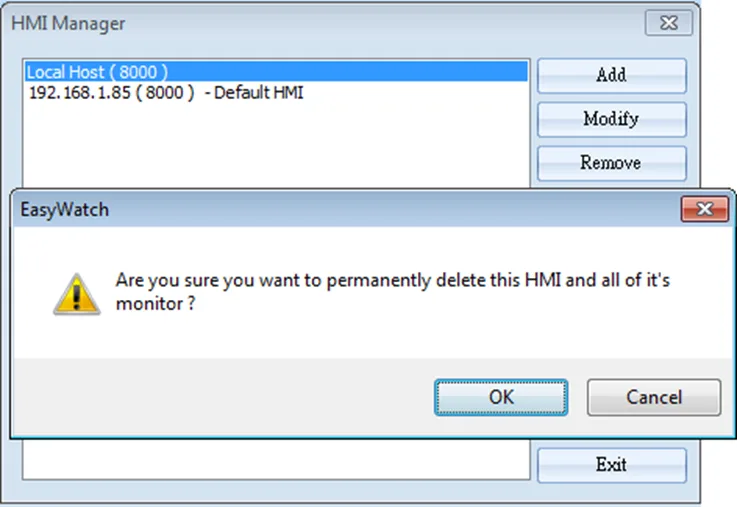
| Remove | Remove the HMI. |
Object List
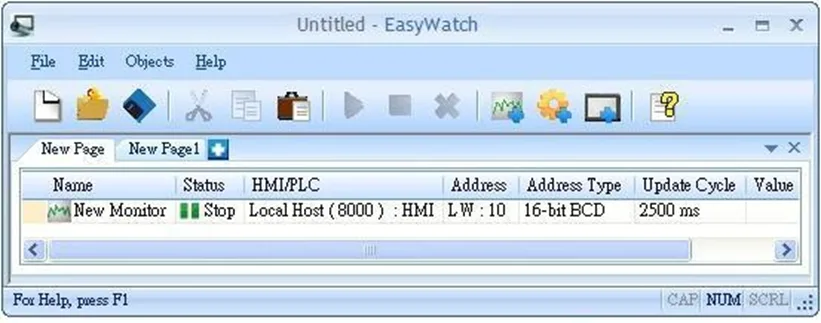
| Setting | Description |
|---|---|
| Name | Displays the object name. The small icons beside the names help users identify the objects. |
| Status | Displays the status of the objects: [Connecting], [Connected], and [Stop]. If HMI is not connected or Port No. is incorrect, the error message “HMI Not Found” will appear. For Monitor Objects, if the address is incorrect, “Address Error” message will appear. |
| HMI / PLC | Displays the information of HMI / PLC that is currently operated by the objects. |
| Address / Address Type | For Monitor Objects, the relevant address setting is displayed. |
| Update Cycle | Set the update interval of the monitor object. |
| Value | For Monitor Object, if the status shows [Connected], the current HMI address value will be displayed. Modifying the value is also available when the Read-Only checkbox is unselected. For Macro Object, if set to [Direct Active], there will be an [Active] button in this column for clicking to directly execute a macro. |
Editing Object List
Adding a new page: Click the icon to add a new page.

Deleting a page: Click the icon and confirm the deletion.
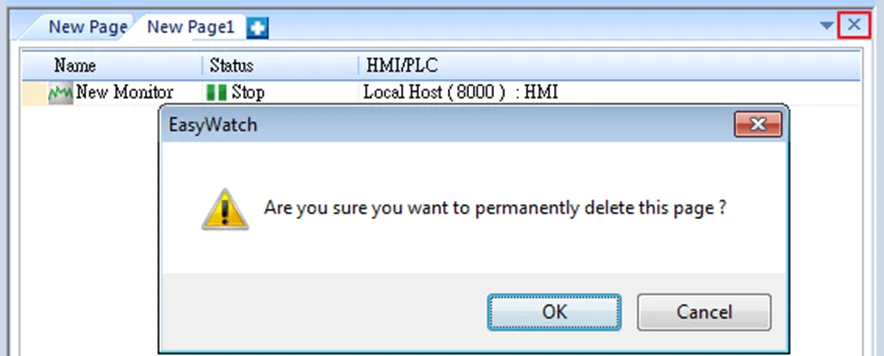
Renaming the page: Double-click on the page name and enter a new name.

Positioning the column headers: Drag and drop the column headers to the desired location.
