
Overview
Macros provide the additional functionality your application may need. Macros are automated sequences of commands that are executed at run-time. Macros allow you to perform tasks such as complex scaling operations, string handling, and user interactions with your projects. This chapter describes syntax, usage, and programming methods of macro commands.
Using the Macro Editor
Macro editor provides the following functions:
- Display line number
- Undo / Redo
- Cut / Copy / Paste
- Select All
- Toggle Bookmark / Previous Bookmark / Next Bookmark / Clear All Bookmarks
- Toggle All Outlining
- Security -> Use execution condition
- Periodical execution
- Execute one time when HMI starts
The instructions in the following part show you how to use these functions.
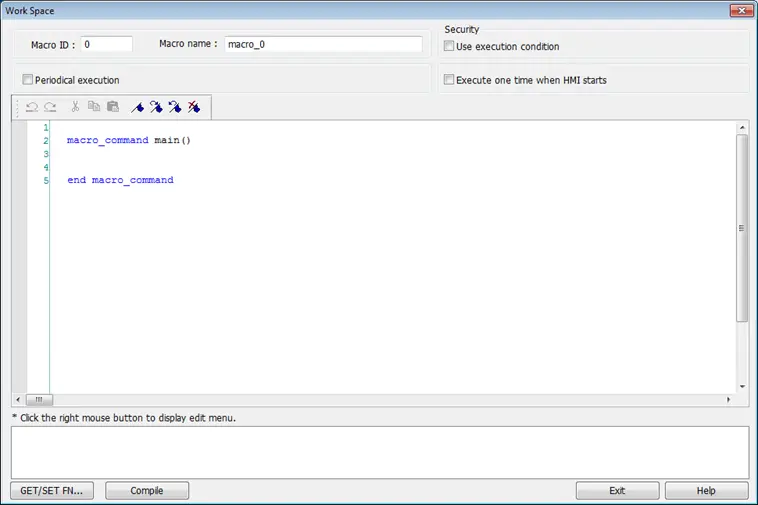
Open the macro editor; you’ll see the line numbers displayed on the left-hand side of the edit area.
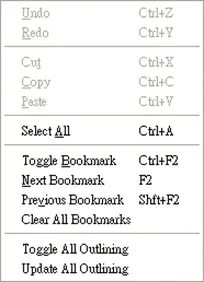
Right click on the edit area to open the pop-up menu as shown in the following figure. Disabled operations are colored grey, which indicates that it is not possible to use that function in the current status of the editor. For example, you should select some text to enable the copy function, otherwise it will be disabled. Keyboard shortcuts are also shown.
The toolbar provides [Undo], [Redo], [Cut], [Copy], [Paste], [Toggle Bookmark], [Next Bookmark], [Previous Bookmark] and [Clear All Bookmarks] buttons.
![EBPro Macro Toolbar: The toolbar provides [Undo], [Redo], [Cut], [Copy], [Paste], [Toggle Bookmark], [Next Bookmark], [Previous Bookmark] and [Clear All Bookmarks] buttons.](https://media.maplesystems.com/wp-content/uploads/2026/04/image-2026-04-03T145328.831.webp "EBPro macro toolbar icons")
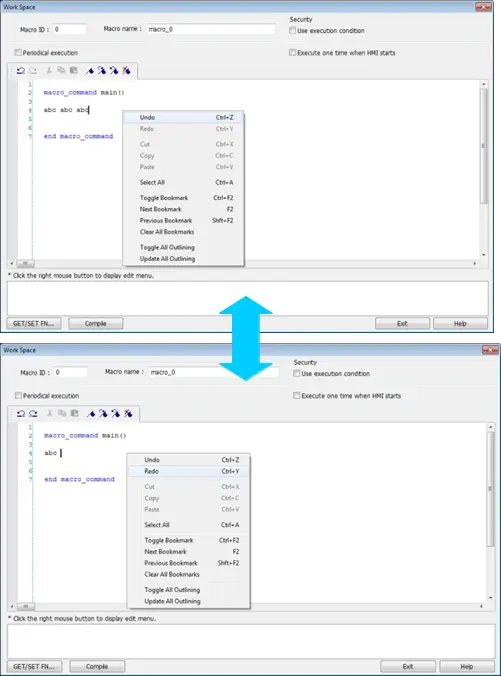
Any modification will enable the [Undo] function. [Redo] function will be enabled after the undo action is used. To perform the undo/redo, right click to select the item or use the keyboard shortcuts. (Undo: Ctrl+Z, Redo: Ctrl+Y).
Select a word in the editor to enable the [Cut] and [Copy] function. After [Cut] or [Copy] is performed, [Paste] function is enabled.
![Standard operation of Cut/Copy/Paste functions. Select a word in the editor to enable the [Cut] and [Copy] function. After [Cut] or [Copy] is performed, [Paste] function is enabled.](https://media.maplesystems.com/wp-content/uploads/2026/04/image-2026-04-03T145619.175.webp "Cut-Copy-Paste functionality")
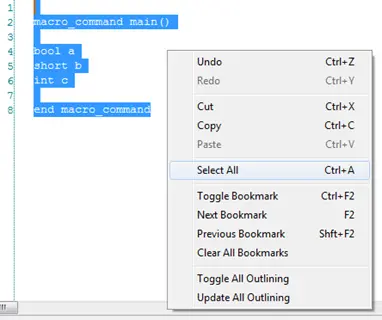
Use [Select All] to include all the content in the edit area.
If the macro is too long, use bookmarks to manage and read the code with ease. The following illustration shows how it works.
- Move your cursor to the position in the edit area where to insert a bookmark. Right click, select [Toggle Bookmark]. There will be a blue little square that represents a bookmark on the left hand side of edit area.
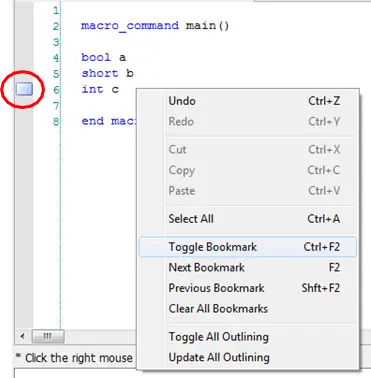
- If there is already a bookmark where the cursor is placed, select [Toggle Bookmark] to close it, otherwise to open it.
- Right click and select [Next Bookmark], the cursor will move to where the next bookmark locates. Selecting [Previous Bookmark] will move the cursor to the previous bookmark.

- Selecting [Clear All Bookmarks] will delete all bookmarks.
Macro editor provides outlining (or code-folding). Outlining will hide macro codes that belong to the same block, and display them as ellipses (…) There will be a tree diagram on the left hand side of edit area. Click – to hide the block or + to open, as shown in the following figure.
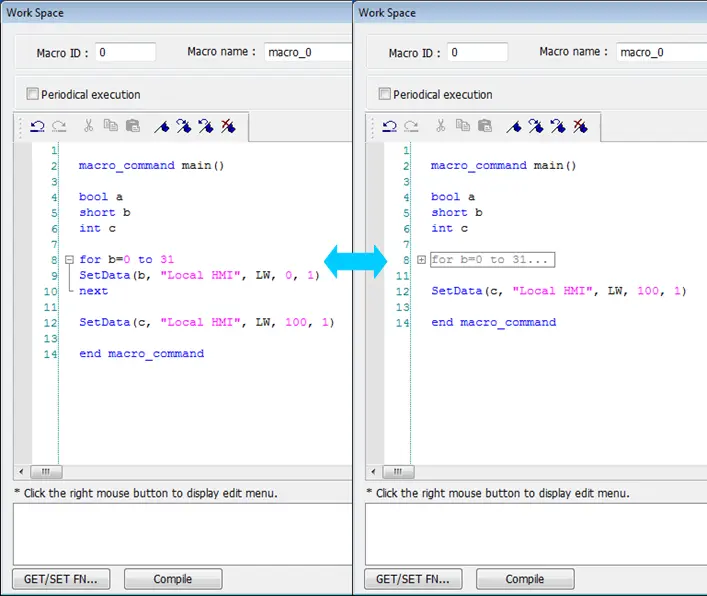
Right click to select [Toggle All Outlining] to open all folded macro code blocks.
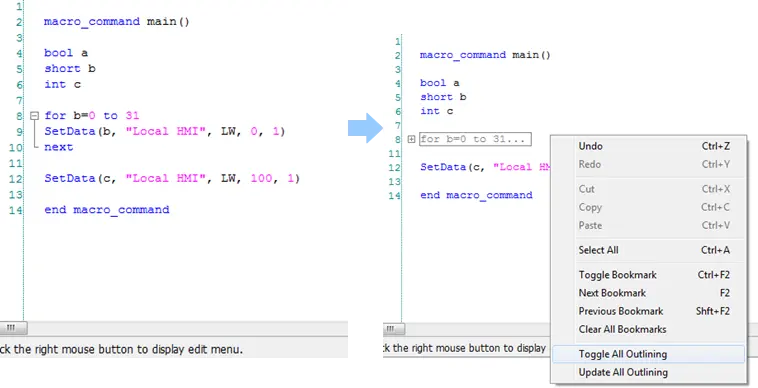
Sometimes the outlining might be incorrect since that the keywords are misjudged as shown in the following figure. To solve this problem, right click and select [Update All Outlining].

The statements enclosed in the following keywords are called a “block” of the macro code:
- Function block:
- sub – end sub
- Iterative statements:
- for – next
- while – wend
- Logical statements:
- if – end if
- Selective statements
- select case – end select
The macro editor is not a monopoly window. Returning to the main screen and editing the project with the Work Space window open is allowed.

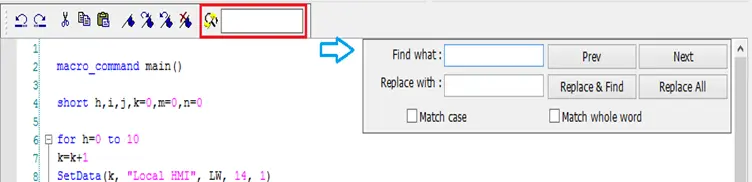
The macro editor provides Find and Replace features.
When [Periodical execution] is checked, this macro will be triggered periodically.

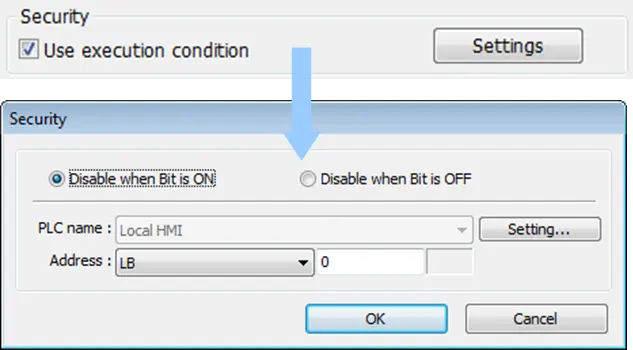
Select [Security] » [Use execution condition] » [Settings] to enable security settings:
- [Disable when Bit is ON]: When Bit is ON, this macro is disabled.
- [Disable when Bit is OFF]: When Bit is OFF, this macro is disabled.
Select [Execute one time when HMI starts], this macro will be executed once when HMI starts up.
Configuration
A macro contains statements. The statements contain constants, variables, and operations. The statements are put in a specific order to create the desired output.
A macro has the following structure:
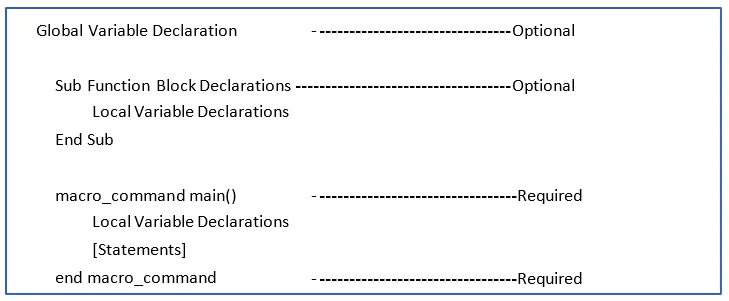
Macro must have one and only one main function which is the execution start point of macro.
The format is:
macro_command main()
end macro_command
Local variables are used within the main macro function or in a defined function block. Its value remains valid only within the specific block.
Global variables are declared before any function blocks and are valid for all functions in the macro. When local variables and global variables have the same declaration of name, only the local variables are valid.
The following example shows a simple macro which includes a variable declaration and a function call.
macro_command main()
short pressure = 10 //local variable declaration
SetData(pressure, “Allen-Bradley DF1”, N7, 0, 1) // function calling
end macro_command
Syntax
Constants and Variables
Constants
Constants are fixed values and can be directly written into statements. The formats are:
| Constant Type | Note | Example |
|---|---|---|
| Decimal integer | — | 345, -234, 0, 23456 |
| Hexadecimal | Must begin with 0x | 0x3b, 0xffff, 0x237 |
| ASCII | Single character must be enclosed in single quotation marks and a string (group of characters) must be enclosed in double quotation marks. A backslash \ can be used to escape the quotation marks contained in a string. Therefore, to enclose a string containing double quotation marks, use \" for the double quotation mark in the string. | 'a', "data", "name" |
| Boolean | — | true, false |
Example:
macro_command main()
short A, B //A and B are variables
A = 1234
B = 0x12 //1234 and 0x12 are constants
end macro_command
Variables
Variables are names that represent information. The information can be changed as the variable is modified by statements.
Naming Rules for Variables
- A variable name must start with an alphabet.
- Variable names longer than 32 characters are not allowed.
- Reserved words cannot be used as variable names.
There are 8 different Variable types, 5 for signed data types and 3 for unsigned data types:
| Variable Type | Description | Range |
|---|---|---|
| bool (boolean) | 1 bit (discrete) | 0, 1 |
| char (character) | 8 bits (byte) | +127 to -128 |
| short (short integer) | 16 bits (word) | +32767 to -32768 |
| int (integer) | 32 bits (double word) | +2147483647 to -2147483648 |
| float (floating point) | 32 bits (double word) | |
| unsigned char | 8 bits (byte) | 0 to 255 |
| unsigned short (short integer) | 16 bits (word) | 0 to 65535 |
| unsigned int | 32 bits (double word) | 0 to 4,294,967,295 |
| long (long integer) | 64 bits (four words) (cMT / cMT X Series only) | +281474976710655 to -281474976710655 |
| unsigned long (long integer) | 64 bits (four words) (cMT / cMT X Series only) | 0 ~ 281474976710655 |
| double | 64 bits (four words) (cMT / cMT X Series only) |
Declaring Variables
Variables must be declared before being used. To declare a variable, specify the type before the variable name.
Example:
int a
short b, switch
float pressure
unsigned short c
Declaring Arrays
Macros support one-dimensional arrays (zero-based index). To declare an array of variables, specify the type and the variable name followed by the number of variables in the array enclosed in brackets “[ ]”. The length of an array could be 1 to 4096. (Macros only support at most 4096 variables per macro).
Example:
int a[10]
short b[20], switch[30]
float pressure[15]
The minimum array index is 0 and the maximum is (array size – 1).
char data [100] // array size is 100
In this case, the minimum of array index is 0 and maximum of array index is 99 (=100-1)
Variable and Array Initialization
There are two ways variables can be initialized:
- By statement using the assignment operator (=)
- Example:
- int a
- float b[3]
- a = 10
- b[0] = 1
- Example:
- During declaration
- Example:
- char a = ‘5’, b = 9
- Example:
The declaration of arrays is a special case. The entire array can be initialized during declaration by enclosing comma separated values inside curly brackets “{}”.
Example:
float data[4] = {11, 22, 33, 44} // now data[0] is 11, data[1] is 22….
Operators
Operators are used to designate how data is manipulated and calculated.
Arithmetic Operators
| Operator | Description | Example |
|---|---|---|
| = | Assignment Operator | pressure = 10 |
+ | Addition | A = B + C |
- | Subtraction | A = B - C |
* | Multiplication | A = B * C |
/ | Division | A = B / C |
% or mod | Modulo division (return remainder) | A = B % 5 or A = B mod 5 |
By default, integer numbers (1, 2,3..etc) are considered having integer data type; therefore, when division is carried out involving two integer numbers where the result should have decimal point, the decimal part will be removed. To avoid this, add .0 (1.0, 2.0, 3.0…etc) behind the dividend or the divisor to turn it into a floating point number calculation.
Examples
| A = 3 / 2 = 1 | » | 3 and 2 are both integers; therefore the result is an integer. |
| B = 3 / 2.0 = 1.5 | » | 3 is an integer whereas 2.0 is a floating point number, therefore the result is a floating point number. |
| C = 3.0 / 2 = 1.5 | » | 3.0 is a floating point number whereas 2 is an integer, therefore the result is a floating point number. |
Comparison Operators
| Operator | Description | Example |
|---|---|---|
< | Less than | if A < 10 then B = 5 |
<= | Less than or equal to | if A <= 10 then B = 5 |
> | Greater than | if A > 10 then B = 5 |
>= | Greater than or equal to | if A >= 10 then B = 5 |
== | Equal to | if A == 10 then B = 5 |
Logic Operators
| Operator | Description | Example |
|---|---|---|
and | Logical AND | if A < 10 and B > 5 then C = 10 |
or | Logical OR | if A >= 10 or B > 5 then C = 10 |
xor | Logical Exclusive OR | if A xor 256 then B = 5 |
not | Logical NOT | if not A then B = 5 |
Shift and Bitwise Operators
Shift and bitwise operators are used to manipulate bits of signed/unsigned character and integer variables. The priority of these operators is from left to right within the statement.
| Shift Operator | Description | Example |
|---|---|---|
<< | Shifts the bits in a bit set to the left a specified number of positions | A = B << 8 |
>> | Shifts the bits in a bit set to the right a specified number of positions | A = B >> 8 |
| Bitwise Operator | Description | Example |
|---|---|---|
& | Bitwise AND | A = B & 0xf |
| | Bitwise OR | A = B | C |
^ | Bitwise XOR | A = B ^ C |
~ | One’s complement | A = ~B |
Priority of all Operators
The overall priority of all operations from highest to lowest is as follows:
- Operations within parenthesis are carried out first
- Arithmetic operations
- Shift and Bitwise operations
- Comparison operations
- Logic operations
- Assignment
Reserved Keywords
The following keywords are reserved for system. These keywords cannot be used as variable, array, or function names.
+, -, *, /, %, >=, >, <=, <, <>, ==, and, or, xor, not, <<, >>,=, &, |, ^, ~, exit, macro_command, for, to, down, step, next, return, bool, short, int, char, float, void, if, then, else, break, continue, set, sub, end, while, wend, true, false, SQRT, CUBERT, LOG, LOG10, SIN, COS, TAN, COT, SEC, CSC, ASIN, ACOS, ATAN, BIN2BCD, BCD2BIN, DATE2ASCII, DATE2DEC,DEC2ASCII, FLOAT2ASCII, HEX2ASCII, DOUBLE2ASCII, ASCII2DEC, ASCII2FLOAT, ASCII2HEX, ASCII2DOUBLE, FILL, RAND, DELAY, SWAPB, SWAPW, LOBYTE, HIBYTE, LOWORD, HIWORD, GETBIT, SETBITON, SETBITOFF, INVBIT, ADDSUM, XORSUM, CRC, CRC8, CRC16_CCITT, CRC16_CCITT_FALSE, CRC16_X25, CRC16_XMODEM, INPORT, OUTPORT, POW, GetCnvTagArrayIndex, GetError, GetData, GetDataEx, SetData, SetDataEx, SetRTS, GetCTS, Beep, SYNC_TRIG_MACRO, ASYNC_TRIG_MACRO, TRACE, FindDataSamplingDate, FindDataSamplingIndex, FindEventLogDate, FindEventLogIndex StringGet, StringGetEx, StringSet, StringSetEx, StringCopy, StringMid, StringMD5, StringDecAsc2Bin, StringBin2DecAsc, StringDecAsc2Float, StringFloat2DecAsc, StringHexAsc2Bin, StringBin2HexAsc, StringLength, StringCat, StringCompare, StringCompareNoCase, StringFind, StringReverseFind, StringFindOneOf, StringIncluding, StringExcluding, StringToUpper, StringToLower, StringToReverse, StringTrimLeft, StringTrimRight, StringInsert, String2Unicode, Unicode2Utf8, UnicodeCat, UnicodeCompare, UnicodeCopy, UnicodeExcluding, Uft82Unicode
Statements
Definition Statement
This covers the declaration of variables and arrays. The formal construction is as follows:
| type name |
This defines a variable with name as “name” and type as “type”.
Example:
int A // define a variable A as an integer
| type name[constant] |
This defines an array variable called “name” with size as “constant” and type as “type”.
Example:
int B[10] // where define a variable B as a one-dimensional array of size 10
Assignment Statement
Assignment statements use the assignment operator to move data from the expression on the right side of the operator to the variable on the left side. An expression is the combination of variables, constants and operators to yield a value.
| VariableName Expression |
Example
A = 2 where a variable A is assigned to 2
Logical Statements
Logical statements perform actions depending on the condition of a boolean expression. The syntax is as follows:
Single-Line Format
| If <Condition> then [Statements] else [Statements] end if |
Example:
if a == 2 then
b = 1
else
b = 2
end if
Block Format
| If <Condition> then [Statements] else if <Condition-n> then [Statements] else [Statements] end if |
if a == 2 then
b = 1
else if a == 3 then
b = 2
else
b = 3
end if
Syntax Description
| if | Must be used to begin the statement. |
| <condition> | Required. This is the controlling statement. It is FALSE when the <Condition> evaluates to 0 and TRUE when it evaluates to non- zero. |
| then | Must precede the statements to execute if the <Condition> evaluates to TRUE. |
| [Statements] | It is optional in block format but necessary in single-line format without else. The statement will be executed when the <Condition> is TRUE. |
| else if | Optional. The else if statement will be executed when the relative <Condition-n> is TRUE. |
| <Condition-n> | Optional. see <Condition> |
| else | Optional. The else statement will be executed when <Condition> and <Condition-n> are both FALSE. |
| end if | Must be used to end an if-then statement. |
Selective Statements
The select-case construction can be used like multiple if-else statements and perform selected actions depending on the value of the given variable. When the matched value is found, all the actions below will be executed until a break statement is met. The syntax is as follows:
Format without a Default Case
| Select Case [variable] Case [value] [Statements] break end Select |
Example:
Select Case A
Case 1
b=1
break
end Select
Format with a Default Case (Case else)
| Select Case [variable] Case [value] [Statements] break Case else [Statements] break end Select |
Example:
Select Case A
Case 1
b=1
break
Case else
b=0
break
end Select
Multiple cases in the same block
| Select Case [variable] Case [value1] [Statements] Case [value2] [Statements] break end Select |
Example:
Select Case A
Case 1
break
Case 2
b=2
break
Case 3
b=3
break
end Select
Syntax Description
| Select Case | Must be used to begin the statement. |
| [variable] | Required. The value of this variable will be compared to the value of each case. |
| Case else | Optional. It represents the default case. If none of the cases above are matched, the statements under default case will be executed. When a default case is absent, it will skip directly to the end of the select-case statements if there is no matched case. |
| break | Optional. The statements under the matched case will be executed until the break command is reached. If a break command is absent, it simply keeps on executing next statement until the end command is reached. |
| end Select | Indicates the end of the select-case statements. |
Iterative Statements
Iterative statements control loops and repetitive tasks depending on condition. There are two types of iterative statements.
for-next Statements
The for-next statement runs for a fixed number of iterations. A variable is used as a counter to track the progress and test for ending conditions. Use this for fixed execution counts. The syntax is as follows:
| for [Counter] = <StartValue> to <EndValue> [step <StepValue>] [Statements] next [Counter] |
or
| for [Counter] = <StartValue> to <EndValue> [step <StepValue>] [Statements] next [Counter] |
Example:
for a = 0 to 10 step 2
b = a
next a
Syntax Description
| for | Must be used to begin the statement |
| [Counter] | Required. This is the controlling statement. The result of evaluating the variable is used as a test of comparison. |
| <StartValue> | Required. The initial value of [Counter] |
| to/down | Required. This determines if the <step> increments or decrements the <Counter>. “to” increments <Counter> by <StepValue>. “down” decrements <Counter> by <StepValue>. |
| <EndValue> | Required. The test point. If the <Counter> is greater than this value, the macro exits the loop. |
| step | Optional. Specifies that a <StepValue> other than one is to be used. |
| [StepValue] | Optional. The increment/decrement step of <Counter>. It can be omitted when the value is 1 If [step <StepValue>] are omitted the step value defaults to 1. |
| [Statements] | Optional. Statements to execute when the evaluation is TRUE. “for-next” loops may be nested. |
| next | Required. |
| [Counter] | Optional. This is used when nesting for-next loops. |
while-wend Statements
The while-wend statement runs for an unknown number of iterations. A variable is used to test for ending conditions. When the condition is TRUE, the statements inside are executed repetitively until the condition becomes FALSE. The syntax is as follows.
| while <Condition> [Statements] wend |
Example:
while a < 10
a = a + 10
wend
Syntax Description
| while | Must be used to begin the statement. |
| continue | Required. This is the controlling statement. When it is TRUE, the loop begins execution. When it is FALSE, the loop terminates. |
| wend | Indicates the end of the while-end statements. |
Other Control Commands
| break | Used in for-next and while-wend. It skips immediately to the end of the iterative statement. |
| continue | Used in for-next and while-wend. It ends the current iteration of a loop and starts the next one. |
| return | The return command inside the main block can force the macro to stop anywhere. It skips immediately to the end of the main block. |