Overview & Concepts
Administrator Tools in EasyBuilder Pro provide utilities for managing system-level settings related to security, user accounts, and certain configuration features of the HMI. These tools allow administrators to control access permissions, manage login credentials, and configure functions that affect how the HMI operates during runtime.
Administrator Tools are typically used to maintain system security and manage user access. Through this feature, administrators can configure and maintain user accounts that determine which operators are permitted to access specific functions or objects within the HMI project.
Administrative management functions include:
- Creating and modifying user accounts
- Assigning privilege levels or security classes
- Importing or managing user account data
These tools are commonly used in systems where different operators require different levels of access, such as limiting configuration changes to supervisors or maintenance personnel. By centralizing user and security management, Administrator Tools help ensure controlled and consistent access to HMI functionality.
Implementation
Administrator Tools allows storing the data of [User Accounts], [USB Security Key], [e-Mail SMTP Server Settings], and [e-Mail Contacts] to USB. With EasyBuilder Pro user accounts and e-Mail function, the data built can be imported to HMI by Function Key object set to “Import user data / Use [USB Security Key]”. The portability and convenience is greatly improved.
To launch Administrator Tools, select the check boxes in [Save] column to enable the selected functions explained below:
![EBPro Administrator Tools window. Administrator Tools allows storing the data of [User Accounts], [USB Security Key], [e-Mail SMTP Server Settings], and [e-Mail Contacts] to USB](https://media.maplesystems.com/wp-content/uploads/2026/04/image-285.webp "EBPro Administrator Tools main window")
User Accounts
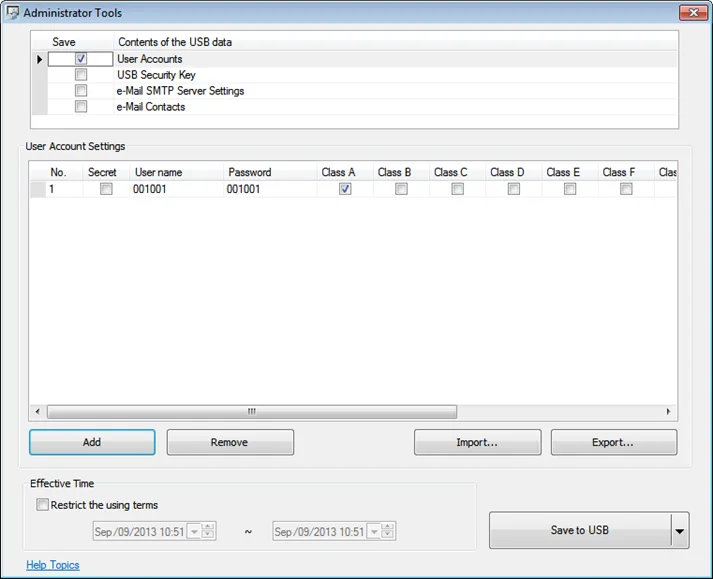
Select [User Accounts] check box and complete the relevant settings
| Settings | Description |
|---|---|
| Secret | Select the check box to set secret accounts. |
| User Name | Sets User Name. Note 1 |
| Password | Sets User Password. Note 1 |
| Class A~L | Sets user privilege. |
| Add | Adds a new account. Note 2 |
| Remove | Deletes an existing account. |
| Import | Imports user account data. |
| Export | Exports user account data. |
| Effective Time | If [Restrict the using terms] is not selected, it is available to import data anytime.If select [Restrict the using terms] check box, and set an effective time period, the importing of data to HMI can only be done in the time limit specified.When time expired, data cannot be imported, please reset the data with this tool again. |
| Save to USB | Saves data to USB. To save to a specific folder, click “✔” button and select “Folder” |
Notes:
- Only allows letters, numbers, “-” or “_”, case-sensitive.
- A maximum of 127 user accounts can be added.
User Account Configuration Options
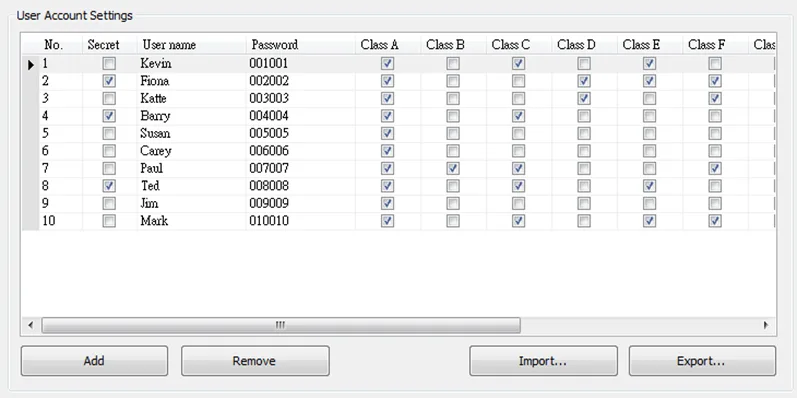
Click [Add] to create a new account. Click [Remove] to delete the selected account. Select [Secret] check box to define the account as a secret user. Type in [User name] and [Password] and check the privilege from [Class A] to [Class L] check boxes.
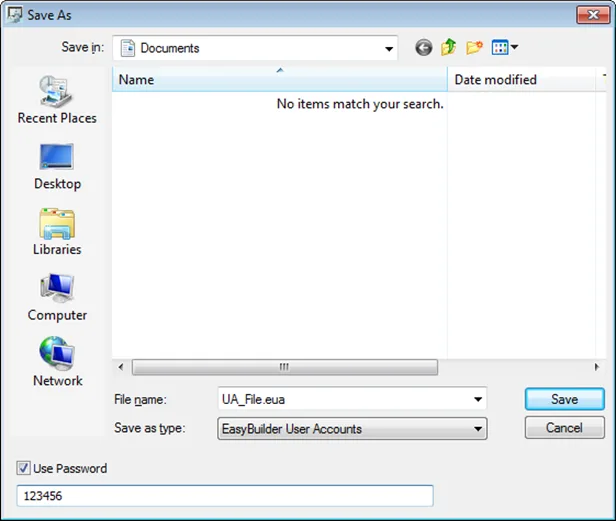
To back up the data, click [Export]. Click [Use Password] to protect the data, next time when click [Import] to import the backup data, a password is required.
If under [Effective Time], the [Restrict the using terms] check box is selected, only during the specified time period can the users import account data to HMI. If not selected, users can import data to HMI at any time.

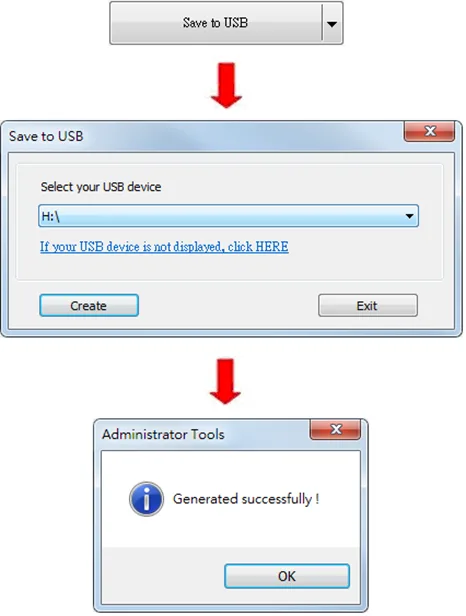
When finished, click [Save to USB], select the location of USB and then click [Create]. If successful, the “Generated successfully!” message is shown.
Account Import using EasyBuilder Pro (Function Key)
The following steps explain how to create a Function Key to import data in EasyBuilder Pro.
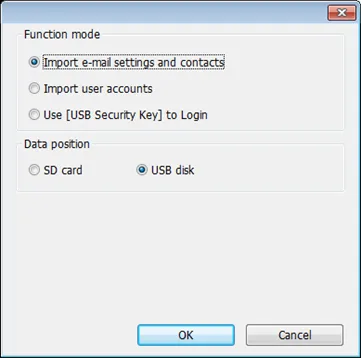
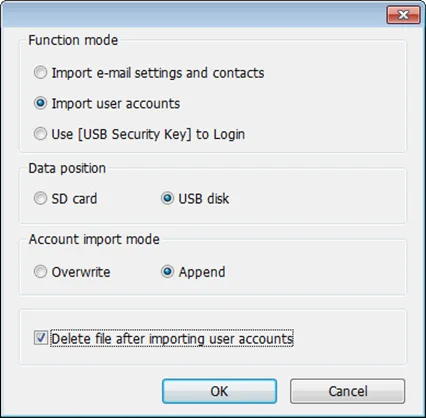
- Select “Import user data/Use [USB Security Key]” in Function Key setting dialog box, and then click [Settings].

- Under [Function mode] select [Import user accounts]. Select the device that stores the data in [Data position]. Select [Overwrite] under [Account import mode]; HMI will only store the account data imported this time. Select [Append], HMI will store the accounts imported this time and those already exist. Select [Delete file after importing user accounts] check box to delete the source files after importing.
Import user accounts to cMT / cMT X using EasyWeb 2.0
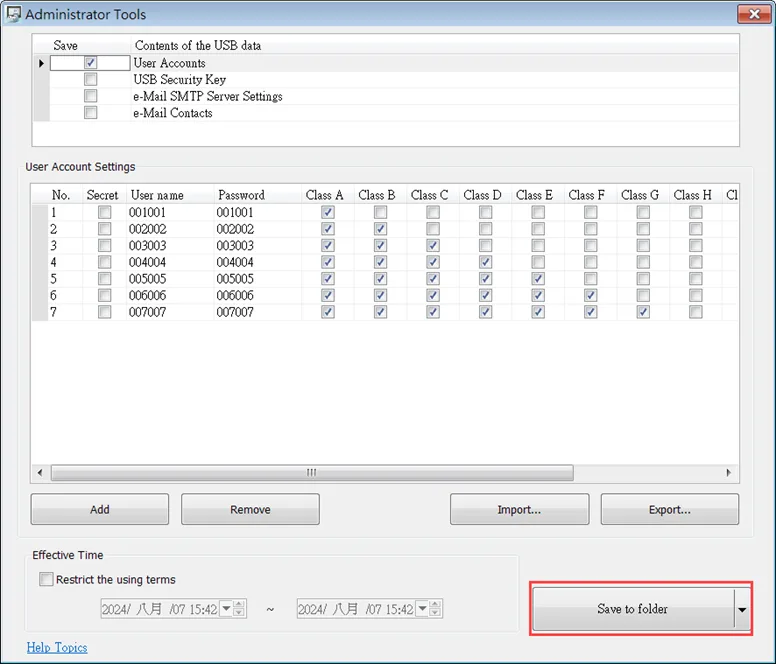
After creating the account data, click [Save to folder] to save it as a UserAccounts file.
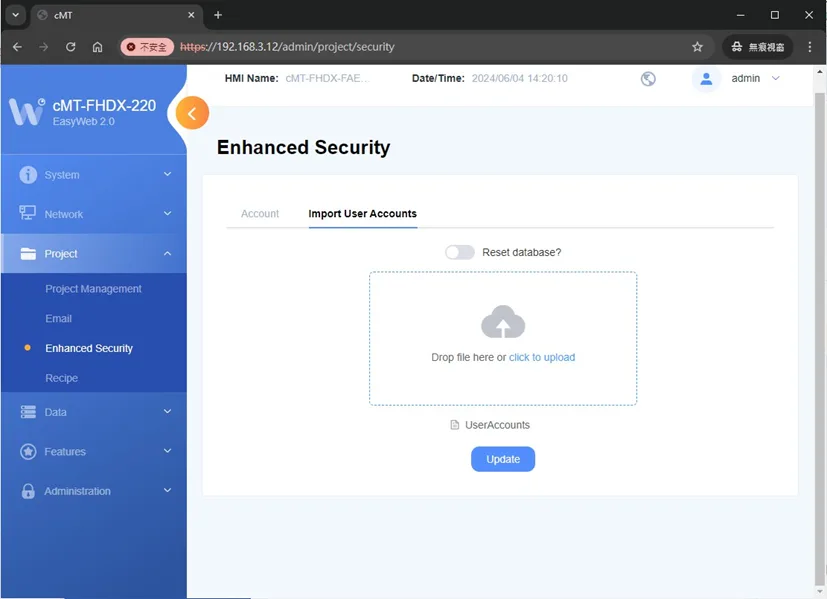
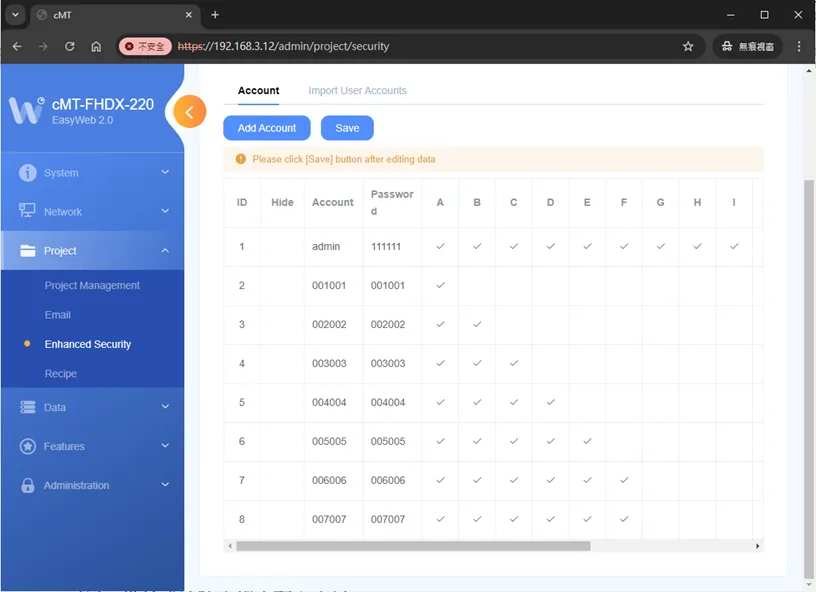
Enter the HMI IP address in the browser to access EasyWeb 2.0. On the Enhanced Security » Import User Accounts page, upload the UserAccounts file. If there are duplicate users the import will fail, but the [Reset database] option can be selected to overwrite and successfully import the file.
On the Account page, click [Save] to add the user accounts to the HMI
Implementation: USB Security Key
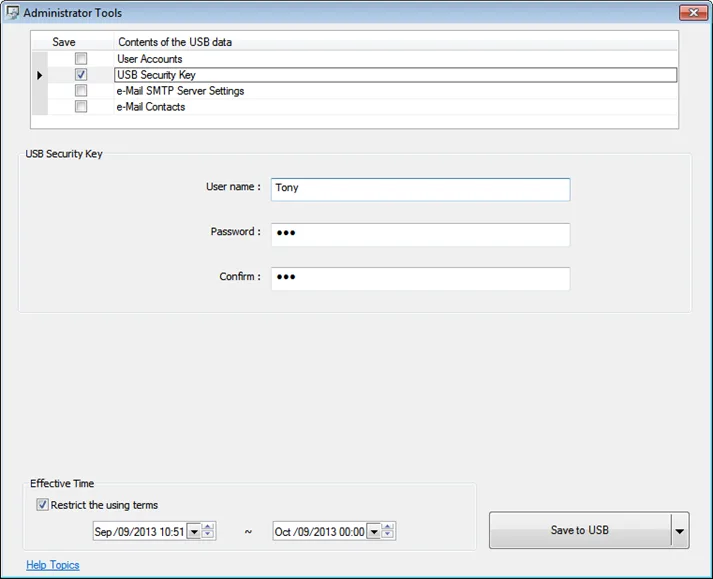
With the predefined user login information, the USB Security Key can be used to log in directly.
| Settings | Description |
|---|---|
| User Name | Sets User Name. Note 1 |
| Password | Sets User Password. Note 1 |
| Confirm | Confirms User Password. |
| Effective Time | Logs in using USB Security Key during the specified time period. If not specifying Effective Time, log in at any time. |
| Save to USB | Saves data to USB. |
Note:
- Only allows letters, numbers, “-” or “_”, and is case-sensitive.
Steps to set the USB Security Key
Type in the existing user name and password. Type the password again in [Confirm] field for password confirmation.
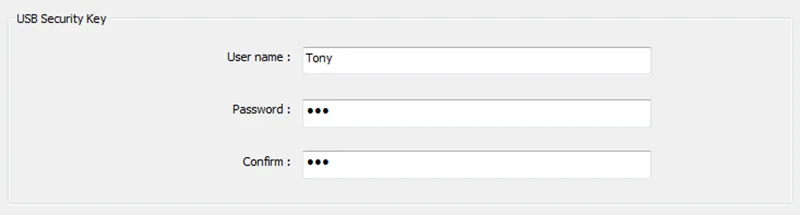
Under [Effective Time] if [Restrict the using terms] check box is selected, only during the specified time period can users log in using USB Security Key. If not selected, users can log in using USB Security Key at any time.
When finished, click [Save to USB], select the location of USB and then click [Create]. If successful, the “Generated successfully!” massage is shown.
Set USB Security key using EasyBuilder Pro (Function Key)
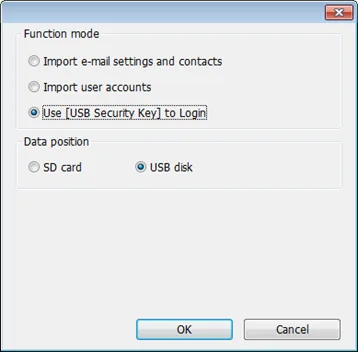
The following steps explain how to create a Function Key to enable USB Security Key in EasyBuilder Pro. By touching the object, the USB Security Key is enabled for login.
- Select “Import user data/Use [USB Security Key]” in Function Key setting dialog box, and then click [Settings].
- Under [Function mode] select [Use USB Security Key to Login]. Select the device that stores the data in [Data position].
Implementation: E-Mail SMTP Server Settings
Select [e-Mail SMTP Server Settings] check box to complete the relevant settings.
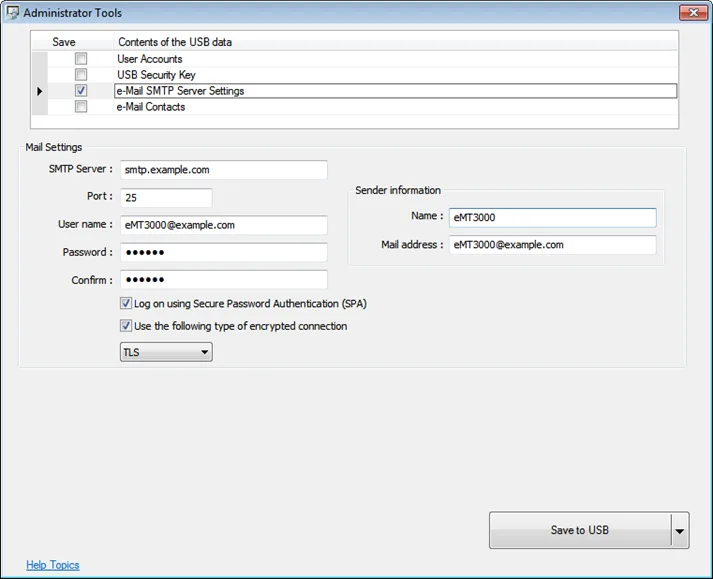
| Mail Settings | Description |
|---|---|
| SMTP Server | Specifies SMTP Server. |
| Port | Specifies SMTP Server port number. |
| User name | User e-mail account name. |
| Password | User e-mail account password. |
| Confirm | Confirm user e-mail account password. |
| Sender Information | Description |
|---|---|
| Name | The sender name displayed when mail received. |
| Mail address | The sender address displayed when mail received. |
SMTP Server Settings Configuration
Configure the settings as shown in the following figure, specific to your desired information
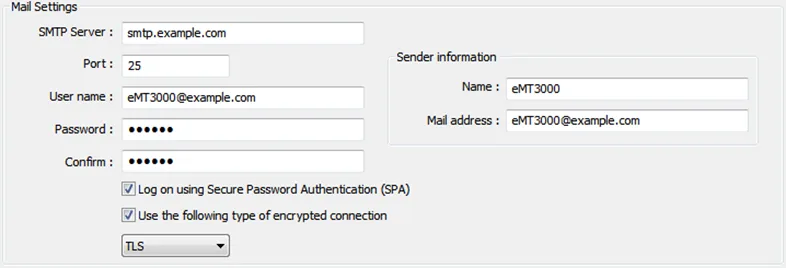
When finished, click [Save to USB], select the location of USB and then click [Create]. If successful, the “Generated successfully!” massage is shown.
Implementation: E-Mail Contacts
Select [e-Mail Contacts] check box to complete the relevant settings.
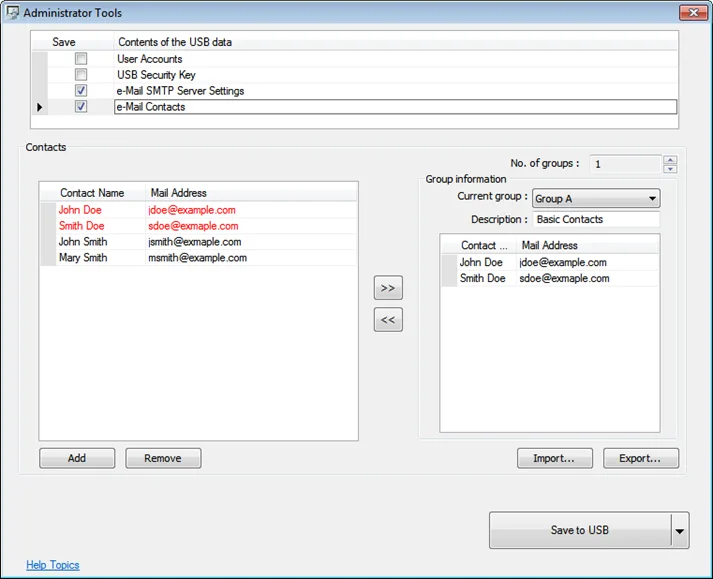
| Settings | Description |
|---|---|
| Add | Adds a new contact. Note1 |
| Remove | Removes a contact. |
| No. of groups | The number of groups. Note2 |
| Current group | The name of current group. Note3 |
| Description | Group description. |
| Import | Imports contact information. |
| Export | Exports contact information. |
| Save to USB | Saves data to USB. |
Notes:
- A maximum of 256 contacts can be added.
- A maximum of 16 groups can be added. (Group A to Group P)
- From Group A to P, when [No. of groups] is “1”, only Group A will exist, when added to “2”, Group A and Group B will exist, and so on.
- UTF-8 characters are allowed in contact names.
E-Mail Contact Setup and Configuration
- Click [Add] to add in all contacts.
- Add the contacts to Group A, the added contacts are displayed in red font.
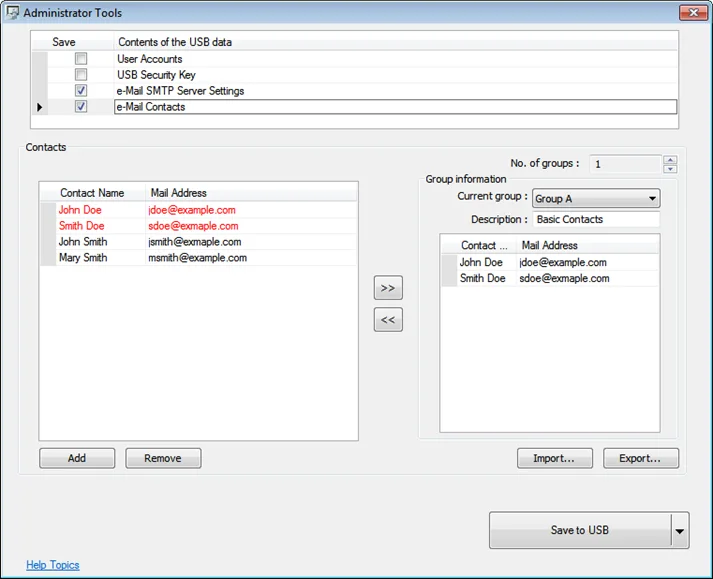
- Press the up or down arrows of the spin box of [No. of groups] to add new groups. If add to “2”, Group B can be found. Repeat step 1 and step 2 to add contacts into groups.
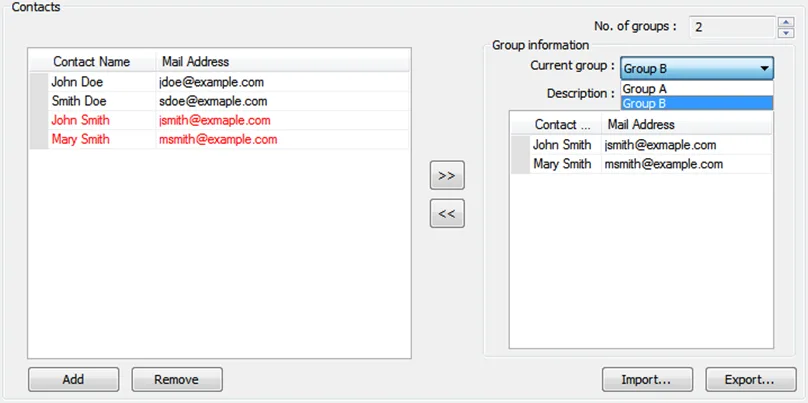
- After adding all the e-mail contacts, click [Export] to back up the data for future use and modification. Next time when needed, click [Import] to import the backup data.
- When finished, click [Save to USB], select the location of USB and then click [Create]. If successful, the “Generated successfully!” massage is shown.
Import E-Mail Settings and Contacts using EasyBuilder Pro (Function Key)
Select “Import user data/Use [USB Security Key]” in Function Key setting dialog box, and then click [Settings].
Under [Function mode] select [Import e-mail settings and contacts]. Select the device that stores the data in [Data position].