Overview & Concepts
SQL Database Integration in EasyBuilder Pro allows an HMI to store and retrieve data from an external SQL database. By connecting to a database server over the network, the HMI can write operational data such as process values, production counts, or event records directly to a structured database table. This enables long-term storage and analysis of system data outside of the HMI device.
To use SQL integration, the HMI must be configured with the database server connection details and the table structure where the data will be stored. The HMI then sends data entries to the database as records according to the configured logging or data transfer settings.
Typical database integration tasks include:
- Writing process data or production results to database tables
- Storing historical records for reporting or analysis
- Allowing external systems to access HMI-collected data
By using a SQL database, data collected by the HMI can be stored centrally and accessed by other software systems such as reporting tools, analytics platforms, or enterprise applications. This allows machine or process data to be integrated into broader monitoring and data management systems.

Implementation: Database Server Object
EasyBuilder Pro offers a Database Server Object, which enables connection with a MySQL or MS SQL database server. This allows users to send data or event log information from the HMI to the database, or to use SQL Queries to access data from the database. Prior to creating or viewing an SQL Query Object, the Database Server Object must first be created and configured.
Configuration
Click the Database Server icon on the toolbar to create a Database Server object. Or, click [Data/History] » [Database Server] in the menu.
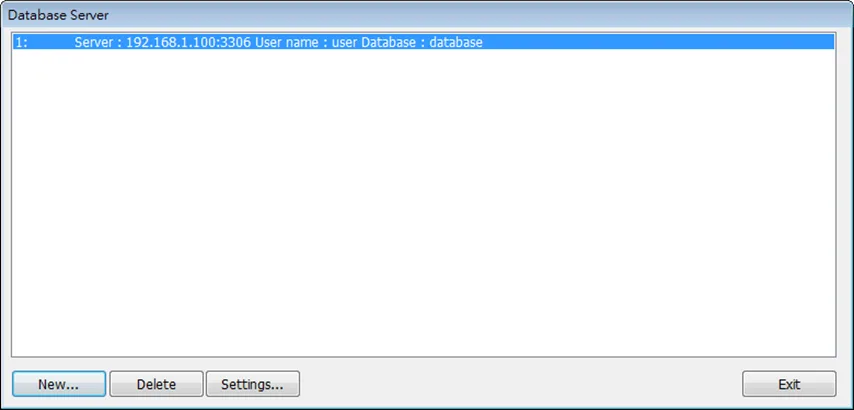
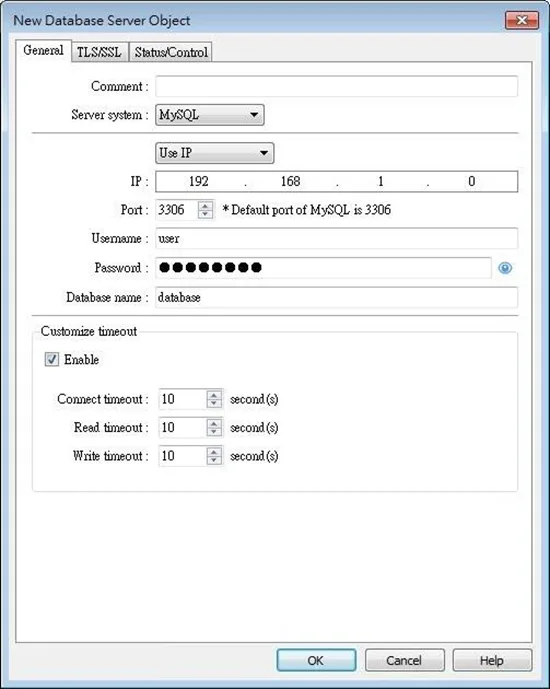
General Tab
| Setting | Description |
|---|---|
| Server system | Supported server systems: MySQL, MS SQL Server |
| IP | Enter the IP address of the database. |
| Use domain name | Supports designating a server using a domain name. |
| Use server name | This option is only available when the selected server system is MS SQL Server. An instance stands for a communication port number, and the port number can be used to identify multiple database servers on the same computer. A server name can be in one of the following formats. • <Computer name><Instance name> • <Computer name> (Connect to Default Instance : MSSQLSERVER) • <IP address><Instance name> • <IP address> (Connect to Default Instance : MSSQLSERVER) |
| Port | Enter the port number of the database. |
| Username | Enter the username for connecting the database. The maximum is 32 words. |
| Password | Enter the password for connecting the database. The maximum is 32 words. |
| Database name | Enter the name of the database for collecting historical data. |
| Customize timeout | Timeouts for the following operations can be customized. Connect timeout The timeout for connection attempts. Connection attempts will be terminated when the timeout is reached. Read timeout The timeout for read operations. Write timeout The timeout for write operations. |
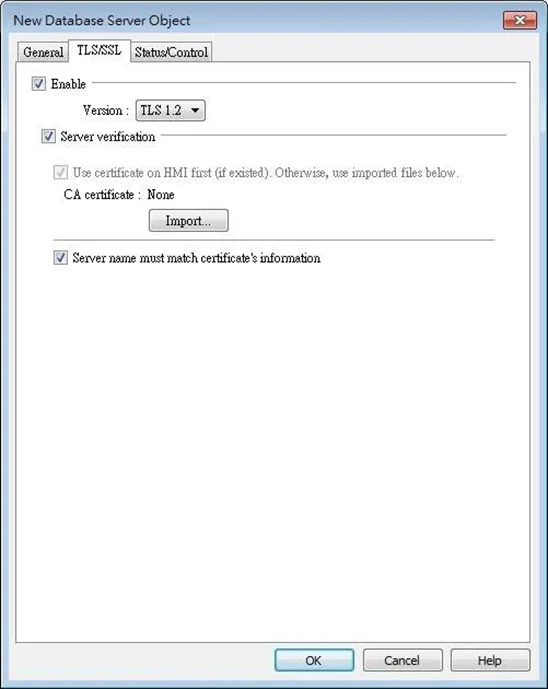
TLS/SSL Tab
| Setting | Description |
|---|---|
| Enable | Enable TLS/SSL security. TLS version can be selected from: TLS 1.0, TLS 1.1, and TLS 1.2. |
| Server verification | Enable Verify whether the server certificate is signed by CA (certificate authority) certificate. Server certificate is sent from server during connection. Server name must match certificate’s information Verify whether the server’s domain name or IP matches the records in the server certificate. Domain name and IP records are stored in Subject Alternative Name of the certificate. |
Status/Control Tab
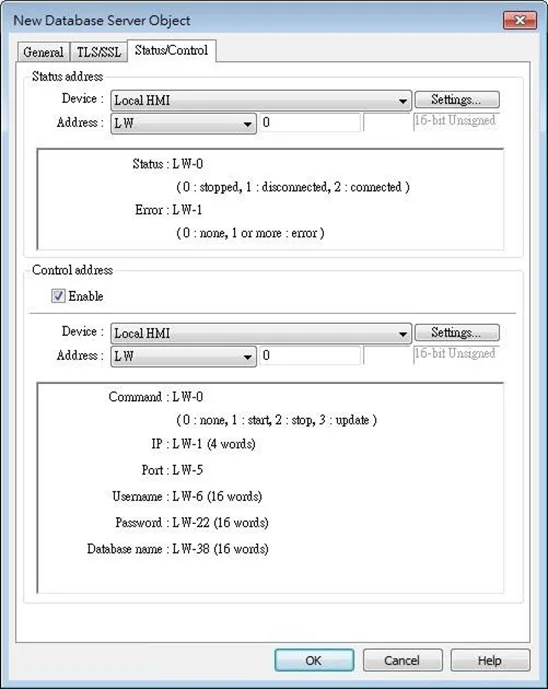
| Setting | Description |
|---|---|
| Status address | LW-n: Displays the connection status of Database Server. Value – Description 0 – Not attempting to connect to database. 1 – Failed to connect to database. 2 – Connection succeeded. LW-n+1: Error indicator. Value – Description 0 – No error. 1 – Unknown error. 2 – Failed to connect to database. 3 – Database blocks the unauthorized connection. 4 – Incorrect database name. 5 – Invalid domain name. 6 – Exceeded connection limit. |
| Control address | LW-n: Controls the operation of Database Server. Value – Description 0 – Ready 1 – Start 2 – Stop 3 – Update LW-n+1: Sets the IP address of the database. LW-n+5: Sets the port number of the database. LW-n+6: Sets the username for connecting database. LW-n+22: Sets the password for connecting database. LW-n+38: Sets the name of the database for collecting historical data. |
Notes:
- If sampled data is successfully synchronized to the SQL database, three tables will be generated in the database, and the sampled data is saved in *_data table.
| Table | Description |
|---|---|
| <HMI NAME> <DATALOG NAME>_data | Saves data sampling |
| <HMI NAME> <DATALOG NAME>_data_format | System folder |
| <HMI NAME> <DATALOG NAME>_data_section | System folder |
- When synchronizing event log, the three tables generated in the database are listed as the following table, and the event log is saved in *_event table.
| Table | Description |
|---|---|
| <HMI NAME>_event | Saves event log |
| <HMI NAME>_event_log | System folder |
| <HMI NAME>_event_update_time | System folder |
- If the content of data sampling / event log, such as data format or event message, is changed and downloaded to HMI, please delete the tables listed above first, and then the new content will thus be effective.
- Azure SQL Server is supported. To use Azure SQL Server, select MS SQL as server system and use domain name. Azure SQL Server has firewall settings, please add the client into whitelist, and see how to configure by opening the link below:
Example
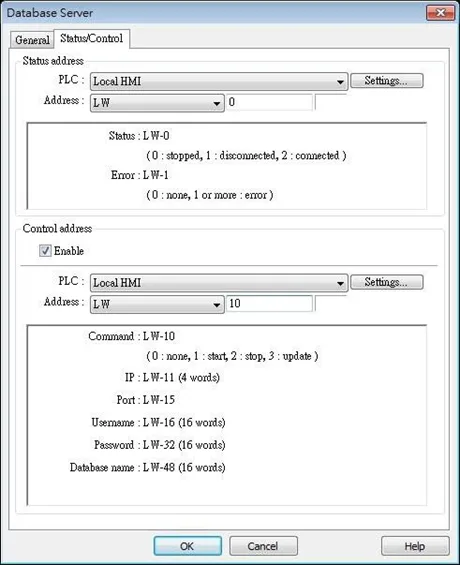
Create a Database Server object, set Status Address to LW-0, and Control Address to LW-10.
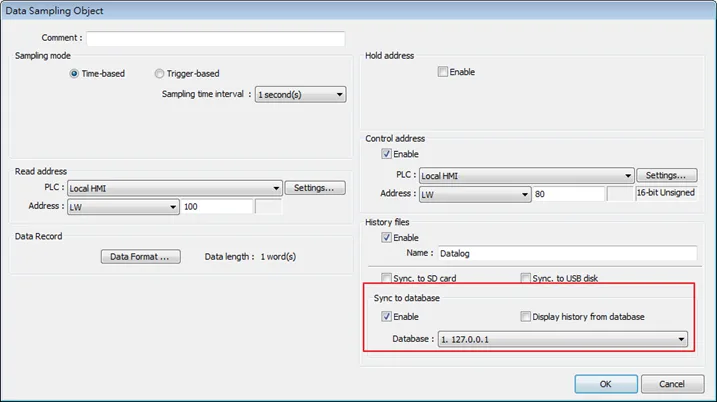
Create a Data Sampling object, in [Sync. to database] group box select [Enable], and set Control Address to LW-80, to update or clear HMI historical data. For information on creating a Data Sampling Object, visit the Data Sampling / Data Logging & Trending page.
If the database is successfully connected, the status indicator LW-0 displays 2 (connection succeeded), and the error indicator LW-10 displays 0 (no error).
Write 2 in LW-80 (sync. data). Open SQL database, the data can be found in table <HMI NAME>_<DATALOG NAME>_data.


Implementation: SQL Query
SQL Query can exchange data with SQL database. Before enabling SQL Query, please configure Database Server.
General Tab
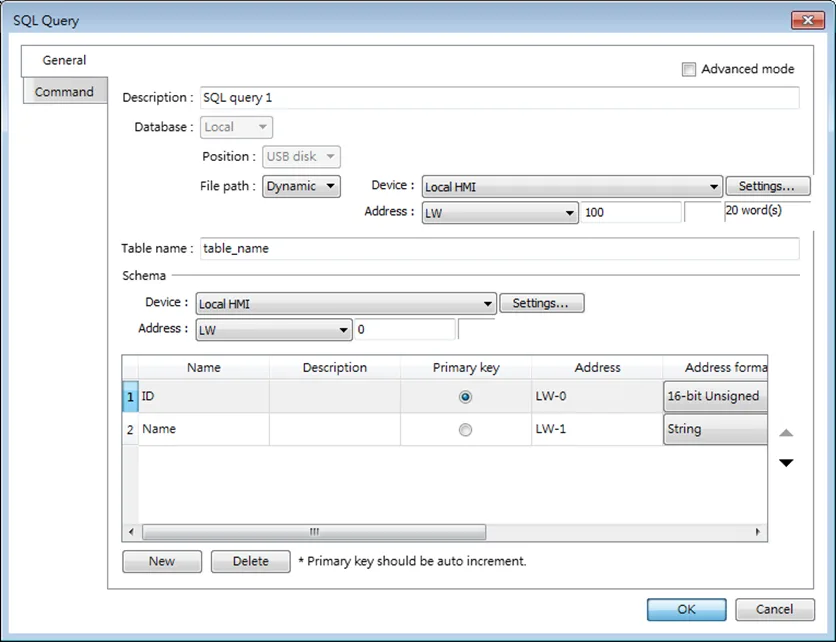
| Setting | Description |
|---|---|
| Advanced Mode | Without [Advanced Mode] selected: Click [New] to add a new row or click [Import from server] to import an existing database. With [Advanced Mode] selected: Manually enter syntax in Command tab to control MySQL/MS SQL database. Please note that returning from Advanced Mode to General Mode is not possible. |
| Description | User’s description about this query. |
| Database | Select the source database to read from. Local: The source database is the SQLite database stored in a USB disk or SD card attached to HMI. Remote: The source database is the designated Database Server. |
| File path | Use [Static] or [Dynamic] directory for a local database. When [Static] is selected, please enter the directory in this dialog box. When [Dynamic] is selected, please designate an address as the data source for the file path. |
| Table name | Enter the name of this query table. |
| Schema | The data read from database will be filled into the corresponding address specified in the schema. Please manually set Address Format after reading data. |
Notes:
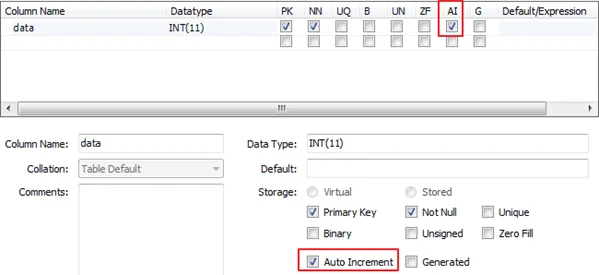
- A Primary Key should contain only numeric values.
- In MySQL, Auto Increment must be enabled for Primary Key.
Command Tab
| Setting | Description |
|---|---|
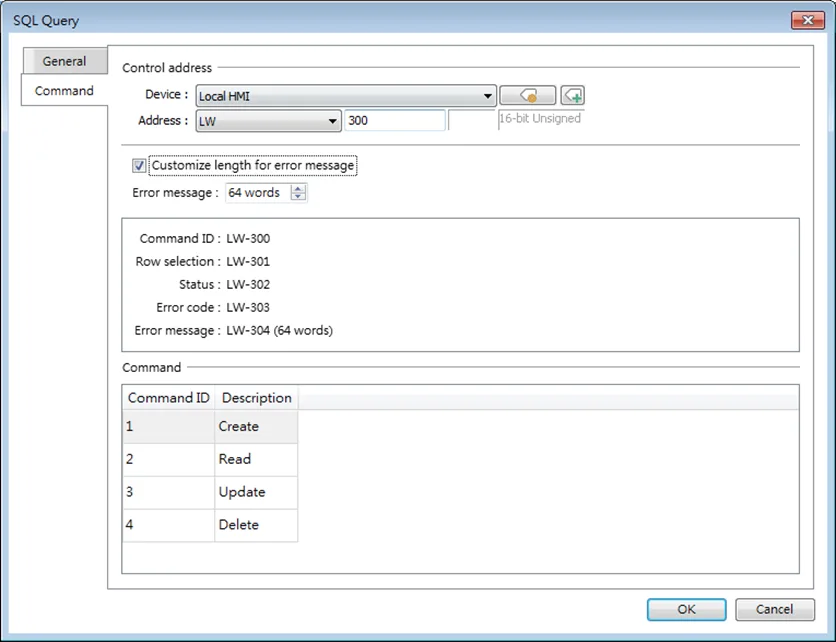
| Control address | Designate five consecutive registers to execute SQL commands and show results. Of the results, the length of error message can be customized. |
| Command | In standard mode (without checking Advanced mode box in General tab), the four basic commands of SQL (Create, Read, Update, and Delete) and their command ID are shown. |
Advanced Mode
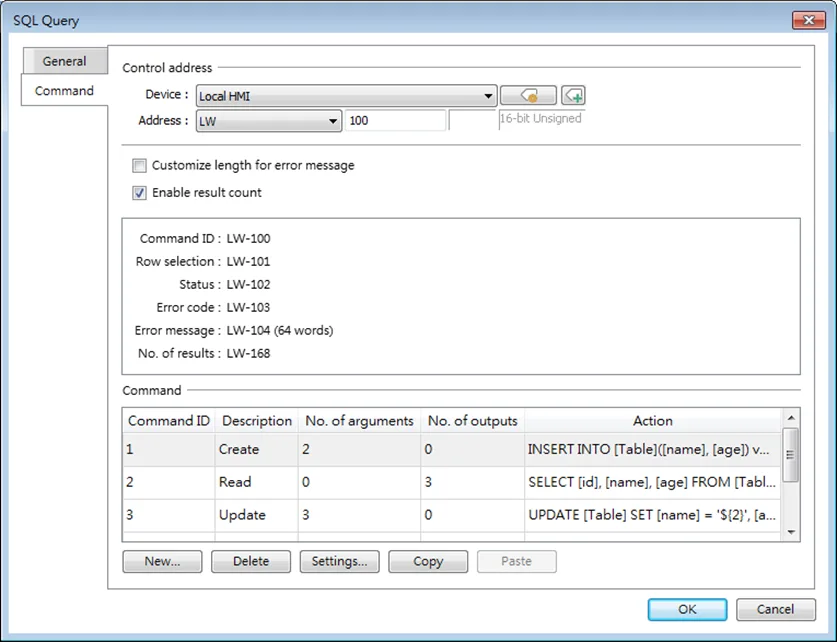
In the Command table in Advanced Mode, [No. of arguments], [No. of outputs], and [Action] columns can be found. Outputting multiple results to consecutive addresses at a time is possible.
| Setting | Description |
|---|---|
| Control address | Specify the ID number used to give this command. |
| Row selection | Specify a row. |
| Status | Displays the execution status. |
| Error code | Displays the execution result. |
| Error message | Displays the error message sent from database server. The default length of the error message is 64 words. Customizing the length of the error message is also possible, and the upper limit is 200 words. |
| No. of results | Displays the number of output results. |
| New / Delete / Settings / Copy | Add, delete, set, or copy a SQL Query command. |
Query Tab
| Setting | Description |
|---|---|
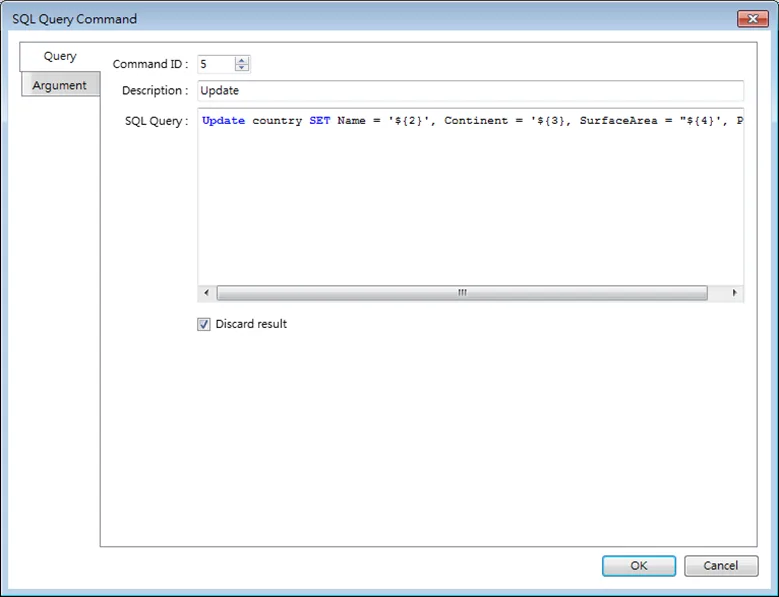
| Command ID | Specify the ID number used to give this command. |
| Description | Enter the description of this command. |
| SQL Query | Enter the syntax for this command. An argument should be enclosed in braces: ${argument no.} |
| Discard result | With this checkbox selected, the result of executing this command will not be shown in SQL Query Result Viewer object. This checkbox can be selected for commands that are done directly to the database without the need for returning a result, such as INSERT INTO, UPDATE, DELETE…etc. |
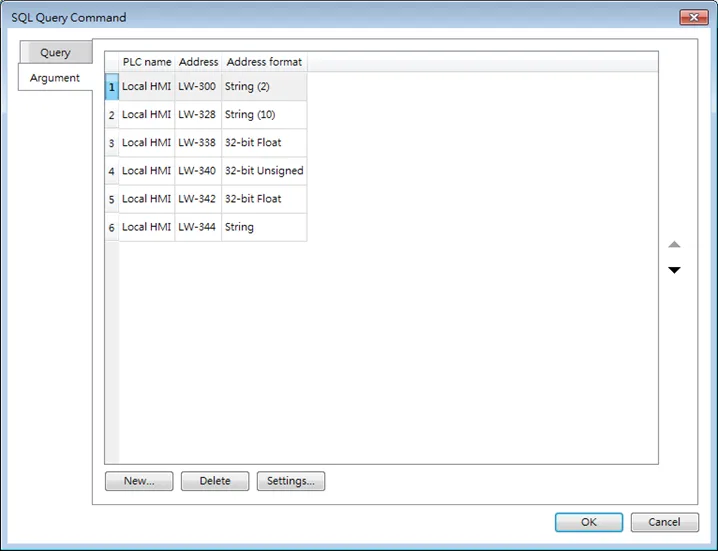
Argument Tab
If argument is used in the syntax of a command in [Query] tab, the system will refer to the address specified in this tab according to the argument number enclosed in ${argument no.}.
Output Tab
When performing a database query in Advanced Mode, the query results will be sequentially stored at the addresses specified on the [Output] settings page. If the [Multiple results] option is selected, the system will output the query results in bulk to a series of consecutive addresses.
[Multiple Results] Not Selected
![Output tab with [multiple results] not selected: query results will be sequentially stored at the specified addresses.](https://media.maplesystems.com/wp-content/uploads/2026/04/image-753.webp "Output tab with multiple results not selected")
[Multiple Results] Selected
![Output tab with [multiple results] selected: the query results will be output in bulk to a series of consecutive addresses.](https://media.maplesystems.com/wp-content/uploads/2026/04/image-754.webp "Output tab with multiple results selected")
| Setting | Description |
|---|---|
| Bulk address | The starting output address for the database query results. |
| Maximum number of results | The [Maximum number of results] can limit the number of outputs from the database query, with an upper limit of 1000 results. The fields included in each query result, and their address format and word length need to be specified. Note that [Maximum number of results] x [No. of outputs] cannot exceed 10000, meaning a maximum of 10000 addresses can be used for output. For example, if the maximum number of results is set to 100, and the query returns 300 results: When [Row selection] is set to 20, the 20th~119th results will be output to the bulk addresses. When [Row selection] is set to 260, the 260th~299th results will be output to the bulk addresses. |
| Show the addresses of the Nth results | Shows the output address of the Nth result in the Address column of the table below this setting. If the address of the output of the first result is LW-200 and the number of words in a result is OFFSET, the address of the output of the Nth result is LW-200+OFFSET*N. |
Status
| Value | Meaning |
|---|---|
| 0 | Normal |
| 1 | Query result exceeds 1000 records. Using LIMIT clause can constrain the number of rows in one page. |
Error Code
| Error Code | Meaning |
|---|---|
| 0 | No mistakes |
| 1 | Unknown error |
| 2 | Invalid command |
| 3 | Database Server is not connected yet |
| 4 | Argument cannot be read |
| 5 | Cannot write and output |
| 6 | Incorrect number of arguments |
| 7 | Error in MySQL, please read error message |
| 8 | Unsupported datatype |
| 9 | Number of columns exceeds the limit |
| 10 | Number of rows exceeds the limit |
| 11 | Unable to read local database directory |
| 12 | Name of local database does not exist |
| 13 | Internal error |
Converting Datatype
Converting datatype as shown in the following table will take place after reading MySQL database. If conversion cannot run properly, error code 5 will show. For example, when converting MySQL’s INT into EasyBuilder Pro’s 16-bit Unsigned, if the value exceeds the limit of 16-bit Unsigned, error code 5 will show.
| MySQL Data Format | EasyBuilder Pro Datatype |
|---|---|
| TINYINT | 16/32-bit BCD |
| SMALLINT | 16/32-bit HEX |
| MEDIUMINT | 16/32-bit Binary |
| INT | 16/32-bit Signed |
| BIGINT, BIT | 16/32-bit Unsigned |
| FLOAT, DOUBLE, DECIMAL | 32-bit Float |
| DATETIME, CHAR, BINARY, VARCHAR, VARBINARY, TINYBLOB, TINYTEXT, BLOB, TEXT, MEDIUMBLOB, MEDIUMTEXT, LONGBLOB, LONGTEXT | String |

Implementation: SQL Query Result Viewer
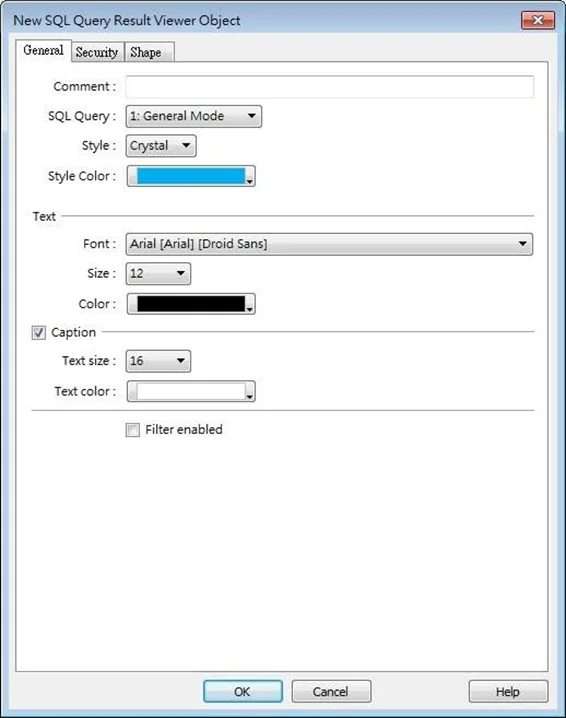
This object shows the results obtained by running the SQL Query operation.
Click on [Data/History] » [SQL Query Result Viewer] to open the settings dialog box. Configure the parameters and click OK; a SQL Query Result Viewer will be created.
General Tab