cMT Series HMIs and Gateways offer additional advanced MQTT features including support for Amazon AWS Things and Device Shadows, as well as support for the Sparkplug B payload specification.
AWS IoT
Overview of AWS IoT
AWS (Amazon Web Service) is a cloud platform widely used in the market, and AWS IoT (Internet of Things) supports the MQTT protocol. EasyBuilder Pro now supports AWS IoT service. Apart from using AWS IoT as a broker in the publish-subscribe mode, users can also create Amazon Things and Device Shadows offered by AWS IoT to make the most of MQTT.
Notes on AWS IIOT:
- The maximum number of layers in a topic is 8 (iot-2/type equals to 2 layers).
- Authentication via username and password in the General tab is not supported, you must use TLS/SSL.
- AWS supports only QoS 0 and QoS 1.
- Retaining the latest message in the MQTT broker is not supported.
This section goes through the steps to use AWS IoT and create a Thing and Shadow in EasyBuilder Pro.
AWS is a cloud platform; therefore, the settings are all configured on the web. You must sign up on the Amazon website before hosting an MQTT Broker. Amazon adds features to AWS frequently. The screenshots below may not be entirely accurate at the time of reading, and feature names may have changed.
Hosting an MQTT Broker
Follow these steps to host an MQTT Broker on AWS.
Remember, Amazon adds features to AWS frequently. The screenshots below may not be entirely accurate at the time of reading, and feature names may have changed.
Instructions: Hosting an MQTT Broker
Visit AWS page
Visit Amazon Web Services website at: https://aws.amazon.comSigh Up and Sign In
Sign up and sign in. Amazon offers a one year free evaluation trial for first time users.
Browse for IoT Core
After sign in, browse for IoT Core.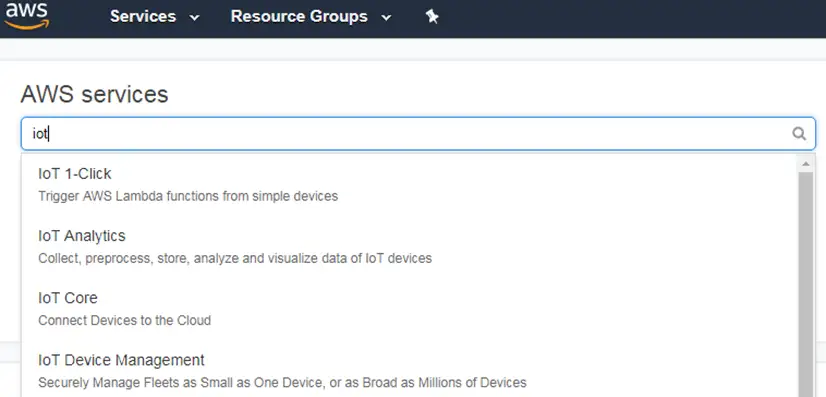
Click ‘Get Started’
Click [Get started] to enter user interface.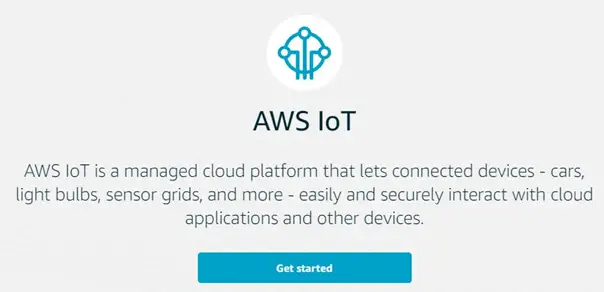
Create Policy
Create a Policy and a Certificate. Click [Secure] » [Policies] and then click [Create a policy].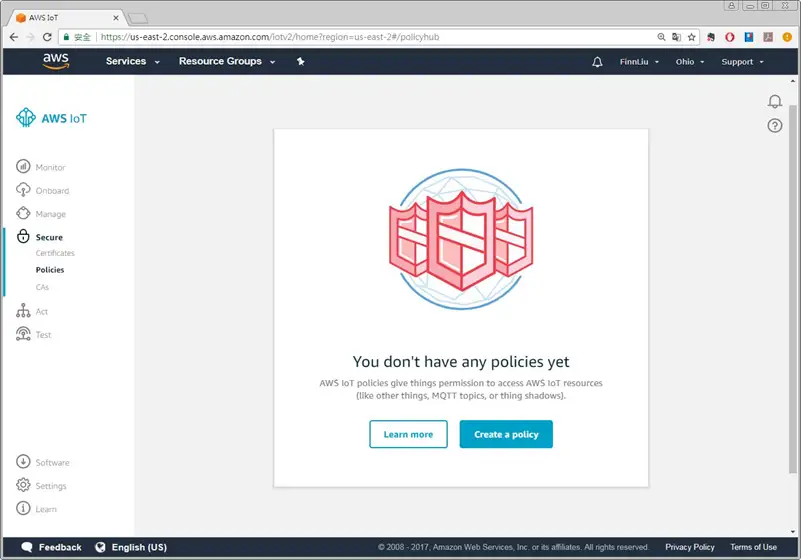
Configure Policy Settings
This page is for defining actions that can be performed by a resource. You may use the settings in the screenshot below or set your own. Click [Create] when finish.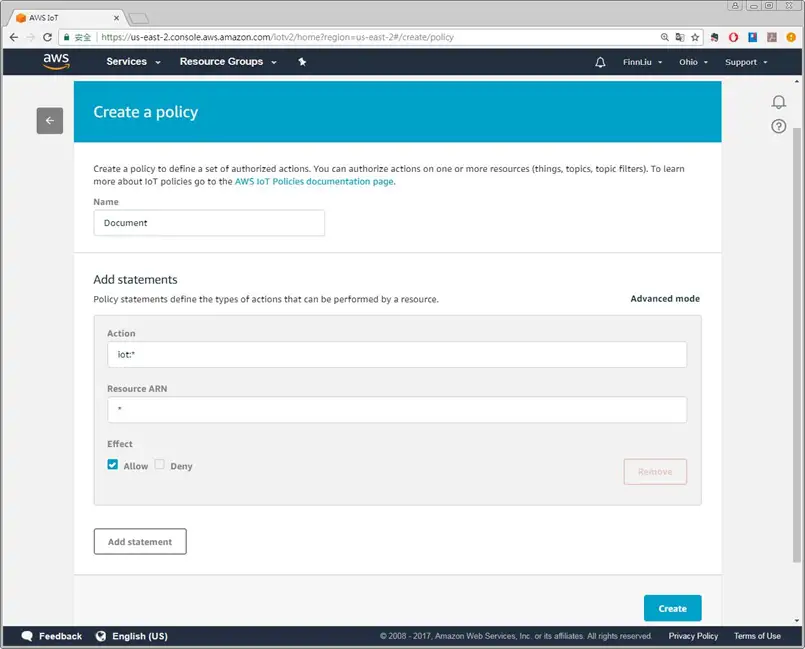
Create Certificate
Click [Secure] » [Certificate] and then click [Create a certificate].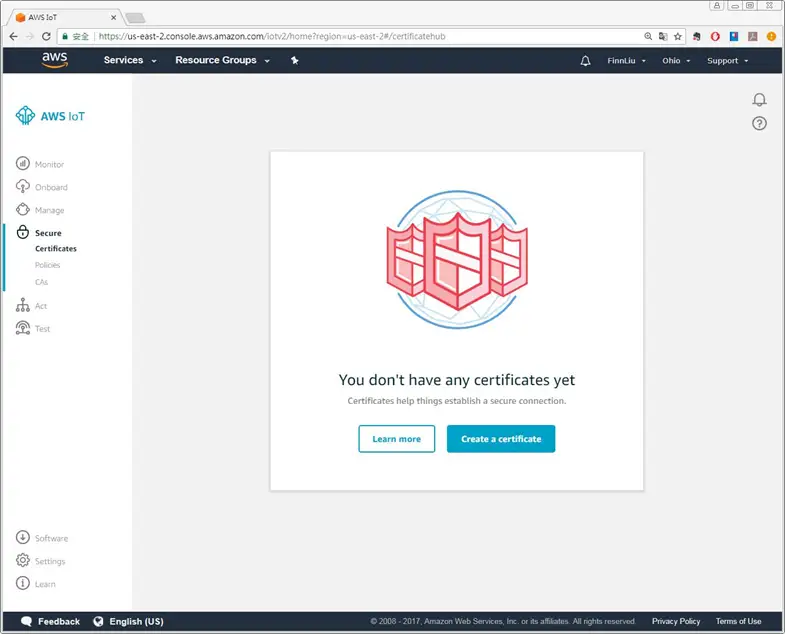
Click the (Create) button
Click [Create certificate] near [One-click certificate creation].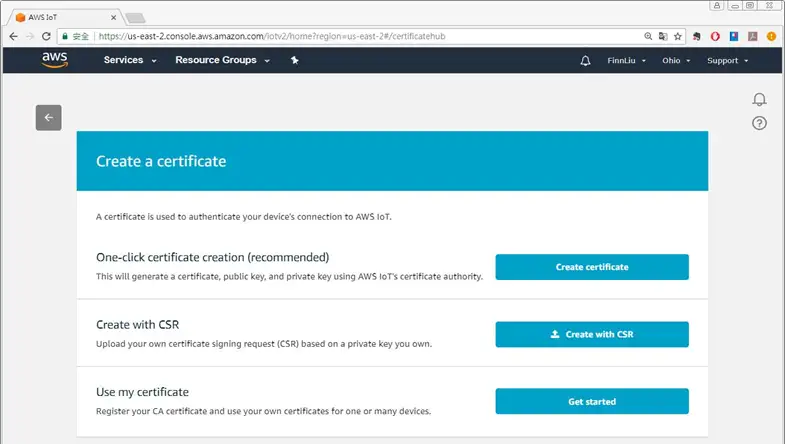
Attach the Policy after Certificate Creation
After saving the four download files, click [Activate] » [Attach a policy].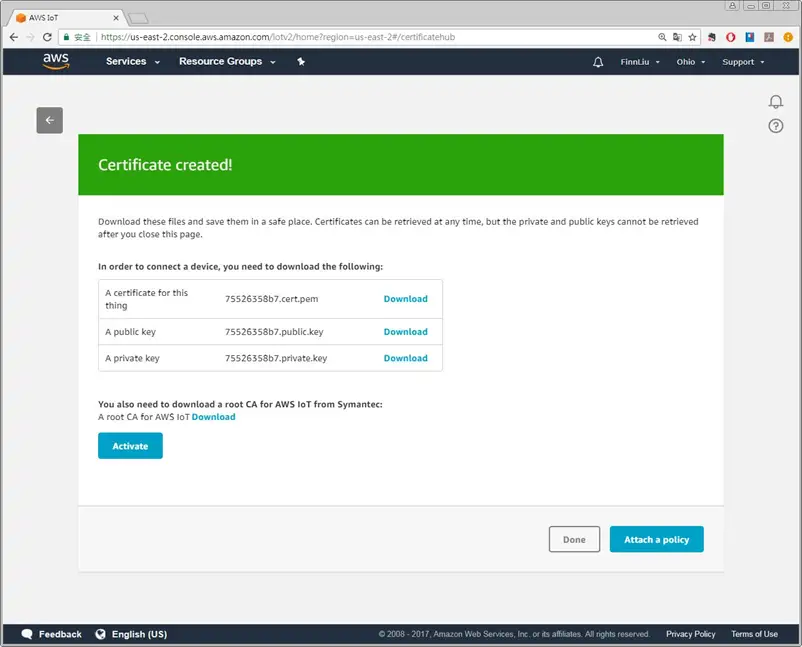
Select the policy created previously
Select the policy created in the preceding steps and then click [Done].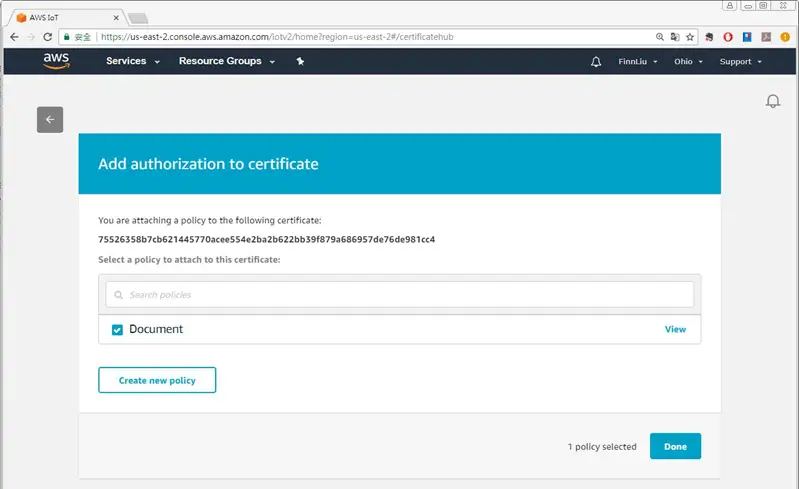
Success Box Pops up
Security setting is done successfully when the following box shows.
Copy the link to your newly created AWS Broker
Click [Settings]. The URL marked in the red frame below is the domain name of your AWS IoT broker, and will be used when setting up the MQTT object in EasyBuilder Pro.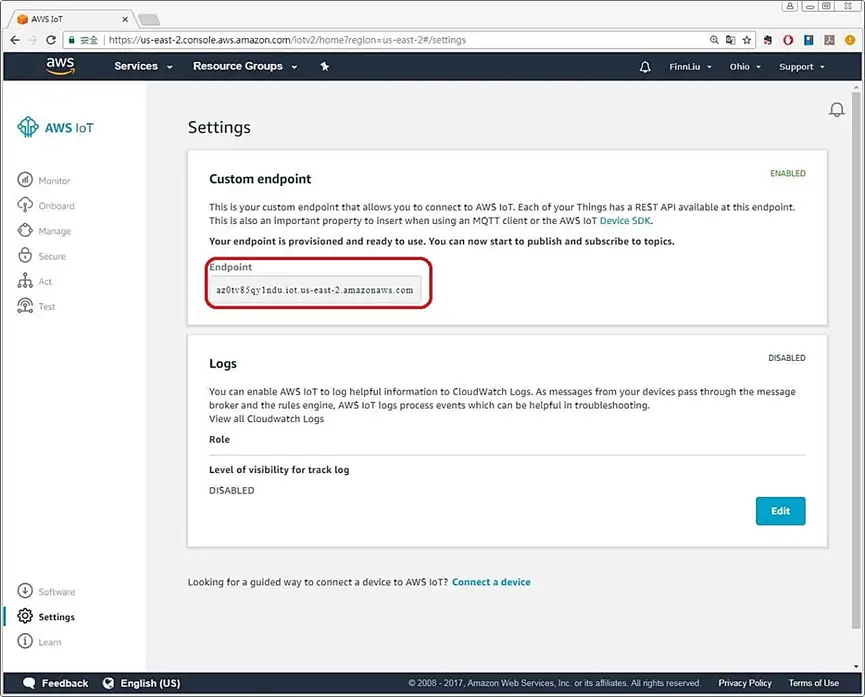
EasyBuilder Pro MQTT Settings
After hosting an AWS MQTT Broker, launch EasyBuilder Pro and open the MQTT settings window.
Configure the MQTT Server Object
Here is how our MQTT Server Object will be configured in order to interface with the AWS broker we just created.
Instructions: Configure the MQTT Server Object
General Tab Settings
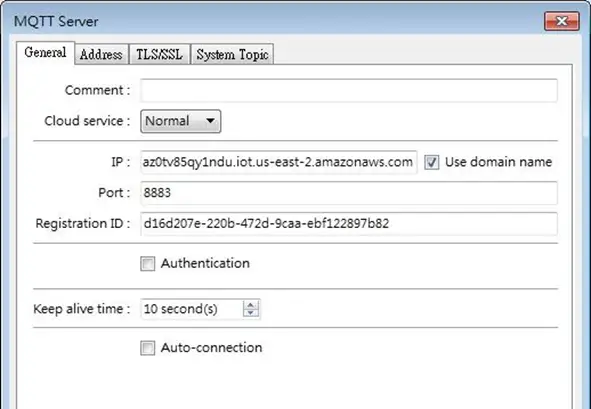
In the General tab, select [Normal] as cloud service to use publish-subscribe mode, or select [AWS IoT] to use Thing/Device Shadow mode.
Use the URL obtained above for the domain name, and use port 8883.
Address Tab Settings
Configure the Status, Buffer, and Control addresses as normal.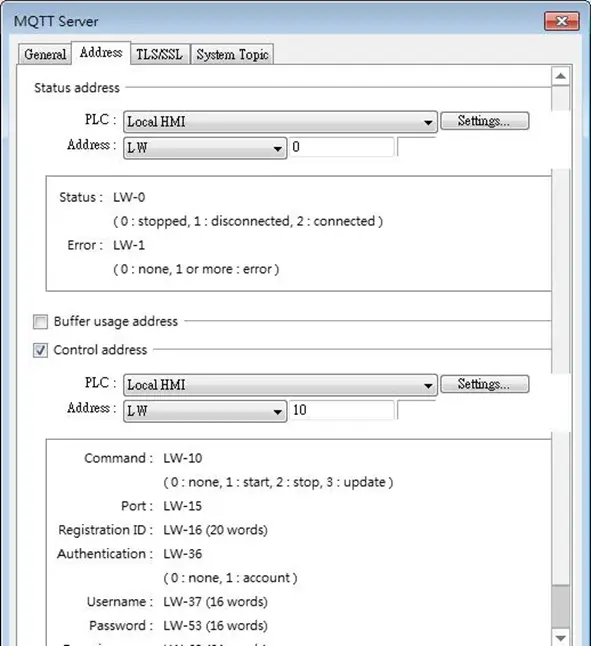
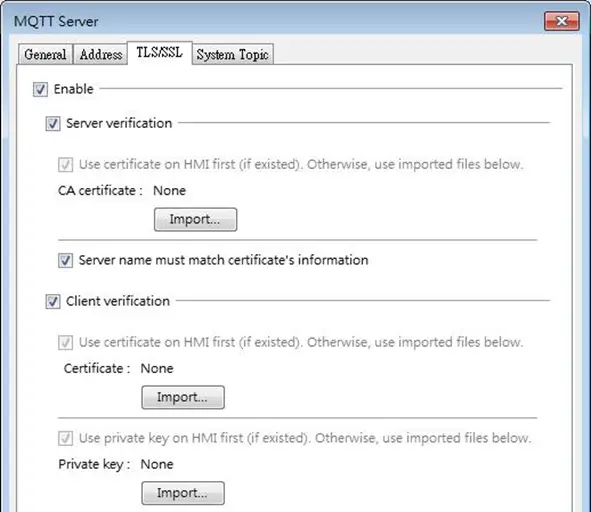
TLS/SSL Tab Settings
In the TLS/SSL tab, import the files generated when creating the AWS certificate.
Server verification, CA certificate: Import a .pem file.
Client verification, Certificate: Import a .crt file. (certificate.pem.crt)
Client verification, Private key: Import a .key file (private.pem.key)
System Topic Tab Settings
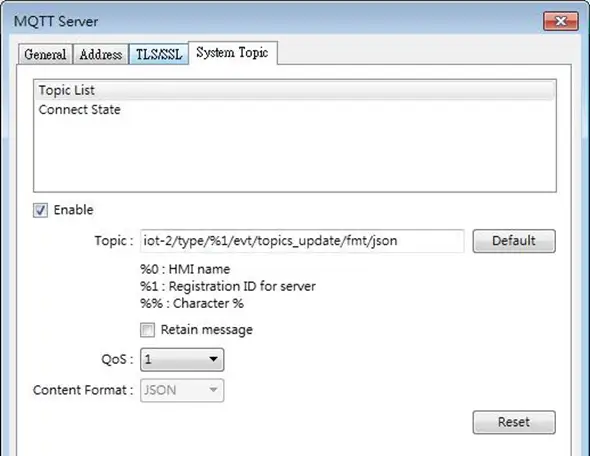
The System Topic tab includes Topic List and Connection State topics that cMT device will automatically send once it connects to broker. Be sure to conform to AWS restriction by changing the [QoS] and unchecking [Retain message] for each topic.Restrictions of using AWS IoT as MQTT Broker:
Only QoS 0 and QoS 1 are available.
Retain message is not supported
The maximum number of layers is 8.
Configure Topic Publisher and Topic Subscriber Settings
If using AWS as a [Normal] cloud service broker, configure the Topic Publisher and Topic Subscriber as described earlier in this manual.If using Things/Device Shadows ([AWS IoT] selected for cloud service on the General tab), see the next section for Publish/Subscribe settings.
Thing and Device Shadow
With AWS IoT, Publisher->Broker-> Subscribe is no longer the only path that data is accessed over MQTT. By introducing the Device Shadow service, a Thing (a device, app…etc) can interact with cloud applications and other devices connected to AWS IoT. The device shadow (sometimes referred to as a thing shadow) is used as a communication layer between your mobile/cloud application and the devices (HMIs) connected to AWS IoT.
The shadow is a persistent, virtual representation of the HMI or Gateway. Because it always has a point-in-time view of the state of your device, it’s easy to write applications that interact with your devices through device shadows. A Shadow can be maintained for each Thing (device/HMI) connected to AWS IoT. The Shadow can be used to get/set the state of a Thing over MQTT, regardless of whether the Thing is connected to the Internet.
Create a Thing and Device Shadow
Follow the below steps to create a Thing connected to AWS.
Instructions: Create a Thing and Device Shadow
Go to the Things menu
In your AWS IoT Dashboard, click [Manage] » [Things] » [Register a thing].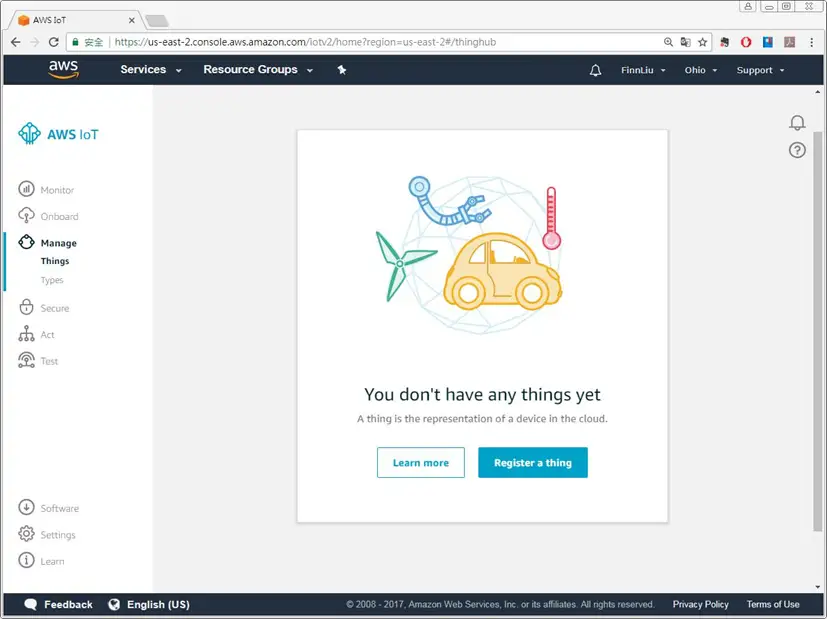
Create a Thing
Select [Create a single thing] and enter the name for the Thing. The additional Thing options can be ignored. Click [Next].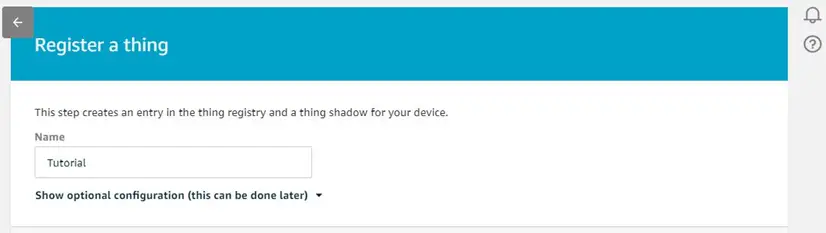
Create without Certificate
Select [Create thing without certificate]. The Thing is created.We will be referencing the certificate created earlier at the next step.
Select the previously-created certificate
Navigate to [Secure] » [Certificates] and select the certificate created previously.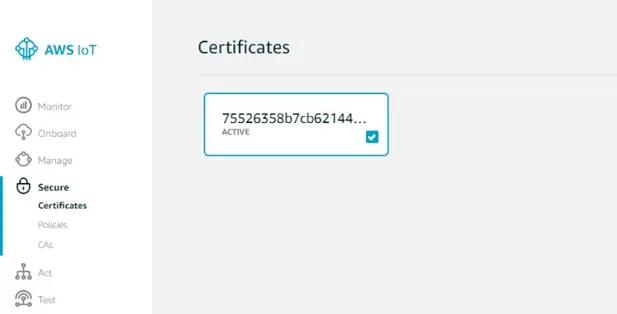
Attach Thing
Select [Attach thing] from the [Actions] menu.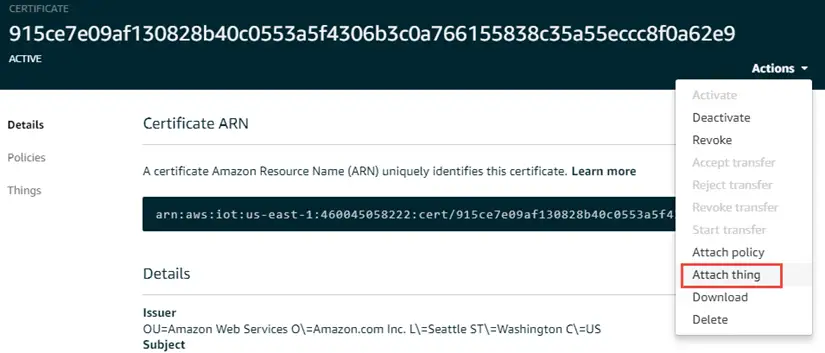
Select the Thing you created in Step 3
Select the Thing created previously and click [Attach] to finish.We just attached the certificate we created earlier to the Thing we just crated in Step 3.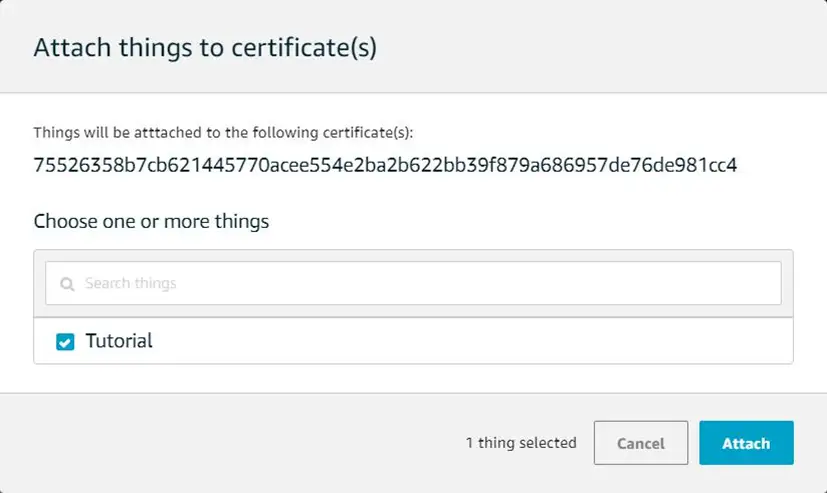
EBPro Configuration: AWS IOT as Cloud Service
In EasyBuilder Pro, make sure that [AWS IoT] is selected as the cloud service option in the MQTT Server settings window.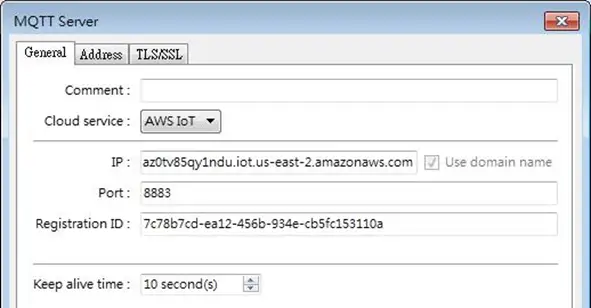
Add a Device
Click [New} to add a device. We’ll add our Thing here.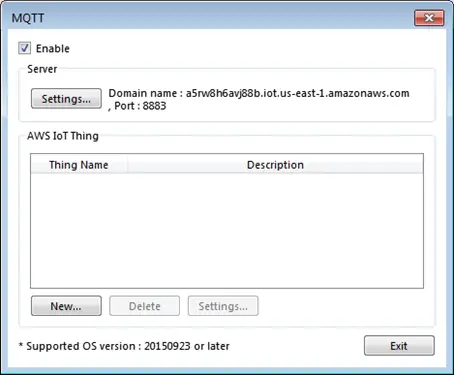
Configure General Tab Properties
Enter the Thing name and set a minimum time between publishes. Only QoS 0 and 1 are available.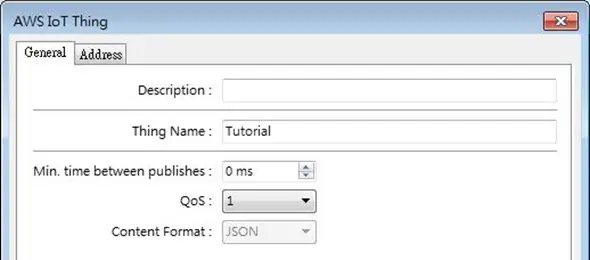
Configure Address Tab Properties
In the Address tab, click [New] and select addresses for “reported” status and “desired” setting.
The arrows “->” and “” indicate the direction in which data is transmitted between the HMI and AWS.
By default, the “reported” data is only sent from the HMI to AWS and “desired” data can be sent in both directions.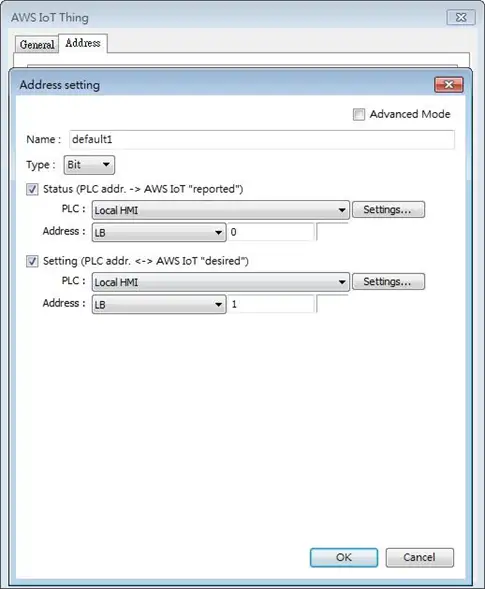
Advanced Mode selection (optional)
If the Advanced Mode checkbox is selected, the Status (reported) and Setting (desired) can use different addresses for each data transmission direction to allow more granular control from AWS.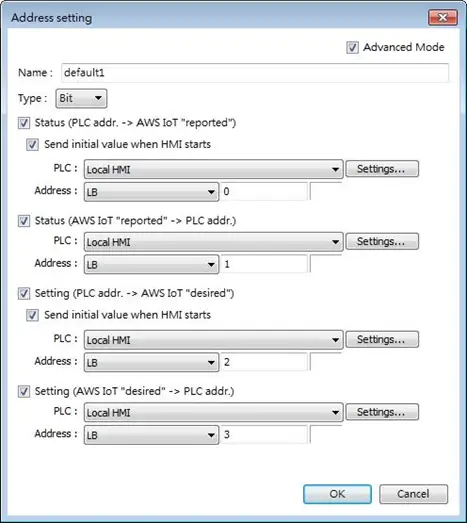
Success!
You should now be able to subscribe and publish to your Thing with the following topics:This information is found in the [Interact] section of the Thing Dashboard.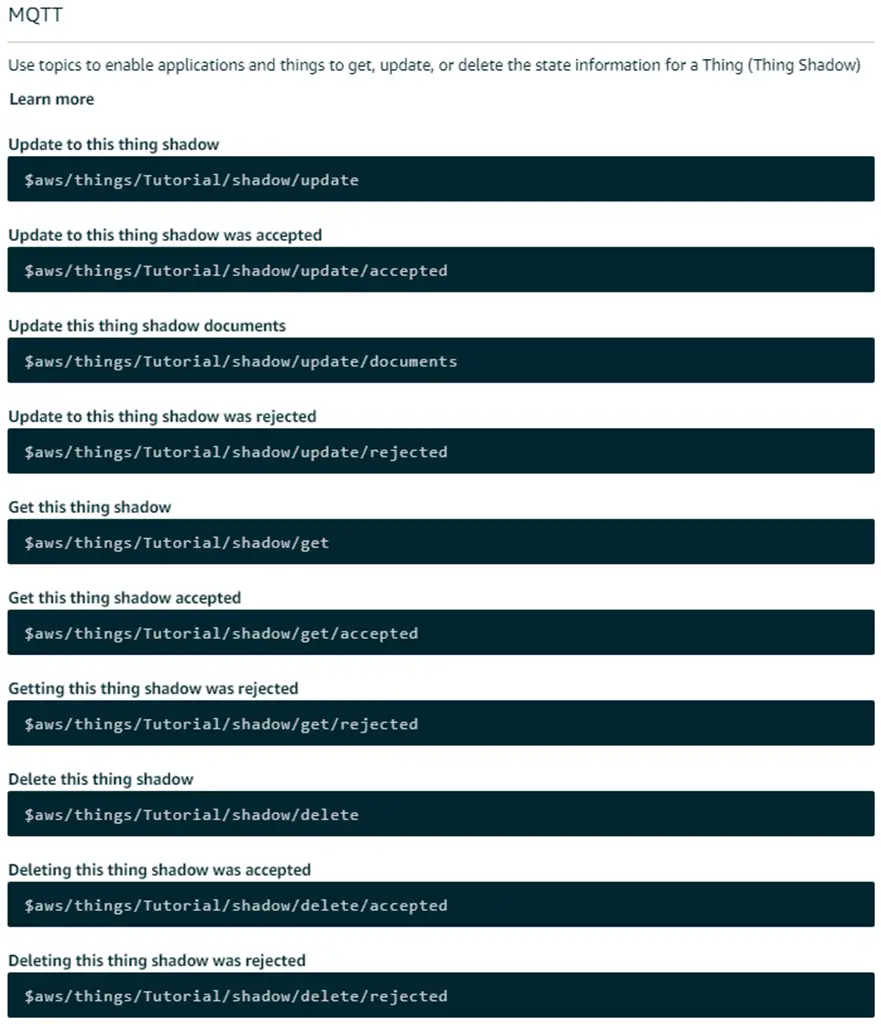
Test within AWS
From the [Test] section of the AWS IoT Dashboard, you should be able to subscribe and publish to topics and interact with your test project.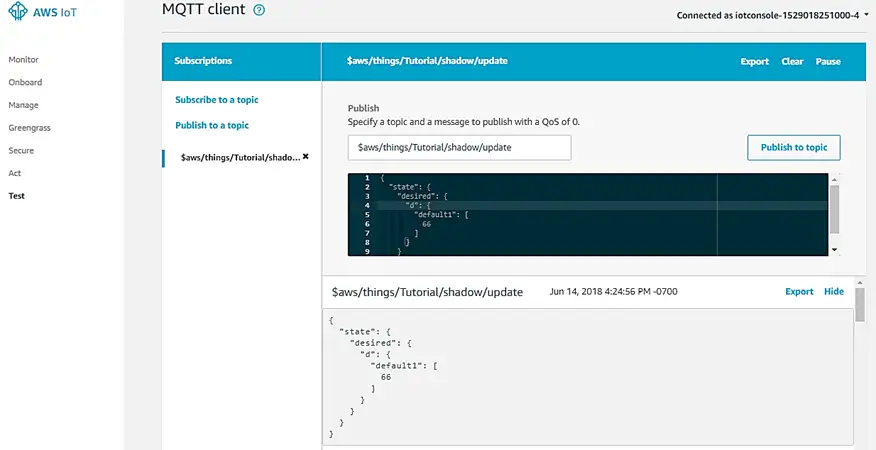
Sparkplug B
Overview of Sparkplug B
Sparkplug is a specification for MQTT enabled devices and applications to send and receive messages in a stateful way. Sparkplug provides a mechanism for ensuring that remote device or application data is current and valid by using device lifecycle messages such as the required birth and last will & testament messages that must be sent to ensure the device lifecycle state and data integrity.
It also is utilized in connecting with the Inductive Automation Ignition Platform utilizing the Cirrus Link MQTT modules. The Sparkplug specification provides the necessary details for any MQTT enabled device to connect to MQTT servers and integrate with zero configuration into Ignition via the Cirrus Link MQTT Engine Module or other Sparkplug supported applications.
Sparkplug B features include:
- Complex data types using templates
- Datasets
- Richer metrics with the ability to add property metadata for each metric
- Metric alias support to maintain rich metric naming while keeping bandwidth usage to a minimum
- Historical data
- File data
The Sparkplug B specification can be found here. Topics are formatted as:
spBv1.0/group_id/message_type/edge_node_id/[device_id]
The following message_type elements are defined for the Sparkplug Topic Namespace:
- NBIRTH – Birth certificate for MQTT EoN nodes.
- NDEATH – Death certificate for MQTT EoN nodes.
- DBIRTH – Birth certificate for Devices.
- DDEATH – Death certificate for Devices.
- NDATA – Node data message.
- DDATA – Device data message.
- NCMD – Node command message.
- DCMD – Device command message.
- STATE – Critical application state message.
EasyBuilder Pro Settings
To configure a Sparkplug B payload, launch EasyBuilder Pro and open the MQTT settings window.
Configure the MQTT Server Object
Follow these steps to configure your MQTT Server Object for a Sparkplug B payload
Instructions: Configure the MQTT Server Object
MQTT Server: General Tab Settings
In the General tab, select [Sparkplug B] for the cloud service. In this example, we will use the test.mosquitto.org public broker.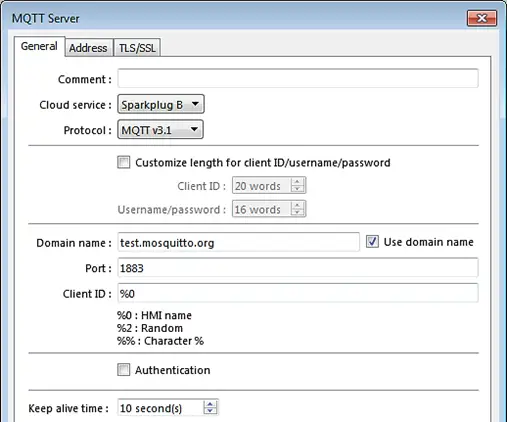
Sparkplug B Dialog: General Tab Settings
Configure the Domain and Sparkplug B general tab information to your desired values.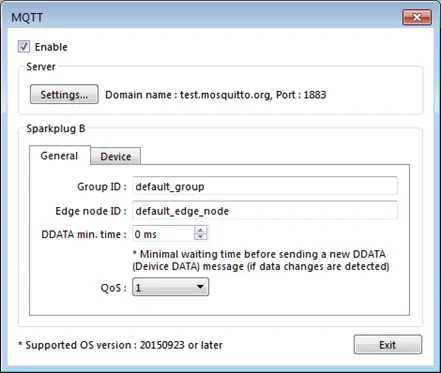
Sparkplug B Device tab
In the Device Tab, this is where we can add new Groups and new Tags for the payload.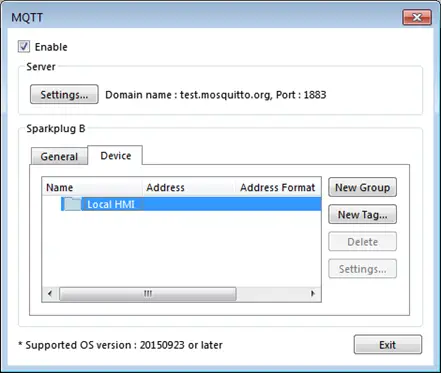
Click ‘New Tag’
In the [Device] tab, click [New Tag] to add data to the payload.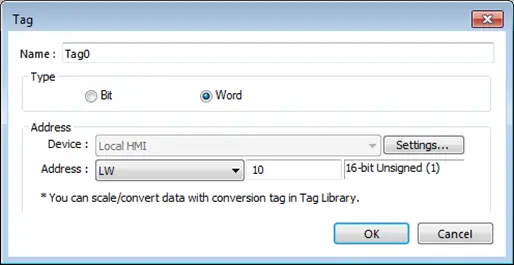
New tag is shown in Device Tab
The Newly Created Tag is now shown in the Device Tab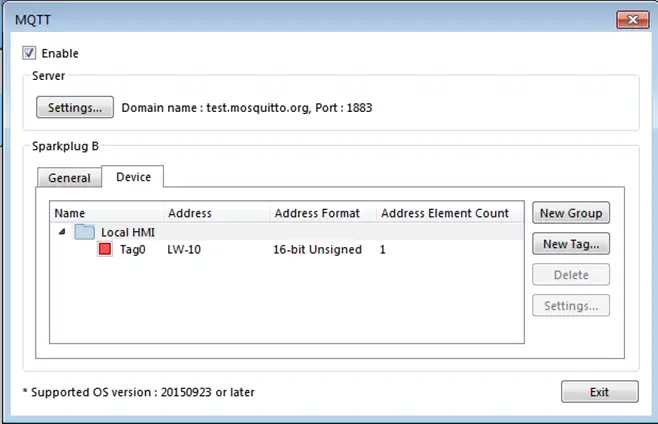
Simulate in EBPro
Add a way to change the specified tag to a screen and run the project in [Online Simulation] mode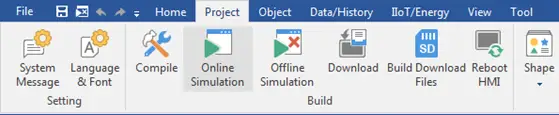
View in MQTT.fx Client
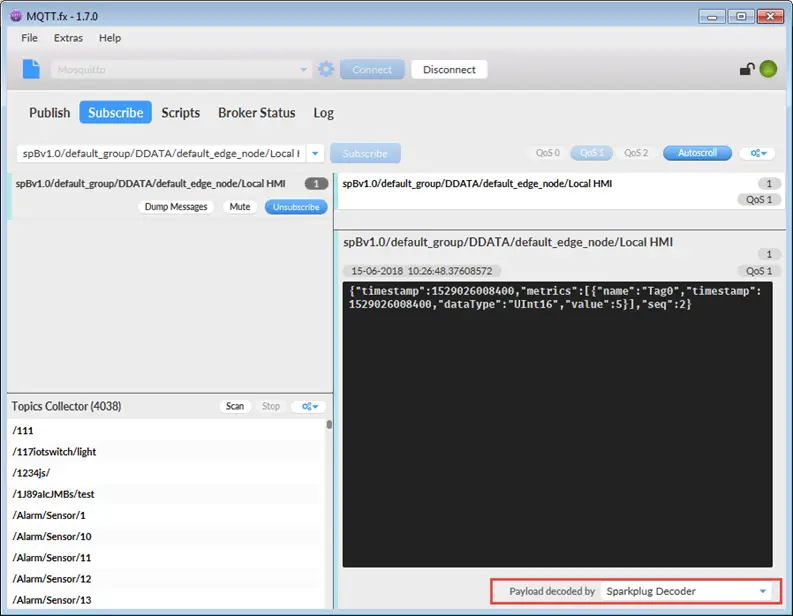
Open the MQTT.fx client program and connect to test.mosquitto.org. The preceding setup results in data being updated on topic [spBv1.0/default_group/DDATA/default_edge_node/Local HMI]. Be sure to set the [Payload decoder] to [Sparkplug Decoder] to view the payload in a readable format.