Overview & Concepts
The Address Tag Library in EasyBuilder Pro provides a centralized location for defining and managing device addresses used within an HMI project. Instead of repeatedly entering device addresses throughout the project, developers can create a tag that represents a specific register and then reference that tag wherever the data is needed. This improves project organization and makes HMI configurations easier to understand and maintain.
Each entry in the Address Tag Library links a tag name to a specific device and register address. The device can be an internal HMI memory area or an external controller connected through a communication driver. Once created, the tag can be used by multiple objects, scripts, or functions throughout the project.
Tags can reference different types of memory sources, including:
- Local HMI memory – Tags can be created for internal HMI registers such as LW (word) or LB (bit) addresses. These tags are commonly used for intermediate calculations, status flags, or internal data storage.
- PLC registers – Tags can reference registers in connected devices, such as Modbus holding registers or other PLC memory locations configured in the device list. This allows the HMI to read or write data from the controller using a descriptive tag name instead of a raw register address.
Typical uses of EasyBuilder Pro’s address tag library include:
- Assigning meaningful names to PLC registers or HMI memory addresses
- Reusing commonly referenced data points across multiple windows
- Simplifying project maintenance by updating a device address in one location
By using descriptive tag names rather than raw addresses, the Address Tag Library helps make projects easier to read, reduces configuration errors, and provides a structured way to manage communication between the HMI and connected devices.
Implementation
Rather than referencing individual memory registers in either the HMI or a PLC, the Address Tag Library allow you to create references to these memory registers for easier lookup later, when configuring objects.
Generally it is recommended to define the commonly used addresses in Address Tag Library when starting to build a project. It not only avoids accidental reuse of addresses but also improves project readability.
Building Address Tag Library
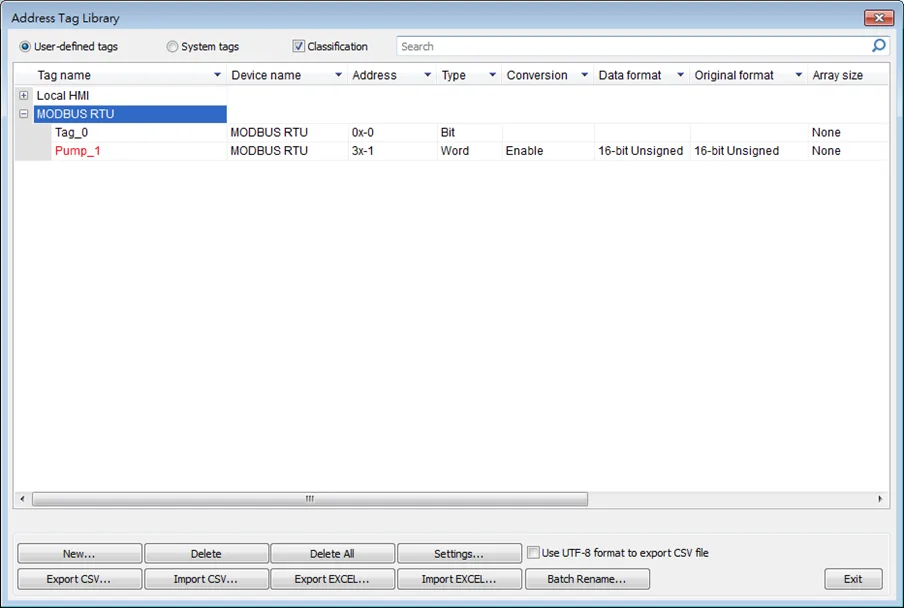
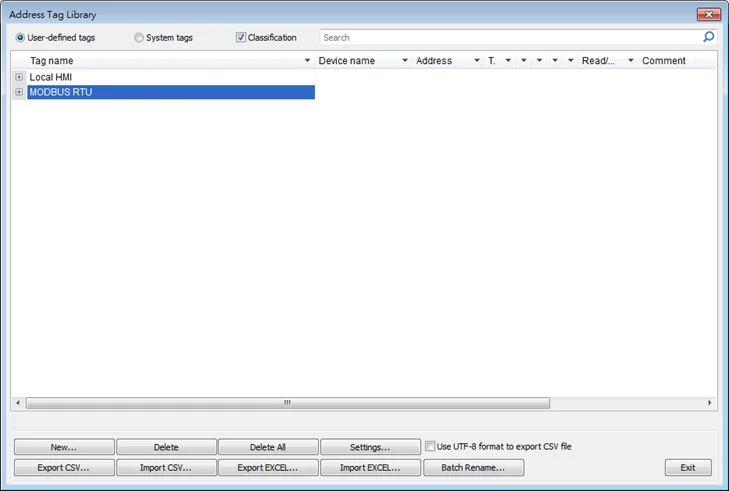
Click [Project] » [Address] on the toolbar and the [Address Tag Library] dialog box appears.
| Setting | Description |
|---|---|
| User-defined tags | Displays user-defined address tags. |
| System tags | Displays system registers. The registers listed cannot be deleted or changed. |
| Classification | With this checkbox selected, the system tags can be classified into categories according to their function. Users may customize classification by editing the system_tag.xml file, found under EasyBuilder Pro installation directory. |
| Search | A key word may be entered in the provided field to search for a specific tag. |
| New | Adds a new address tag. Please see the steps next page. |
| Settings | Sets the selected address tag. |
| Delete All | Deletes all existing address tags. |
| Delete | Deletes the selected address tag. |
| Export CSV | Saves all current address tags as .csv file. Tag names of the tags used in the project file will be displayed in red in Excel. |
| Import CSV | Loads the existing .csv file of address tag to the current project. |
| Export EXCEL | Saves all current address tags as .xls file. |
| Import EXCEL | Loads the existing .xls file of address tag to the current project. |
| Use UTF-8 format to export CSV file | If selected, the .csv file will be exported in UTF-8 format. If not selected, in ANSI format. |
| Batch rename | Rename multiple address tags of a device at a time. |
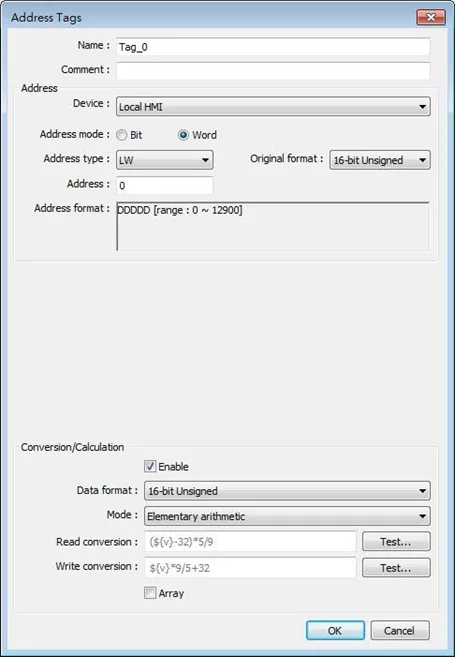
Click [New] and select the relevant properties:
| Setting | Description |
|---|---|
| Name | The name of the address tag. |
| Comment | The information about the address tag. |
| Name | The name of the address tag. |
| Device | As defined in [System Parameter Settings] » [Device list]. |
| Address mode | The tag address type; select [Bit] or [Word]. |
| Address type | The available address types depend on [Device] and [Address mode]. |
| Address | Address of the tag. |
| Original format | If select [Word] in [Address mode], the data format can be specified. When a tag with [Original format] specified is selected, the system will only use the specified format. |
| Conversion/Calculation (Use macro subroutine) | When enabled, the data format that the address tag will be converted into can be specified. Macro subroutines can be selected to do read/write conversion. |
| Mode (cMT / cMT X only) | Select Macro Subroutine mode or Elementary Arithmetic mode. |
| Read / Write conversion | In Macro Subroutine mode, select the macro subroutine to do read/write conversion. The macro subroutine can only be selected when the data format is identical to the one in the macro subroutine. In Elementary Arithmetic mode, valid formulas must be entered respectively in read conversion and write conversion fields. A valid arithmetic formula contains at least one and only one device value which is represented by $(v). The available mathematical symbols include: +, -, *, /, and parentheses (). |
Click [OK], a newly added tag can be found in the [User-defined tags] library.

Using the Address Tag Library with Objects
The following steps illustrate the process of referencing an Object with a Tag in the Address Tag Library
Instructions: Using the Address Tag Library with Objects
Create a Tag
Create a tag in Address Tag Library.Create an Object
Create an object, select [General] » [Device].Configure the Object Settings
Click [Settings] to finish the settings.Click “User- Defined Tag”
Select [User-defined tag] check box.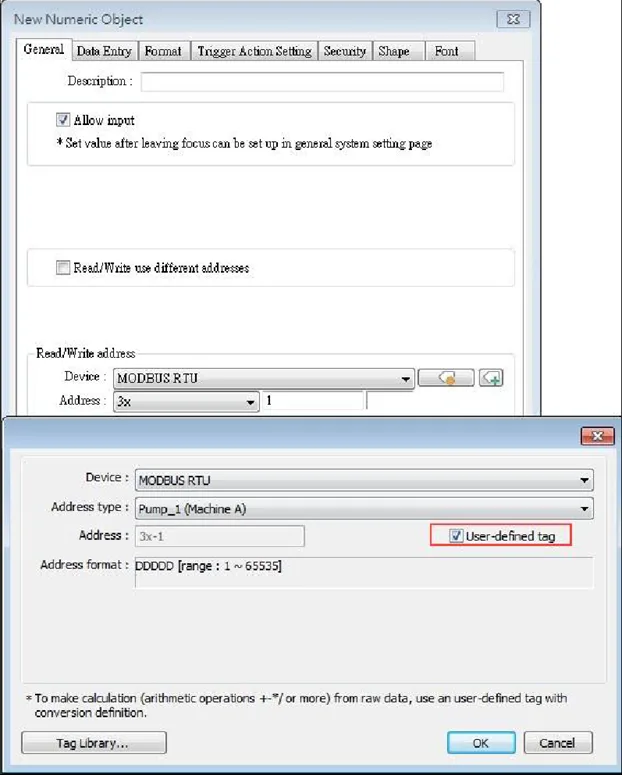
Select the tag
In [Address type] select the defined tag you want to attach to the object.If the data type is selected when creating the address tag, the system automatically restricts the data format to the one selected.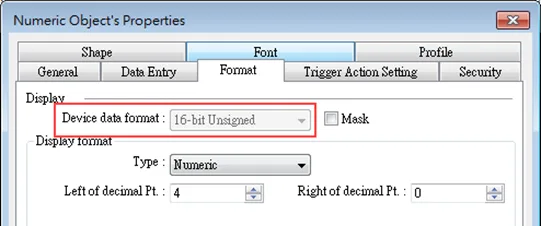
Done
Now you’re done. The Tag is now linked with the object.When finished, the window tree will show the address tag name used by the object.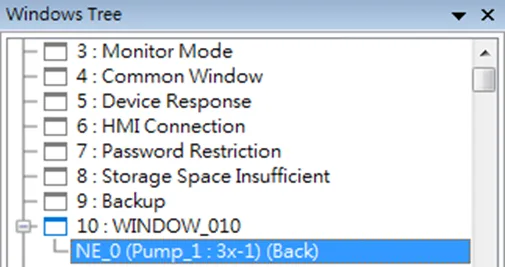
Note:
- The name of the used tags will be written in red font in Address Tag Library.