
Overview & Concepts
The Action Trigger object in EasyBuilder Pro is used to execute predefined system or project-level actions automatically when specified conditions are met. Unlike objects that display data or transfer register values, the Action Trigger performs operational commands within the HMI runtime environment. It allows event-driven execution of built-in functions without requiring macro scripting.
An Action Trigger is configured by defining:
- The specific action to execute
- The trigger condition
- The control register or bit associated with the condition
When the defined trigger condition becomes true, the selected action executes immediately. The trigger mechanism is typically based on a designated control bit turning ON, enabling the object to respond directly to PLC states or internal HMI registers.
Common applications include:
- Automatically changing windows when a status condition occurs
- Initiating system functions tied to machine states
- Executing predefined operational commands based on register transitions
Because it is configuration-based, the Action Trigger object provides a reliable method for implementing event-driven automation within a project.

Implementation
Click [Object] » [Action-related] » [Action Trigger (per-page)] or [Action Trigger (Global)] icon on the toolbar to open an Action Trigger object property dialog box. Clicking [New] can add a new Action Trigger.
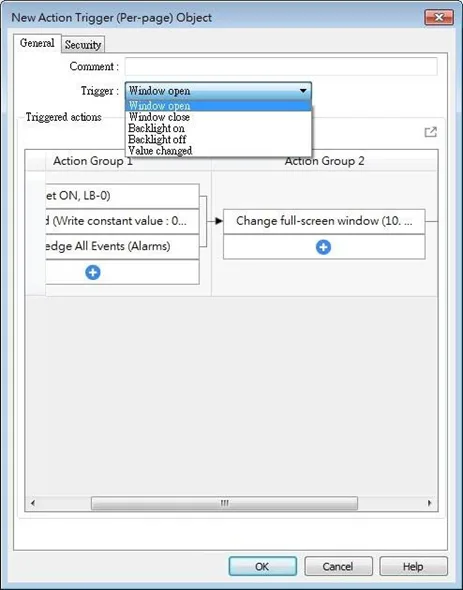
General Tab (Per-Page)
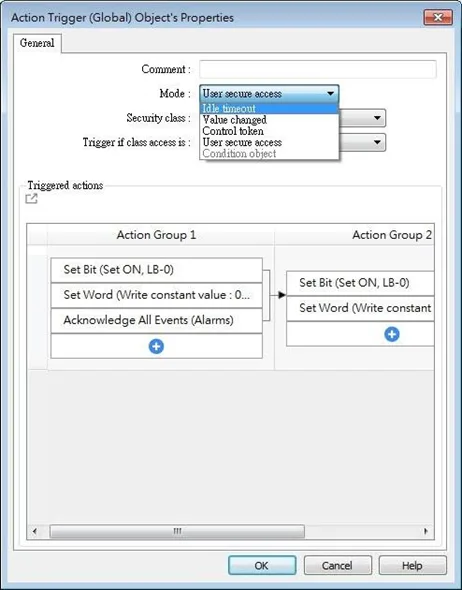
General Tab (Global)
Object Configuration Setting Options
| Setting | Description |
|---|---|
| Trigger (per-page) | Window open: Triggers actions when window opens. Settings in Security tab will not be available when using this mode. Window close: Triggers actions when window closes. Backlight on: Triggers actions when backlight turns on. Backlight off: Triggers actions when backlight turns off. Value changed: When the state of the designated register meets the preset condition, Action Trigger will start executing. |
| Mode: Idle Timeout (Global) | If the screen is left untouched for more than the specified time limit configured in [Idle Timeout], Action Trigger will start executing. Range: 1~43200 seconds |
| Mode: Value Changed (Global) | When the state of the designated register meets the preset condition, Action Trigger will start executing. Check condition recursively when actions ended When all actions are completed, the trigger condition will be checked again; and if the condition is met, the actions will be triggered again. Dynamic condition value This option is available when [Word] is selected as Type. Selecting this option opens the [Read/Condition use different addresses] option. When [Read/Condition use different addresses] is not selected, the condition value is read from the next contiguous register of [Value address]. |
| Control Token (Global) | Triggers actions when the Control Token is acquired or unacquired. |
| User Secure Access (Global) | Triggers actions when access to the specified security class is obtained or lost. When the security class is [Any], the actions can be triggered, regardless of class, when the access is obtained or lost. |
| Condition Object (Global) | Triggers actions when the conditions set in Condition object are met. Check condition recursively when actions ended When all actions are completed, the trigger condition will be checked again; and if the condition is met, the actions will be triggered again. |
| Action Group | Actions are classified into groups. Actions in the same group will simultaneously be triggered, and only after the actions in the previous group have been all triggered, the actions in the next group will then be triggered. |
| Delay | Delays the action for the specified time period (milliseconds). |
| Set Bit | Sets the designated bit address ON or OFF. Set ON Sets ON the designated bit. Set OFF Sets OFF the designated bit. Toggle Alternates the bit state. |
| Set Word | Changes the value in the designated word address. Write constant value Writes the constant value to the designated register. Increment value (JOG+) Increases value in register by a set amount in [Inc. value], up to the [Upper limit]. Decrement Value (JOG-) Decreases value in register by a set amount in [Dec. value], down to the [Bottom limit]. Dynamic Limits (JOG+, JOG-) Sets the [Upper limit](JOG+) and [Bottom limit](JOG-) by a designated register. Write constant string Writes the constant string to the designated register. Object Control Command (cMT / cMT X only) Listed for selection are commands (with their corresponding command values) available for the control address of various functions. System Tag Command (cMT / cMT X only) When a system tag is set as write address; for example, LW-9134: Language Mode, the commands relating to the system tag can be selected. |
| Change window | Switches to the designated window. Change full-screen window can only be the last action in the last group in an Action Trigger. Change full-screen window: Changes to another base window. Change common window: Changes common window. Return to previous window: Changes from current screen to the previous one displayed. For example, when window no. 10 is changed to window no. 20, this function can be used to return to window no. 10. This function is only available for base window. Animation Setting: The effects are: Fade, Fly, Float, Wipe, Split, Circle, Clock, Zoom, Turn, Push. Different effects may be used for Start (window appears) and End (window disappears). [Duration] specifies how many milliseconds (ms) a transition effect takes to complete. [Direction] The direction of the transition. |
| Execute Macro | Executes one of the Macros from the drop-down list that has already been configured by users. Running a macro may take a while to complete; therefore, when [Execute Macro] is put into an action group, it is seen as completed when it is triggered. The system will not wait for the macro to complete running before moving on to the next action group. |
| Popup Window | Pops-up a designated window. |
| Close Window | Closes currently opened window. |
| Popup Calculator Window | Opens a calculator with an unchangeable appearance, allowing operators to do simple calculation and enter the result to a destination object by pressing the Enter key. |
| Keyboard Input | Inputs characters/control signals, as often used with [Numeric] or [ASCII] objects. Enter: Same as the keyboard’s “Enter” function. Backspace: Same as the keyboard’s “Backspace” function. Clear: Clear the value in the word register. Esc: Same as the [Close window] function; it is used to close the keyboard window. Delete: Same as the keyboard’s “Delete” function, deletes the number or character on the right side of the text cursor. Left: Same as the keyboard’s “←” key moves the text cursor to the left side of the previous number or character. Right: Same as the keyboard’s “→” key moves the text cursor to the left side of the next number or character. Inc: Add 1 to the current value. Dec: Minus 1 from the current value. ASCII/UNICODE: Specify the character to be entered by this key. |
| Screen Hardcopy | Saves current screen as a hard copy file into a SD card or USB disk. |
| Acknowledge all events (Alarms) | Acknowledges all events at once. |
| Import Data | Imports the e-mail contacts or user accounts, or logs in using USB Security Key. Data Position: The external device to read data from. Options: USB disk or SD card. Account import mode: If [Overwrite] is selected, there will be only imported accounts after import. If [Append] is selected, there will be imported accounts in addition to existing accounts after import. Delete file after importing user accounts: The system will delete the account data saved in the external device after importing; this can prevent the account data from leaking out. |
| Wait Until | The next group will be executed only when the condition set for a designated bit or word address is met. However, if the condition is not met even after the set wait time (timeout), it can either move on to the next action group or end prematurely without continuing. |
| Data Transfer (Global) | Sends the value in the designated address to another address. |
| File Transfer | Transfer files by FTP. HMI will connect to the FTP server in passive mode. General Tab: Download: Transfer file from FTP server to local HMI. Upload: Transfer file from local HMI to FTP server. Server address: [Direct]: Designate server address related settings in EBPro. [Dynamic]: Designate an address for changing the server address related settings dynamically on HMI. Suppose the dynamic address is set to LW-n, then: LW-n: Host usage (0: IP, 1 Domain name) LW-n+1: IP (4 words) LW-n+5: Port LW-n+6: Authentication (0: None, 1: Account) LW-n+7: Username (16 words) LW-n+23: Password (16 words) LW-n+39: Domain name (64 words) Delete the source file after successful transfer Following successful transfer, the source file will be deleted. When transferring in [Download (FTP -> HMI)] mode, please make sure that the account has the write permission on the FTP server. File Tab: Set file position and full path of FTP server / Local HMI. When a folder path is specified, all the files in that folder will be transferred, not including files in subfolders. When a file with identical file name already exists, it will be overwritten regardless. Status Tab: Designate an address for showing file transfer result and FTP server response. |
| Control Token | The action to acquire or unacquire a Control Token. Control Token: Select a Control Token. Action: Set this action to acquire or unacquire a Control Token. Max. waiting time: Continues or stops running the next action group if the Control Token is still not acquired even after the set [Max. waiting time]. |
| Backup | Backup historical data or recipe data to an external storage device, or transfer data via email or FTP server. |
| Safely Remove USB disk/SD card | Safely remove the external storage device to ensure data integrity. |
Notes:
- At most 1000 Action Triggers can be created in a project.
- At most 20 groups can be created in an Action Trigger, and at most 20 actions can be added into a group.
- To rename an action group, right-click on the name of the action group and select [Rename].
- File Transfer Error Codes:
| Error Code | Description |
|---|---|
| 0 | File transferred successfully |
| 1 | The HMI directory for download does not exist |
| 3 | USB disk or SD card is not found |
| 4 | HMI or FTP directory is empty |
| 5 | Uploaded file does not exist |
| 8 | Operation rejected by FTP server |
| 9 | USB disk or SD card is full |
| 10 | Unknown error |