
Overview & Concepts
RFID integration in EasyBuilder Pro is most effectively used as a secure authentication and access control method for HMI systems. Instead of relying on usernames and passwords, RFID enables users to access the HMI by scanning a physical credential (badge or card), allowing fast and secure login directly at the machine interface.
This approach improves both security and usability. Traditional password-based systems can be slow and vulnerable, while RFID provides near-instant access with a simple scan and reduces the risk of unauthorized entry because it requires possession of a physical device.
How RFID Security Works in Practice
- An RFID tag is scanned using a connected reader (typically USB)
- The reader sends the tag ID to the HMI
- The HMI compares the ID against a stored user or authorization table
- The system assigns permissions or grants/denies access based on the match
This process enables real-time authentication tied directly to physical credentials.
Security Capabilities and Benefits
- Fast authentication – Users log in instantly by tapping a card instead of typing credentials
- Reduced attack surface – Eliminates risks like weak passwords or brute-force attacks
- Physical credential requirement – Access requires possession of a unique RFID tag, making it harder to compromise
- Role-based access control – Different tags can assign different permission levels (operator vs maintenance)
- Auditability – System actions can be tied to specific users and logged for traceability
Typical Security Applications
- Logging users into the HMI with RFID badges
- Restricting access to configuration or maintenance screens
- Enabling machine operation only for authorized personnel
- Assigning dynamic roles (operator, technician, engineer) based on scanned tag
RFID in EasyBuilder Pro is best understood as a modern authentication layer—replacing or enhancing traditional login methods with faster, more secure, and more accountable access control tied to physical credentials.
Implementation
External RFID Operation
RFID operational configuration is through the Security tab of the EasyBuilder Pro System Parameters menu; RFID cards are considered “plugins”.
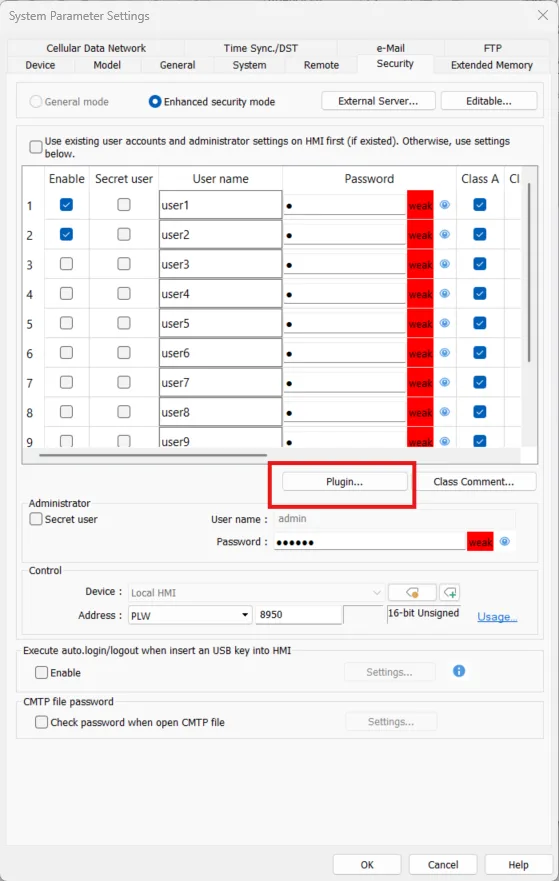
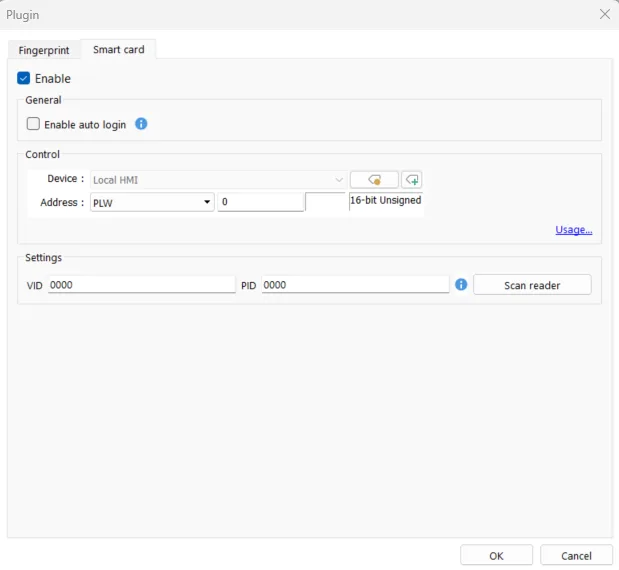
Above is the Plugin window for most cMT units. Enable the Smart Card tab (this is what an RFID scanner is) and then select the config options.
When configuring the RFID scanner, to prevent interference from other USB devices during login, it’s necessary to first set the VID and PID of the USB scanner. After clicking [Scan Reader], the system will prompt a message “Please insert your USB Reader”.
Once the RFID scanner is inserted into the PC, the system will obtain a unique VID and PID for the RFID scanner. Click [Save], and the system will automatically incorporate this VID and PID into the settings.
Do not plug your reader into the PC until prompted, or it will not be detected.
[Enable auto login]: Select the [Enable auto login] option to keep the fingerprint/USB scanner in a state where it is always ready for login, without the need to activate the scanner through a command. To revert to the default state where the scanner is activated via command, use command 7 (Pause auto login) or command 8 (Resume auto login) to pause/resume the auto login status.
Now you can adjust the device settings for automatic logins, UI configuration, commands, and more.
Built-In RFID Reader
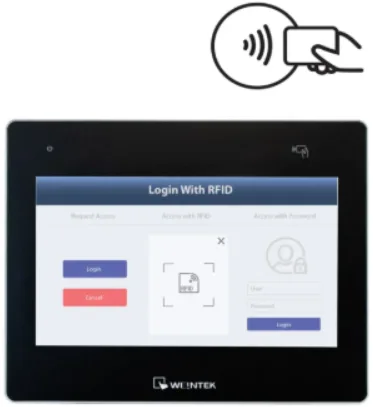
Select cMT X Series HMIs have an RFID reader built into the front panel of the HMI, eliminating the need for external RFID peripherals.
Setup of this functionality is the same as external readers, except for the settings window as shown below:
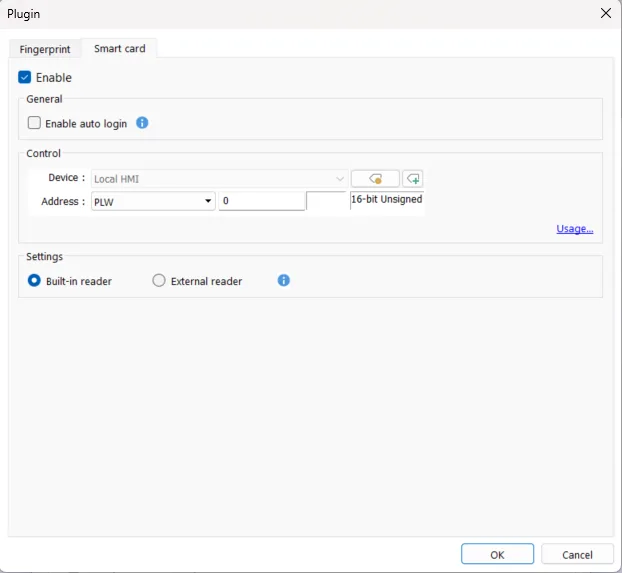
System Settings for RFID Operation
Control Address
When control address is set to PLW-n, where n is an arbitrary number, the following addresses will be designated:
| Address | Tag Name | Description |
|---|---|---|
| PLW-n (1 word) | Command | Commands to be executed: Login, Add Fingerprint / RFID Card, Remove Fingerprint / RFID Card, etc. |
| PLW-n + 1 (1 word) | Result | Displays the result of command execution. |
| PLW-n + 2 (1 word) | Status | The initialization status of the plugin server. |
| PLW-n + 3 (1 word) | Error | The error code from the device server. |
Commands
Setting different values in PLW-n [command] enables different commands:
| Set Value | Command | Corresponding Address |
|---|---|---|
| 1 | Log in by fingerprint / RFID / barcode | |
| 2 | Add fingerprint / RFID / barcode by user name | Set [user name] first. |
| 3 | Add fingerprint / RFID / barcode by user index | Set [user index] first. |
| 4 | Remove fingerprint / RFID / barcode by user name | Set [user name] first. |
| 5 | Remove fingerprint / RFID / barcode by user index | Set [user index] first. |
| 6 | Remove all fingerprints / RFID / barcodes | |
| 7 | Pause auto login | |
| 8 | Resume auto login |
Command Execution Results
| Result Codes | Command execution result |
|---|---|
| 0 | Succeeds |
| 1 | Unknown error |
| 6 | Canceled |
| 101 | Account not linked |
| 115 | Authentication failed |
| Others | System error |
Error Codes
| Error Codes | Command execution result |
|---|---|
| 0 | Initialization succeeds |
| 1 | Unknown error |
| 2 or more | System error |