
Overview & Concepts
The User-Defined Startup Screen feature in EasyBuilder Pro allows a specific window to be displayed automatically when the HMI project starts. Instead of always opening the default initial window, the system can be configured to show a designated screen based on project settings or defined conditions. This allows developers to control what operators see when the HMI powers on or when the runtime project begins.
Startup screen behavior can be configured to support different operational needs. This makes it possible to guide operators directly to important information or required actions immediately after system startup.
Typical startup screen configurations include:
- Displaying a main operating dashboard when the HMI powers on
- Opening a login screen to require user authentication before operation
- Showing a system status or initialization screen during startup
By defining a startup screen, developers can improve usability and ensure operators begin in the correct part of the interface. This helps maintain consistent workflow and system operation from the moment the HMI starts running the project.
Implementation
In order to assign a specific window to be the initial window shown when the HMI powers on, you must first create the window within the EasyBuilder Pro project.
New Window Creation
Create a window that you want to use as the startup window. To review the Window Creation process, see the “Project Windows and Screens” section.
Defining new Startup Window
In the [Project} => [System Parameters] menu General tab, simply click the dropdown for “Startup Window no” and select the window you would like to have displayed as the new project startup window.
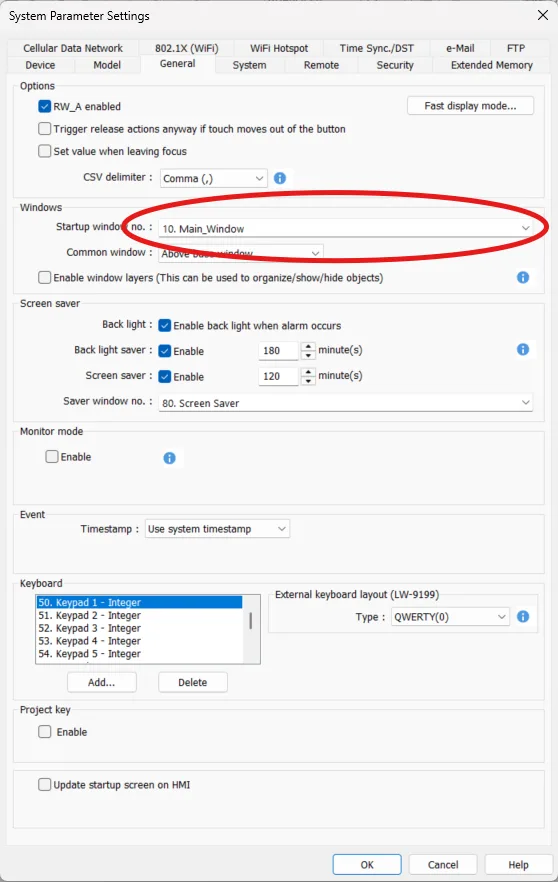
That drop-down menu will show all the windows configured in the project. Select the desired startup window, and then click the [OK] button to save.
Download the project to an HMI (or run simulation mode) and the project window you chose is now the first one that displays when the project is initialized.