
Overview & Concepts
User Management and Access Classes in EasyBuilder Pro provide a structured way to control who can access and operate different parts of an HMI project. By defining user accounts and assigning permission levels, the system can restrict certain functions to authorized personnel while allowing general operators to access standard interface features.
User Management allows administrators to create and maintain individual user accounts that require login credentials. Each user is assigned an Access Class, which represents their permission level within the system. When a user logs in, the HMI uses the assigned access class to determine which protected functions the user is allowed to operate.
Common uses of user management and access classes include:
- Creating separate login accounts for operators, supervisors, and maintenance personnel
- Restricting configuration or system settings to higher access levels
- Allowing only authorized users to operate protected interface objects or functions
By organizing users into access classes and requiring authentication through login credentials, EasyBuilder Pro provides a controlled way to manage permissions and maintain secure operation of the HMI system.

Implementation
The main location where User Management happens is the Security tab of the System Parameters Menu. In EasyBuilder Pro Home menu, select System Parameters => Security
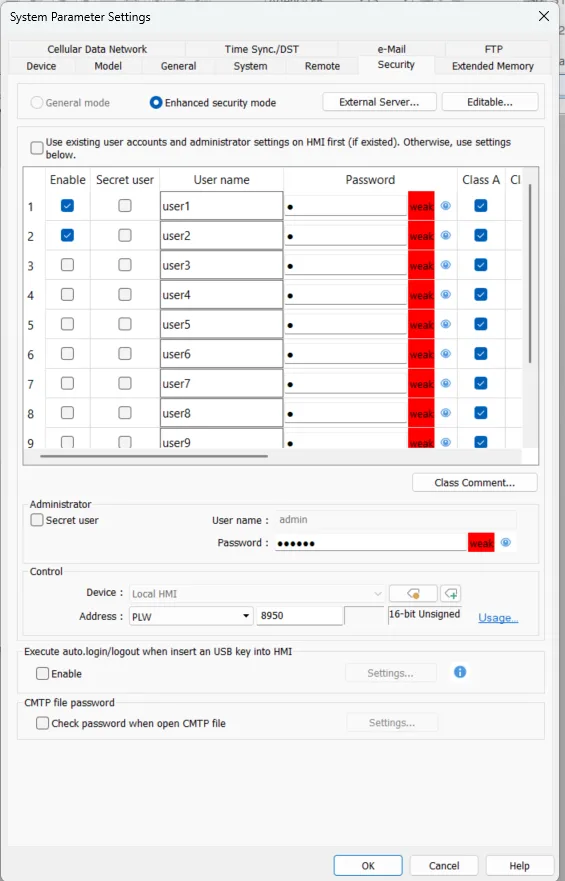
For cMT and cMT X Series models, only Enhanced Security mode is used.
Enhanced Security Mode Configuration
Up to 11 users can be set here. In addition, [Administrator] setting is provided. Administrator has all privileges and can operate all object classes. A username can contain Chinese characters, letters, and numbers, and a password can only contain letters and numbers. Each user can have up to 12 operable classes: A to L. (Up to 127 users can be set in Administrator Tools. Please see the Administrator Tools section for more details.)
Enhanced Security Mode provides a [Control address] for users to manage the accounts directly on HMI. Please see below for more details.
Alternatively, use USB Security Key to log in automatically. Insert the USB disk in which the key is saved to log in. Please see below for more details.
Login can also be achieved using fingerprint or RFID. Upon successful fingerprint recognition or RFID card scanning, the linked account will be automatically logged in.
LDAP Mode
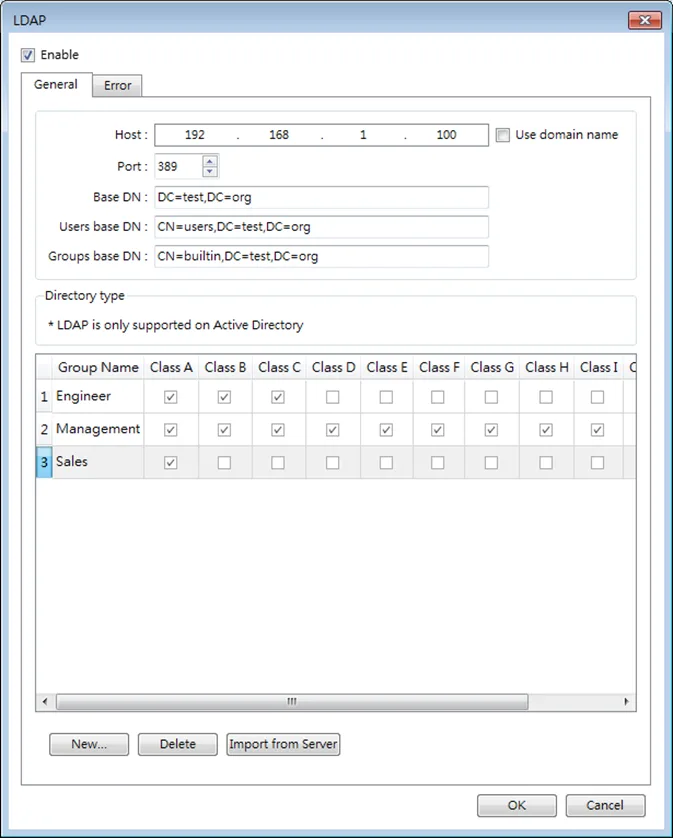
LDAP (Lightweight Directory Access Protocol) enables applications to access Directory server providing database-like data structure, and here, the primary use of LDAP is to enable centralized user account management. When using LDAP mode, user account management is up to the Directory server, with HMI validating user login via the LDAP protocol.
To have LDAP set up on HMI, users only need to provide necessary information about the directory server and set the operable classes for each group, without the need for managing username/password for each user.
Remote HMI Mode
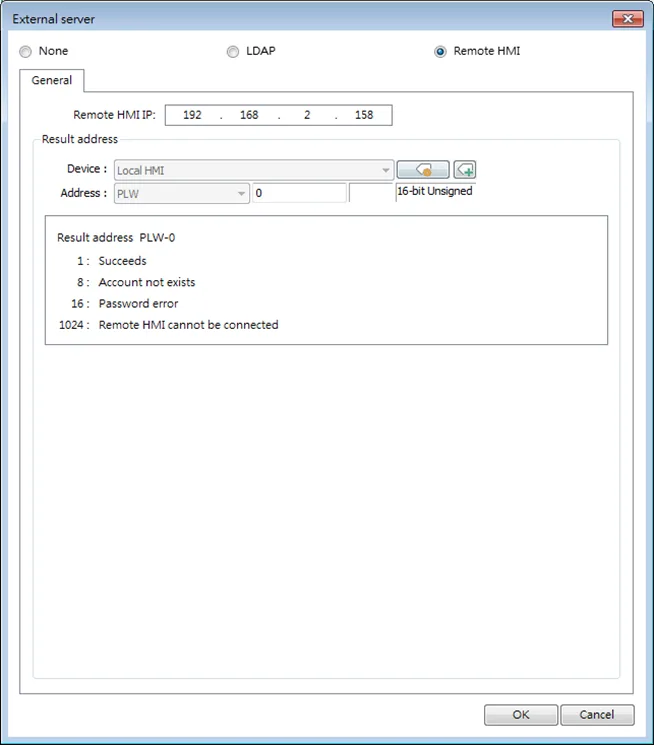
In this mode, user accounts can be managed on a remote HMI, instead of the local HMI. The accounts on a remote HMI can be used to log in the local HMI; therefore, managing the accounts on the local HMI is not necessary.
Enhanced Security Mode and Control Address
The control address is used for login and account management, with 20 consecutive addresses designated for parameter settings. When employing a cMT/cMT X Series model, LW and PLW registers are available for selection.
LW refers to local addresses on the HMI itself, while PLW refers to addresses on the client side, such as cMT-iV5, cMT-iV6, iOS, and Android devices. As each cMT/cMT X series can connect to multiple client devices, the system registers for login and account management operate independently on each client device.
To log in using the control address, select either [user name] or [user index]. Ensure to set [user name] and [password] in advance under [System Parameter Settings] » [Security] » [Enhanced security mode].
Control Address Settings
| Address | Tag Name | Description |
|---|---|---|
| LW/PLW-n (1 word) | command | Commands to be executed: Login, Logout, Add/Setting/Delete Accounts, etc. |
| LW/PLW-n + 1 (1 word) | command execution result | Displays the result of command execution. |
| LW/PLW-n + 2 (1 word) | user index | The index of accounts (used with Option List Object). |
| LW/PLW-n + 3 (1 word) | user privilege | Binary value. Level A = bit0, Level B = bit1, … |
| LW/PLW-n + 4 (8 words) | user name | Account name (Case-sensitive and only allows Chinese characters, letters and numbers). |
| LW/PLW-n + 12 (8 words) | password | Account password (Case-sensitive and only allows letters, numbers, or special characters). |
After setting the [Control address], the relevant addresses can be found in [Address Tag Library] » [User-defined tags]. For example, setting [Control address] to LW/PLW-0: (UAC stands for User Account Control)
LW/PLW-0 → [UAC command]
LW/PLW-1 → [UAC command execution result]
LW/PLW-2 → [UAC user index]
LW/PLW-3 → [UAC user privilege]
LW/PLW-4 ~ LW/PLW-11 → [UAC user name]
LW/PLW-12 ~ LW/PLW-20 → [UAC password]
Note:
- In Enhanced Security Mode on a cMT / cMT X model, the Control Address can only be assigned to a word register of Local HMI. Please note that security features will work only on HMI when the control address is LW. Remote login on cMT Viewer will not be possible.
Commands
| Set Value | Command | Corresponding Address |
|---|---|---|
| 1 | Log in by User Name | Set [user name] and [password] first. After entering the user name and password, the system will check if they are valid in [System Parameter Settings] » [Security] » [Enhanced security mode]. |
| 2 | Log in by user index | Set [user index] and [password] first. |
| 3 | Log out | |
| 4 | Change the password of current logged-in user | Set [user name] and [password] first. Please fill in the original password in [user name] and new password in [password]. |
| 5 | Add an account | Set [user name], [password] and [user privilege] first. |
| 6 | Add a temporary account (minutes) | Set [user name], [password], [user privilege], and [user index] first. [user index] is for specifying a time period (in minutes), within this period the account is valid. If 0 is specified, this account stays valid until the HMI is powered off. |
| 7 | Delete an existing account by user name | Set [user name] first. |
| 8 | Delete an existing account by user index | Set [user index] first. |
| 9 | Setting the privilege of an existing account by user name | Set [user name] and [user privilege] first. |
| 10 | Setting the privilege of an existing account by user index | Set [user index] and [user privilege] first. |
| 11 | Setting the password of an existing account by user name | Set [user name] and [password] first. |
| 12 | Setting the password of an existing account by user index | Set [user index] and [password] first. |
| 13 | Read the privilege of an existing account by user name | Set [user name] first. If the command succeeds, [user privilege] can be displayed. |
| 14 | Read the privilege of an existing account by user index | Set [user index] first. If the command succeeds, [user privilege] can be displayed |
| 15 | Add a temporary account (days) | Set [user name], [password], [user privilege], and [user index] first. [user index] is for specifying a time period (number of days), within this period the account is valid. If 0 is specified, this account stays valid until the HMI is powered off. |
| 16 | Add an expiring account (minutes) | Set [user name], [password], [user privilege], and [user index] first. [user index] is for specifying a time period (in minutes), within this period the account is valid. 0 is an invalid value for this setting. |
| 17 | Add an expiring account (days) | Set [user name], [password], [user privilege], and [user index] first. [user index] is for specifying a time period (in days), within this period the account is valid. 0 is an invalid value for this setting. |
| 18 | Remaining minutes for user name | Set [user name] first. If succeeded, the remaining time (in minutes) will be displayed in [user index]. |
| 19 | Remaining minutes for user index | Set [user index] first. If succeeded, the remaining time (in minutes) will be displayed in [user index]. |
| 20 | Remaining days for user name | Set [user name] first. If succeeded, the remaining time (number of days) will be displayed in [user index]. |
| 21 | Remaining days for user index | Set [user index] first. If succeeded, the remaining time (number of days) will be displayed in [user index]. |
Notes:
- Add a temporary account / expiring account: The difference between temporary accounts and expiring accounts is that temporary accounts are not stored in the system and will be invalid after HMI is turned off. Both temporary accounts and expiring accounts will be automatically deleted when they are expired.
- Delete the existing account: The currently logged in account cannot be deleted.
- Offline/Online Simulation: Simulate using the account settings in the program. Any modifications of the account during simulation will not be reserved for next simulation.
- admin: Default administrator account, cannot be deleted, has all privileges and cannot be changed.
- System Register PLW-10754: Displays current user name. (Only available for cMT / cMT X Series)
- The [user privilege] address does not display the privileges assigned to current user account, please use system register LW-9222 to display the privileges.
- LDAP mode does not support login with [user index].
Command Execution Results
After the command is executed, the system stores the result code to the control address LW-n = 1. The listed result codes below are shown in Hexadecimal format)
| Result Codes | Command execution result |
|---|---|
| (0x001) | Succeeds |
| (0x002) | Invalid command |
| (0x004) | Account exists (when adding a new account) |
| (0x008) | Account not exists |
| (0x010) | Password error |
| (0x020) | Deny command |
| (0x040) | Invalid name |
| (0x080) | Invalid password character exists |
| (0x100) | Invalid import data |
| (0x200) | Out of validity range (when log in by USB Security Key). The [Effective Time] can be set in Administrator Tools. |
Enhanced Security Mode Usage
Importing User Accounts
The user accounts can be set using other tools we provide, apart from the settings in [System Parameter Settings] » [Security] tab. Administrator Tools can also be used to set user accounts.
Administrator Tools can be found in the installation directory. After the program starts, select the [User Accounts] check box. Up to 127 accounts can be added.
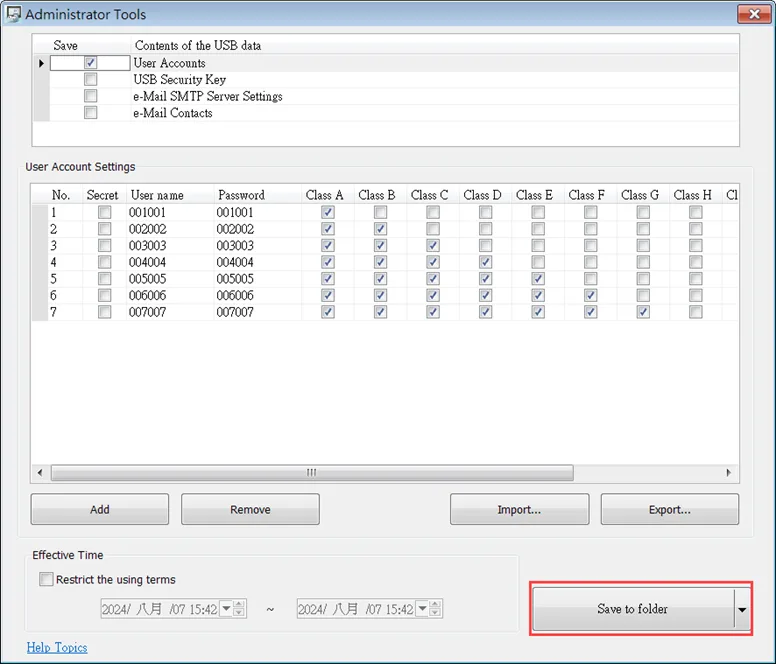
The added accounts can be stored in USB disk or SD card and imported in HMI by a Function Key Object. To do so, create a Function Key Object, and select [Import user accounts].
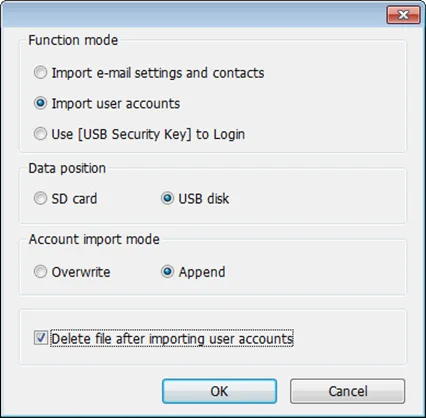
When finished, insert the external device to HMI, and press Function Key to import accounts. If [Overwrite] is selected, the existing accounts will be overwritten with new accounts and automatically log out after importing.
If select [Delete file after importing user accounts] check box, the system will delete the account data saved in the external device after importing. If the [Effective Time] in Administrator Tools is specified, the importing can only be done in the time limit specified. The imported accounts will not be deleted by system when the effective time ends.
Login via USB Security key
Instead of entering user name and password to login, a key can be used to do so. In EasyBuilder Pro installation directory, launch Administrator Tools, select [USB Security Key] check box. The account information uses the predefined data in [System Parameter Settings] » [Security].
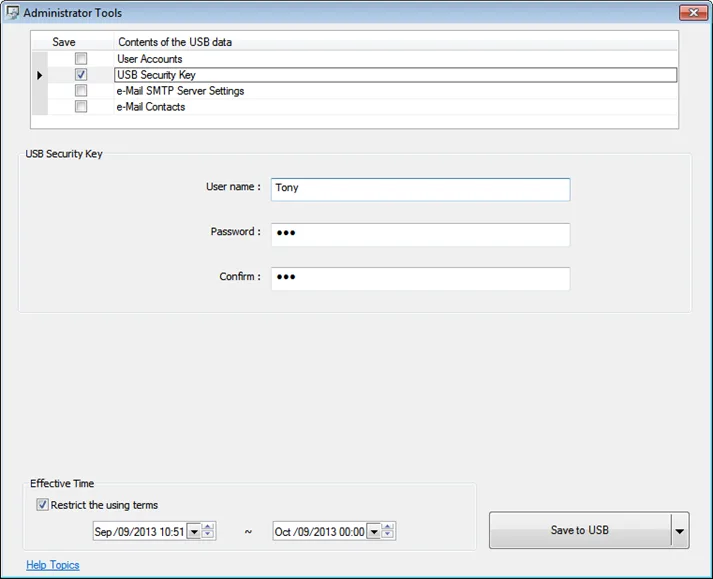
USB Security Key can be stored in USB disk or SD card, and create a Function Key to log in by USB Security Key as shown below:
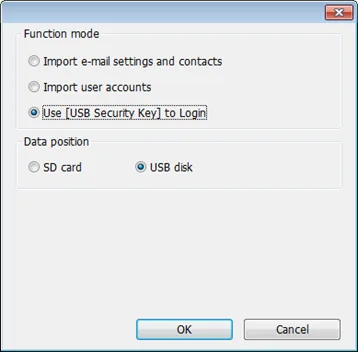
When finished, insert the external device to HMI, and press Function Key to log in using USB Security Key. If the [Effective Time] in Administrator Tools is specified, the login can only be done in the time limit specified. The system will log out automatically when the key expires.
Login and Logout Automatically with USB Security Key
As shown below, in [System Parameter Settings] » [Security], select [Enable] check box for [Execute auto. login/logout when insert an USB key into HMI].
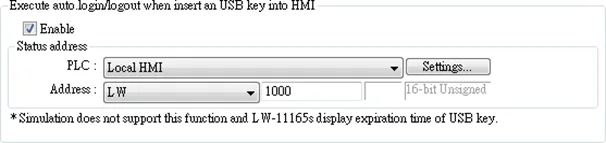
This function allows automatic login / logout using an USB security key. Insert the USB disk in which the key is saved to HMI to log in, and remove the USB disk to log out.
The login / logout status will be written into a designated address, the result codes of login / logout:
- 0x00: No Action
- 0x01: Login Succeeds
- 0x04: Login Fails
- 0x08: Login Succeeds
- 0x10: Logout Fails
Notes:
- When Auto Login / Logout is enabled, log in by [Function Key] object is not possible, but it is still possible to log in / out with a designated control address.
- This function does not support On-line / Off-line simulation.
- Only the USB Security Key saved in USB disk is valid.
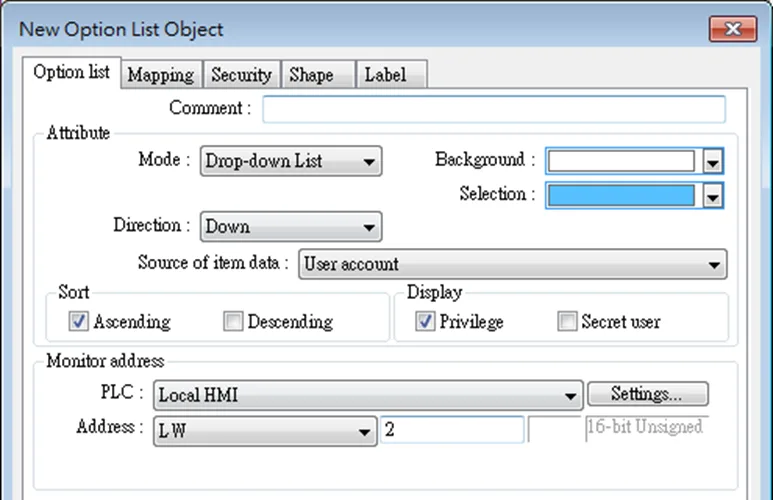
Enhanced Security Mode with Option List Object
Enhanced Security Mode uses Control Address LW-n + 2 as account index. With Option List Object, account names and privileges can be displayed. Users can select whether or not to display the account privileges and secret users in Option List.
Secret users are set to be hidden in [System Parameter Settings] » [Security] » [Enhanced Security Mode]; their account names will be hidden in Option List if [Secret user] check box is not selected. If the control address is set to LW-0, the monitor address for index of Option List is designated to LW-2.
LDAP Mode Configuration
LDAP (Lightweight Directory Access Protocol) enables applications to access Directory server providing database-like data structure, and here, the primary use of LDAP is to enable centralized user account management. When using LDAP mode, user account management is up to the Directory server, with HMI validating user login via the LDAP protocol. To have LDAP set up on HMI, users only need to provide necessary information about the directory server and set the operable classes for each group, without the need for managing username/password for each user.
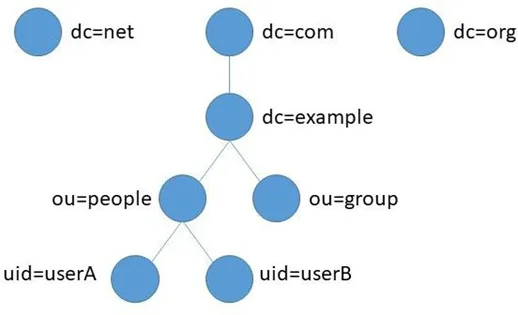
The control addresses used by LDAP Mode are the same as the control addresses used by Enhanced Security Mode. Please note that obtaining LDAP user name using Option List object is not possible; therefore, [Log in by user index] is not supported.
Notes:
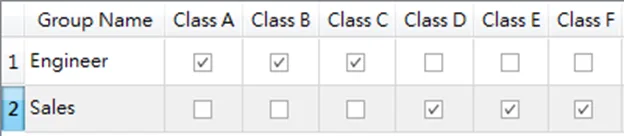
- A user may be a member of multiple groups; in this case, the user has permission to operate all classes assigned for all the groups the user is in. As shown in the following figure, if a user is a member of both Engineer and Sales groups, the user can operate classes A~F.
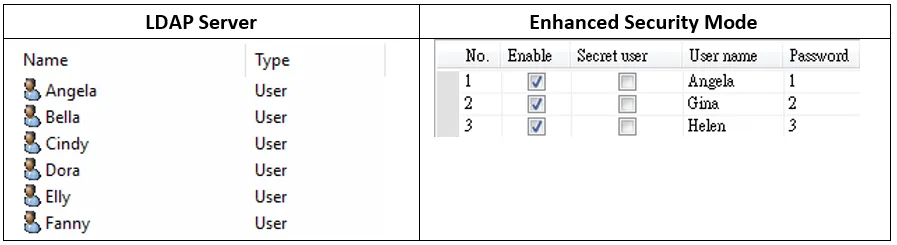
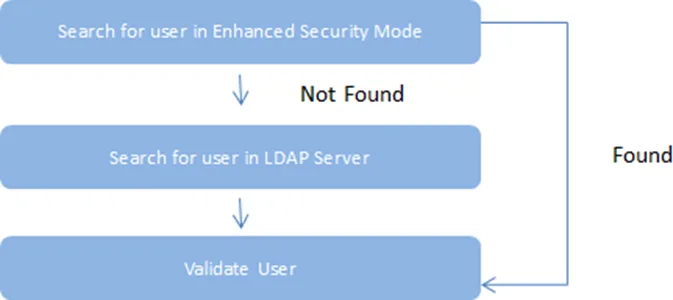
- The credentials in the list in Enhanced Security Mode can also be managed and validated in LDAP mode. Please note that when a username exists in the lists of both modes, the system will only validate user using Enhanced Security Mode. As shown in the following figure, in the case where username Angela exists in the user list in both LDAP server and Enhanced Security Mode, the HMI will validate user under Enhanced Security Mode.
- LDAP Mode does not support login with [user index].
- LDAP is only supported on Active Directory.
- HMI cannot change user’s password; therefore, when adding a new user in LDAP server, please do not select [User must change password next logon].
![HMI cannot change user’s password; therefore, when adding a new user in LDAP server, please do not select [User must change password next logon].](https://media.maplesystems.com/wp-content/uploads/2026/04/image-567.webp "When creating new users in LDAP server, leave the highlighted option blank. The HMI cannot change the user's password in LDAP mode")
General Tab
Set LDAP server and operable classes for each group.
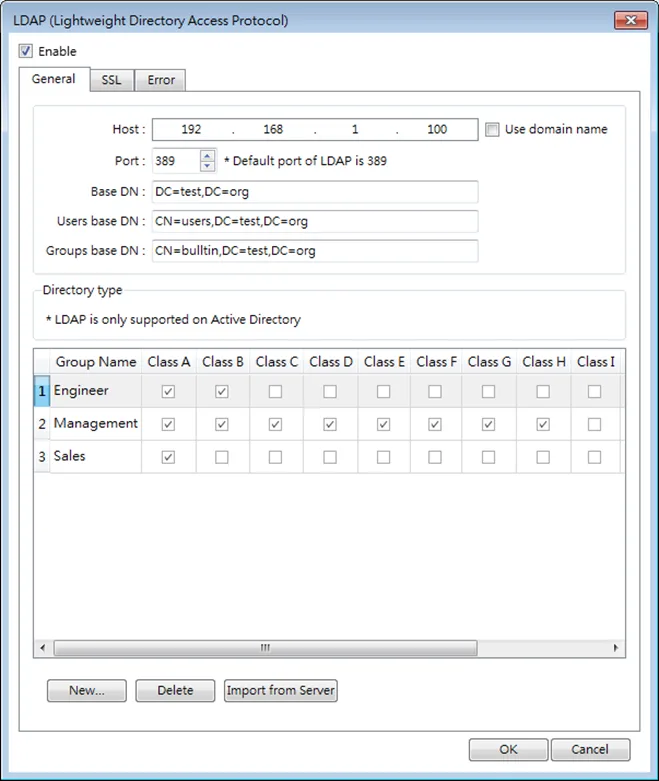
| Setting | Description |
|---|---|
| Host | Set the IP address of the host or use domain name. |
| Port | By default the port number is:LDAP: 389LDAPS: 636 |
| Base DN | LDAP server’s domain name (DN). |
| User base DN | Organizational units (OU) that hold users. |
| Group base DN | Organizational units (OU) that hold groups. |
| New | Add a new group. |
| Delete | Delete a group. |
| Import from Server | Log in LDAP server using user credentials to import all allowable groups. |
| Group Name and Class | Select the operable classes for each group. The group name can be 64 words in maximum, case-sensitive, and allows letters / numbers / symbols / Unicode. |
TLS / SSL Tab
Enable settings in this tab for LDAPS (LDAP over SSL) connection with the AD server.
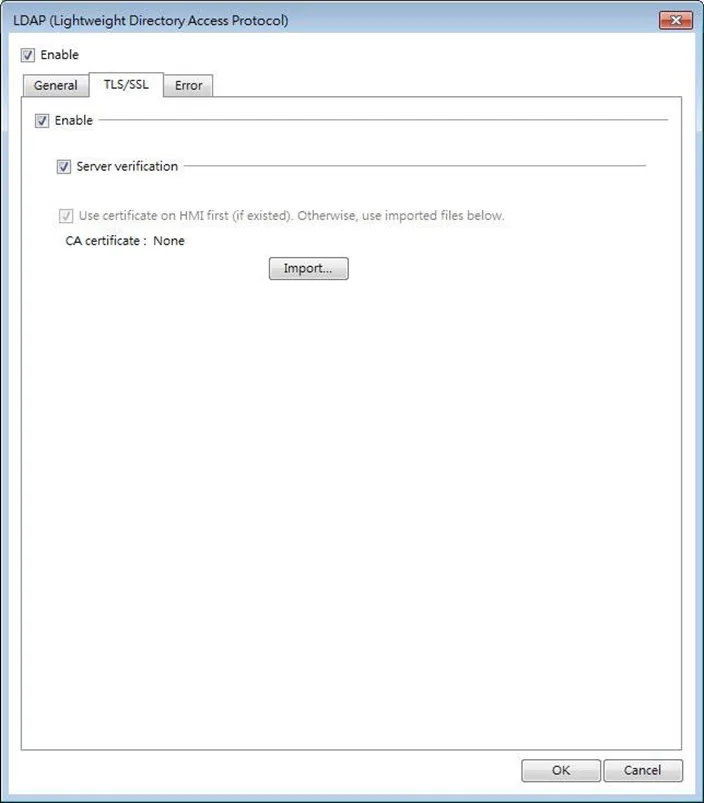
| Setting | Description |
|---|---|
| Enable | Enable TLS/SSL security for secured LDAP communication. |
| Server verification | When establishing connection, the HMI will verify whether the certificate supplied by the server matches the one stored on HMI. |
| Use certificate on HMI (if existed)… | Use current certificate on HMI or import a new certificate. |
Error Tab
When LDAP server cannot be connected, an error code shows in the designated address.
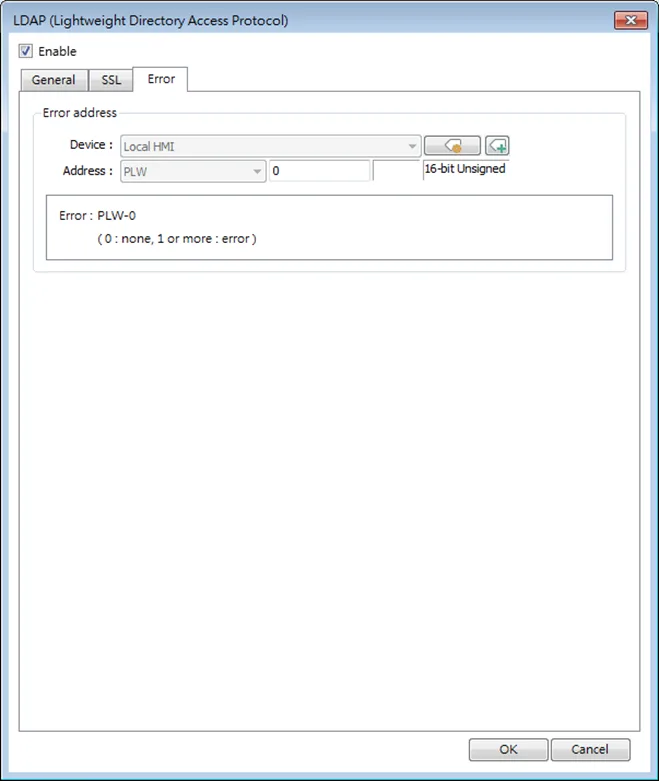
| Setting | Description |
|---|---|
| Error address | The result of login is output to this address. Value – Description 0 – No error 1 – Error on LDAP server or no password is entered. 2 – Unknown error 257 – Remote LDAP server cannot be connected. 258 – Wrong username or password. 259 – Verification failed 512 – Unknown TLS 513 – Domain name does not match CN. |
LDAP Settings (Import from Server)
Get group information from LDAP server.
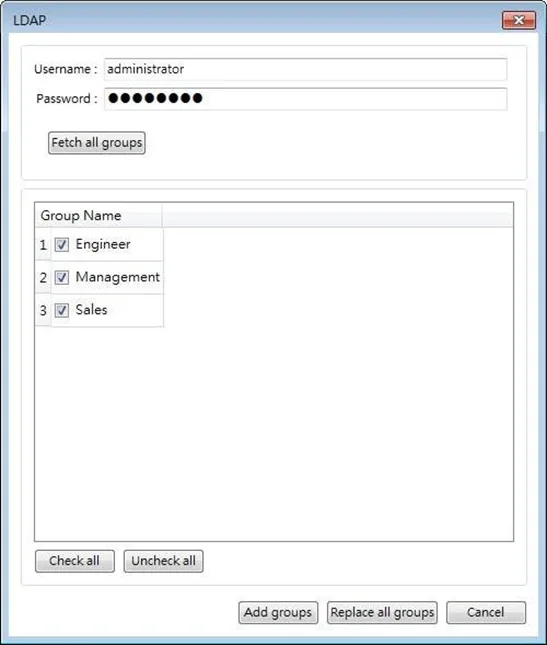
| Setting | Description |
|---|---|
| Username | Log in LDAP Server using username. |
| Password | Log in LDAP Server using password. |
| Fetch all groups | Fetch all groups of the DN in LDAP server. Error Message – Description Can’t contact LDAP server – LDAP server cannot be connected. Invalid Credentials – Wrong username or password used for login LDAP server. Unknown – Error on LDAP server or no password is entered. |
Notes:
- The maximum number of groups allowable in LDAP mode is 128 groups. When importing from LDAP server, the system will check the number of groups in LDAP server first; exceeding 128 groups will result in unsuccessful import.
- Importing duplicate group name will not clear the operable classes of that group.
Remote HMI Mode
In this mode, user accounts can be managed on a remote HMI, instead of the local HMI. The accounts on a remote HMI can be used to log in the local HMI; therefore, managing the accounts on the local HMI is not necessary.
| Setting | Description |
|---|---|
| Remote HMI IP | The IP address of the remote HMI that holds the user accounts. |
| Result address | When an error occurs while trying to authenticate the account or connect to the remote HMI, the corresponding error code will be output to the designated result address. |
Notes:
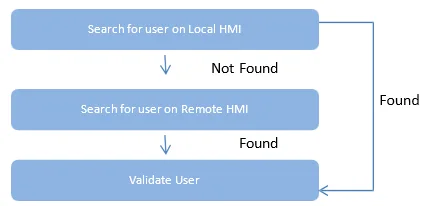
- The accounts can be authenticated via both local and remote HMI. When the same account exists on both local and remote HMI, the authentication is done via the local HMI, instead of the remote HMI. As shown below, user Angela will be authenticated via local HMI.

Login / Logout with Plugins
After enabling the plugin, users have the option to log in either through a fingerprint recognition device for accounts linked to fingerprints or via a USB scanner for accounts linked to RFID cards or barcodes.
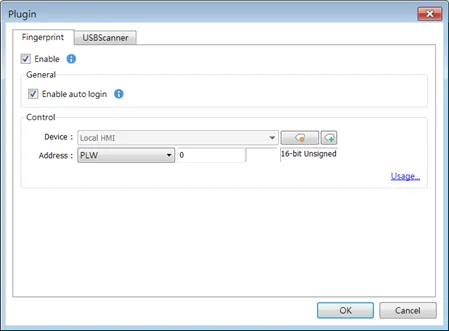
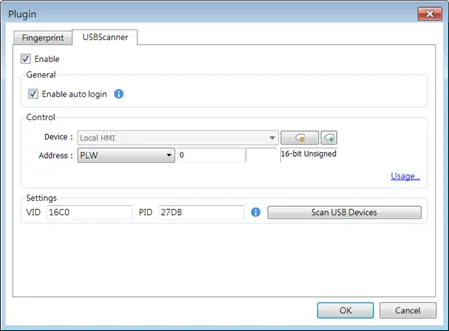
When configuring the USB scanner, to prevent interference from other USB devices during login, it’s necessary to first set the VID and PID of the USB scanner. After clicking [Scan USB Devices], the system will prompt a message “Please insert your USB Device”. Once the USB scanner is inserted into the PC, the system will obtain a unique VID and PID for the USB scanner. Click [Save], and the system will automatically incorporate this VID and PID into the settings.
[Enable auto login]: Select the [Enable auto login] option to keep the fingerprint/USB scanner in a state where it is always ready for login, without the need to activate the scanner through a command. To revert to the default state where the scanner is activated via command, use command 7 (Pause auto login) or command 8 (Resume auto login) to pause/resume the auto login status.
Control Address Settings
When control address is set to PLW-n, where n is an arbitrary number, the following addresses will be designated:
| Address | Tag Name | Description |
|---|---|---|
| PLW-n (1 word) | Command | Commands to be executed: Login, Add Fingerprint / RFID Card, Remove Fingerprint / RFID Card, etc. |
| PLW-n + 1 (1 word) | Result | Displays the result of command execution. |
| PLW-n + 2 (1 word) | Status | The initialization status of the plugin server. |
| PLW-n + 3 (1 word) | Error | The error code from the device server. |
Commands
Setting different values in PLW-n [command] enables different commands:
| Set Value | Command | Corresponding Address |
|---|---|---|
| 1 | Log in by fingerprint / RFID / barcode | |
| 2 | Add fingerprint / RFID / barcode by user name | Set [user name] first. |
| 3 | Add fingerprint / RFID / barcode by user index | Set [user index] first. |
| 4 | Remove fingerprint / RFID / barcode by user name | Set [user name] first. |
| 5 | Remove fingerprint / RFID / barcode by user index | Set [user index] first. |
| 6 | Remove all fingerprints / RFID / barcodes | |
| 7 | Pause auto login | |
| 8 | Resume auto login |
Command Execution Results
After the command is executed, the system will store the result code at control address PLW-n + 1.
| Result Codes | Command execution result |
|---|---|
| 0 | Succeeds |
| 1 | Unknown error |
| 6 | Canceled |
| 101 | Account not linked |
| 115 | Authentication failed |
| Others | System error |
Error Codes
When the plugin server initializes, the system will store the result code at control address PLW-n + 3.
| Error Codes | Command execution result |
|---|---|
| 0 | Initialization succeeds |
| 1 | Unknown error |
| 2 or more | System error |
Object Security Settings
Object Security Settings are explained in the Object-Level Security page.