What is a Task?
Tasks are specifically predefined actions taken by the controller such as writing a value to a tag register, displaying a new screen, turning a bit on/off, etc.
The number of tasks is limited only by the total amount of memory available in the controller. Each task has two fundamental components: the action taken when the task activates and the triggering mechanism that starts the action.
Tasks can be activated from the following sources in MAPware:
- Quick Button keys – all of the quick button keys (i.e. Go to Screen, Set Bit, Write Value to Tag, etc.) are, in fact, designed to implement a simple task. For example, the Go to Screen button key, when pressed, executes the GotoScreen task.
- Touchscreen button keys – in addition to the quick button keys, there are two ‘specially designed’ advanced button keys that can perform multiple tasks: the Multi-Task Single-State button and the Multi-Task Multi-State button . Button tasks are further split into three types:
- Press tasks: task(s) execute each time the button is pressed by the operator. It does not matter if the button is pressed and released or pressed and held down, the associated task(s) will execute only once per button press.
- Pressed tasks: task(s) continuously execute while the associated button is held down. With this option, the HMC will repeatedly send the command(s) until the button is released.
- Released tasks: task(s) execute when the operator releases the pressed button. Note that the associated task only executes once per button release.
- Screen Tasks – these are tasks that are ‘tagged’ to a particular screen. Therefore, screen tasks execute when the screen displays. There are three types of screen tasks:
- ‘Before showing Screen’: task executes before the tagged screen is displays
- ‘While showing Screen’: task executes continuously while the tagged screen displays
- ‘After Hiding Screen’: task executes immediately after the tagged screen is closed
- Global Task – these tasks execute continuously while HMC is on. Tasks are ‘global’ meaning that it does not depend on any particular screen to display.
- Power-on Task – tasks that execute once during initial power-up of the HMC.
Task List
Over fifty actions can be performed by a task. The tables below provides a list of all tasks available and a brief description.
| Task Action | Description |
|---|---|
| Add a Constant Value to a Tag | Add a constant value to the current value residing in an internal HMC or external PLC tag |
| Add Tag B to Tag A | Add a value residing in the Tag B register to the current value residing in the Tag A register |
| Copy HMI Block to HMI/PLC Block | Copies the values in a block of continuous registers beginning with the Tag B register to the block of registers designated with the Tag A register |
| Copy HMI/PLC Block to HMI Block | Copies the values in a block of continuous registers beginning with the Tag B register to the block of registers designated with the Tag A register |
| Copy RTC to PLC Block | Copies the real-time clock (RTC) data in the HMC to a consecutive set of 16-bit registers (using BCD format) in the PLC beginning with the target tag (HMC2000 only) |
| Copy Tag B to Tag A | Copies a value residing in the Tag B register to the target Tag A register |
| Go to Popup Screen | Displays a popup screen (HMC2000 only) |
| Go To Screen | Displays a new screen |
| Previous Screen | Displays the prior screen (in numerical order) |
| Next Screen | Displays the next screen (in numerical order) |
| Print Data | Prints the displayed screen (to a connected serial printer) |
| Set RTC | Change a set value (i.e. year, month, day, etc.) of the internal real-time clock of the controller (HMC2000 only) |
| Swap Tag A and Tag B | Swaps (exchanges) the values residing in the Tag A register and the Tag B register |
| Switch Screen From Tag | Displays a base screen according to the value in a targeted tag |
| Subtract a Constant Value from a Tag | Subtract a constant value from the current value residing in an internal HMC or external PLC tag |
| Subtract Tag B from Tag A | Subtract a value residing in the Tag B register to the current value residing in the Tag A register |
| Toggle Bit | Toggles (turn off/on) an internal HMC or external PLC tag coil/bit |
| Turn Bit ON | Set (turn on) an internal HMC or external PLC tag coil/bit |
| Turn Bit OFF | Clear (turn off) an internal HMC or external PLC tag coil/bit |
| USB Data Log Upload | Copies (uploads) a series of data registers into a USB Flash Drive |
| Write Value to Tag | Write a constant value to an internal HMC or external PLC tag |
| Key Specific Tasks | Tasks that can only be executed using an Advanced Bit or Word button on screen. See next table for a detailed list. |
| Key Specific Tasks: | Description |
|---|---|
| Clear Data Entry | Clears value displayed in Data Entry window of keypad |
| Cancel Data Entry | Restores the original value in the Data Entry window of keypad and discontinues entry |
| Accept Data Entry | Writes the value displayed in Data Entry window of keypad to target register |
| Switch to Next Data Entry | Moves to next Bit/Register Entry object according to Object ID number |
| Switch to Previous Data Entry | Moves to prior Bit/Register Entry object according to Object ID number |
| Increase Value by 1 | Adds +1 to the existing value |
| Decrease Value by 1 | Subtracts from the existing value |
| Increase Digit by 1 | Adds +1 to the highlighted digit of existing value. If highest digit value already shown, then cycles back to lowest digit value |
| Decrease Digit by 1 | Subtracts from the highlighted digit of existing value. If lowest digit value already shown, then cycles back to highest digit value |
| Shift Value to Left | Shifts value one digit to the left (same as multiplying by 10) |
| Move Cursor to Left | Shifts focus cursor one digit to the right |
| Move Cursor to Right | Shifts focus cursor one digit to the right |
| Sign Key (+/-) | Toggles signed value |
| Sign Key (+/-) and 0 | Toggles signed value when pressed once. Changes to 0 when pressed again |
| Numeric keys 0-9 and A-F | Enters specified numeral into entry field |
| Edit Bit On | Changes Bit Entry value to 1 |
| Edit Bit Off | Changes Bit Entry value to 0 |
| Acknowledge Alarm | Acknowledges the top-Most alarm displayed |
| Acknowledge All Alarms | Acknowledges all currently active alarms |
| Previous Alarm | Move all alarms down one line in the list of alarms |
| Next Alarm | Move all alarms up one line in the list of alarms |
| Previous Historical Alarm | Move all alarms down one line in the list of historic alarms |
| Next Historical Alarm | Move all alarms up one line in the list of historic alarms |
| Refresh All Trends | The Historical Trend graph is updated when this task is executed |
| Start Logger for all Groups | Begins logging data as specified in Data Logger for all groups |
| Stop Logger for all Groups | Discontinues logging data as specified in Data Logger for all groups |
| Start Logger of Group # | Begins logging data as specified by Data Logger group number |
| Stop Logger of Group # | Discontinues logging data as specified by Data Logger group number |
| Clear Log Memory | Clears all data collected in HMC memory by the Data Logger |
| Move to Latest Historical Alarm | Move to the last recorded alarm in the list of historic alarms |
| Move to Oldest Historical Alarm | Move to the oldest recorded alarm in the list of historic alarms |
| Move to Latest Alarm | Move to the last recorded alarm in the list of active alarms |
| Move to Oldest Alarm | Move to the oldest recorded alarm in the list of active alarms |
| Start Printing of Group # | Begins printout of data as specified by Data Logger group number |
| Stop Printing of Group # | Discontinues printout of data as specified by Data Logger group number |
| Clear Historical Alarm Memory | Clears out all alarms listed in the Historic Alarm list |
| Show Ethernet Configuration Screen | Displays a predefined window that allows the user to change Ethernet settings during runtime. |
| Copy Screen Data to USB | Copy data to the attached USB drive. |
| Copy Screen Data to SD Card | Copy data to the attached SD card. |
| Show Login Screen | Displays a user login screen to enable Screen Access Levels. |
| Log Out | Logs out the current user. |
| Change Password | Allows the current user to change their password. Password changes are not retained through power cycle. |
| Start External Logger for All Groups | Begins logging data as specified in Data Logger for all external groups |
| Stop External Logger for All Groups | Discontinues logging data as specified in Data Logger for all external groups |
| Start External Logger of Group # | Begins logging data as specified by Data Logger external group number |
| Stop External Logger of Group # | Discontinues logging data as specified by Data Logger external group number |
Execution Table
Not all tasks are available for each method of execution (i.e. global vs. power-on, etc.) as some tasks are not suitable in some circumstances. Below is a table that indicates which tasks are available for each method of execution:
| Task Description | Touchscreen Buttons/ Membrane Keys | Screen Tasks | Power-On | Global |
|---|---|---|---|---|
| Press / Released Tasks | Pressed Tasks | Before / After Screen Tasks | While Showing Screen Tasks | |
| Go To Screen | x | x | x | |
| Previous Screen | x | x | ||
| Next Screen | x | x | ||
| Switch Screen From Tag | x | x | x | |
| Go to Popup Screen (Touchscreen models only) | x | |||
| Write Value to Tag | x | x | x | x |
| Add a Constant Value to a Tag | x | x | x | x |
| Subtract a Constant Value from a Tag | x | x | x | x |
| Add Tag B to Tag A | x | x | x | x |
| Subtract Tag B from Tag A | x | x | x | x |
| Turn Bit ON | x | x | x | |
| Turn Bit OFF | x | x | x | |
| Toggle Bit | x | x | x | |
| Copy Tag B to Tag A | x | x | x | x |
| Swap Tag A and Tag B | x | x | x | |
| Print Data | x | |||
| Set RTC | x | |||
| Copy HMI Block to HMI/PLC Block | x | x | x | x |
| Copy HMI/PLC Block to HMI Block | x | x | x | x |
| Copy RTC to PLC Block | x | |||
| USB Data Log Upload | x | x | x | x |
| Key Specific Tasks | x | x |
Task Descriptions
Add a Constant Value to a Tag
Description: Add a constant value to the current value residing in an internal HMC or external PLC tag.
Parameters:
- Tag – target address
- Number – constant value added to the target tag when the task executes.
- Type – format (Unsigned, Signed, Hexadecimal, BCD, Binary, or Float) of data.
Add Tag B to Tag A
Description: Add a value residing in the Tag B register to the current value residing in the Tag A register.
Parameters:
- Tag A: destination address
- Tag B: source address
Copy HMI Block to HMI/PLC Block
Description: Copies the values in a block of continuous registers beginning with the Tag B register to the block of registers designated with the Tag A register.
Parameters:
- Tag A: destination location of values. Can be either internal memory or a block of PLC registers
- Tag B: source location of values. Must be internal memory
- Number of words: This is the total number of consecutive registers copied.
- Enable Control: Allows tags to control this task.
Note: this option is only available if configuring a global task or a “while showing” screen task. Only internal HMC tags are used.
- Enable: if ON, allows task to be executed
- Done: HMC sets this coil after completion of task
- Error: HMC sets this coil if error performing task
Copy HMI/PLC Block to HMI Block
Description: Copies the values in a block of continuous registers beginning with the Tag B register to the block of registers designated with the Tag A register.
Parameters:
- Tag A: destination location of values. Must be internal memory
- Tag B: source location of values. Can be either internal memory or a block of PLC registers
- Number of words: This is the total number of consecutive registers copied.
- Enable Control: Allows tags to control this task.
Note: this option is only available if configuring a global task or a “while showing” screen task. Only internal HMC tags are used.
- Enable: if ON, allows task to be executed
- Done: HMC sets this coil after completion of task
- Error: HMC sets this coil if error performing task
Copy RTC to PLC Block (HM2000 only)
Description: Copies the real-time clock (RTC) data in the HMC to a consecutive set of 16-bit registers (using BCD format) in the PLC beginning with the target tag.
Parameters:
- First PLC Tag – target location that is used to write RTC values as follows:
- Address 0 (Specified by First PLC Tag): Hour (hh) – range 0 to 23
- Address +1: Minute (mm) – range 0 to 59
- Address +2: Seconds (ss) – range 0 to 59
- Address +3: Day of Month (DD) – range 1 to 31
- Address +4: Month (MM) – range 1 to 12
- Address +5: Year (YY) – range 0 to 99
- Address +6: Day of Week (DY) – range 1-7 with 1=Sunday,…, 7=Saturday
- Enable Control – Allows tags to control this task.
Note: this option is only available if configuring a global task or a “while showing” screen task. Only internal HMC tags can be used.
- Enable – if ON, allows task to be executed
- Done – HMC sets this coil after successful completion of task. Coil clears (reset) the next time the task executes.
- Error – HMC sets this coil if error occurs during performance of task. Coil clears (reset) the next time the task executes.
Copy Tag B to Tag A
Description: Copies a value residing in the Tag B register to the target Tag A register.
Parameters:
- Tag A: this is the destination address
- Tag B: this is the source address
- Enable Control: Allows tags to control this task.
Note: this option is only available if configuring a global task or a “while showing” screen task. Only Internal HMC tags are used.
- Enable: if ON, allows task to be executed
- Done: HMC sets this coil after completion of task
- Error: HMC sets this coil if error performing task
Go to Popup Screen (HMC2000 only)
Description: Displays targeted popup screen. On an HMC4000 you’d instead use “write value to tag” and “toggle bit” tasks, outlined in this section
Parameters:
- Popup Screen Number: Target popup screen to display
- Popup Screen Name: Assigned name of popup screen
Go to Screen
Description: Displays targeted base screen.
Parameters:
- Screen Number: Target base screen to display
- Screen Name: Assigned name of base screen
Print Data
Description: Prints the displayed screen (to a connected serial printer).
Set RTC (HMC2000 only)
Description: Change a set value (i.e. year, month, day, etc.) of the internal real-time clock of the HMC. This is done by configuring the key to increment or decrement the current value by 1 whenever the key is pressed.
Parameters:
- Real Time Clock Settings:
- Increment: add +1 to the current value
- Decrement: subtract from the current value
- Options:
- Year – range 0 to 99
- Month – range 1 to 12
- Date {Day of Month} – range 1 to 31
- Hour – range 0 to 23
- Minute – range 0 to 59
- Seconds – range 0 to 59
- Day of Week – range 1-7 with 1=Sunday,…, 7=Saturday
Subtract a Constant Value from a Tag
Description: Subtract a constant value from the current value residing in an internal HMC or external PLC tag.
Parameters:
- Tag: this is the target address
- Number: constant value to subtract from the target tag when the task is executed.
- Type: format (Unsigned, Signed, Hexadecimal, BCD, Binary, or Float) of data
Subtract Tag B from Tag A
Description: Subtract a value residing in the Tag B register to the current value residing in the Tag A register.
Parameters:
- Tag A: this is the destination address
- Tag B: this is the source address
Swap Tag A and Tag B
Description: Swaps (exchanges) the values residing in the Tag A register and the Tag B register.
Parameters:
- Tag A: target location for Tag B value
- Tag B: target location for Tag A value
Switch Screen from Tag
Description: Displays a new screen based upon the value in the Tag register. The requested screen must be a base screen. If the number in the tag register does not represent a valid screen, an error message displays on the HMC screen.
Parameters:
- Tag: target location that is read to determine screen
Toggle Bit
Description: Toggles (turn off/on) an internal HMC or external PLC tag coil/bit.
Parameters:
- Tag: this is the target address
Turn Bit ON
Description: Set (turn on) an internal HMC or external PLC tag coil/bit.
Parameters:
- Tag: this is the target address
- Enable Control: Allows tags to control this task.
Note: this option is only available if configuring a global task or a “while showing” screen task. Only internal HMC tags are used.
- Enable: if ON, allows task to be executed
- Done: HMC sets this coil after completion of task
- Error: HMC sets this coil if error performing task
Turn Bit OFF
Description: Clear (turn off) an internal HMC or external PLC tag coil/bit.
Parameters:
- Tag: this is the target address
- Enable Control: Allows tags to control this task
Note: this option is only available if configuring a global task or a “while showing” screen task. Only internal HMC tags are used.
- Enable: if ON, allows task to be executed
- Done: HMC sets this coil after completion of task
- Error: HMC sets this coil if error performing task
USB Data Log Upload
Description: Copies (uploads) a series of data registers into a USB Flash Drive
Parameters:
- DateTime: 16-bit register that is used to record the date and time
- Group: 16-bit register used to record group data
- Start Register For File Name or Filename option
- File Name
- Status Register
Write Value to Tag
Description: Write a constant value to an internal HMC or external PLC tag .
Parameters:
- Tag: this is the target address
- Number: constant value placed into the target tag when the task executes.
- Type: format (Unsigned, Signed, Hexadecimal, BCD, Binary, or Float) of data
- Enable Control: Allows tags to control this task
Note: this option is only available if configuring a global task or a “while showing” screen task Only internal HMC tags are used.
- Enable: if ON, allows task to be executed
- Done: HMC sets this coil after completion of task
- Error: HMC sets this coil if error performing task
Key Specific Tasks
Description: tasks execute using a membrane function key or the Multi-State Single-Task or Multi-State Multi-Task buttons on screen.
Parameters:
- Clear Data Entry: Clears value displayed in Data Entry window of keypad.
- Cancel Data Entry: Restores the original value in the Data Entry window of keypad and discontinues entry.
- Accept Data Entry: Writes the value displayed in Data Entry window of keypad to target register.
- Switch to Next Data Entry: Moves to next Bit/Register Entry object according to Object ID number.
- Switch to Previous Data Entry: Moves to prior Bit/Register Entry object according to Object ID number.
- Increase Value by 1: Adds +1 to the existing value.
- Decrease Value by 1: Subtracts from the existing value.
- Increase Digit by 1: Adds +1 to the highlighted digit of existing value. If the highest digit value is shown, then cycles back to lowest digit value.
- Decrease Digit by 1: Subtracts from the highlighted digit of existing value. If the lowest digit value is shown, then cycles back to highest digit value.
- Shift Value to Left: Shifts value one digit to the left (same as multiplying by 10).
- Move Cursor to Left: Shifts focus cursor one digit to the right.
- Move Cursor to Right: Shifts focus cursor one digit to the right.
- Sign Key (+/-): Toggles signed value.
- Sign Key (+/-) and 0: Toggles signed value, and then enters 0.
- Numeric keys 0-9 and A-F: Enters designated digit.
- Edit Bit On: Changes Bit Entry value to 1.
- Edit Bit Off: Changes Bit Entry value to 0.
- Acknowledge Alarm: Acknowledges the top-Most alarm displayed.
- Acknowledge All Alarms: Acknowledges all currently active alarms.
- Previous Alarms: Move all alarms down one line in the list of alarms.
- Next Alarm: Move all alarms up one line in the list of alarms.
- Previous Historical Alarm: Move all alarms down one line in the list of historic alarms.
- Next Historical Alarm: Move all alarms up one line in the list of historic alarms.
- Refresh All Trends: The Historical Trend graph is updated when this task is executed.
- Start Logger for all Groups: Begins logging data as specified in Data Logger for all groups.
- Stop Logger for all Groups: Discontinues logging data as specified in Data Logger for all groups.
- Start Logger of Group #: Begins logging data as specified by Data Logger group number.
- Stop Logger of Group #: Discontinues logging data as specified by Data Logger group number.
- Clear Log Memory: Clears all data collected in HMC memory by the Data Logger.
- Move to Latest Historical Alarm: Move to the last recorded alarm in the list of historic alarms.
- Move to Oldest Historical Alarm: Move to the oldest recorded alarm in the list of historic alarms.
- Move to latest Alarm: Move to the last recorded alarm in the list of active alarms.
- Move to oldest Alarm: Move to the oldest recorded alarm in the list of active alarms.
- Start Printing of Group #: Begins printout of data as specified by Data Logger group number.
- Stop Printing of Group #: Discontinues printout of data as specified by Data Logger group number.
- Clear Historical Alarm Memory: Clears out all alarms listed in the Historic Alarm list.
- Show Ethernet Configuration Screen: Displays a predefined window that allows the user to change Ethernet settings during runtime.
- Copy Screen Data to USB: Copy data to the attached USB drive.
- Copy Screen Data to SD Card: Copy data to the attached SD card.
- Show Login Screen: Displays a user login screen to enable Screen Access Levels.
- Log Out: Logs out the current user.
- Change Password: Allows the current user to change their password. Password changes are not retained through power cycle.
- Start External Logger for All Groups: Begins logging data as specified in Data Logger for all external groups.
- Stop External Logger for All Groups: Discontinues logging data as specified in Data Logger for all external groups
- Start External Logger of Group #: Begins logging data as specified by Data Logger external group number.
- Stop External Logger of Group #: Discontinues logging data as specified by Data Logger external group number.
Assigning Tasks
Global or Power On Tasks
To assign Global or Power-On Tasks, click the Tasks folder in the Project Information Window. Power On Tasks are executed one time when the HMC first powers up. Global Tasks are executed continuously while the HMC is running:
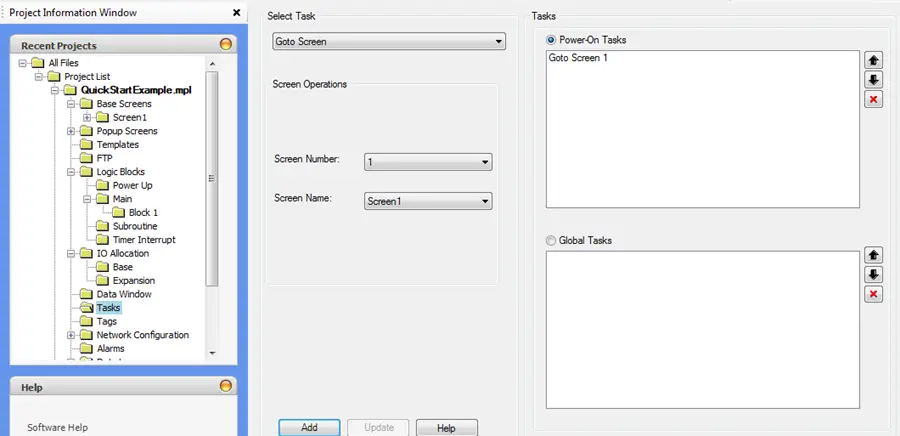
Notice the above; there is a default Power On task that tells the HMC which screen to display first.
Screen Tasks
To assign a Screen Task, click the Tasks subfolder located under the screen you wish to assign a task to.
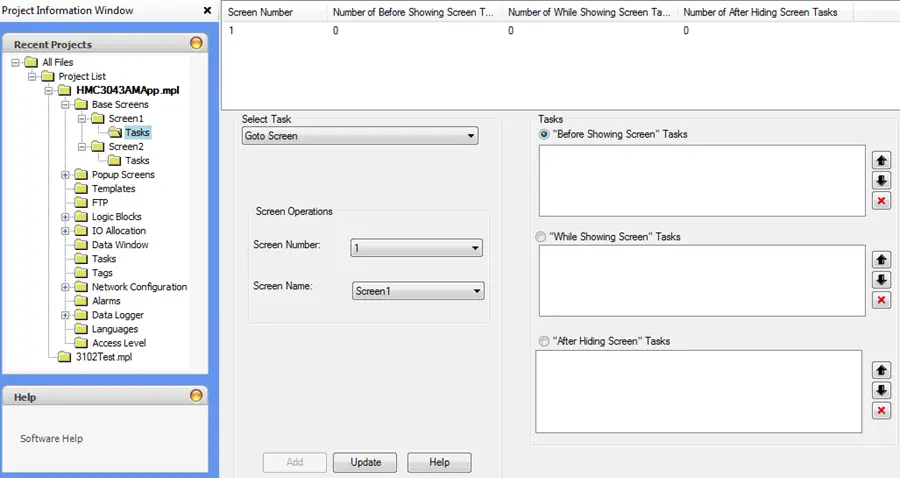
A summary of the number of assigned tasks for that screen shows across the top.
Creating a Task
Before you select which task you would like to execute(see Select Task below), you must click the radio button for when you would like the task to execute.
Instructions: Creating a Task
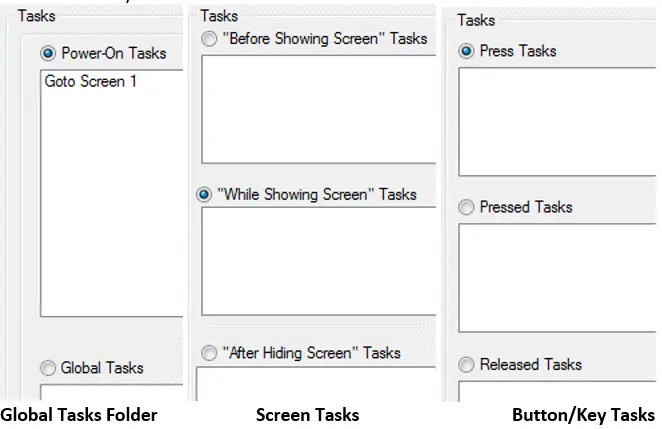
Select Task Execution Condition
Click the radio button for when you would like the task to execute.
Options are Power-On and Global in the global task folder
Before, While and After for screen tasks,
Press, Pressed, and Released for the button and function key tasks.
Select the Task
Click the drop-down menu to select one of the tasks available (see descriptions earlier in this chapter for more information on what each task does).
If additional parameters are required for the selected task, they will appear in the area below. Enter the required additional parameters, if needed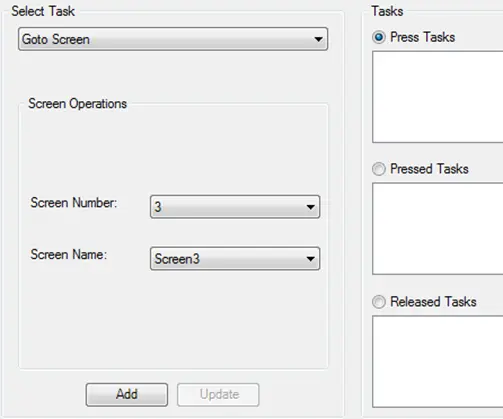
Click ADD button
Click the Add button. The task is entered into the selected tasks action.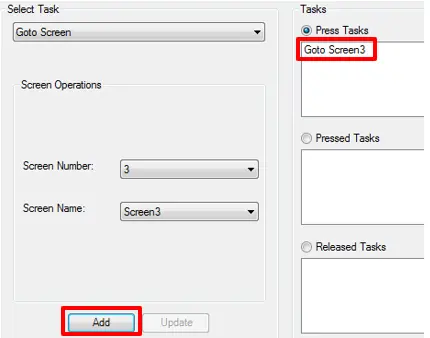
Modifying a Task
Follow the steps below to modify an existing task.
Instructions: Modifying a Task
Highlight existing Task
To change the parameters for an existing task, highlight the task you wish to modify. The Update button becomes active.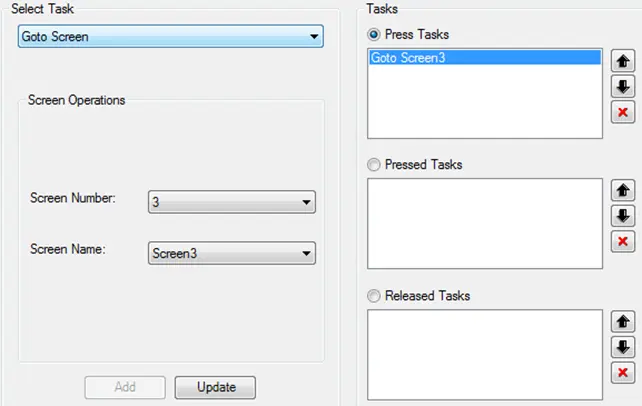
Change the task
Change your parameter to the desired option and click Update. The task has now been updated.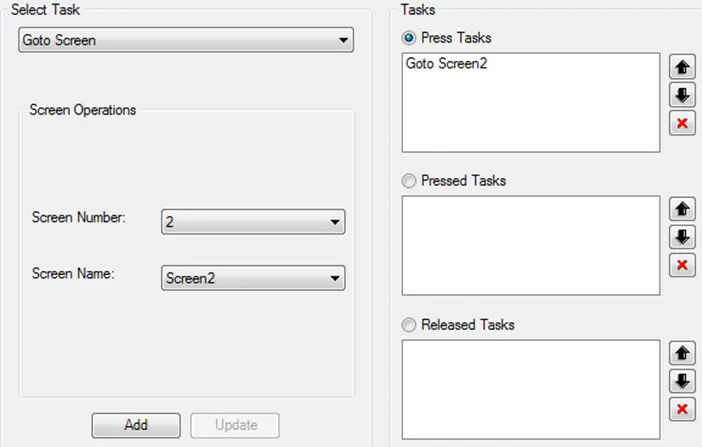
Deleting a Task
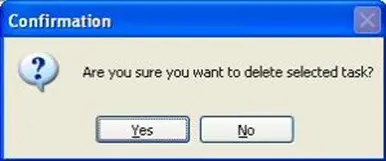
To delete a task, highlight the task you wish to delete and click the X button. A popup dialog box appears, asking if you want to remove the task.
Task Order of Operation
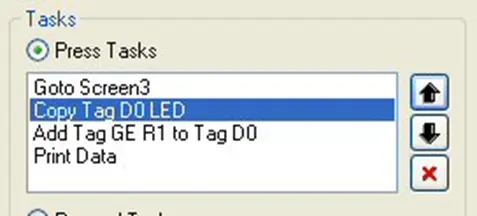
You can create multiple tasks for each key action. During operation, the HMC executes the list of tasks from top to bottom, in the order that they appear. There is no limit to the number of tasks you can add, (except for the overall memory limit of the HMC).
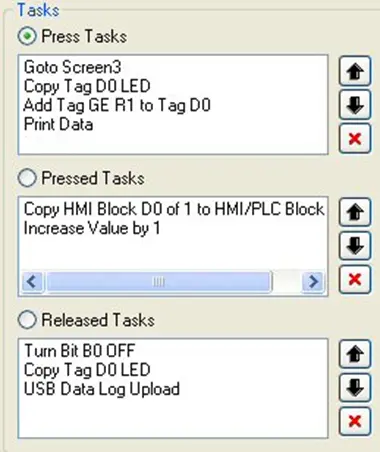
If you wish to reorder the tasks listed, simply select a task and use the up/down arrows to rearrange the order: