
Register-based Objects
There are many options for displaying and writing to 16/32-bit registers. Register-based objects display the value in an internal or PLC register and allow the operator to write new values. Register-based objects can also display predefined messages or images depending upon the ‘state’ or range of values in the register.

Word Lamp
Word lamps display predefined text labels or images shown according to the ‘state’ of the target address. Each state represents a single value or range of values tied to a particular text label or image. The HMC continuously polls the target register to determine which state image to display. A maximum of 32 states are supported. Word lamps are used where more than two choices are required. For example, a tri-state condition with Run, Auto, and Manual modes may be indicated using a word lamp.
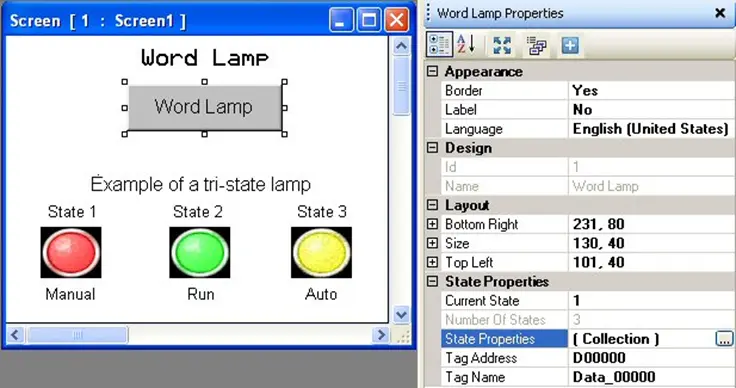
Place a Word Lamp object on screen
- Use one of the following:
- click Draw > Display Objects > Word Lamp from the standard menu
- click Advanced Objects > Word Lamp from the Draw toolbar
- Move cursor to a start point for the button object. Click and hold mouse cursor.
- Drag mouse cursor to an end point for the button object and release. The button appears on screen and the Word Lamp Properties box displays.
Word Lamp Properties Options
- Border (description) (HMC2000 only) – add a line around the perimeter of the object.
- Label (description) (HMC2000 only) – option to have a label appear on the top/bottom of the object.
- Language (description) – configure displayed text for up to 9 languages per object.
- Text Alignment (description) – Determines the alignment of the text in relation to the size of the button.
- Transparency – Sets the object as transparent or not.
- Design (description) – identifies object.
- Layout (description) – coordinates (i.e. size and position) for the object.
- Current State – shows the current state displayed on the Word Lamp for editing.
- Number of States – indicates the total number of states configured for this particular word lamp. This attribute cannot be modified here. Use State Properties to add/delete states.
- State Properties (Collection) – use to create the states and assign attributes for each particular state. Click the button to display the State Properties popup dialog box:
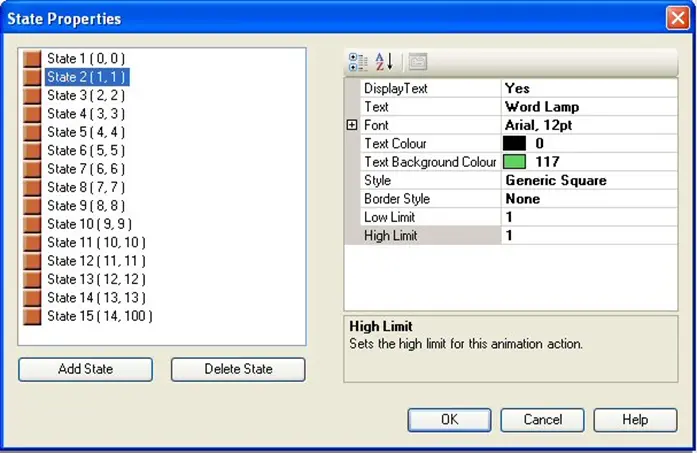
- The left side of the State Properties box shows all of the States currently configured. There are a maximum of 32 states per Word Lamp.
- Add State – click this button to add a new state (always appended to the bottom of the list).
- Delete State – click one of the States in the list box to highlight and then click this button to delete it
- The right side of the State Properties box shows the configuration for the highlighted state:
- Text Background Color – determines the fill or background color of the state. Click the button to display the color palette and select a color.
- Text Color – determines the text color. Click the button to display the color palette and select a color.
- Gradient (description) – Allows you to make the background color a gradient of two colors
- Border Style – the style or appearance of the button. Options are Raised, Etched, Bump, Sunken, Frame, Flat and None.
- Display Text – option to display what is written in the Text field on the button for that state.
- Font (description) – the text attributes, follows the same properties as top-level font properties
- High Limit – enter the maximum value associated with this particular state.
- Low Limit – enter the minimum value associated with this particular state. Any value read from the target PLC address that is within the Low Limit and High Limit will display this state.
- Style – options are Generic Square, Circle, Rounded Rectangle, User defined Images, or From Picture Library.
- Text – label applied to that particular state. Default text is ‘Word Lamp’.
- Tag Name (description) – this is the tag name of the target register that is monitored.
Resize a Word Lamp object
Move the mouse pointer over one of the resize handles. When the pointer changes to a double-headed arrow, simply click and drag to a new location.

Numeric Display
Numeric Display shows the current value of an 8/16/32-bit register. The value can be displayed using a number of formats (i.e. signed, unsigned, floating point), and special effects (ex. flash, color, visibility). The numeric display object supports linear scaling (engineering units) with the ability to scale the read value based upon two mathematical operations. When a numeric display is on a screen of the HMC, the HMC continuously polls the target register to show the current value.
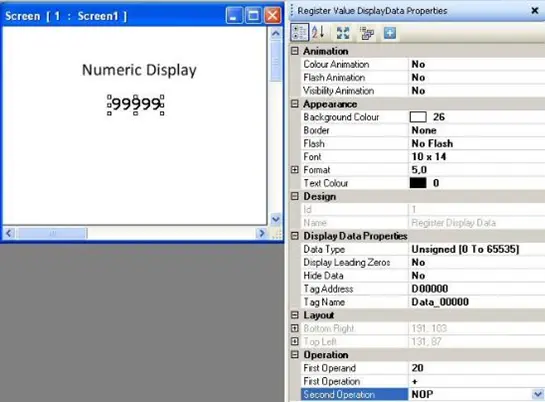
Place a Numeric Display object on screen
- Use one of the following:
- click Draw > Display Objects > Data Display > Numeric Display from the standard menu
- click Show Data > Numeric Display from the Draw toolbar
- click the Numeric Display icon in the Objects toolbar
- Move cursor to a start point for the button object. Click to place the object on screen.
- The object appears on screen and the Register Value Display Data Properties box displays.
Register Value Display Data Properties Options
- Color Animation (description) – dynamically change the color of the object.
- Flash Animation (description) – dynamically ‘flash’ object.
- Visibility Animation (description) – make the object disappear or become ‘invisible’.
- Background Color (description) – option to select a color as a ‘backdrop’ to the object.
- Border (description) – add a line around the perimeter of the object.
- Flash (description) – continuously ‘flashes’ the object.
- Font (description) – select the font of the displayed text
- Format – select optional decimal point display and total number of digits to show. You can either type in numbers at the top with the following syntax: “<number of digits>,<number of digits after decimal point>” (eg 5,2 for a number like 123.45)
- Digits after Decimal Point – used to display the value in the target register with a decimal point. Maximum of 10 digits.
- Number of Digits – represents the total number of digits before and after the decimal point (if used). Maximum of 10 digits.
- Text Alignment (HMC4000 only) – Determines the alignment of the text in relation to the size of the button.
- Text Color – Determines the color of the text. Click to display the color palette.
- Transparency – Sets the object as transparent or not.
- Design (description) – identifies object.
- Data Type (description) – Define the data type of the displayed value.
- Display Leading Zeroes – when enabled, data has leading zeroes to the left of the value.
- Hide Data – if enabled, data will be represented with asterisks ‘***’. This feature is for security password entry.
- Tag Name (description) – this is the Tag name of the target register that is monitored.
- Layout (description) – coordinates (i.e. size and position) for the object.
- Operation – use this feature to perform a mathematical calculation on the object data.
- First Operation – this is the first mathematical operation performed on the data object. Options are NOP (no operation), addition (+), subtraction (-), multiplication (*), and division (/).
- First Operand – this constant value applies to the value in the targeted data object according to the mathematical operand listed under First Operation.
- Second Operation – this is the second mathematical operation performed on the data object.
- Second Operand – this constant value applies to the computed value of the First Operation according to the mathematical operand listed under Second Operation.
Resize a Numeric Display object
Resize the Numeric Display object by changing the Font attribute. You can also move this object.

Message Display
Message Display shows a predefined set of messages depending upon the value read in a targeted register. Messages can be of varying length (max of 40 characters). Maximum number of messages is 255.
Note: if the value read from the targeted register is not within any of the predefined ranges, then the message displayed is blank. When a message data display is on a screen of the HMC, the HMC continuously polls the target register.
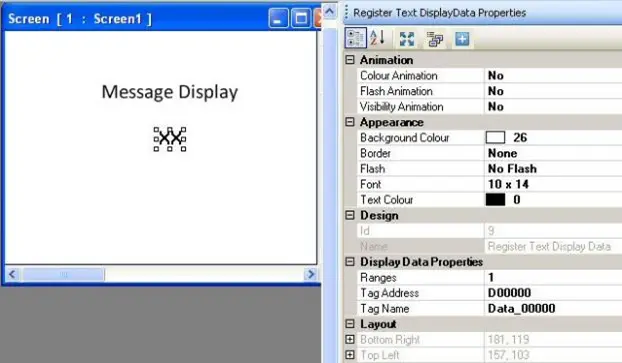
Place a Message Display object on screen
- Use one of the following:
- click Draw > Display Objects > Data Display > Message Data from the standard menu
- click Show Data > Message Data from the Draw toolbar
- click the Message Display icon in the Objects toolbar
- Move cursor to a start point for the button object. Click to place the object on screen.
- The object appears on screen and the Register Text Display Data Properties box displays.
Register Text Display Data Properties Options
- Color Animation (description) – dynamically change the color of the object.
- Flash Animation (description) – dynamically ‘flash’ object.
- Visibility Animation (description) – make the object disappear or become ‘invisible’.
- Background Color (description) – option to select a color as a ‘backdrop’ to the object.
- Border (description) – add a line around the perimeter of the object.
- Flash (description) – continuously ‘flashes’ the object.
- Font (description) – select the font of the displayed text
- Text Alignment (HMC4000 only) – Determines the alignment of the text in relation to the size of the button.
- Text Color – Determines the color of the text. Click to display the color palette.
- Transparency – Sets the object as transparent or not.
- Design (description) – identifies object.
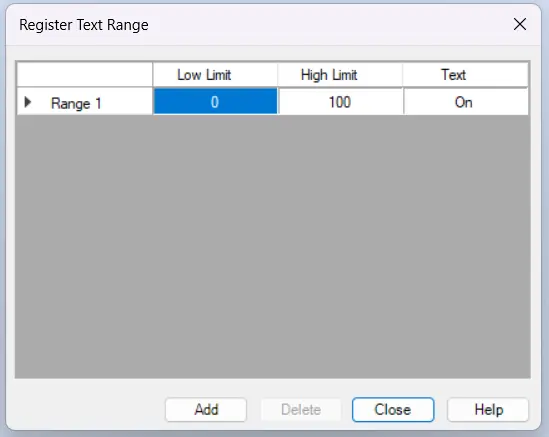
- Ranges – click the directory button to display the Register Text Range popup window
- Register Text Range – Maximum of 255 ranges allowed. Enter the Low Limit and High Limit values (0 to 65535) and the text to display when the value read from the targeted register is within range. Each text message has a maximum of 40 characters.
- Tag Name (description) – this is the Tag name of the target register that is monitored.
- Layout (description) – coordinates (i.e. size and position) for the object.
Resize a Message Display object
Resize the Message Display object by changing the Font attribute. You can also move this object.

Write Value to Tag
The Write Value to Tag button writes a predefined constant value to the target tag register each time the button is pressed.
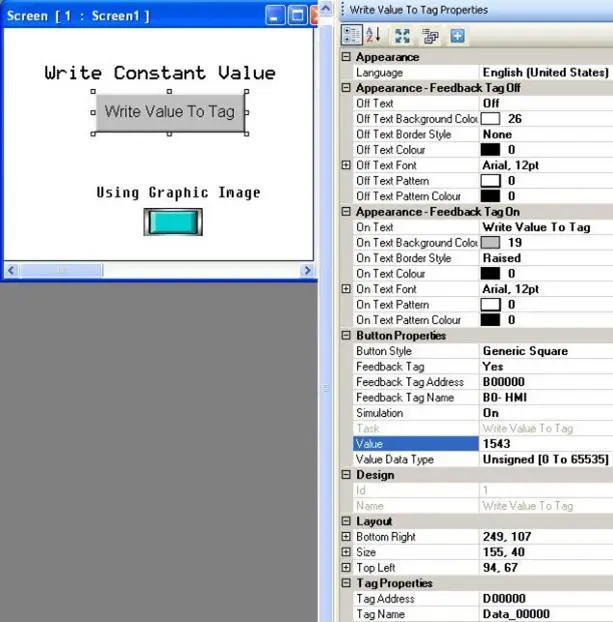
Place a Write Value to Tag button object on screen
- Use one of the following:
- click Draw > Buttons > Word Action > Write Value to Tag from the standard menu
- click Quick Buttons > Write Value to Tag from the Draw toolbar
- Move cursor to a start point for the button object. Click and hold mouse cursor.
- Drag mouse cursor to an end point for the button object and release. The button appears on screen and the Write Value to Tag Properties box displays.
Write Value to Tag Properties Options
- Visibility Animation (description) – make the object disappear or become ‘invisible’.
- Language (description) – highlight the language that must be selected to display the entered text.
- Text Alignment – Determines the alignment of the text in relation to the size of the button.
- Transparency – Sets the object as transparent or not.
- Appearance Feedback Tag On/Off (description) – select the On and/or Off labels.
- Gradient (HMC4000 only) (description) – Allows you to make the background color a gradient of two colors
- Button Style (description) – selects a style or ‘look’ to the button.
- Enable Control Bit (description) – Enables and disables the Control bit for the button.
- Feedback Tag (description) – Enable this feature and select the same tag for both the target address and the feedback tag address, if you wish to see the button change state (i.e. go from an ‘off’ or untouched look to an ‘on’ or touched look).
- Simulation – select ‘On/Off’ to see how button looks in that state (only available if Feedback Tag is ‘Yes’).
- Task – write Value to Tag (cannot be modified)
- Value – this is the constant value that is written to the selected Tag.
- Value Data Type (description) – select the data format used to write the value to the target register. Options are unsigned, signed, hexadecimal, BCD, and binary.
- Design (description) – identifies object..
- Layout (description) – coordinates (i.e. size and position) for the object.
- Tag Name (description) – this is the Tag name of the target register to write to.
Resize a Write Value to Tag button object
Move the mouse pointer over one of the resize handles. When the pointer changes to a double-headed arrow, simply click and drag to a new location.

Add Value to Tag
The Add Value to Tag button adds a predefined constant value to the target tag register each time the button is pressed. The HMC reads the current value in the register and then adds to this value the predefined constant.
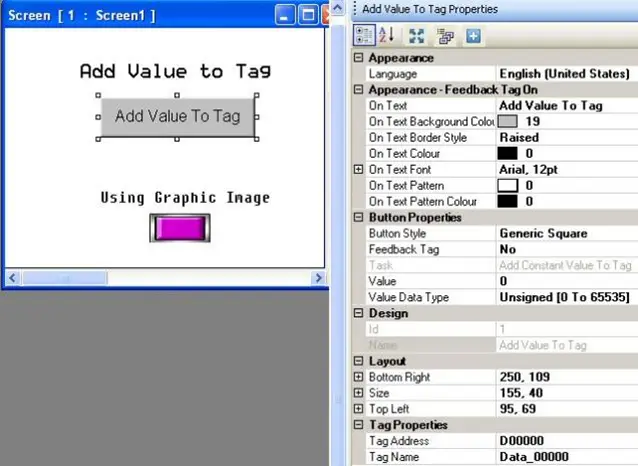
How to place an Add Value to Tag button object on a screen
- Use one of the following:
- click Draw > Buttons > Word Action > Add Value to Tag from the standard menu
- click Quick Buttons > Add Value to Tag from the Draw toolbar
- Move cursor to a start point for the button object. Click and hold mouse cursor.
- Drag mouse cursor to an end point for the button object and release. The button appears on screen and the Add Value to Tag Properties box displays.
Options available using the Add Value to Tag Properties dialog box
- Visibility Animation (description) – make the object disappear or become ‘invisible’.
- Language (description) – highlight the language that must be selected to display the entered text.
- Text Alignment – Determines the alignment of the text in relation to the size of the button.
- Transparency – Sets the object as transparent or not.
- Appearance Feedback Tag On/Off (description) – select the On and/or Off labels.
- Gradient (HMC4000 only) (description) – Allows you to make the background color a gradient of two colors
- Button Style (description) – selects a style or ‘look’ to the button.
- Enable Control Bit (description) – Enables and disables the Control bit for the button.
- Feedback Tag (description) – Enable this feature and select the same tag for both the target address and the feedback tag address, if you wish to see the button change state (i.e. go from an ‘off’ or untouched look to an ‘on’ or touched look).
- Simulation – select ‘On/Off’ to see how button looks in that state (only available if Feedback Tag is ‘Yes’).
- Task – Add Constant Value to Tag (cannot be modified)
- Value – this is the constant value that is added to the selected Tag.
- Value Data Type (description) – select the data format used to add the value to the target register. Options are unsigned, signed, hexadecimal, BCD, and binary.
- Value Maximum Limit – Specifies the maximum value that can be entered into the tag associated with the selected object.
- Design (description) – identifies object..
- Layout (description) – coordinates (i.e. size and position) for the object.
- Tag Name (description) – this is the Tag name of the target register to add to.
Resize an Add Value to Tag button object
Move the mouse pointer over one of the resize handles. When the pointer changes to a double-headed arrow, simply click and drag to a new location.

Subtract Value from Tag
The Subtract Value to Tag button subtracts a predefined constant value from the target tag register each time the button is pressed. The HMC reads the current value in the register and then subtracts the predefined constant from this value.
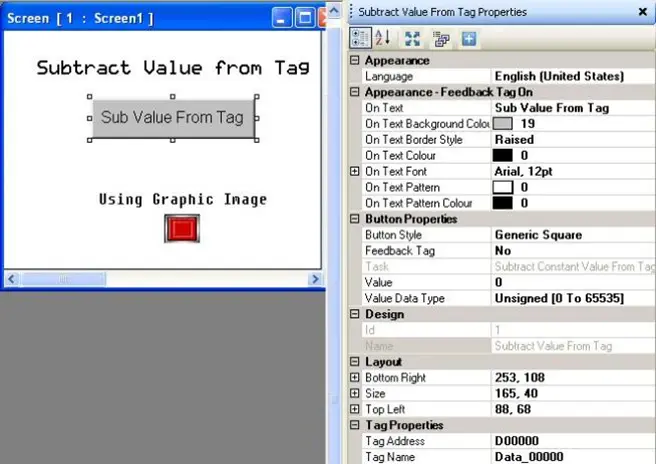
How to place a Subtract Value from Tag button object on a screen
- Use one of the following:
- click Draw > Buttons > Word Action > Subtract Value from Tag from the standard menu
- click Quick Buttons > Subtract Value from Tag from the Draw toolbar
- Move cursor to a start point for the button object. Click and hold mouse cursor.
- Drag mouse cursor to an end point for the button object and release. The button appears on screen and the Subtract Value from Tag Properties box displays.
Options available using the Subtract Value from Tag Properties dialog box
- Visibility Animation (description) – make the object disappear or become ‘invisible’.
- Language (description) – highlight the language that must be selected to display the entered text.
- Text Alignment – Determines the alignment of the text in relation to the size of the button.
- Transparency – Sets the object as transparent or not.
- Appearance Feedback Tag On/Off (description) – select the On and/or Off labels.
- Gradient (HMC4000 only) (description) – Allows you to make the background color a gradient of two colors
- Button Style (description) – selects a style or ‘look’ to the button.
- Enable Control Bit (description) – Enables and disables the Control bit for the button.
- Feedback Tag (description) – Enable this feature and select the same tag for both the target address and the feedback tag address, if you wish to see the button change state (i.e. go from an ‘off’ or untouched look to an ‘on’ or touched look).
- Simulation – select ‘On/Off’ to see how button looks in that state (only available if Feedback Tag is ‘Yes’).
- Task – Subtract Value From Tag (cannot be modified)
- Value – this is the constant value that is subtracted from the selected Tag.
- Value Data Type (description) – select the data format used to subtract the value from the target register. Options are unsigned, signed, hexadecimal, BCD, and binary.
- Value Minimum Limit – Specifies the minimum value that can be entered into the tag associated with the selected object.
- Design (description) – identifies object..
- Layout (description) – coordinates (i.e. size and position) for the object.
- Tag Name (description) – this is the Tag name of the target register to subtract from.
Resize a Subtract Value from Tag button object
Move the mouse pointer over one of the resize handles. When the pointer changes to a double-headed arrow, simply click and drag to a new location.

Add Tag B to Tag A
When pressed by the operator, causes HMC to read the current value in a defined register designated as Tag B and then add this value to the current value in a targeted register designated as Tag A.
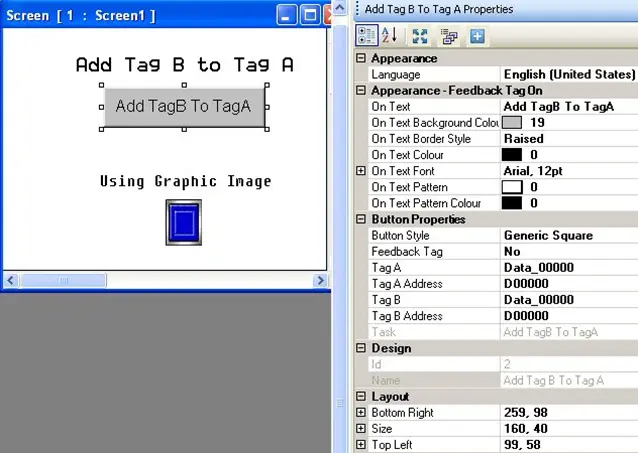
Place an Add Tag B to Tag A button object on screen
- Use one of the following:
- click Draw > Buttons > Word Action > Add Tag B to Tag A from the standard menu
- click Quick Buttons > Add Tag B to Tag A from the Draw toolbar
- Move cursor to a start point for the button object. Click and hold mouse cursor.
- Drag mouse cursor to an end point for the button object and release. The button appears on screen and the Add Tag B to Tag A Properties box displays.
Add Tag B to Tag A Properties Options
- Visibility Animation (description) – make the object disappear or become ‘invisible’.
- Language (description) – highlight the language that must be selected to display the entered text.
- Text Alignment – Determines the alignment of the text in relation to the size of the button.
- Transparency – Sets the object as transparent or not.
- Appearance Feedback Tag On/Off (description) – select the On and/or Off labels.
- Gradient (HMC4000 only) (description) – Allows you to make the background color a gradient of two colors
- Button Style (description) – selects a style or ‘look’ to the button.
- Enable Control Bit (description) – Enables and disables the Control bit for the button.
- Feedback Tag (description) – Enable this feature and select the same tag for both the target address and the feedback tag address, if you wish to see the button change state (i.e. go from an ‘off’ or untouched look to an ‘on’ or touched look).
- Simulation – select ‘On/Off’ to see how button looks in that state (only available if Feedback Tag is ‘Yes’).
- Tag A/B (description) – the two target tags used to add values
- Task – add Tag A to Tag B (cannot be modified)
- Value Data Type (description) – select the data format used for both Values. Options are unsigned, signed, hexadecimal, BCD, and binary.
- Design (description) – identifies object..
- Layout (description) – coordinates (i.e. size and position) for the object.
Resize an Add Tag A to Tag B button object
Move the mouse pointer over one of the resize handles. When the pointer changes to a double-headed arrow, simply click and drag to a new location.

Subtract Tag B from Tag A
When pressed by the operator, causes HMC to read the current value in a defined register designated as Tag B and then subtract this value from the current value in a targeted register designated as Tag A.
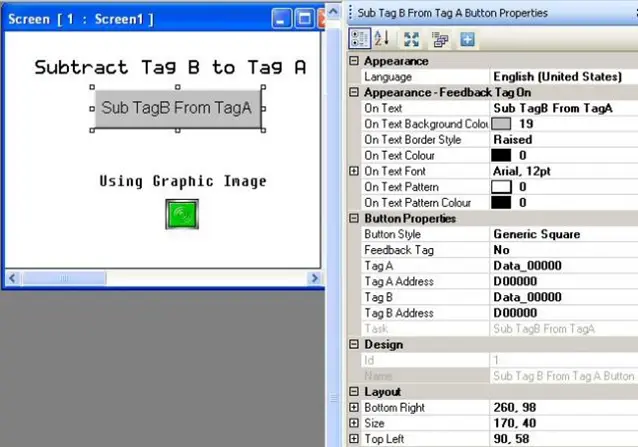
Place a Subtract Tag B from Tag A button object on screen
- Use one of the following:
- click Draw > Buttons > Word Action > Subtract Tag B from Tag A from the standard menu
- click Quick Buttons > Subtract Tag B from Tag A from the Draw toolbar
- Move cursor to a start point for the button object. Click and hold mouse cursor.
- Drag mouse cursor to an end point for the button object and release. The button appears on screen and the Subtract Tag B from Tag A Properties box displays.
Subtract Tag B from Tag A Properties Options
- Visibility Animation (description) – make the object disappear or become ‘invisible’.
- Language (description) – highlight the language that must be selected to display the entered text.
- Text Alignment – Determines the alignment of the text in relation to the size of the button.
- Transparency – Sets the object as transparent or not.
- Appearance Feedback Tag On/Off (description) – select the On and/or Off labels.
- Gradient (HMC4000 only) (description) – Allows you to make the background color a gradient of two colors
- Button Style (description) – selects a style or ‘look’ to the button.
- Enable Control Bit (description) – Enables and disables the Control bit for the button.
- Feedback Tag (description) – Enable this feature and select the same tag for both the target address and the feedback tag address, if you wish to see the button change state (i.e. go from an ‘off’ or untouched look to an ‘on’ or touched look).
- Simulation – select ‘On/Off’ to see how button looks in that state (only available if Feedback Tag is ‘Yes’).
- Tag A/B (description) – the two target tags used to subtract values
- Task – Subtract Tag B from Tag A (cannot be modified)
- Value Data Type (description) – select the data format used for both Values. Options are unsigned, signed, hexadecimal, BCD, and binary.
- Design (description) – identifies object..
- Layout (description) – coordinates (i.e. size and position) for the object.
Resize a Subtract Tag B from Tag A button object
Move the mouse pointer over one of the resize handles. When the pointer changes to a double-headed arrow, simply click and drag to a new location.

Numeric Entry
Numeric Entry shows the current value of an 8/16/32-bit register and allows the operator the ability to write a new value. The value displays using a number of formats (i.e. signed, unsigned, floating point, and ASCII). The numeric entry object supports linear scaling (engineering units) with the ability to scale the read value based upon two mathematical operations. When a numeric entry is on a screen of the HMC, the HMC continuously polls the target register to show the current value.
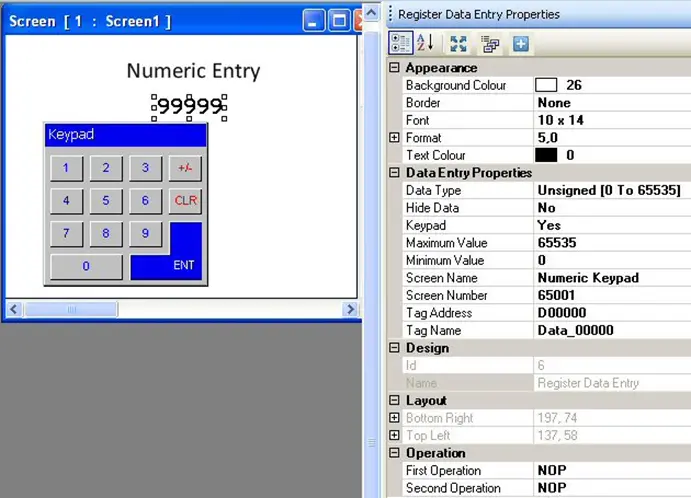
Place a Numeric Entry object on screen
- Use one of the following:
- click Draw > Input Objects > Data Entry > Numeric Entry from the standard menu
- click Edit Data > Numeric Entry from the Draw toolbar
- click the Numeric Entry Display icon in the Objects toolbar
- Move cursor to a start point for the button object. Click to place the object on screen.
- The object appears on screen and the Register Data Entry Properties box displays.
Register Data Entry Properties Options
- Visibility Animation (description) – make the object disappear or become ‘invisible’.
- Background Color (description) – option to select a color as a ‘backdrop’ to the object.
- Border (description) (HMC2000 only) – add a line around the perimeter of the object.
- Font (description) – select the font of the displayed text
- Format – select optional decimal point display and total number of digits to show. You can either type in numbers at the top with the following syntax: “<number of digits>,<number of digits after decimal point>” (eg 5,2 for a number like 123.45)
- Digits after Decimal Point – used to display the value in the target register with a decimal point. Maximum of 10 digits.
- Number of Digits – represents the total number of digits before and after the decimal point (if used). Maximum of 10 digits.
- Text Alignment (HMC4000 only) – Determines the alignment of the text in relation to the size of the button.
- Text Color – Determines the color of the text. Click to display the color palette.
- Data Type (description) – Specifies the Data Type of the Value to display and edit
- Enable Control Bit (description)(HMC2000 only) – if enabled, the HMC monitors the selected bit tag address. ‘0’ prevents a new entry, ‘1’ allows normal editing by the operator.
- Edit Existing Data (HMC4000 only) –
- Hide Data – if enabled, data will be represented with asterisks ‘***’. This feature used for security password entry.
- Keypad (HMC2000 only) – selects using a popup keypad (Yes) or use a keypad on located on the same screen (No)
- Maximum/Minimum Value – select the limits that the operator enters as a valid number
- Screen Name/Number (HMC2000 only) – determines which popup keypad to use
- Tag Name (description) – this is the Tag that will be displayed and edited
- Design (description) – identifies object..
- Layout (description) – coordinates (i.e. size and position) for the object.
- Operation – use this feature to perform a mathematical calculation on the object data.
- First Operation – this is the first mathematical operation performed on the data object. Options are NOP (no operation), addition (+), subtraction (-), multiplication (*), and division (/).
- First Operand – this constant value applies to the value in the targeted data object according to the mathematical operand listed under First Operation.
- Second Operation – this is the second mathematical operation performed on the data object.
- Second Operand – this constant value applies to the computed value of the First Operation according to the mathematical operand listed under Second Operation.
Resize a Numeric Entry object
Resize the Numeric Entry object by changing the Font attribute. You can also move this object.
Numeric Entry object and Popup Screens
The Numeric Entry object is not permitted on a popup screen – only base and template screens.