
What are Alarms?
At the most basic level, alarms are simply predefined messages that display on the HMC screen when a bit attached to each message triggers. This is used in circumstances in which the HMC operator must be notified immediately of a problem or event that is occurring in the system.
Alarm features:
- Configure up to 256 unique alarm messages for each project
- Auto acknowledge feature allows one key press to acknowledge each particular alarm or all active alarms at once
- Option when alarm memory is full, to erase the previous alarms and log new alarms from the beginning or simply to stop logging any new alarms that occur.
- Alarm messages trigger by bits that are part of ‘word’ registers. Option to select random 16-bit word registers (more versatility but slower response time) or 16 consecutive word registers (less versatile but quick response time)
- Log feature: captures event to non-volatile memory to view at a later date
- Severity (range 0 to 9) – determines priority of alarms
- Alarm Print Notification: if selected, alarm message is sent to serial printer that is connected to the HMC.
Constructing an Alarm Database
Configure the alarm global parameters
First, you must select three parameters that determine how your HMC unit works with alarms. These settings are configured either in the Project Configuration dialog box (select Project menu, then Properties, then click the Alarm tab, only available on the HMC2000s) or go directly to the Alarm Project Configuration Properties dialog box (click the Alarms folder in the Project Information Window) and then click the Change Properties button.
Parameter 1 – 16 random or consecutive registers (HMC2000 only)
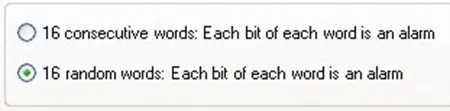
Each alarm message must tag to a bit. When the bit is set, it will trigger the display of the alarm message. The HMC monitors bits in word registers to ensure a fast response time. Therefore, each group of 16 alarm messages requires one 16-bit word register. Therefore, for 256 alarm messages, the HMC must monitor 16 word registers. The MAPware software provides two options for the HMC to read word registers allocated for alarms:
- 16 consecutive words: this option reserves sixteen word registers in consecutive order.
- 16 random words: this option allows you to randomly select word registers. They do not have to be in consecutive order and you do not have to allocate 16 registers.
Select 16 consecutive words if you:
- Plan to configure all or most of the 256 alarm messages available in each project.
- Wish to ensure maximum speed and minimize any delays in displaying alarm messages.
Select 16 random words if you:
- Do not need 256 alarms and, therefore, do not wish to ‘tie up’ so many registers in the PLC for alarm messages.
- Do not have 16 consecutive registers available or would rather separate the registers into random groups.
Parameter 2 – Auto acknowledge
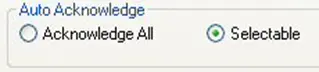
The acknowledge feature is used to indicate that the plant floor operator has seen an alarm message. Do this by:
- Changing the color of the displayed message for an active alarm or
- Removing the displayed message from the screen if the alarm is no longer active
This parameter provides the option of configuring one bit/coil to acknowledge all alarms (Acknowledge All) or select unique bit/coils for each alarm message that displays (Selectable).
Parameter 3 – If memory is full
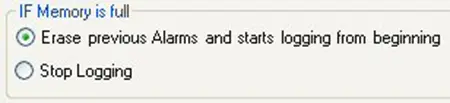
This option determines how the HMC unit behaves when the memory allocated to historical alarms is full. Two options are:
- Erase previous alarms and log from the beginning – this option will erase the oldest alarms recorded, making room for new alarms that occur.
- Stop logging – use this option to make sure no prior alarms are lost. However, when the alarm memory is full, then no new alarms display.
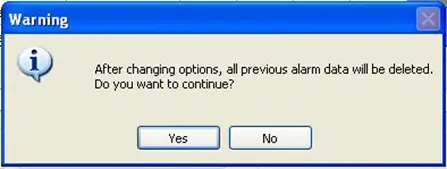
Note: Make sure you perform the above steps first before you start creating alarm messages; you can always return to this menu to change the global alarm settings but if you do, all alarm messages created are erased
Create the alarm tags using the Tag Database
Before you can start creating your alarm messages, you must open the tag database (Tags folder in the Project Information Window) and assign word registers for the alarm messages. The word registers can be internal HMC memory or registers located in a connected PLC. Calculate how many alarm tags you need based upon the number of alarm messages that you wish to display. Use register memory, not bit/coil memory since alarms tag to bits in word registers (16 messages/bits per register). Also, determine how many Acknowledge bit/coils you require and create these as well.
Note: if you selected ’16 consecutive words’ option above, then you must create 16 consecutive data registers for alarms before you continue to the next step.
Generate the alarm messages
Click the Alarms folder in the Project Information Window. If you have selected the Auto Acknowledge – Acknowledge All alarms option (see Step 1. Parameter 2 above), then you must select a tagged coil/bit using the pull-down box next to Acknowledge All Alarms On Bit/Coil. If you do not enter this first, the following error message displays on the Alarm dialog box “Please select Acknowledge All Alarms field first.”
- If 16 random words is chosen in Step 1a 16-bit word register, select the bank of messages (i.e. 00 (000-015)) that you wish to configure under Alarm Section. Under Tag List, click the word register that you wish to tag to this bank, then click Assign.
- If 16 consecutive words are selected, go directly to the Tag List and click a group of 16 consecutive registers, then click Assign. If you see this:
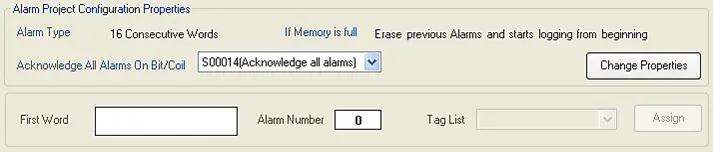
The Assign button is unavailable. This means that MAPware does not see 16 consecutive registers in the tag database. Go back into the tag database and verify that 16 consecutive data registers are available for the 256 alarms.
HMC4000 Series Alarm Database Parameters
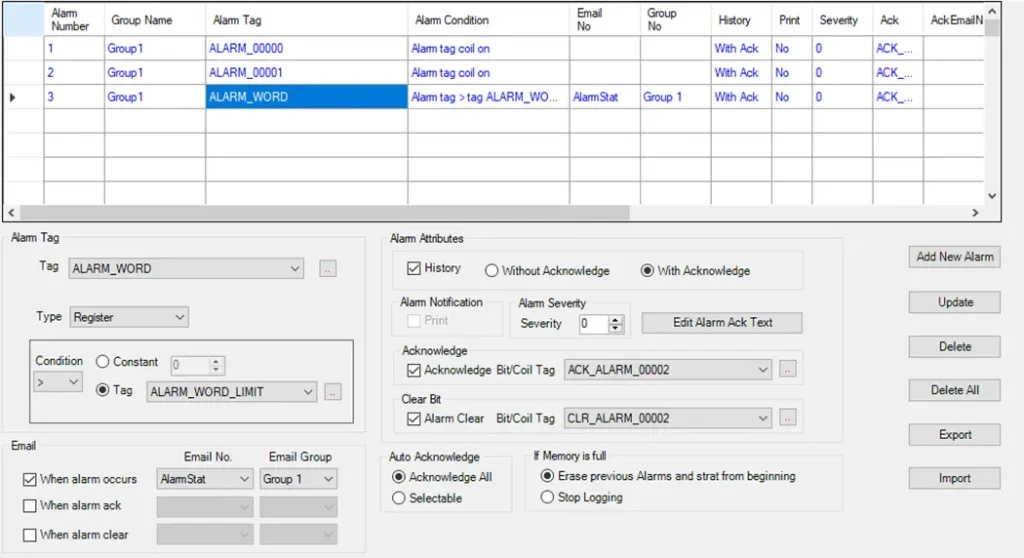
In the Project Information Window of your HMC4000 Series project, select the Alarms folder to access the Alarm Database.
Alarm Tag
Tag
Select the Tag that the alarm will respond to from existing tags in the Tag Database or create a new tag.
Type
The Type can be either a Coil or a Register (or Register Bit).
If using a coil or register bit for the alarm, the option is given to trigger the alarm if the state is ON or OFF. Additionally if using a register bit the Bit Number needs to be specified.
Alarm Attributes
History
Selecting the History option will allow the alarm to be displayed in a Historical Alarm List object on the screen. Optionally, Acknowledgement data can be displayed in this object as well.
Alarm Notification
In previous models, selecting the “Print” option would send a notification of the alarm to a serial printer. This option is not available for the HMC4000 Series. Use Email instead to push alarm notifications.
Alarm Severity
Set a Severity ranking from 0-9. Alarm Lists can be configured to display only alarms of a certain severity.
Edit Alarm Ack Text
This option allows changes to be made to the text that is displayed regarding an alarm’s Acknowledge status in the Real Time Alarm Display Object.
Acknowledge/Clear Bit Tag
Alarms can be assigned a bit tag to acknowledge or clear them from logic if necessary. Alarms can be cleared from the screen using the buttons on the Alarm List object.
Auto Acknowledge
Select whether the alarm will respond to the “Ack All” button or task or must be acknowledged individually.
If Memory Is Full
The response to full memory can either be to erase all alarms from the beginning or stop logging alarms.
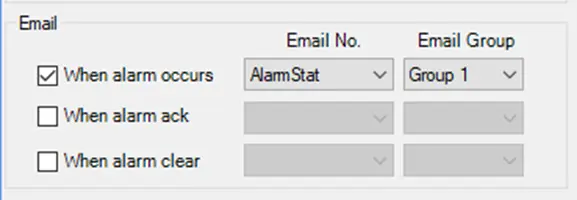
The Alarm can generate an email when it occurs, when it is acknowledged, and when it is cleared. Select the Email Screen and the group to which it will be sent.
Add New Alarm
To create an alarm, configure the settings for the alarm then click Add New Alarm.
Update
To update an alarm, select an existing alarm from the table, modify the configuration and then click Update.
Export/Import
The alarm table can be exported/imported as a .csv file. This allows quick changes to be made to large numbers of alarms in a spreadsheet editor or share alarms between HMC4000 projects.
Configuring Alarm Messages
Now that you have determined the global settings for your alarms and created the tags to use (see above section), you are now ready to configure each alarm message, along with the particular attributes assigned to each message.
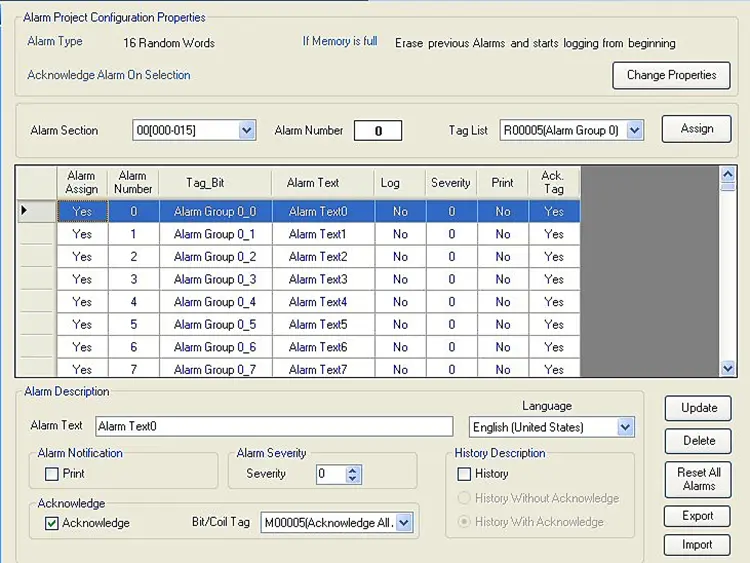
To do this, you must go back to the Alarm Project Configuration Properties dialog box (click the Alarms folder in the Project Information Window):
How to configure alarm messages
See the steps below to properly configure alarm messages in MAPware-7000
Instructions: How to configure alarm messages
Select the alarm you wish to edit/modify
To enter or modify a particular alarm message, you must click the Alarm Number of the alarm you wish to edit – a forward page symbol appears in the first column to indicate the selected alarm. The table indicates the current settings for each alarm and cannot be directly edited.Alarm Assign – indicates if this particular alarm is active (assigned).
Alarm Number – designated number assigned to each alarm. Range is 0 to 255.
Tag Bit – this is the particular bit (005) of the word register (see Tag List above) monitored by the HMC for this alarm. When this bit is set (1), the predefined alarm text for this alarm displays in the Alarm List object.
Alarm Text – the text that is shown in the Alarm List object when this alarm is activated.
Log – option to capture the alarm to internal HMC memory so that it can be viewed at a later date (see History section)
Severity – indicates the severity level (0-9) of each alarm (see Alarm Severity below).
Print – option to send alarm text to a serial printer attached to the HMC
Ack Tag – determines if an acknowledge bit is assigned to this message.
Note: if the Acknowledge All Alarm global feature is used, then this option is preset to Yes and cannot be changed
Enter the Alarm Text
In the Alarm Description section, under Alarm Text, enter the text that will appear when this alarm triggers. A maximum of 40 characters is permitted.If you are using more than one language, click the Language pull-down box to configure a unique alarm message per language selected.Alarm Notification
Check the Print box to send a copy of the alarm text message to a connected serial printer when an alarm activates.Alarm Severity
Assign a severity level to each alarm (default is 0).Alarms display in the Alarm List object according to the severity level assigned to each alarm. This is a useful feature if you wish to prioritize alarms. For example, if an Alarm List object is set to Severity Level 2, then it will only display active alarms whose severity level is 2, 3, 4, on up to and including 9. Any alarm that is configured with a Severity level of 0 or 1 will not be displayed. With this feature, you could set up an Alarm List object that only shows alarms of the ‘highest’ priority. To do this, you might set the severity level to 9, then it would only show alarms with a Severity Level of 9.Acknowledge
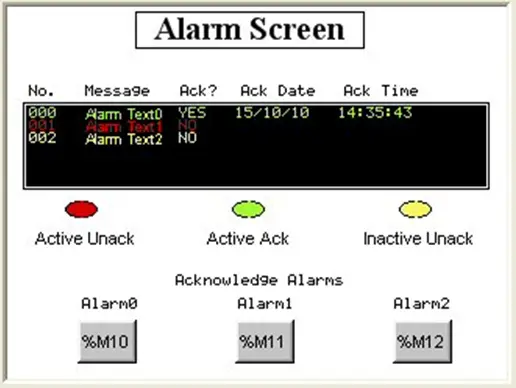
This option is available if the global setting (see last section) for Auto Acknowledge has been set to Selectable. Then configure each alarm with a unique bit/coil tag address used to acknowledge the alarm. When the acknowledge bit is set (for example by using an Advanced Bit Button object) by the plant floor operator, the Alarm List object indicates that the alarm is acknowledged. This is accomplished by changing the color of the alarm text message, recording the Date/Time of acknowledgement on screen, and/or simply using ‘Yes/No’ text in the Alarm List objectIn this example, Alarm0 (green) activates, and then is acknowledged by the plant floor operator. Alarm1 (red) is also activate but has not been acknowledged. Finally, Alarm2 (yellow) was activate but became inactive before the operator acknowledged the occurrence of the alarm.
When an alarm is configured with the Acknowledge option, the alarm message remains on display after the operator has acknowledged the alarm (as shown above). However, when the alarm is no longer active, then the alarm message is removed. In the scenario above, when Alarm0 is no longer active, the message is removed (since the operator has already acknowledged the message). In addition, if the operator presses the Alarm2 Acknowledge Alarm button, then the Alarm2 message is removed (since this alarm has since become inactive).
Note: if the Acknowledge option is not used, then the alarm message remains on the display regardless of whether or not the alarm is active.
History Description
The Alarm History option records the alarm message into non-volatile historical alarm memory (65536 bytes reserved) of the HMC. Alarm messages stored in the historical alarm memory are viewed using the Alarm List object with the Alarm Type attribute set to Historical.There are two options:
History Without Acknowledge – Alarms are recorded into historical alarm memory regardless of whether or not the operator has acknowledged the alarm.
History With Acknowledge – Any alarm configured with this option must be acknowledged by the HMC operator by setting the assigned Acknowledge Bit. If this is not done, then the next time the alarm is active, it will not be added to historical alarm memory (although it will display as an active alarm in the Alarm List).
Note: if the history option is checked, the alarm message displays on any Alarm List object configured as Real-Time alarm type when it becomes active
Finish
To finish, you must click the Accept (Update) button. This will record the settings for the particular alarm you have highlighted. Once this has been done, you will see the Alarm Assign attribute change from No to Yes for the selected alarm.You must click the Accept button for every alarm you create.
Other buttons in the alarm database
Accept/Update: Alarm text and other attributes can be changed at any time during the creation of a project (see above). Simply go back into the alarm database, highlight the particular alarm message you wish to edit, make the changes, and then click the Update button.
Delete: this button will delete that highlighted alarm and return it back to default settings.
Reset All Alarms: completely clears all of the alarms and returns them back to default.
Note: you must reassign the Alarm Acknowledge coil and the tag registers before you can start creating alarm messages again.
Export: save the alarm database as a CSV file that can be modified and imported back into the project.
Import: use this button to import an alarm database CSV file. Before you can import, make sure the following parameters are met in your project:
- The global setting for alarm 16 consecutive/random word registers must match the alarm type used in the imported CSV file. If not, you will see the message, “Current project Alarm Type is not the same as in import alarm database”. Click the Change Properties button in the alarm database to correct this setting.
- The tags used in the imported file must exactly match tags already created in your tag database.
- The imported CSV file should not contain any negative numbers.
- Do not change any of the Alarm Numbers assigned in the imported CSV file.
- The Number of Languages in the current project should match the import file.
Alarm List Display Objects
To display any alarm messages, you must place an Alarm List object on a screen. There are two basic types of Alarm List objects:
- Real Time Alarms – use this type when you wish to display actively occurring alarms.
- Historical Alarms – use this type to display a history of alarms that have occurred in the past. Alarms are saved to non-volatile memory so that they can be viewed even after power has been removed from the HMC for a period of time.
There are many features and options that are available to you when displaying alarms:
- The Alarm List object can be any size on screen. Optional scroll bars allow you to display information that might not completely fit in the alarm display that you have created.
- The Alarm Severity feature allows you to display a subset of active alarms so that you can display alarms in groups of increasing importance.
- In addition to displaying alarm text messages, you can also record the time and date that the alarm took place, when it was acknowledged, and when conditions went back to normal.
- The Real Time Alarms have the option of displaying the alarm messages in color according to state or condition of the alarm (active, inactive, acknowledged).
The Alarm List object is used to display alarm messages that have been configured using the Alarm database (see Constructing an Alarm Database section earlier in this chapter). Alarm messages appear in the configured Alarm List object when the bit that they are associated with is set.
How to Place an Alarm on a Screen
Follow the steps below to place an Alarm on a Screen in MAPware-7000
Instructions: How to Place an Alarm on a Screen
Create Alarm: Standard Menu
Click Draw > Display Objects > Alarm from the standard menuCreate Alarm: Draw Toolbar
Click Advanced Objects > Alarm from the Draw toolbarCreate Alarm: Objects Toolbar
Click the Alarm icon in the Objects toolbar.
Place the Alarm
Move cursor to a start point for the Alarm List object. Click and hold mouse cursor.Drag to complete
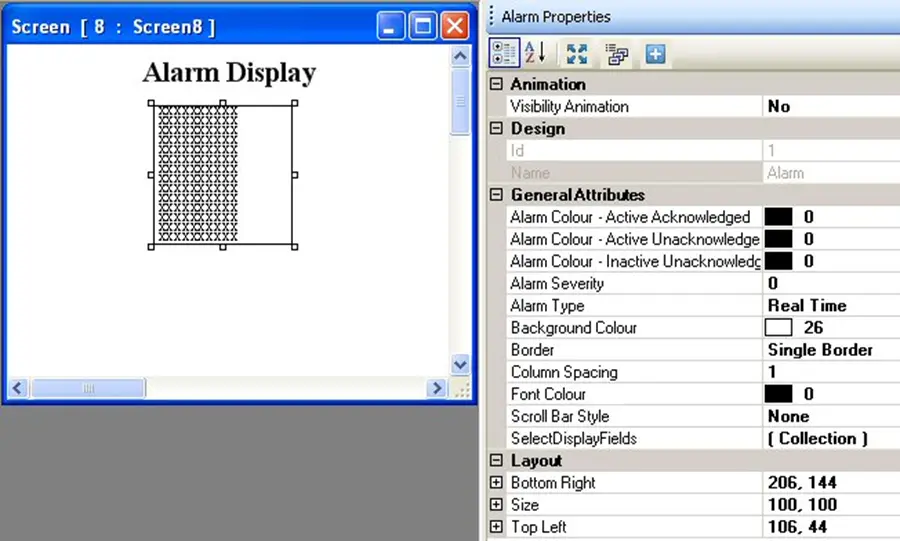
Drag mouse cursor to an end point for the Alarm object and release. The object appears on screen and the Alarm Properties box displays.
To configure/edit properties of the object:
- Click the object on screen to display the Alarm Properties box on the right side of the screen.
- Animation
Visibility Animation - Design
- General Attributes
- Alarm Color – Active Acknowledged – sets the color that is displayed when the active alarm is acknowledged by the operator.
- Note: not available for Historical Alarm Type.
- Alarm Color – Active Unacknowledged – sets the color displayed when an alarm is active but has not been acknowledged yet by the operator.
- Note: not available for Historical Alarm Type.
- Alarm Color – Inactive Unacknowledged – the color used for text that is displayed when the alarm is no longer active but did not get acknowledged by the HMC operator.
- Note: not available for Historical Alarm Type.
- Alarm Color – Active Acknowledged – sets the color that is displayed when the active alarm is acknowledged by the operator.
- Alarm Header – Adds a header to the Alarm Display object. Header text is configured in the Select Display Fields dialog.
- Alarm Severity – ten levels (0-9) used to represent which alarms should be displayed. For example, if alarm severity level is set to 3, then only alarm messages in the Alarm Database with Severity levels of 3, 4 … 9 will be displayed.
- Alarm Type – select Real Time to display alarms as they occur. Select Historical to display alarms captured using the History feature in the Alarm database.
- Background Color – determines the background color of the Alarm list. Click the button to display the color palette and select a color.
- Border – optional line around the periphery of the alarm list.
- Column Spacing – number of pixels between the columns of data displayed (see Select Display Fields).
- Font Color – color of the columns of data displayed.
- Note: this setting only applies if Alarm Type is set to Historical. For Real Time Alarm Types, the Alarm Colors (see above) take precedent over Font Color.
- Scroll Bar Style – Use the scroll bar feature if the data to be displayed is larger than the Alarm list. The vertical scroll bar is used to easily scroll through the list of alarm messages that are displayed. The horizontal scroll bar is used to scroll through the columns of data (i.e. time, date, message, acknowledge time/date, etc.)
- Select Display Fields – determines what data is to be displayed when an alarm occurs. If Alarm Header is enabled, the header text is configured in this dialog for each column. No spaces or special characters are allowed in the header text.
- Alarm Text – maximum of 52 characters is allowed.
- Alarm Number – whenever an alarm occurs, a number is assigned to it. This is useful if there might be more alarms than can be shown in the area allocated. Then the operator knows what section of the total alarm list he is viewing.
- On-Time – this is the time at which an alarm became active. Options are: HH:MM:SS, MM:SS, and HH:MM. (H=hour, M=minute, S= second).
- Off-Time – this is the time at which an alarm became inactive.
- On-Date – this is the date at which an alarm became active. Format is DD/MM/YY. (D=day of the month, M=month, Y=year).
- Off-Date – this is the date at which an alarm became inactive.
- Active – this simply indicates if an alarm is currently active or not. Options are: Y/N or Yes/No. Not available for historical alarms.
- Ack-Time – this is the time at which an alarm was acknowledged by the HMC operator.
- Ack-Date – this is the date at which an alarm was acknowledged by the HMC operator.
- Acknowledge – indicates if alarm is acknowledged. Not available for historical alarms.
- Severity – the severity level assigned to each alarm message, (0-9).
- Layout (see General Properties)
Resize an Alarm List object
You can change the overall height and width of the Alarm List object by holding the mouse cursor over one of the white demarcation boxes along the perimeter of the object, then hold down the left mouse button to drag to a new position. You can limit the viewable messages to one or expand the Alarm List object to cover the entire screen.
Note: The font size of each message is fixed (to 5×7 pixels) and cannot be changed.
Real-Time Alarm Display
The real-time alarm type option in the Alarm List object immediately displays any alarm message in which the assigned bit has been set (i.e. current alarm). The message remains on display until:
- The operator has acknowledged the alarm by setting the configured acknowledge bit and
- The alarm message is no longer active (the assigned bit is reset)
Note: if the Acknowledge format is set to Selectable and no Acknowledge tag is configured for a particular alarm message in the Alarms folder, then during operation, the alarm message will remain on display even when the alarm becomes inactive.
Below is an example of a simple real-time alarm:
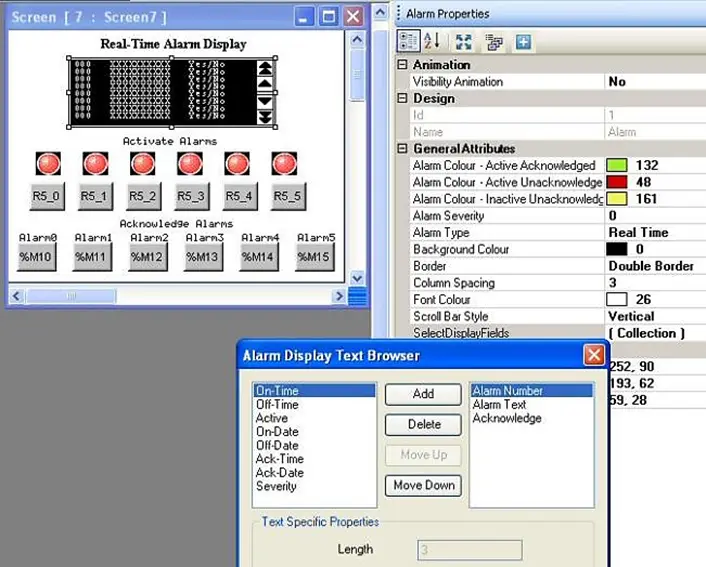
Note: the buttons/lamps under ‘Activate Alarms’ are used in this example to activate and deactivate an alarm by controlling the target alarm bit. The buttons under ‘Acknowledge Alarms’ are used to acknowledge each alarm by controlling the acknowledgement bit for each alarm.
We have configured this alarm display with a black background and text colors of green, red, and yellow to indicate the active acknowledged, active not acknowledged, and inactive states respectively. We will display the alarm text, an alarm number, and acknowledge indicator for each alarm message displayed. Notice that on the Alarm Display Text Browser, you can rearrange the fields displayed by highlighting a field (in the right-hand column) and clicking the Move Up/Move Down buttons.
When using the run time simulator in MAPware, the following screen is displayed:
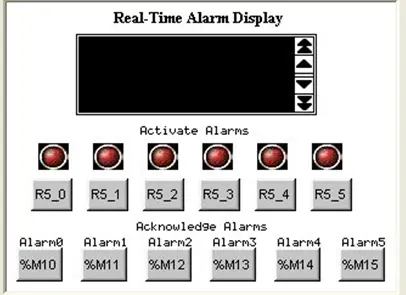
No alarms are currently active; therefore, the alarm display is blank.
We will activate Alarm#1 by pressing the R5_0 button:
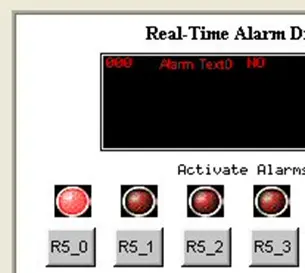
The message appears on the display (in red) along with an assigned alarm number (000) and text indicating that this alarm has not been acknowledged yet (NO).
The operator presses the %M10 button which has been configured to acknowledge the alarm:
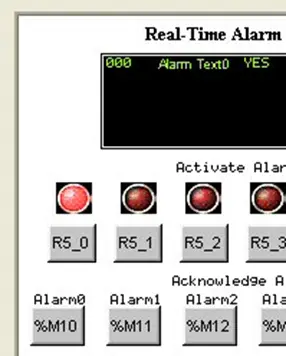
Note that the color of the alarm has changed to green and the acknowledgement indicator is ‘YES’. However, the alarm is still active so the message remains on display.
Let’s press the R5_0 button again, to clear the alarm condition:
The alarm message has been acknowledged and cleared (become inactive) so the message is removed from the Alarm List object.
How does the alarm look if we activate the alarm, and then clear the alarm without pressing the acknowledgement key?
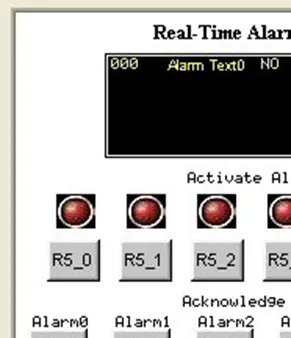
In this case, the alarm remains on screen but the color is yellow (indicating alarm is no longer active). Also note that the alarm acknowledgement indicator is ‘NO’. The alarm remains on screen until the operator presses the acknowledgement key (%M10).
Alarms are displayed on the list in the order that they occur, with the first occurrence on top:
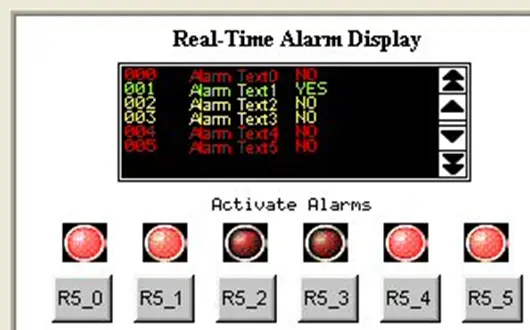
Use the optional scroll bar feature if there is a possibility of having more active alarms occurring than there is room to display.
Historical Alarm Display
The historical alarm type option in the Alarm List object displays only alarm messages in the Alarm Database that have the Log field (History) enabled. Unlike the Real-Time option, alarm messages remain on the list, even after the alarm has become inactive and/or the operator has acknowledged the alarm.
Alarm messages in the Historical Alarm List are retained even when power is removed from the HMC, and then reapplied. For this reason, the Historical Alarm List is primarily used to provide a record of alarms that have occurred in the past.
Below is an example of a historical alarm:
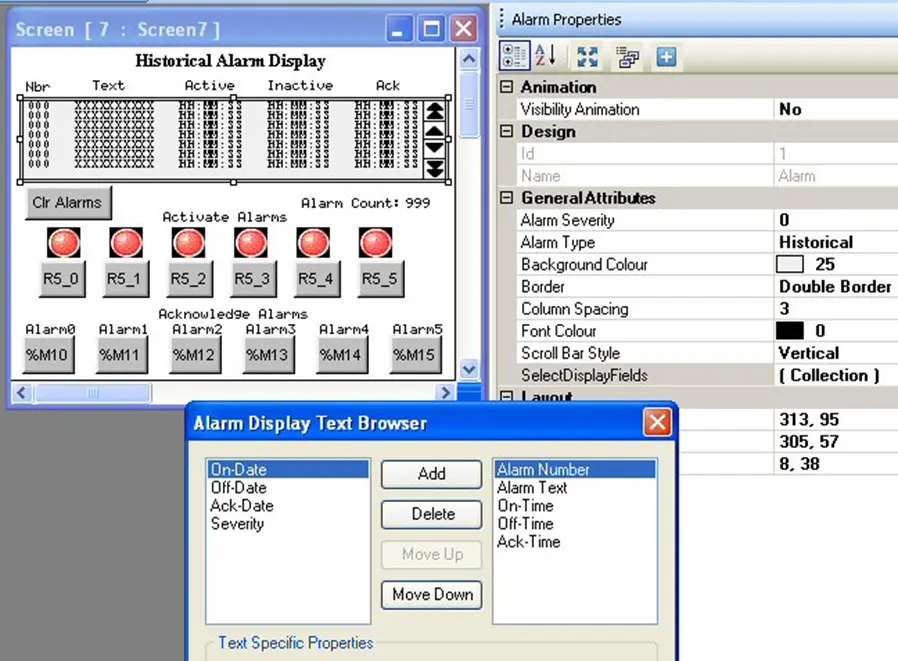
Note that the three alarm color options are not available for historical alarms; use the background and text font color options. In this example, the following fields are shown; alarm number, alarm text, on-time, off-time, and ack-time. For clarity, we have placed titles on the top of the alarm list to help identify each field.
For this example, there is also an Advanced Bit button (Clr Alarms) that is configured with a Key Specific Task to Clear Historical Alarm Memory. This button can be used to clear the alarm memory and blank the display.
There is also a Numeric Display object (Alarm Count – SW0004) which shows how many alarm messages are in memory. The other objects perform the same function as in our example of using a real-time Alarm List above.
Historical alarms display only alarm messages that have been stored in non-volatile memory of the HMC. Therefore, you cannot use the MAPware run time simulator to display a historical alarm. To see a historical alarm, you must download the project to the HMC unit:
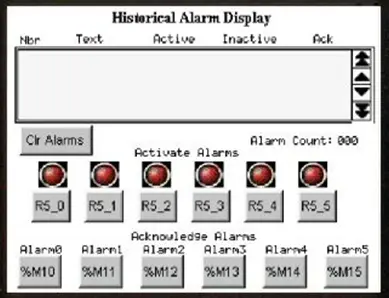
Let’s activate Alarm#1 by pressing the R5_0 button. Then we acknowledge this alarm by pressing the %M10 button and press the R5_0 button again to deactivate the alarm:
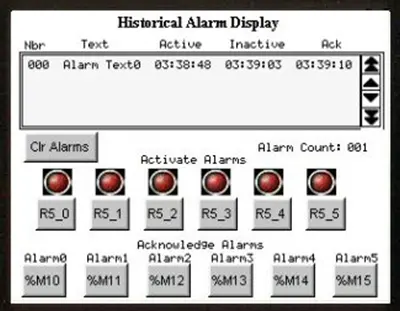
The text appears on display, along with the time at which the alarm became active, acknowledged, and then inactive.
Let’s press R5_0 again to activate the same alarm, but instead of acknowledging the alarm, let’s deactivate the alarm without acknowledgement:
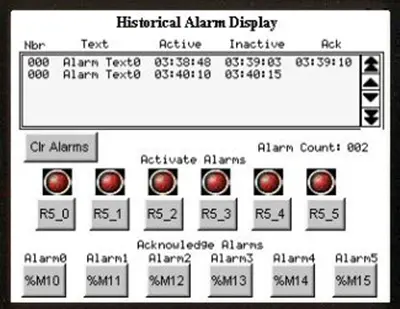
In the Alarm Database, this alarm is configured with the ‘History Without Acknowledge’ attribute. New instances of this alarm will be recorded into the Alarm History memory of the HMC even though the operator did not acknowledge the last alarm. Therefore, if we activate this alarm again without acknowledging, it will display:
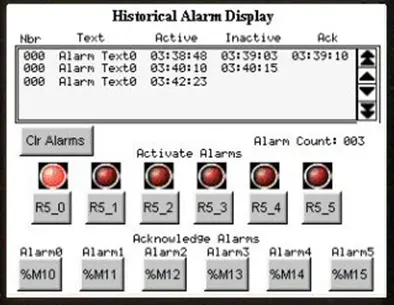
Use the ‘History Without Acknowledge’ attribute if you want a record of each alarm occurrence, regardless of whether or not the alarm was acknowledged by the operator.
The alarm that is triggered by pressing R5_1 is configured with the ‘History With Acknowledge’ attribute. Let’s activate this alarm, press the %M11 acknowledge button, then press R5_1 button again to deactivate:
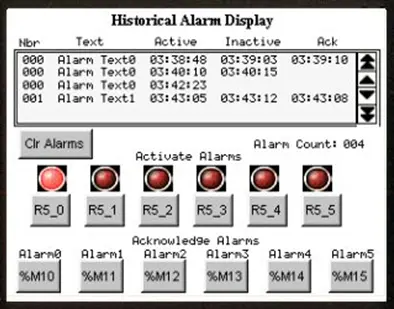
So far, nothing different; this alarm behaves the same as the prior alarm. Let’s now activate the same alarm again, but instead of acknowledging, we will deactivate the alarm:
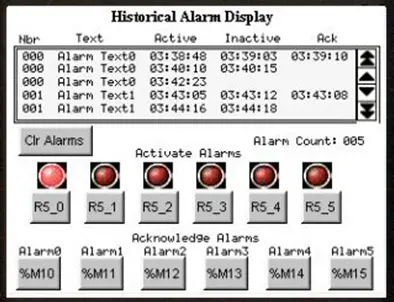
If this alarm is activated again, it is not placed into the Alarm Memory. Therefore, it does not appear on screen. When using the ‘History With Acknowledge’ attribute, all new instances of this alarm (other alarms are not affected) will not be displayed until the alarm is acknowledged by the plant floor operator. Use this setting if you wish to conserve alarm memory space in the HMC or if operator acknowledgement of the alarm is a requirement.
Finally, the alarm history is in non-volatile memory of the HMC so you can always see prior alarms that have occurred even when power is removed from the HMC for a period of time. The MAPware software allocates 65536 bytes for alarm messages and can retain up to 6000 historical alarm messages. If you wish to clear the alarm memory, simply use a Function Key or Advanced Bit Button that is configured as a Key Specific Task – Clear Historical Alarm Memory. Otherwise, the memory is cleared based upon the global setting in the Project Configuration dialog box (in the Alarms folder, click Change Properties).
Uploading Historical Alarms
In addition to viewing historical alarms using the Historical Alarm object above, you can also upload the alarms to the MAPware software. This allows you to export the alarms to a CSV file and to see how much memory has been used.
- Connect the HMC unit to your computer.
- Close any open projects in MAPware.
- Click Project > Transfer > Upload to display the Upload/Download dialog box:
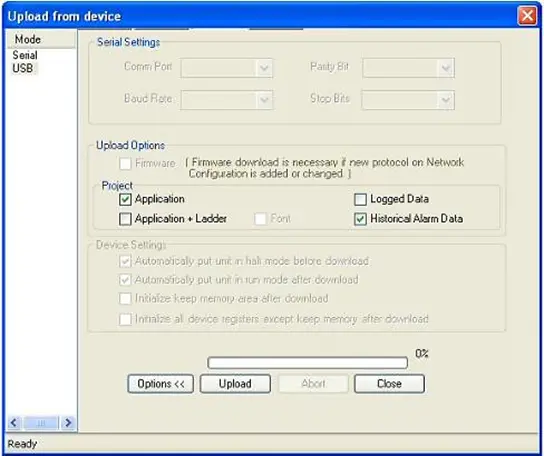
- Select Application and/or Ladder. Also select Historical Alarm Data. Click Upload.
- After the upload has finished, a new file (HistAlarmData.bin) is created and placed in the MAPware directory (default location is C:\Program Files\Maple Systems\MAPware7000). To create a CSV file, click Tools > Display Historical Alarm Data. A CSV file is automatically created (HistAlarm.csv) and displayed using Microsoft Excel.
Other Alarm Controls
Predefined Alarm Tags
In the tag database, there are several tags (bit and register) that can be used for alarm purposes:
- Acknowledge All Alarms (S00014 bit, Read Only): indicates if-
- 0: All alarms are acknowledged
- 1: All alarms are not acknowledged
- Note: applies to both Historical and Real Time alarms
- Real and Historical Alarm Control (S00035 bit, Read/Write): if bit is set to-
- 0: online operation, all alarms are monitored.
- 1: offline operation, all occurring alarms are ignored (not displayed or entered into the historical alarm memory area) until control is reset back to 0.
- Note: any alarms that occurred while offline are displayed after control is reset back to 0.
- Historical Alarm Count (SW0004 register, Read Only): represents the total number of alarms currently listed in the Historical Alarm Memory.
Touchscreen Tasks
- Alarm Acknowledge button: use this button to acknowledge the topmost alarm currently displayed in the Alarm List. This button will only work if the following conditions are met:
- The Acknowledge All feature (see Project Configuration dialog box under the Alarm tab, Auto Acknowledge option) is not set.
- The selectable Acknowledge bit is not enabled for each alarm.
- Acknowledge All button: same as above except that, when pressed, this button acknowledges all of the currently active alarms.
- Note: Same conditions as above apply.
- Next Alarm button: when pressed, this button advances (move all alarms up one line) the list of alarms displayed. This is similar to pressing the Down Arrow on the Vertical Scroll bar when enabled.
- Note: only works with Alarm List object that is configured as Alarm Type – Real.
- Previous Alarm button: when pressed, this button recedes (move all alarms down one line) the list of alarms displayed. This is similar to pressing the Up Arrow on the Vertical Scroll bar when enabled.
- Note: only works with Alarm List object that is configured as Alarm Type – Real.
Key Specific Tasks
- Key Specific Task – Acknowledge Alarm: performs same function as the Acknowledge Alarm touchscreen button (see above).
- Key Specific Task – Acknowledge All Alarms: performs same function as the Acknowledge All alarms touchscreen button (see above).
- Key Specific Task – Previous Alarm: performs same function as the Previous Alarm touchscreen button (see above).
- Key Specific Task – Next Alarm: performs same function as the Next Alarm touchscreen button (see above).
- Key Specific Task – Previous Historical Alarm: when pressed, this button detracts (move all alarms down one line) the list of alarms displayed. This is similar to pressing the Up Arrow on the Vertical Scroll bar when enabled.
- Note: only works with Alarm List object that is configured as Alarm Type – Historical.
- Key Specific Task – Next Historical Alarm: when pressed, this button advances (move all alarms up one line) the list of alarms displayed. This is similar to pressing the Down Arrow on the Vertical Scroll bar when enabled.
- Note: only works with Alarm List object that is configured as Alarm Type – Historical.
- Key Specific Task – Move to Latest Historical Alarm: this button moves to the last (bottom) line of the list of alarms displayed, thereby showing the most recent (latest) historical alarm. This is similar to pressing the Double Down Arrow on the Vertical Scroll bar when enabled.
- Note: only works with Alarm List object that is configured as Alarm Type – Historical.
- Key Specific Task – Move to Oldest Historical Alarm: this button moves to the first (top) line of the list of alarms displayed, thereby showing the oldest historical alarm. This is similar to pressing the Double Up Arrow on the Vertical Scroll bar when enabled.
- Note: only works with Alarm List object that is configured as Alarm Type – Historical.
- Key Specific Task – Move to Latest Alarm: this button moves to the last (bottom) line of the list of alarms displayed, thereby showing the most recent (latest) alarm. This is similar to pressing the Double Down Arrow on the Vertical Scroll bar when enabled.
- Note: only works with Alarm List object that is configured as Alarm Type – Real Time.
- Key Specific Task – Move to Oldest Alarm: this button moves to the first (top) line of the list of alarms displayed, thereby showing the oldest alarm. This is similar to pressing the Double Up Arrow on the Vertical Scroll bar when enabled.
- Note: only works with Alarm List object that is configured as Alarm Type – Real Time.
- Key Specific Task – Clear Historical Alarm Memory: when pressed, this clears the Historical Alarm memory of all past alarms entered.