
Overview
As the name suggests Structured Text is a text based programming language in which program instructions are entered as discrete statements in a text source file. The processor executes the statements in the source file from left to right top to bottom (subject to the rules of precedence and program flow as described below). This programming method is similar to other high level programming languages such as C or Visual Basic.
Statements
The basic unit of structured text program is a statement. A statement is an instruction to the processor to perform a set of actions. Statements are composed of one or more expressions and end with a semicolon ‘;’ character. Statements can contain other statements and span multiple lines. Multiple statements can be placed on a single line, though limiting source files to one statement per line is a good way to improve readability.
ST programs are lists of statements. The order in which statements are evaluated is, by default, from the top of the source file to the bottom. However, this order can be controlled by the programmer using keywords that tell the processor to change to order of operation. These keywords are said to control program flow. Some examples of keywords are: FOR, IF, END_IF
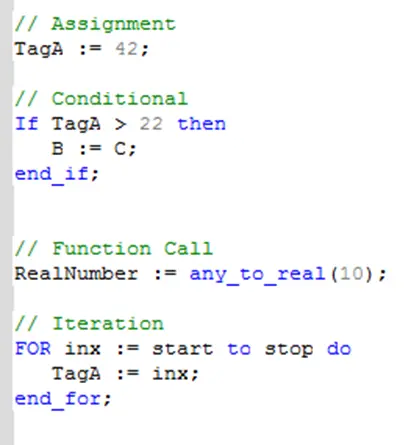
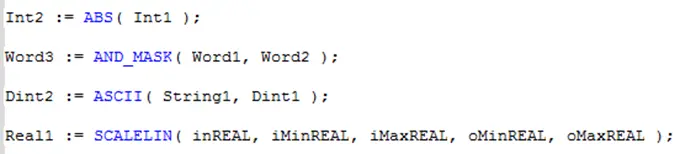
Some common examples of Structured Text statements are:
Expressions
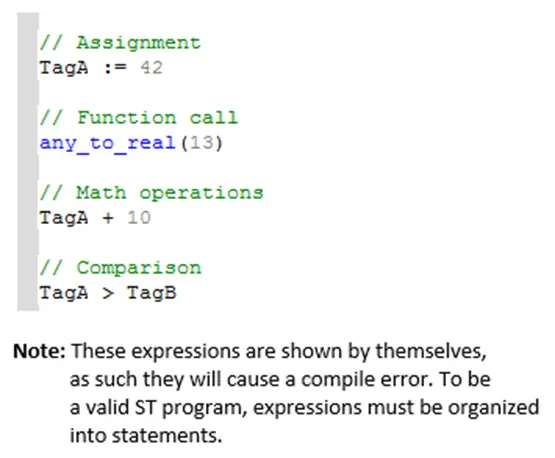
Expressions are the building blocks of ST statements. An expression is any piece of a statement that evaluates to a single value. Expressions may or may not have side effects. A typical ST expression consists of an operator and one or more operands. Some typical ST statements are:
Operands
The operands of expressions are themselves expressions. When an expression is evaluated, it is replaced with the result of the operation. This result is then used as an operand to evaluate the next expression. This process continues until the entire statement has been evaluated. The order in which expressions are evaluated is governed by operator precedence. Expressions that contain higher precedence operators are evaluated first and expressions with lower precedence operators are evaluated later.
Comments
ST programs use familiar mathematical operators, keywords that have meanings in English, and tag names that can describe the data they represent. However, the structure of statements means that it is not always clear what a program doing. Comments should be used liberally in ST programs to make it clear to anyone reading the source file what the program is doing (or at least what it is intended to do).
Comments are simply text in the source file that is visible to anyone looking at the file in the editor, but is ignored by the compiler and is not part of the program executed by the processor.
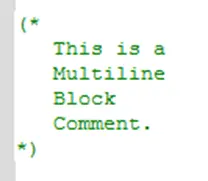
There are two ways to enter comments in the ST Editor. A block comment is created by enclosing the comment between (* and *) character sequences:

Block comments can span multiple lines:
And can be embedded in a line of text:

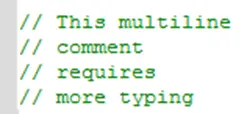
The second type of comment is an inline comment. An inline comment starts with a // character sequence and continues to the end of a line.

The // character sequence must be repeated before (to the left of) each line that is to be used as a comment.
Inline comments can be placed after (to the right of) a line of code.

But can’t be embedded in a single line of code because all of the text to the right of the // is ignored.

Adding Logic to the Block
Operators and Expressions
This section lists the operators available in ST programs to compose expressions. Operators act on operands to produce some result, the result becomes the value of the expression. Operators may also have side effects. For example, the assignment operator ‘:=’ evaluates to the value of the expression on the right hand side of the operator, and has the side effect that the tag on the left hand side is assigned the same value. Another example is a function call. The function call expression evaluates to the function’s returned value, and as a side effect, the statements in the function are executed.
In ST programs, the operands of expressions are themselves expressions. The expression to the right is referred to as the RHS operand and the expression to the left is referred to the LHS operand. Some operators only act on one operand, some act on both the RHS and LHS operands. In either case, once the expression is evaluated, the operator and its operand(s) are replaced with the result of the operation. Then the next expression is evaluated. This process repeats until the entire statement is evaluated.
The order in which expressions are evaluated is referred to as precedence. Operator precedence is shown in the table below (precedence of 1 indicates expressions with this operator will be evaluated first, etc.). Operators of the same precedence are evaluated left to right. Parenthesis can change the precedence of operators and should be used liberally to make the intended order of operations explicit.
Operators available to use in ST are given in the following table:
| Operator | Name | Description | Example Statement(s) | Priority |
| ( ) | Parenthesis | Used to change the order in which expressions are evaluated. Expressions within parenthesis are evaluated first. | // with (), TagA = 40 TagA := 10 * (1 + 3); // without (), TagA = 13 TagA := 10 * 1 + 3; | 1 |
| func() | Function call | Values are assigned to parameters. Function is executed. Expression evaluated to returned value. | 2 | |
| ** | Exponential | Evaluates to the left hand expression raised to the power of the right hand expression. Note: both operands must be of type REAL. | result := 2.0 ** 2.0; // 4.0 | 3 |
| – | Negation | Evaluates to the negative of the operand immediately to the right. | TagA := -TagB; | 4 |
| NOT | Complement | Returns that opposite logical value of the Boolean operator on the RHS. | State := NOT true; // false State := NOT false; // true | 4 |
| * | Multiplication | Evaluates to the LHS multiplied by the RHS | result := 3 * 4; // 12 | 5 |
| / | Division | Evaluates to the LHS divided by the RHS. | 5 | |
| MOD | Modulo | Computes the modulus (Remainder) of the LHS divided by the RHS. | result := 5 MOD 2; // 1 result := 9 MOD 3; // 0 result := 12 MOD 5; // 2 | 5 |
| + | Addition | Computes the sum of the RHS added to the LHS. | result := 5 + 2; // 7 result := 9 + 3; // 12 result := 12 + 5; // 17 | 6 |
| – | Subtraction | Subtracts the RHS from the LHS | 6 | |
| < | Less Than | True when LHS is less than the RHS, false otherwise. | 7 | |
| > | Greater Than | True when the LHS is greater that the RHS, false otherwise | 7 | |
| <= | Less than or equal | True when the LHS is less than OR equal to the RHS, false otherwise | 7 | |
| >= | Greater than or equal | True when the LHS is greater than OR equal to the RHS, False otherwise | 7 | |
| = | Test for equality | True if RHS has the same value as the LHS, False otherwise. | 8 | |
| <> | Test for inequality | True if the RHS does not have the same value as the LHS, False otherwise | 8 | |
| &, AND | Boolean AND operation | True if LHS AND RHS are true, false otherwise | result := true & true; // true result := true AND false; // false result := false AND true; // false result := false & false; // false | 9 |
| XOR | Exclusive OR | True if the LHS is true while the RHS is false, or the LHS is false while the RHS is true. False if both LHS and RHS are true. False if both LHS and RHS are false. | result := true XOR true; // false result := true XOR false; // true result := false XOR true; // true result := false XOR false; // false | 10 |
| OR | Boolean OR | False if both LHS AND RHS are false, true otherwise. | result := true OR true; // true result := true OR false; // true result := false OR true; // true result := false OR false; // false | 11 |
| := | Assignment | Writes the value of the RHS to the tag on the LHS. Note: only one assignment operator is allowed per statement. The LHS operand must be a tag. | TagA := 10; // TagA set to 10 TagB := TagA; // TagB set to 10 | 12 |
Keywords and Program Flow
ST programs have reserved keywords that have special meaning to the compiler. In general, these keywords are used by the programmer to control when and how statements are executed. The table below lists the keywords available in the ST Editor, the sections that follow describe how they are used.
| Keyword | Description | Section |
|---|---|---|
| IF | Indicates test condition for IF statement | IF Statement |
| THEN | Indicates beginning of block of statements controlled by IF statement. | IF Statement |
| ELSIF | Indicates test condition to control ELSIF block of statement in an IF statement. | IF Statement |
| ELSE | Indicates beginning of conditional block of statements for ELSE condition in IF statement, or default block in CASE statement. | IF Statement, CASE Statement |
| END_IF | Indicates end of IF statement | IF Statement |
| CASE | Indicates input to CASE, multi-selection statement. | CASE Statement |
| OF | Indicates beginning of condition blocks for CASE, multi-selection statement | CASE Statement |
| END_CASE | Indicates the end of a case statement | CASE Statement |
| FOR | Indicates expression used in for loop, and initial value of the for the loop index. | FOR Statement |
| TO | Indicates expression used for final value of FOR loop index. | FOR Statement |
| BY | Indicates expression used for increment value in for loop | FOR Statement |
| DO | Indicates beginning of statement block used in FOR statement and WHILE statement | FOR Statement, WHILE Statement |
| END_FOR | Indicates end of statement block used in FOR statement | FOR Statement |
| WHILE | Indicates expression used as condition for while loop. | WHILE Statement |
| END_WHILE | Indicates the end of a statement block and end of a WHILE loop | WHILE Statement |
| REPEAT | Indicates the beginning of a block of statements used in a repeat loop | REPEAT Statement |
| UNTIL | Indicates end of REPEAT statement block and expression used for test condition | REPEAT Statement |
| EXIT | Exit from loop | EXIT Statement |
| RETURN | Return from a function | RETURN Statement |
IF Statement
The IF statement is used to conditionally control the execution of a block of statements. When the condition is true the code is executed when it is false the code is not. The Syntax of an IF statement is as follows (on next page):
IF <Condition> THEN
	<Statement>;
	 > .
	<Statement>;
END_IF;
<Condition> is an expression that evaluates to a Boolean value (e.g. >, <, <=, >=, OR, AND, XOR, OR).
When the <Condition> expression is true. The Statements are executed. When <Condition> is false the <Statements> are not executed and program execution moves to statements after the END_IF keyword.
Example:
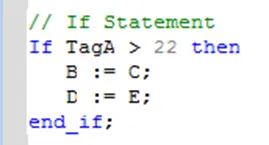
The IF statement can also contain one or more ELSIF keywords with additional conditions, and an ELSE keyword that is executed when the IF (and any ELSIF) conditions are false. The syntax when using ELSIF and ELSE keywords is:
IF <ConditionA> THEN
	[Statement(s)]
ELSIF <ConditionB> THEN
	[Statement(s)]
 >
ELSIF <ConditionN> THEN
	[Statement(s)]
ELSE
	[Statement(s)]
END_IF;
The condition following an ELSIF keyword is only evaluated if the preceding IF condition is false. If multiple ELSIF keywords are used only the first one with a condition that evaluates to true will be executed. The ELSE statement will be executed if and only if the IF condition and all ELSIF conditions are false.
Example:
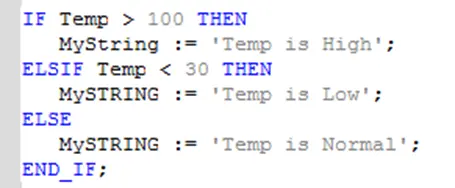
CASE Statement
The case statement provides a way of selecting from a set of conditions. The syntax for the CASE statement is as follows:
CASE <expression> OF
	<value>:
		[Statement(s)]
	<value>, <value>,  >  :
		[Statements(s)]
	<min value> .. <max value>:
		[Statement(s)]
	ELSE
		[Statement(s)]
END_CASE;
The CASE keyword is immediately followed by an expression which acts as the parameter to the rest of the statement. The OF keyword indicates the beginning of a list of possible values or range of values. When the value of the expression is equal to one of the listed values (or within the range or set of values) the statements following that value (or range/set of values) is executed. The CASE statement can also contain an ELSE keyword in place of the last value. This acts as the default case and is executed if none of the other values match of the expression’s value.
Example:
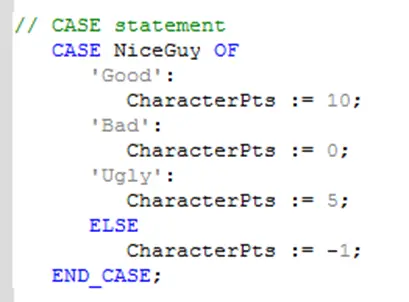
Example:
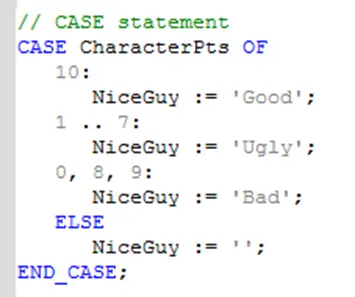
In the second example note that, for the first case a single value (10) was used, in the second case a range (1 to 7) was used and in the third case a set of values (0, 8 and 9) were used. The values for each case must be unique, and must be constant values. Tags are not allowed.
FOR Statement
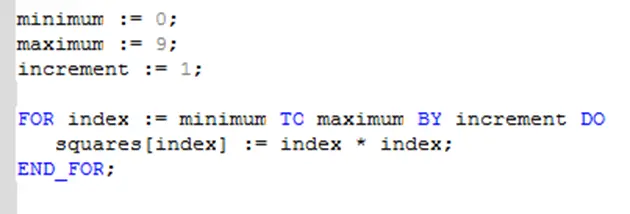
The FOR statement is a means of iterating or repeating a series of statements a specified number of times. The syntax of a FOR statement is:
FOR <index expression> := <min> TO <max> BY <step> DO
	[Statement(s)]
END_FOR;
The statements between the DO and END_FOR keywords will be executed repeatedly. The first time they are executed <index expression> is set to <min>. After one execution <index expression> in incremented by the amount specified by <step>, and the statements are evaluated again. The process is repeated until <index expression> is equal to or greater than the value of max.
<index expression>, <min>, <max> and <step> must be a tags. The BY keyword is optional. If omitted the index is incremented by 1.
Example:
WHILE Statement
The WHILE statement is another iteration statement. If executes a block of code while an expression evaluates as true. The syntax for the while statement is as follows:
WHILE <condition> DO
	[Statement(s)]
END_WHILE;
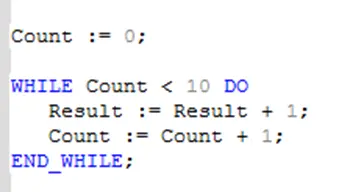
As long as the expression <condition> evaluates to true, the statements between DO and END_WHILE will continue to execute. This means that the programmer must include logic in the while loop’s block of statements that will eventually result in the condition expression evaluating to false. If not the loop will never exit.
Example:
REPEAT Statement
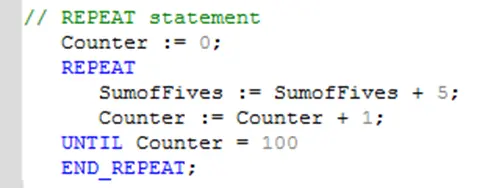
The REPEAT statement is similar to the WHILE statement except that the condition to continue loop execution occurs after the block of statements is executed, and the loop continues until the condition becomes true. Use this statement if you want to ensure the block of statements is executed at least once.
The syntax for the REPEAT Statement is as follows:
REPEAT
	[statement(s)]
UNTIL <condition>
END_REPEAT;
As with the WHILE statement the programmer must be careful to include logic in the statements that makes the condition become true at some point, or the loop will never exit.
Example:
EXIT Statement
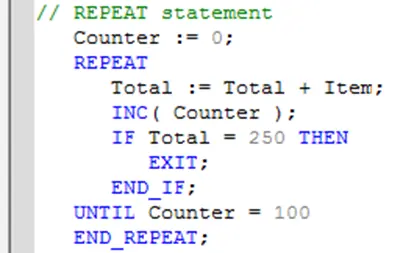
The EXIT statement is used to break out of an enclosing loop (FOR, WHILE or REPEAT).
Example:
RETURN Statement
The RETURN statement is used to return from a function or a function block and return execution to the calling statement.
Example:
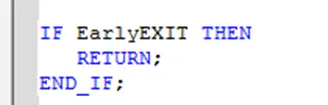
This keyword can be used in an ST subroutine or User Defined Function Block to return at the end of the function or to return when a certain condition is true, by paring the RETURN statement with an IF statement as shown in the example.
Preprocessor Commands
In addition to operators, keywords and function calls, MAPware-7000 also has a set of Preprocessor commands. As the name suggests these commands are evaluated before the program is executed. In fact they are evaluated before the program is compiled. These are generally used to define static variables that correspond to constant values. They can make a program easier to read by replacing numbers with meaningful text. The available Preprocessor commands are:
| Command | Description |
|---|---|
| #define | Create a name that represents a constant number. |
| #ifdef | Tests whether the specified label has been defined. |
| THEN | Used with #ifdef statement to specify a list of #define statements to evaluate when the variable exists. |
| #else | Designates a block of #define statements to evaluate if the #ifdef evaluates to false. |
| #end_if | Designates the end of a #ifdef block. |
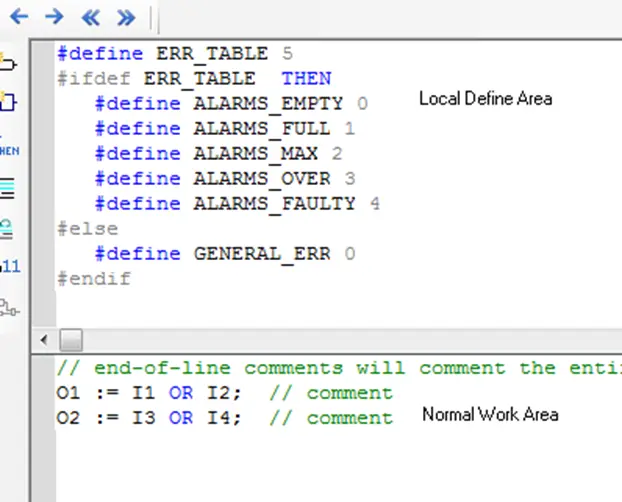
Preprocessor commands can be placed in a source file directly. Or placed in a special Local Define Area. To open the local define area open the Logic Block that you want to use. Then click View>Local Define. The define area appears above the ST Editor window:
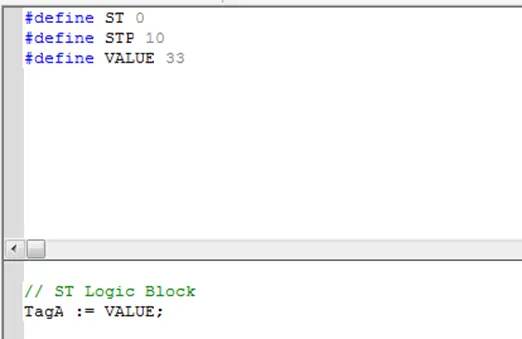
The screen shot below gives an example of how these preprocessor commands can be used:
Quick Select Menu Options
In the ST Editor, the Quick Select Menu has the options detailed in the sections that follow.
Insert Variable
This option allows you to use the standard variable selection window to insert a variable in the program instead of simply typing in the tag name in the editor. This can be helpful in remembering what tags are available.
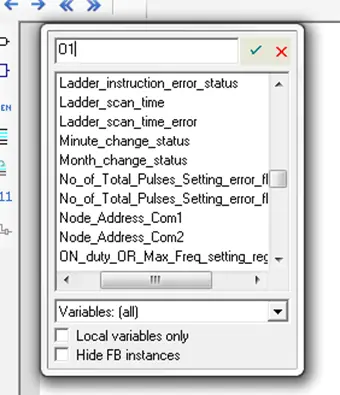
By default, all of the System Tags, global tags, and Local tags for the selected logic block are listed. You can select a tag from the list or create a new one by typing a new tag name, then clicking the Accept button. Note: if you only want to see local tags for the selected logic block, check the Local variables only box.
In this example, we will add a local variable O1. If the tag is new, clicking the Accept button displays a new dialog:
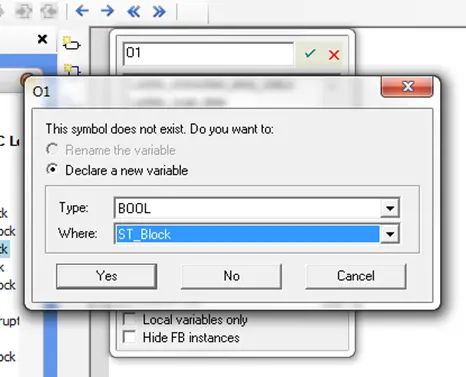
When creating a new variable, you must determine the data type (i.e. BOOL, INT, STRING, etc.) and visibility of the variable. If Global is selected, the variable can be used in any of the logic blocks you create. If you select Local (by selecting the name of the logic block you are in), then the tag variable can only be used and seen by the logic block. Selecting RETAIN stores the tag in non-volatile memory of the device so that the value is retained after power is cycled.
Click Yes to return to the logic block work area and place the tag:
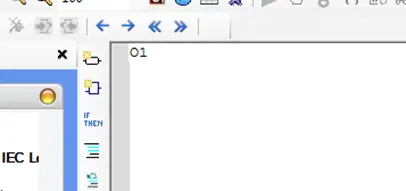
The tag is automatically added to the tag database.
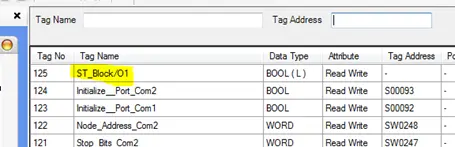
In ST Programming, you may prefer to write the code statements, then assign variables afterwards.
For example, let’s add a statement to the variable O1 that we already created by typing:
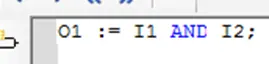
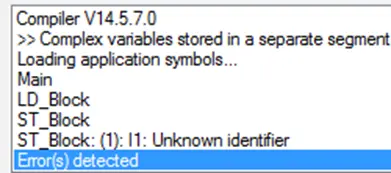
If we try to compile, we will get errors because the new variables, I1 and I2 are not yet added to the Tag library:
You can add a new variable that has already been written into the code by double-clicking the variable (to highlight the entire name), then clicking the Insert Variable button:
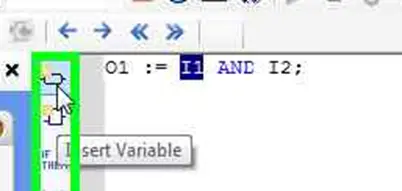
Once a variable has been added to the Tag library, you do not have to use the Insert Variable button again to reference the tag- simply type the name of the tag into the code.
Insert FB
This option can be used to insert a function call or function block call. Or to select an operator to use.
Click to add a function block to the logic code work area. The Function Block dialog box appears:
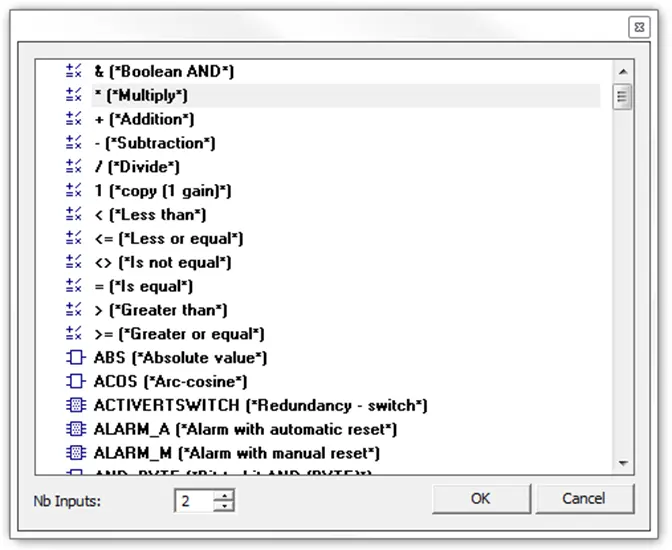
Note the icons to the left of the functions in this window. These indicate the type of object being selected.

this icon indicates an operator or a simple function with 1 input and one output. Examples are:
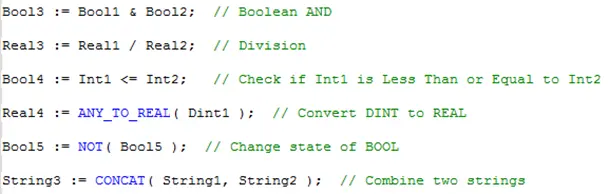

this indicates more complex function call that may have several inputs of different data types and one output. To get the output, you must use a variable with the correct data type with the assignment operator. Examples are:

this icon indicates a user defined subroutine. These functions are used the same way as built in functions

This icon indicates a built in function block. In this case selecting the function block will simply place the name of the function block in the text editor. If you want to use a function block this will not work. Instead you should enter the name of a function block instance as described in the section on Function Block Calls.

This icon indicates a User Defined Function Block. In this case selecting the function block will simply place the name of the function block in the text editor. If you want to use a function block this will not work. Instead you should enter the name of a function block instance as described in the section on Function Block Calls.
Select the Function that you wish to use. With some functions, you can change the number of inputs using the Nb Inputs option. Because ST programming is text-based, all functions are displayed in the work area as either a mathematical operator (i.e. +, -, *, >, :=) or as a function name with a description of required input parameters, (ex. AND_MASK( IN(*ANY*), MSK(*ANY*))). You must complete the function block by adding the necessary input and output parameters.
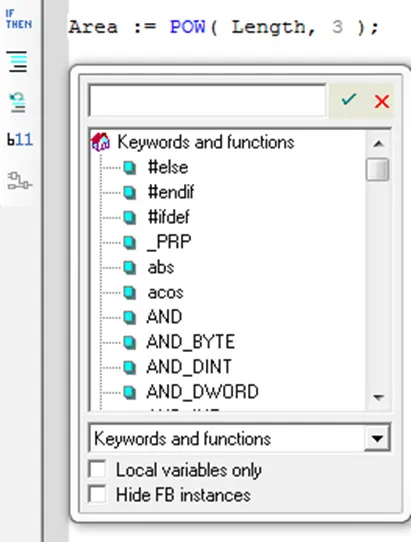
List Key Words
Lists the available keywords. This includes the list of operators, keywords, preprocessor statements, and built in functions. The selected keyword can be pasted in the project by pressing the checkbox or pressing <enter> after a keyword is selected.
Insert Comment
This is a handy way to comment out blocks of a program at a time.
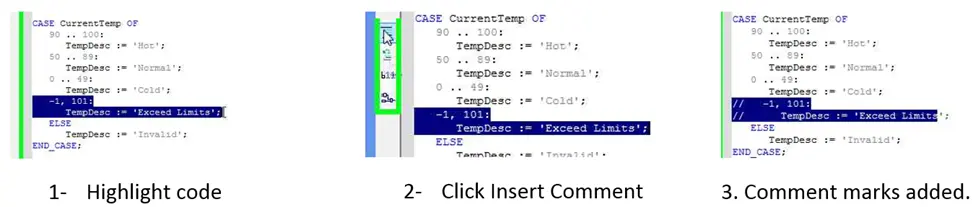
Commenting out a block of code is a common way to trouble shoot a logic block by turning off a chunk of code.
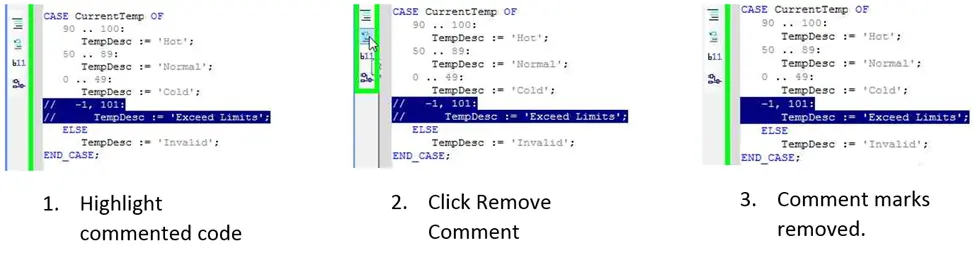
Remove Comment
This reverses the insert comment action:
Show Value in Text
This button is used when testing the logic using Simulation Mode (click Mode > Start Simulation > Logic Only). It shows the value of each variable:
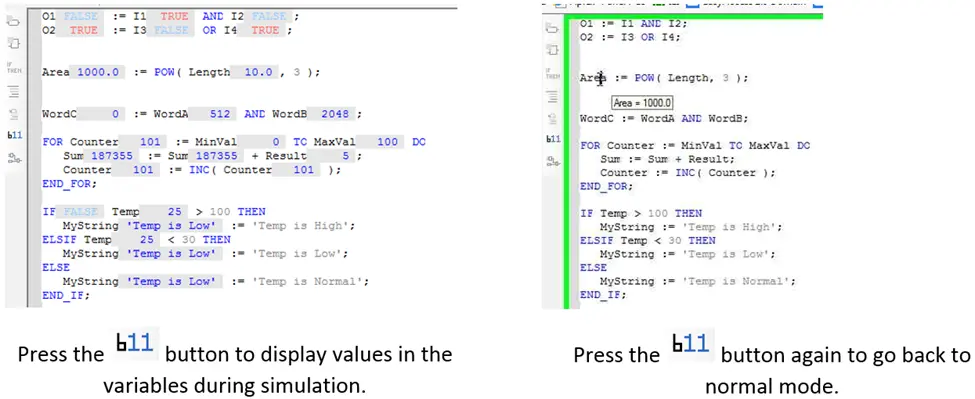
In normal mode, you can see a particular variable value by clicking the variable then keeping the cursor on the variable until a popup display appears (see picture above).
Show Expression
When this button is pressed while an expression is highlighted in the code, it will display a popup window that shows the expression in FBD format.
For example, clicking the button while the expression ‘Temp > 100’ is highlighted displays:
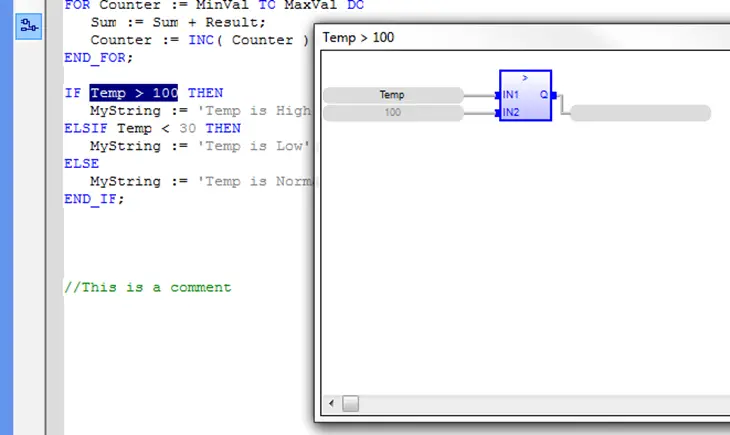
For programmers who are more experienced with the graphic format of a Function Block, this may help visualize the expression.
Functions, Subroutines and Function Blocks
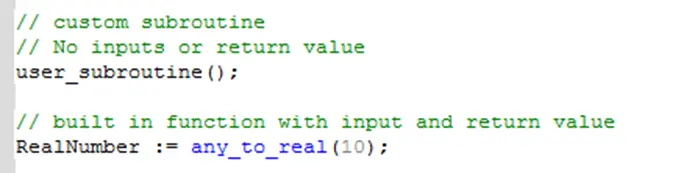
In addition to using ST keywords to create the flow of statements detailed in the previous section, the primary way to control a program’s execution path is by using functions or subroutines. A function is a predefined block of code that is invoked with a function call. When a function call occurs in an ST logic block, the processor jumps to the code in that function and executes it until it reaches the end of the function or a RETURN statement. The basic syntax of a function call is:
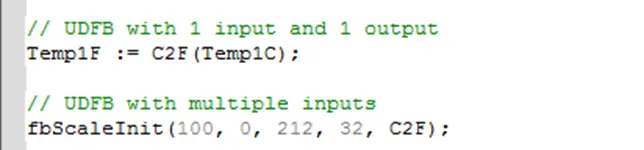
[return value := ] function_name([parameter1], [parameter2], [ > ]);Code language: CSS (css)Functions have one (optional) return value, and can have several (optional) input parameters. Some examples of function calls are:
Functions vs. Function Blocks
In MAPware-7000 IEC programming, there are two basic types of functions that can be called from ST programs.
- Ordinary functions – These can be built in functions or user created subroutines
- Function Blocks – These can be built in function blocks or user defined function blocks
The fundamental difference between the two is that function blocks have instances, while ordinary functions do not. Because of this difference, calls to ordinary functions are somewhat different than calls to function blocks.
Ordinary Function Calls
Ordinary function can have multiple inputs but only one output. To call an ordinary function you use the function name, as it appears in the Instruction List for built in functions, or in the Subroutine folder for user created subroutines. If there are input parameters, you can pass in tags, or literal values in a comma separated list within the parentheses following the function name. If there is a return value. You can use the assignment operator before the function call to assign the return value to a local tag:
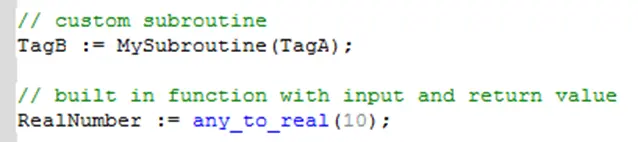
Because of the limit of one output, or return value, for ST functions, if you are defining a subroutine that you want to call from an ST program make sure to only define one output parameter. Calling a subroutine that has more than one output will cause a compile error.
Function Block Calls
Since Function Blocks have instances with their own set of data, when you want to call a function block you make the call using the name of the function block instance as it appears in the Function Block Instance folder. Do not use the name of the function block; listed in the UDFB folder for user defined function blocks, or in the Instruction List for built in function blocks.
For those familiar with object oriented programming in other programming languages, a function block in MAPware-7000 can be thought of as an object that has multiple properties, but only one method. Using the function block instance name as a function call invokes the method.
If the function block has only one output parameter you can use the assignment operator to assign the output value as with ordinary function calls.

If there are multiple output this will cause a compile error. The outputs of the function block can still be accessed however, using the following syntax:
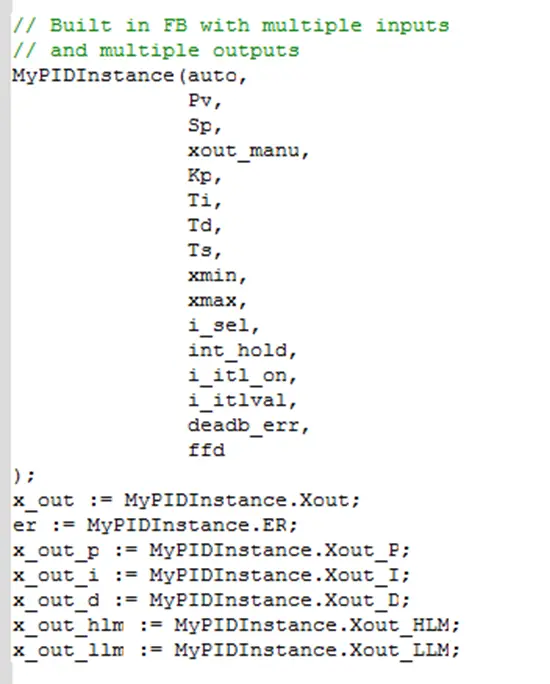
< Tag > := <Function Block Instance Name>.<property name>Code language: HTML, XML (xml)For example a call to the built in PID function block will look like this:
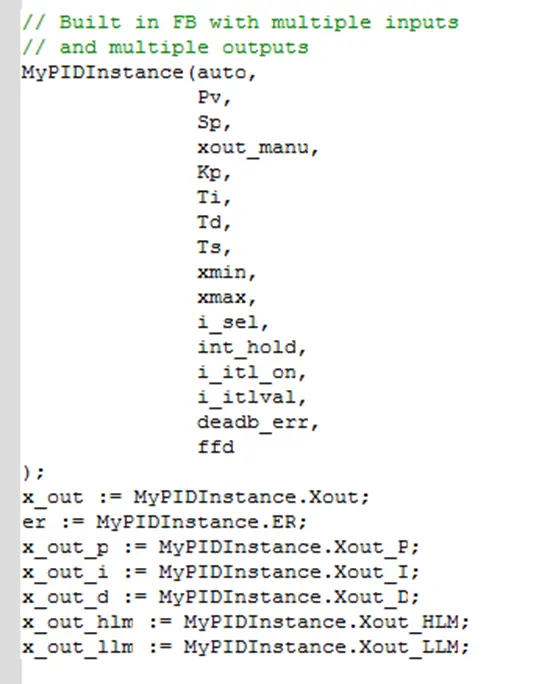
The input parameters are passed in using the parameter list. The results are accessed by assigning the output properties to standard tags.
Using this ‘.’ operator, it is possible to use properties of a function block instance as variables in ST programs, or as parameters in other function calls.

And function block instances themselves can be used as parameters, provided the function block or function is defined to accept them:
