
Static Objects and Drawing Tools
The MAPware software provides many drawing tools used to create simple graphics on a screen. Sophisticated static objects are also available to display graphics or text. Static objects (as opposed to dynamic objects) are screen objects that do not change what displays on screen. Dynamic objects (such as lamps or numeric input registers) change according to the value of a coil or register in a PLC or internal memory of the HMC. This section provides descriptions of the simple drawing tools and static objects available in the MAPware software.

Line Object
Display simple lines on a screen of varying angle, length and color.
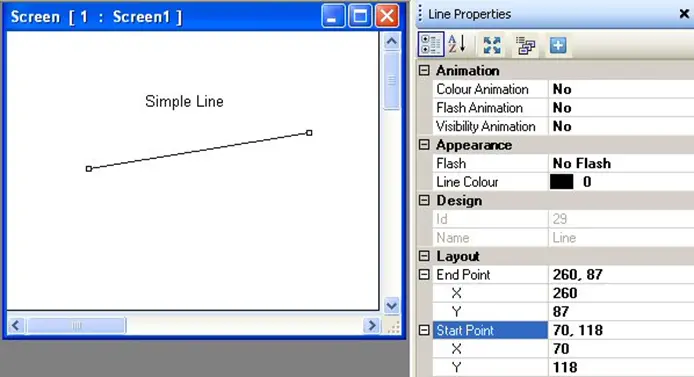
Place a line on screen
- Use one of the following:
- Click Draw > Graphical Objects > Line from the standard menu
- Click Drawing Tools > Line from the Draw toolbar
- Click the Line icon from the Draw toolbar
- Move cursor to a start point for the line. Click and hold mouse cursor.
- Drag mouse cursor to an end point for the line and release. The line appears on screen and the Line Properties box displays.
Line Properties options
- Flash Animation (description) – dynamically ‘flash’ object.
- Color Animation (description) – dynamically change the color of the object.
- Visibility Animation (description) – make the object disappear or become ‘invisible’.
- Flash (description) – continuously ‘flashes’ the object.
- Line Color (description) – sets color of the perimeter line.
- Line Thickness – Defines how thick the line is drawn (range of 1 to 5)
- Design (description) – identifies object.
- Layout (description) – coordinates (i.e. size and position) for the object.
Resize a Line
Move the mouse pointer over one of the resize handles. When the pointer changes to a double-headed arrow, simply click and drag to a new location.

Rectangle Object
Use to display a rectangle or square on a screen of varying size and color.
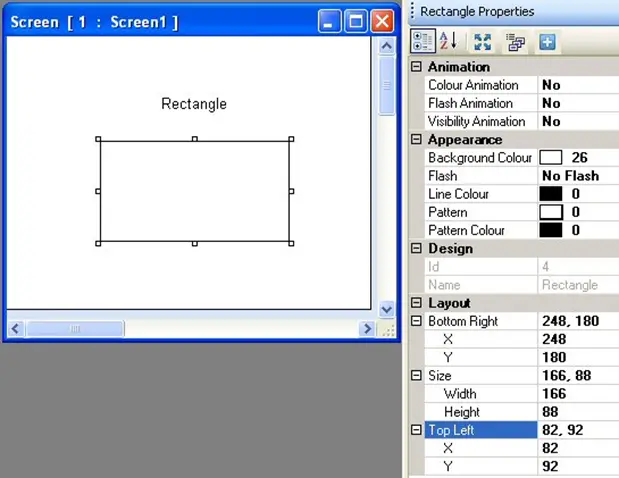
Place a rectangle on screen
- Use one of the following:
- Click Draw > Graphical Objects > Rectangle from the standard menu
- Click Drawing Tools > Rectangle from the Objects toolbar
- Click the Rectangle icon from the Draw toolbar
- Move cursor to a starting corner endpoint for the rectangle. Click and hold mouse cursor.
- Drag mouse cursor diagonally to the opposite endpoint for the rectangle and release. The rectangle appears on screen and the Rectangle Properties toolbox displays.
Rectangle Properties Options
- Color Animation (description) – dynamically change the color of the object.
- Flash Animation (description) – dynamically ‘flash’ object.
- Visibility Animation (description) – make the object disappear or become ‘invisible’.
- Background Color (description) – option to select a color as a ‘backdrop’ to the object.
- Flash (description) – continuously ‘flashes’ the object.
- Line Color (description) – sets color of the perimeter line.
- Pattern – this is an option to use two colors for the background. The pattern determines how the two colors display. Eight patterns are available. Click to display the pattern options.
- Pattern Color – Select the second background color when using the pattern option above. Click to display the color palette.
- Transparency – Sets the object as transparent or not.
- Gradient (HMC4000 only) (description) – Allows you to make the background color a gradient of two colors
- Design (description) – identifies object.
- Layout (description) – coordinates (i.e. size and position) for the object.
Resize a rectangle
Move the mouse pointer over one of the resize handles. When the pointer changes to a double-headed arrow, simply click and drag to a new location.

Ellipse Object
Use to display an ellipse or circle on a screen of varying size and color.
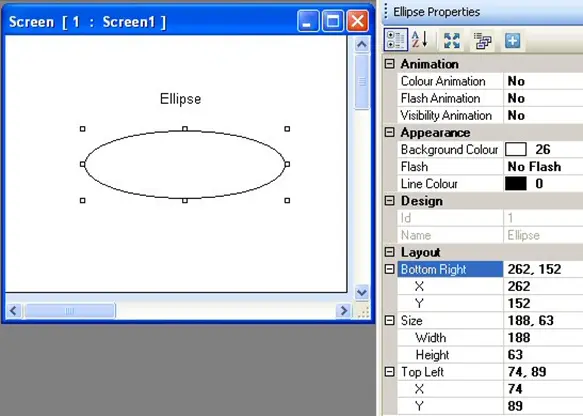
Place an ellipse on a screen
- Use one of the following:
- Click Draw > Graphical Objects > Ellipse from the standard menu
- Click Drawing Tools > Ellipse from the Objects toolbar
- Click the Ellipse icon from the Draw toolbar
- Move cursor to a starting corner endpoint for the ellipse. Click and hold mouse cursor.
- Drag mouse cursor diagonally to the opposite endpoint for the ellipse and release. The ellipse appears on screen and the Ellipse Properties toolbox displays.
Ellipse Properties Options
- Color Animation (description) – dynamically change the color of the object.
- Flash Animation (description) – dynamically ‘flash’ object.
- Visibility Animation (description) – make the object disappear or become ‘invisible’.
- Background Color (description) – option to select a color as a ‘backdrop’ to the object.
- Flash (description) – continuously ‘flashes’ the object.
- Line Color (description) – sets color of the perimeter line.
- Transparency – Sets the object as transparent or not.
- Gradient (HMC4000 only) (description) – Allows you to make the background color a gradient of two colors
- Design (description) – identifies object.
- Layout (description) – coordinates (i.e. size and position) for the object.
Resize an ellipse
Move the mouse pointer over one of the resize handles. When the pointer changes to a double-headed arrow, simply click and drag to a new location.

Round Rectangle Object
Use to display a rounded (with beveled edges) rectangle or square on a screen of varying size and color.
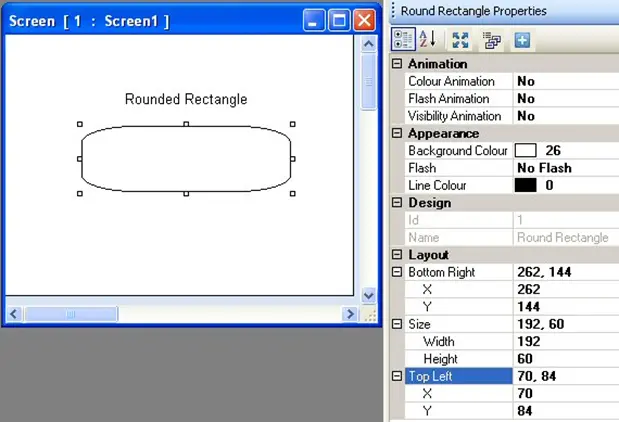
Place a rounded rectangle on screen
- Use one of the following:
- Click Draw > Graphical Objects > Rounded Rectangle from the standard menu
- Click Drawing Tools > Rounded Rectangle from the Objects toolbar
- Move cursor to a starting corner endpoint for the rounded rectangle. Click and hold mouse cursor.
- Drag mouse cursor diagonally to the opposite endpoint for the rounded rectangle and release. The rectangle appears on screen and the Round Rectangle Properties toolbox displays.
Round Rectangle Properties Options
- Color Animation (description) – dynamically change the color of the object.
- Flash Animation (description) – dynamically ‘flash’ object.
- Visibility Animation (description) – make the object disappear or become ‘invisible’.
- Background Color (description) – option to select a color as a ‘backdrop’ to the object.
- Flash (description) – continuously ‘flashes’ the object.
- Line Color (description) – sets color of the perimeter line.
- Transparency – Sets the object as transparent or not.
- Gradient (HMC4000 only) (description) – Allows you to make the background color a gradient of two colors
- Design (description) – identifies object.
- Layout (description) – coordinates (i.e. size and position) for the object.
Resize a round rectangle
Move the mouse pointer over one of the resize handles. When the pointer changes to a double-headed arrow, simply click and drag to a new location.

Picture Object
Use to display a picture (predefined *.bmp, *.jpg, or *.gif graphic image file) on a screen of varying size.
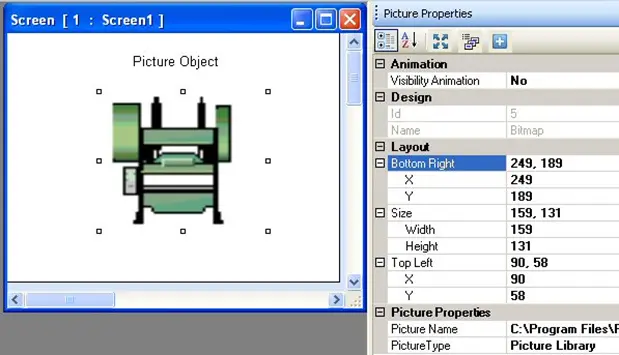
Place a picture on screen
- Use one of the following:
- Click Drawing Tools > Picture from the Objects toolbar
- Click the Picture icon from the Draw toolbar
- Move cursor to a starting corner endpoint for the picture. Click and hold mouse cursor.
- Drag mouse cursor diagonally to the opposite endpoint for the picture and release. The picture appears on screen and the Picture Properties toolbox displays.
Picture Properties Options
- Visibility Animation (description) – make the object disappear or become ‘invisible’.
- Design (description) – identifies object.
- Layout (description) – coordinates (i.e. size and position) for the object.
- Picture Properties – use to assign a graphic image to the picture object.
- Picture Name – this is the file name of the image that is displayed in the picture. To select an image, click the directory button , then locate and select the image in the Picture Library or use the browser window.
- Picture Type – options are Picture Browser or Picture Library.
- Picture Browser – this option allows you to search your hard drive for imported images using the Picture Name field. The image can be *.bmp, *.gif, or *.jpg format.
- Picture Library – choose from a large selection of predefined images in the Picture library included with the MAPware-7000 software.
Resize a picture
Move the mouse pointer over one of the resize handles. When the pointer changes to a double-headed arrow, simply click and drag to a new location.

Simple Text Object (HMC2000 only)
Use to display text on a screen using one of four font sizes and selectable color.
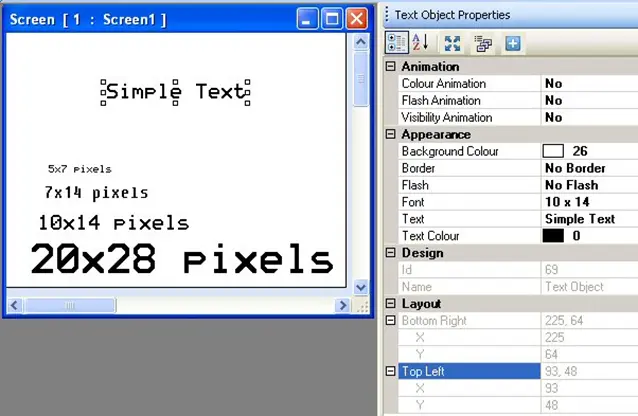
Place simple text object on screen
- Use one of the following:
- Click Draw > Display Objects > Text from the standard menu
- Click Drawing Tools > Text from the Objects toolbar
- Click the Text icon from the Draw toolbar
- Move precision cursor to the desired location for the text and click to place.
- The Text object (with ‘Text’) appears on screen and the Text Properties toolbox displays.
Simple Text Object Properties Options
- Color Animation (description) – dynamically change the color of the object.
- Flash Animation (description) – dynamically ‘flash’ object.
- Visibility Animation (description) – make the object disappear or become ‘invisible’.
- Background Color (description) – option to select a color as a ‘backdrop’ to the object.
- Border (description) – add a line around the perimeter of the object.
- Flash (description) – continuously ‘flashes’ the object.
- Font (description) – select from one of four options – 5×7, 7×14, 10×14, and 20×28 pixels.
- Text (description) – The text that appears in the box. Screen size of the display and the font used determine the maximum number of characters.
- Text Color – Determines the color of the text. Click to display the color palette.
- Transparency – Sets the object as transparent or not.
- Design (description) – identifies object.
- Layout (description) – coordinates (i.e. size and position) for the object.
Resize a simple text object
Text objects are not resizable – the number of characters and font size determines the size. To move the text object, simply click and drag using the mouse to the target location on screen.

Multilingual Text Object
Use to display multilingual text on a screen using Windows True Type fonts. The term ‘multilingual’ refers to the ability to use the Multilanguage feature with this object. This is the ability to configure up to nine text labels per object. The current value in the Language tag (SW0001) determines the particular text label shown during operation. The multilingual text object also differs from the simple text object because it uses Windows True type fonts.
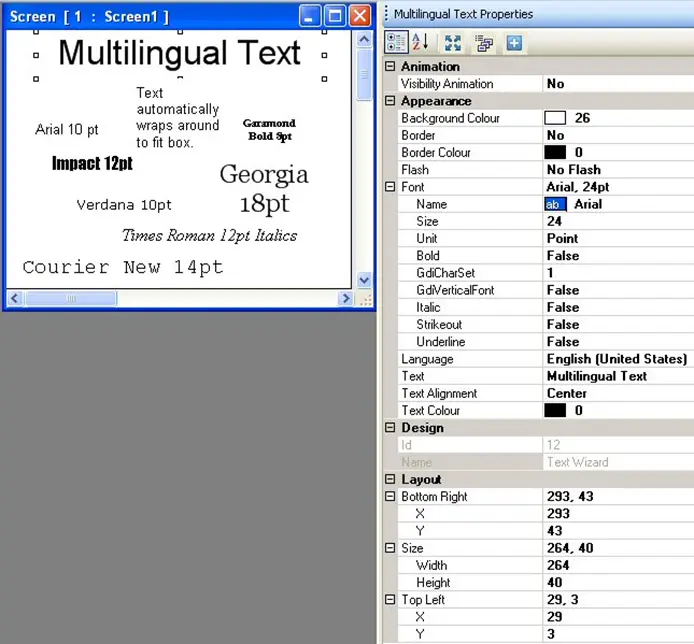
Place multilingual text on screen
- Use one of the following:
- Click Draw > Graphical Objects > Multilingual Text from the standard menu
- Click Drawing Tools > Multilingual Text from the Objects toolbar
- Click the Multilingual Text icon from the Draw toolbar
- Move precision cursor to the desired location for the text and click to place.
- The Multilingual Text object (with ‘Sample Text’) appears on screen and the Multilingual Text Properties toolbox displays.
Multilingual Text Properties Options
- Visibility Animation (description) – make the object disappear or become ‘invisible’.
- Background Color (description) – option to select a color as a ‘backdrop’ to the object.
- Border (description) – add a line around the perimeter of the object.
- Border Color (HMC2000 only) – select a color for the border.
- Flash (description) – continuously ‘flashes’ the object.
- Font (description) – configure how you wish the text to appear.
- Language (description) – highlight the language that must be selected to display the entered text.
- Text Alignment – determines how text on multiple lines aligns: Left, Right, or Center justified.
- Text (description) – The text that appears in the box. Screen size of the display and the font used determine the maximum number of characters.
- Text Color – Determines the color of the text. Click to display the color palette.
- Transparency – Sets the object as transparent or not.
- Gradient (HMC4000 only) (description) – Allows you to make the background color a gradient of two colors
- Design (description) – identifies object.
- Layout (description) – coordinates (i.e. size and position) for the object.
Resize a multilingual text object
The Multilingual text object is resizable and has the advantage that the text wraps around to the next line if the width of the text box is too small.
Move the mouse pointer over one of the resize handles. When the pointer changes to a double-headed arrow, simply click and drag to a new location.

Time Object
Use to display time (all HMCs have a built-in real time clock RTC) on a screen using one of four font sizes and selectable color.
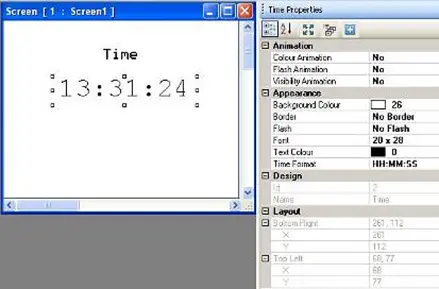
Place a time object on screen
- Use one of the following:
- Click Draw > Display Objects > Time from the standard menu
- Click Clock Objects > Time from the Objects toolbar
- Move precision cursor to the desired location for the Time and click to place.
- The Time object (with current computer time) appears on screen and the Time Properties toolbox displays.
Time Object Properties Options
- Color Animation (description) – dynamically change the color of the object.
- Flash Animation (description) – dynamically ‘flash’ object.
- Visibility Animation (description) – make the object disappear or become ‘invisible’.
- Background Color (description) – option to select a color as a ‘backdrop’ to the object.
- Border (description) (HMC2000 only) – add a line around the perimeter of the object.
- Flash (description) – continuously ‘flashes’ the object.
- Font (description) – configure how you wish the text to appear.
- Text Color (description) – Determines the color of the text. Click to display the color palette.
- Time Format – options are HH:MM:SS (hours, minutes, seconds) or HH:MM (hours, minutes)
- Transparency – Sets the object as transparent or not.
- Design (description) – identifies object.
- Layout (description) – coordinates (i.e. size and position) for the object.
Resize a time object
Time objects are not resizable – the size is fixed by the number of characters and font size. To move the time object, simply click and drag using the mouse to the target location on screen.

Date Object
Use to display date (all HMCs have a built-in real time clock RTC) on a screen using one of four font sizes and selectable color.
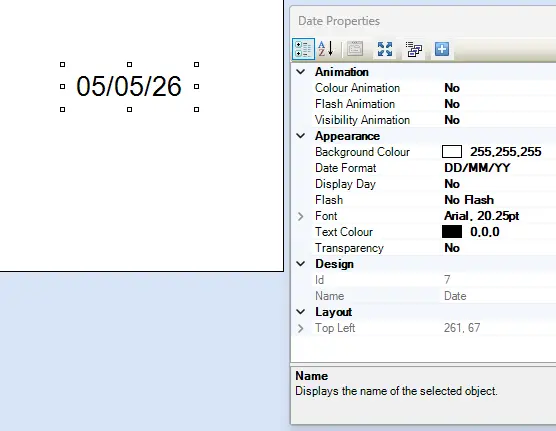
Place a date object on screen
- Use one of the following:
- Click Draw > Display Objects > Date from the standard menu
- Click Clock Objects > Date from the Objects toolbar
- Move precision cursor to the desired location for the Date and click to place.
- The Date object (with current computer date) appears on screen and the Date Properties toolbox displays.
Date Object Properties Options
- Color Animation (description) – dynamically change the color of the object.
- Flash Animation (description) – dynamically ‘flash’ object.
- Visibility Animation (description) – make the object disappear or become ‘invisible’.
- Background Color (description) – option to select a color as a ‘backdrop’ to the object.
- Border (description) (HMC2000 only) – add a line around the perimeter of the object.
- Date Format – several options are available. See the dropdown menu in MAPware for these options.
- Display Day – option to display the day of the week to the left of the Date.
- Flash (description) – continuously ‘flashes’ the object.
- Font (description) – configure how you wish the text to appear.
- Text Color (description) – Determines the color of the text. Click to display the color palette.
- Transparency – Sets the object as transparent or not.
- Design (description) – identifies object.
- Layout (description) – coordinates (i.e. size and position) for the object.
Resize a date object
Date objects are sized according to the number of characters and font size. To move the date object, simply click and drag using the mouse to the target location on screen.