
What is a Screen?
A screen is a predefined collection of objects to be displayed at the same time. A screen is displayed by the press of a button, function key, or can be called by a request from a PLC.
How many different types of screens are there? In MAPware, you can configure or define a screen to be one of the following:
- Base Screen – this is the most common type of screen. Simply put, this is a full-sized screen that displays objects placed onto it. The term ‘full-sized’ varies, of course, depending upon the HMC model selected and the display size of that model. For example, a base screen for the HMC4043A-M model (4.3” diagonal screen) is 480×272 pixels. When displayed, a base screen covers the entire area of the display.
- Popup Screen – this is another common type of screen that is used to display a smaller ‘popup’ screen on top of a base screen. Popup screens allow you to display information or objects only when needed by the HMC operator. This keeps the HMC interface more intuitive and simpler to use. Because a popup screen displays on top of a base screen, a popup screen must be smaller than full-size for the display used.
- Template Screen – This screen is also full-sized but is not called directly by a button or function key on the HMC. It cannot display using a command from a PLC. A template screen displays by attaching it to a base screen. When displayed, all objects on the template screen overlay onto the base screen.
- Keypad Screens – there are four pre-defined popup keypad screens: numeric keypad, hex keypad, bit keypad, and ASCII keypad. These keypads can be used by objects (i.e. Bit Entry, Numeric Entry) to modify register values.
- Web Screens – This type of screen can be viewed by connecting to the HMC’s built in web server with an internet browser program. The screen is displayed in the web browser as if it were a website. Only text based objects and static images are supported in this type of screen.
Screen Types and Templates
Base Screens
Base screens are full-sized screens that display groups of objects (i.e. Bit Lamps, Buttons, Bar graphs, etc.) on the HMC display.
How to create a base screen
The following steps outline the ways to create a base screen in MAPware-7000
Instructions: How to create a base screen
From the Project information window
Right-click the Base Screens folder located in the Project Information Window. A popup dialog box appears – click New Base Screen.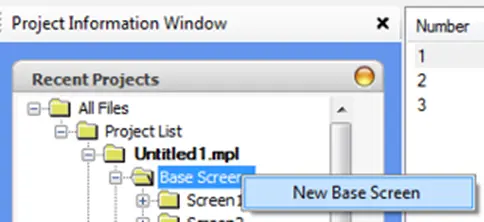
Or from the layout toolbar
Click the New Base Screen icon in the Layout Toolbar.
The New Screen now appears in the workspace
The new screen appears in the work area of MAPware and the Screen Properties box displays.
Base Screen Properties
Click anywhere on the screen (but not on any objects that have been placed onto the screen) to display the Screen Properties box on the right side of the screen.
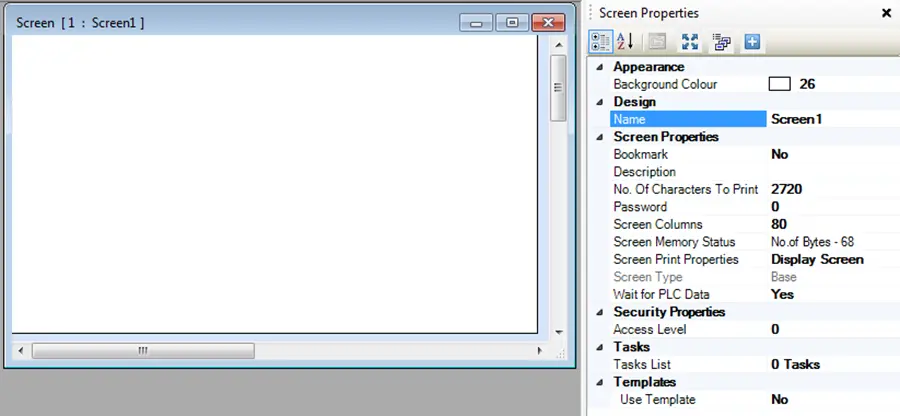
- Appearance
- Background Color – determines the fill or background color of the screen. Click the button to display the color palette and select a color.
- Design
- Name – this is the name assigned to the selected screen. The text entered for the name appears as the title for the screen in the Projects Information window. By default, the name is simply Screen1, Screen2, etc. However, you may wish to assign a new name that helps define the purpose of the screen, (i.e. numeric keypad).
- Number – this is the number assigned to the screen. A number assigns to each screen when created. By default, the number assigned is the next available number in sequence but you can edit this field to assign a new number. Range is 1 to 49999.
- Screen Properties
- Bookmark – option to assign a bookmark to this screen.
- Description – Enter text to help describe the purpose of this screen.
Note: this text is not downloaded to the HMC. - No. of Characters To Print (HMC2000 only) – if this screen is configured to print to a serial printer, this value determines how many of the characters displayed on the screen will be sent to the serial printer.
Note: maximum is 1590 characters (using smallest font). If there is more text on the target screen than the value entered, then only the specified number of characters prints, beginning with text at the top of the screen. - Password – user can protect access to the selected screen by assigning a numeric password. Range is 0 to 9999 (0 is no password assigned). When password-protected, a request to display the target screen causes a dialog box to appear, asking user to enter correct password:
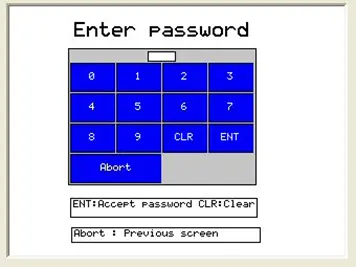
If correct, screen displays.
- Screen Properties (cont.)
- Screen Columns (HMC2000 only) – determines the total number of characters (columns) in each row that print.
- Screen Memory Status (HMC2000 only) – this indicates the total amount of memory required (in bytes) for selected screen. Click the button to display a more detailed description of the memory used:
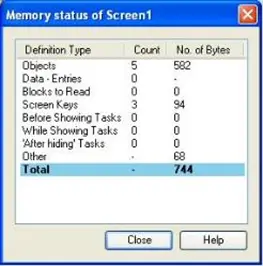
- Screen Properties (cont.)
- Screen Print Properties (HMC2000 only) – determines how the screen is to be used when requested:
- Display Screen (default) – screen is displayed on the HMC and not sent to a serial printer.
- Print Screen – screen data is sent to a serial printer only and is not displayed when requested. However, a message “Printing in Progress” displays on the HMC and remains until the HMC is finished sending all text on the screen to the serial printer. Then the prior screen displays.
- Print Once and Display Screen – screen is displayed and printed. Please note that the screen does not appear on the HMC display until the entire text is output to the serial printer. To shorten the time interval, use the fastest baud rate available for the printer, and reduce the No Of Characters to Print setting to the minimum required.
Note: the target screen will print again every time the screen displays.
- Screen Type – identifies what type of screen this is (i.e. base, popup, or template).
- Wait for PLC Data (HMC2000 only) – if enabled, the HMC does not display the screen until after it has read the current values of all PLC-related objects. Disable this option if you wish to increase the speed of screen updates.
- Screen Print Properties (HMC2000 only) – determines how the screen is to be used when requested:
- Security Properties
- Access Level – Define the Access Level of the Screen. The screen will only be accessible to users with the same Access Level or above.
- Tasks
- Tasks List – Displays the number of tasks associated with the selected screen and allows new tasks to be created or existing tasks to be edited.
- Templates
- Use Template – Determines whether this page should use a template screen.
- No Of Templates – Specifies the number of template screens that will be used on this screen. Limited by the number of template screens you’ve already created
- Template1 through Template10 – Specifies the name of the template screen to show on the base screen. There will be a number of these options equal to the number of template screens you define in the option above.
Popup Screens
Popup screens are screens that display groups of objects (i.e. Bit Lamps, Buttons, Bar graphs, etc.) on the HMC. They display on top of base screens and are smaller than the size of the HMC LCD display.
Note: although you can configure several popup screens to display on a base screen, only one popup screen displays at a time.
How to create a popup screen
The following steps outline the ways to create a popup screen in MAPware-7000.
Instructions: How to create a popup screen
From Project Information Window
Right-click the Popup Screens folder located in the Project Information Window. A popup dialog box appears – click New Popup Screen.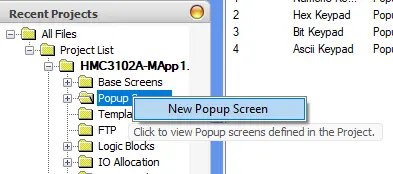
or from Layout toolbar
Click the New Popup Screen icon in the Layout Toolbar.
New Screen Appears
The new screen appears in the work area of MAPware and the Screen Properties box displays.
Popup Screen Properties
Click anywhere on the screen (but not on any objects that have been placed onto the screen) to display the Screen Properties box on the right side of the screen.
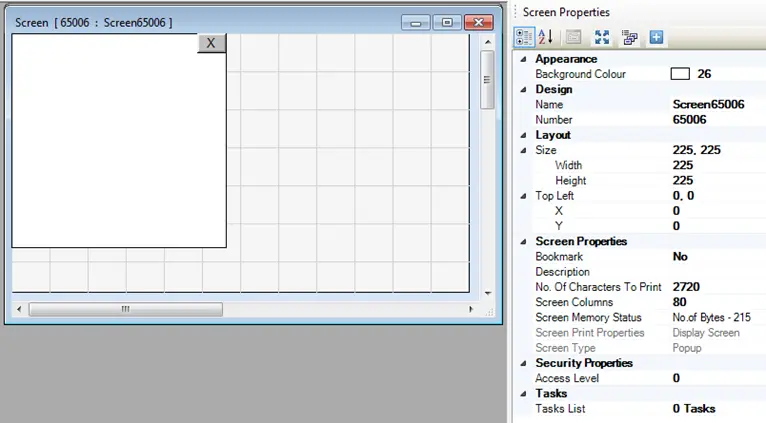
- Appearance
- Background Color – determines the fill or background color of the screen. Click the “…” button to display the color palette and select a color.
- Design
- Name – this is the name assigned to the selected screen. The text entered for the name appears as the title for the screen in the Projects Information window. By default, the name is simply Screen65001 Screen65001, etc. However, you may wish to assign a new name that helps define the purpose of the screen, (i.e. numeric keypad).
- Number – this is the number assigned to the screen. A number is automatically assigned to each screen when created. By default, the number assigned is the next available number in sequence (starting with 65001), but you can edit this field to assign a new number.
Note: popup screens must be in the range of 65001-65534.
- Layout
- Size – sets the pixel size (width x height) of the popup screen. Default is 237×180 pixels.
- Width – the width (in pixels). Range is 30 to 319.
- Height – the height (in pixels). Range is 30 to 239.
- Top Left – this position indicator places the top left corner of the popup screen in relation to the base screen when called.
- X – Position (in pixels) along the horizontal (X) axis.
Note: the maximum setting must less than the width of the popup screen and the base screen + one pixel. For example, if the width of the popup screen is 237 pixels, then the maximum position along the X-axis is 320 (width of base screen) minus 237 (width of popup) – 1 pixel equals 82 pixels. - Y – Position (in pixels) along the vertical (Y) axis.
Note: the maximum setting must less than the height of the popup screen and the base screen + one pixel. For example, if the height of the popup screen is 180 pixels, then the maximum position along the Y-axis is 240 (height of base screen) minus 180 (height of popup) – 1 pixel equals 59 pixels.
- X – Position (in pixels) along the horizontal (X) axis.
- Size – sets the pixel size (width x height) of the popup screen. Default is 237×180 pixels.
- Screen Properties
- Bookmark – option to assign a bookmark to this screen.
- Description – Enter text to help describe the purpose of this screen.
Note: this text is not downloaded to the HMC. - No. of Characters To Print (HMC2000 only) – if this screen is configured to print to a serial printer, this value determines how many of the characters displayed on the screen will be sent to the serial printer.
Note: maximum is 1590 characters (using smallest font). If there is more text on the target screen than the value entered, then only the specified number of characters prints, beginning with text at the top of the screen. - Password – user can protect access to the selected screen by assigning a numeric password. Range is 0 to 9999 (0 is no password assigned). When password-protected, a request to display the target screen causes a dialog box to appear, asking user to enter correct password.
- Screen Columns (HMC2000 only) – determines the total number of characters (columns) in each row that print.
- Screen Memory Status (HMC2000 only) – this indicates the total amount of memory required (in bytes) for selected screen. Click the button to display a more detailed description of the memory used:
- Screen Properties (cont.)
- Screen Print Properties (HMC2000 only) – For popup screens, this option is always set to Display Screen.
- Screen Type – identifies what type of screen this is (i.e. base, popup, or template).
- Security Properties
- Access Level – Allows an Access Level to be assigned to this screen. Users and Access Levels are assigned using the Define > Access Level menu option. If a screen is assigned an access level other than zero, the operator must log in using a valid Username and Password in order to view the screen. See the Error! Reference source not found. section below.
- Tasks
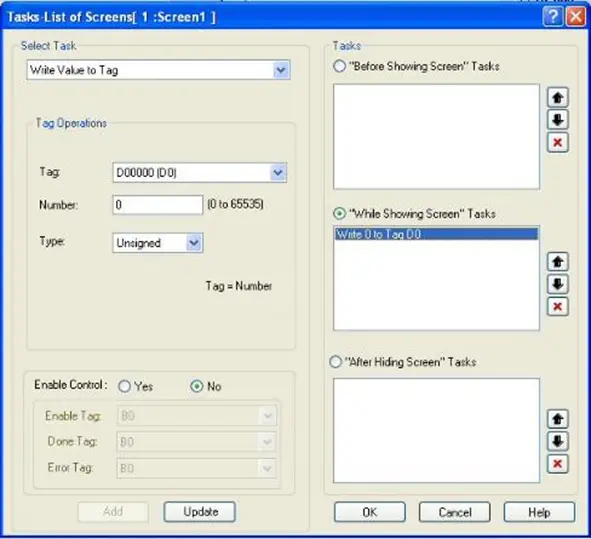
- Task List – option to assign tasks to the target screen. Click the button to display the Task List for the selected screen:
Placing Objects onto a Popup Screen
Any of the objects described in the Data & Display Objects pages can be placed onto a popup screen with the exception of the Bit Entry and Numeric Entry objects.
Template Screens
Template screens are screens that overlay onto base screens. Template screens are used for two primary reasons:
- To conserve project memory – If you have a project that requires the same objects (like a Text box or Company Logo picture) to be displayed on multiple screens, place these objects on a template screen. This reduces the amount of memory required to display these objects.
- To save time and cost of updating projects – If some objects in a project are shared in a number of screens, using a template reduces the amount of time required to make changes to these common objects.
How to create a template screen
The following steps outline the ways to create a popup screen in MAPware-7000.
Instructions: How to create a template screen
From Project Information Window
Right-click the Templates folder located in the Project Information Window. A popup dialog box appears – click New Template Screen.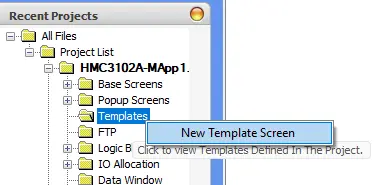
or from Layout toolbar
Click the New Templage Screen icon in the Layout Toolbar.
New Screen Appears
The new screen appears in the work area of MAPware and the Screen Properties box displays.
Template Screen Properties
Click anywhere on the screen (but not on any objects that have been placed onto the screen) to display the Template Screen Properties box on the right side of the screen.
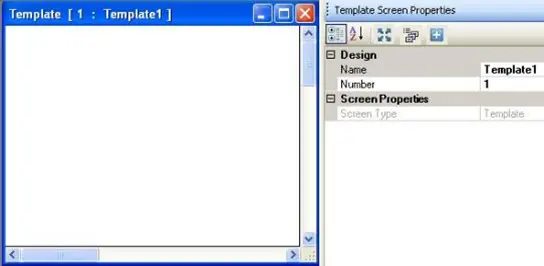
- Design
- Name – this is the name assigned to the selected screen. The text entered for the name appears as the title for the screen in the Projects Information window. By default, the name is simply Template1, Template2, etc. However, you may wish to assign a new name that helps define the purpose of the screen, (i.e. company logo).
- Number – this is the number assigned to the screen. A number assigns to each screen when created. By default, the number assigned is the next available number in sequence (starting with 1), but you can edit this field to assign a new number.
Note: template screens must be in the range of 1 to 10.
- Screen Properties
- Password – user can protect access to the selected screen by assigning a numeric password. Range is 0 to 9999 (0 is no password assigned). When password-protected, a request to display the target screen causes a dialog box to appear, asking user to enter correct password.
- Screen Type – identifies what type of screen this is (i.e. base, popup, or template).
Placing Objects onto a Template Screen
Any of the objects described in the Data & Display Objects pages can be placed onto a base (template) screen
Applying a template screen
After you have created your template screens, you must then assign the templates to base screens. Then when a base screen is displayed on the HMC display, the assigned template screens will show as well.
To assign a template screen to a base screen, click Screen > Apply Template Screens from the standard menus:
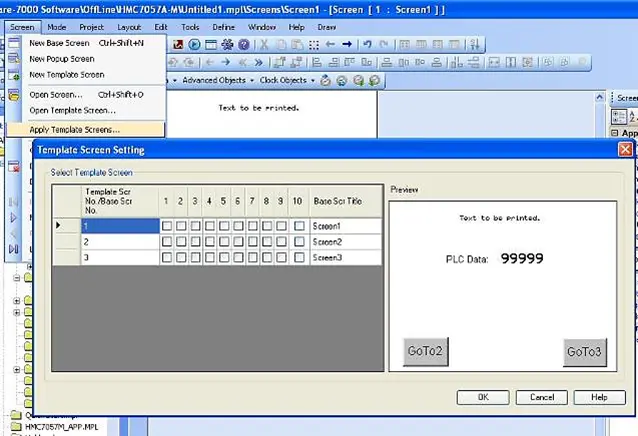
Note: To be able to view the Screen menu, you must be selecting a screen in the Project Information Window. The Screen menu will not show up if you are not actively selecting a specific screen within the Project information Window
The table is a list of all base screens created in the project (each row corresponds to a base screen). Ten columns represent the Template screens (maximum of ten template screens can be created). To assign a particular template screen to a base screen, simply check the appropriate template.
Note that the Preview screen indicates how the template screens overlay onto the selected base screen.
Another method of assigning template screens to a base screen is to display the base screen and assign the template using the Templates attribute listed in the Screen Properties dialog box:
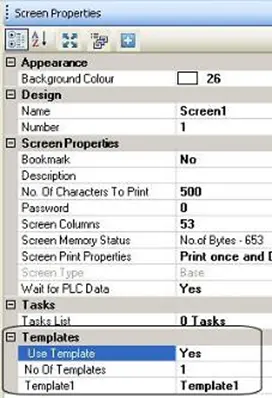
Alternatively, you can simply apply and specify the number of templates, and which templates in the base screen properties.
Web Screens
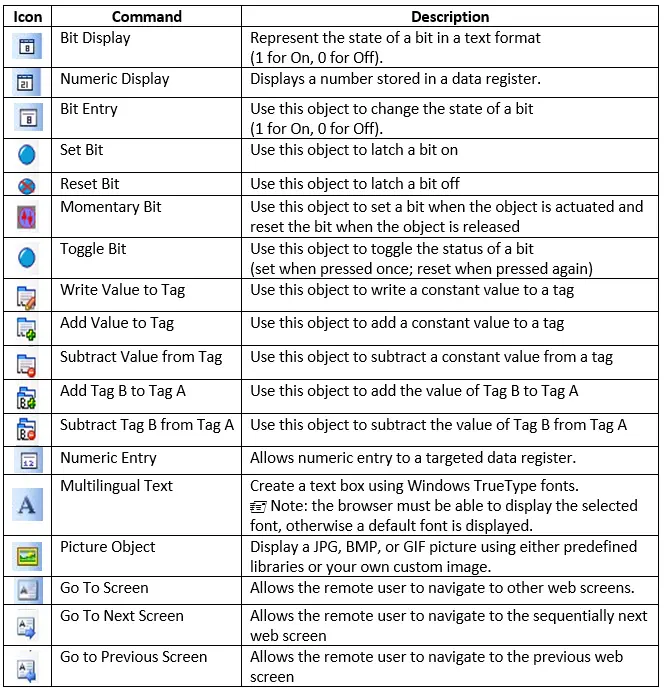
Web screens can be viewed through a web browser connected to the HMC’s web server, allowing remote access to HMC data from a remote computer on the Ethernet network or, if exposed to the internet, from anywhere in the world. Web screens allow the remote user to both view and modify data in the HMC. The objects used on web screens are restricted to text based data display / input objects, static images and navigation buttons.
The following objects are available for use on web screens:
Enabling the Webserver
Before a web screen can be created the web server must be enabled and configured. To do this click Tools > Web Server Configuration, and check the checkbox to enable the web server:
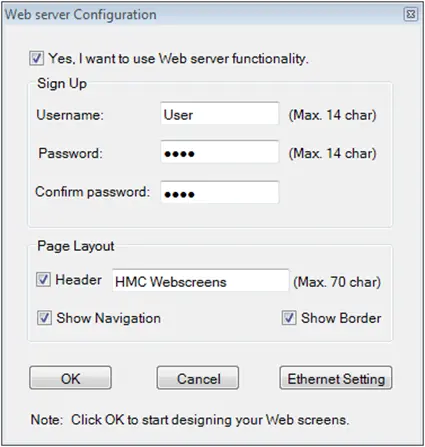
Once enabled, several fields are activated allowing the web server to be configured:
- Username / Password – A username and password are required. The remote operator will be prompted to enter these credentials before they can view the web screens in their browser. Both Username and Password can be up to 14 characters and can contain alpha numeric characters as well as; ‘*’, ‘-’, ‘_’ and ‘.’ characters.
- Header – If enabled, the text entered here will be displayed in the browser window as banner with white text on a blue background.
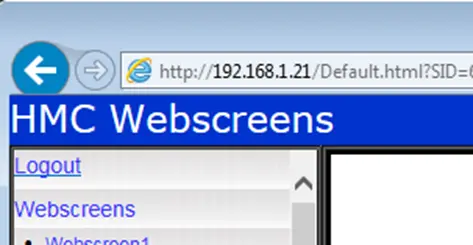
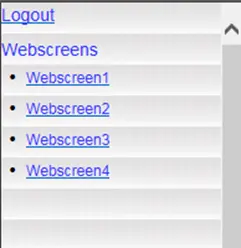
- Show Navigation – If enabled, a navigation bar will appear in the browser to the left of the active web screen with links to all of the web screens in the project. The operator can click any of the screens listed to go directly to that screen.
- Show Border – If enabled, a border will appear around the web screens.
- Ethernet Settings (HMC2000 only) – This button is a shortcut to the Ethernet Settings tab on the Project Configuration window. The IP address entered here is the address the remote user will point their browser to in order to view the screens.
Creating Web screens
Once the web server is enabled, as described above, a Web screens folder will appear in the Project Information Window.
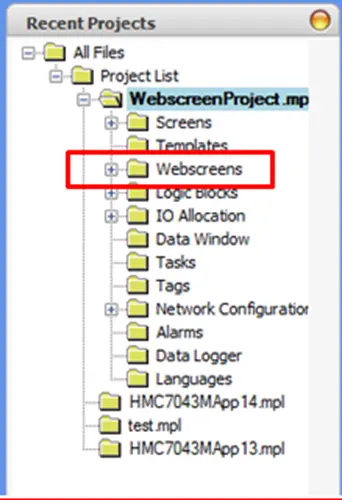
In this folder a default web screen will be created. The default screen name will appear in blue indicating that this is the first screen displayed when the user connects the web server. To create additional web screens simply right click the Web screens folder and select New Web Screen from the context menu:

Once there are multiple web screens, a different web screen can be designated as the default screen by right clicking the screen name in the Project Information Window and selecting Set as Default screen from the context menu.
The process for adding objects to a web screen is the same as adding objects to a base screen. Only objects available for use on web screens will be selectable. There are some differences in how the objects behave on a web screen as opposed to on a base screen:
- Input objects used on web screens will not have a keypad associated with them, instead the browser will have an input method that can be used to enter data. For example, on a desktop, the remote user can click a numeric input object with their mouse then enter data with a keyboard, pressing enter on the keyboard writes the data to the HMC.
- Not all properties are available on web screens
- A font selected for an object on a web screen must be present on the browser; otherwise the browser will use a default font to display the object.
- GoTo buttons can only be used to go to another web screen. Popup screens are not allowed.
- External PLC tags cannot be used on a web screen.
- A maximum of 100 tags can be used per web screen.
- A maximum of 100 web screens can be configured per project.
Once the web screens are created, download the application to the HMC. If the Ethernet settings have been changed, don’t forget to check the Ethernet Settings checkbox in the download window.
Connecting to Web Screens Locally with an Internet Browser
Once the screens have been created and downloaded to the HMC, the next step is to connect to the web screens with an internet browser.
Instructions: Connecting to Web Screens Locally with an Internet Browser
Enter the IP Address of the HMC
If the computer running the browser is on the same Local Area Network (LAN) as the HMC, simply enter the IP address assigned to the HMC in the web browser’s address bar:
Enter Username and Password
A prompt will appear to enter the Username and password configured for the web server: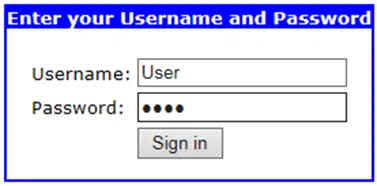
Sign In
Once that is entered click the Sign in button to display the default web screen.A maximum of 10 users can connect to a single HMC’s web server.
TCP port 80 is used to serve the web screens.
Web screens have a refresh time of one second.
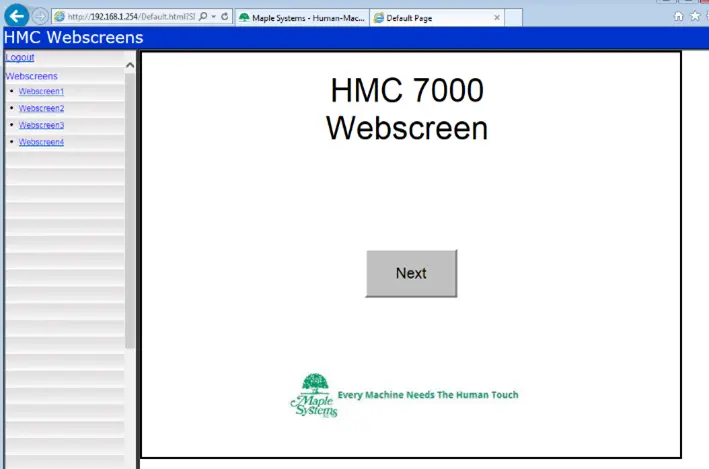
Connecting from the Internet
If the browser used to connect to the HMC is not on the same Local Area Network as the HMC it will be necessary to expose the HMC’s web server to the Internet. Typically this is done by opening port 80 in the router or by forwarding port 80 to the HMC’s IP address by adding an entry in the port forwarding table in the router. On the Ethernet Settings tab of the Project Configuration window set the default gateway to the router’s private IP address. Once the router is configured, connect to the HMC sever by entering the router’s public IP address in the web browser address bar.
Modifying screens
Navigating Screens
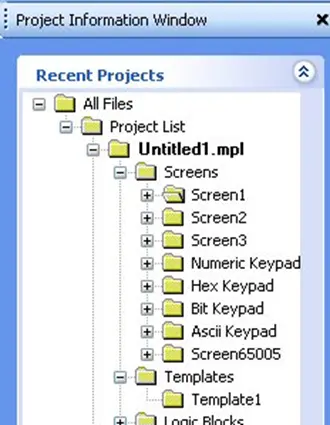
The easiest way to navigate to a screen is to select it from the Screens folder in the Project Information Window:
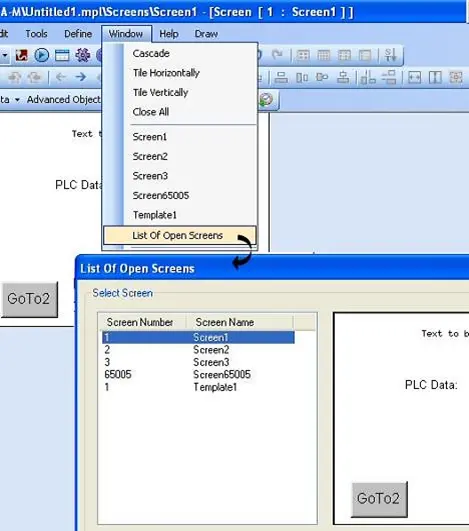
Another method is to click Window > List of Open Screens from the standard menu:
If you have many screens and you wish to work on a subset of screens, then the bookmark feature may be useful. Bookmarks provide a means to switch quickly from one screen to another.
Viewing multiple screens
You may wish to look at several screens at a time in the workspace area of the MAPware software. To do this, click Window > Tile Horizontally (Vertically):
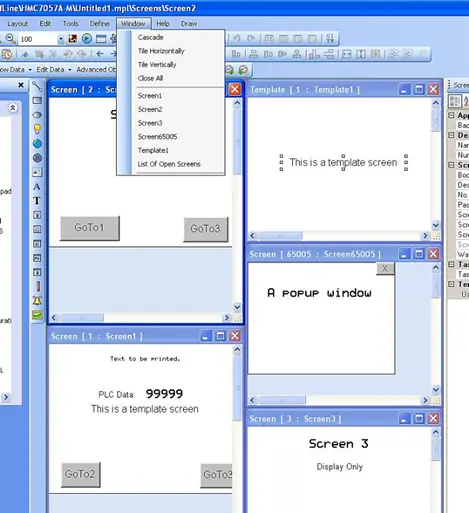
Note: click the Close All option in Windows to close all open screens.
Deleting a screen
Select one of three methods to delete a screen. Display the screen in the work area of MAPware:
- Click Screen > Delete from the standard menu.
- Click the Delete Screen icon in the Screen Toolbar.
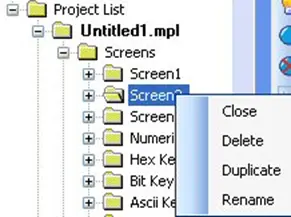
- Right-click the Screen name listed in the Project Information Window, then click Delete.
Duplicating a screen
Select one of two methods to duplicate a screen. Display the screen in the work area of MAPware:
- Click Screen > Duplicate from the standard menu.
- Right-click the Screen name listed in the Project Information Window, then click Duplicate.
Renaming a screen
Select one of two methods to rename a screen. Display the screen in the work area of MAPware:
- Click any area of the screen to display the Screen Properties dialog box, and then enter a new name under the Design > Name attribute.
- Right-click the Screen name listed in the Project Information Window, then click Rename.
Importing a screen
How to Import a screen
Full size screens and popup screens can be imported from an existing project, provided that the screen size in the source project is the same as the screen size of the destination project.
Instructions: How to Import a screen
Select Import Screen option
Click Screen > Import Screen from the menu bar.
Find the Source Project file
An open file dialog window will be displayed. Browse to the source project file (.mpl) and click open.Choose windows (screens) to import
A preview window is displayed allowing you to browse through the available windows and select the desired window(s) to import.Multiple windows can be imported by holding down the Control key and clicking the windows in the Import Screen List.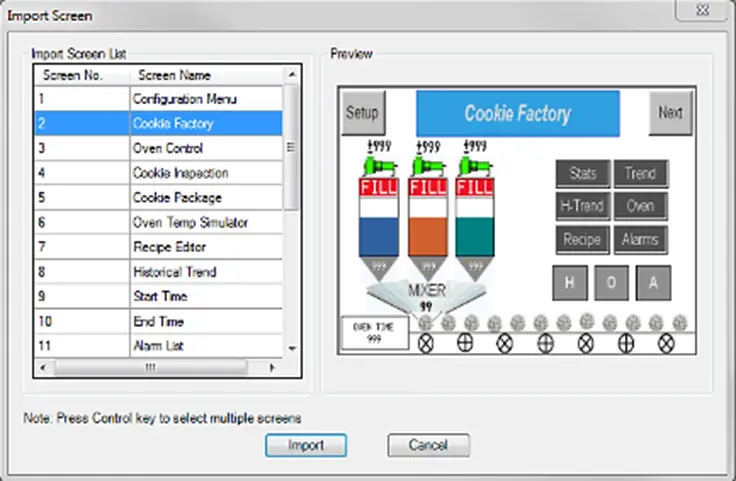
Select Corresponding Tags to import (Optional)
Select the tags you would like to import with the screen(s).Confirm
Click the Import button, the selected screens will be added to the Screens folder in the project tree. The screen will retain the screen number from the source project unless a screen with that number already exists in the destination project.