
Recipes
Recipes are preconfigured values that are either uploaded from the PLC into the HMC or downloaded from the HMC into the PLC. The advantage of using recipes is in batch processing applications in which a series of unique values or set points are required to produce or perform an operation. If there are several different batches or recipes, then the recipe features makes it easier for the plant floor operator to select which recipe they need for the current job, downloaded the preset values to the PLC from the HMC with the press of a button, and start the job.
How to Set up a Recipe in MAPware (HMC2000)
Follow these simple steps to set up a recipe in MAPware-7000
Instructions: How to Set up a Recipe in MAPware (HMC2000)
Configure the tags
Configure the tag registers that will be used for the source registers (registers that are used to store the preset values) and the target registers (register that receive the preset values when the operator presses a button on the HMC screen).Use the Tag Database to configure these registers.Configure the screen
Configure a screen that is used to enter the preset values into the source registers. Preferably, the source registers should be registers that reside in non-volatile memory (i.e. retentive tags).Create a button
Create a Transfer/Upload Recipe button and configure the target and source tags and how many consecutive register to transfer/upload.

Transfer Recipe (HMC2000 only)
The Transfer Recipe button is used to copy predefined constant values from a consecutive set of internal HMC memory tags to a set of PLC memory tag registers. Up to 100 values can be transferred per button created.
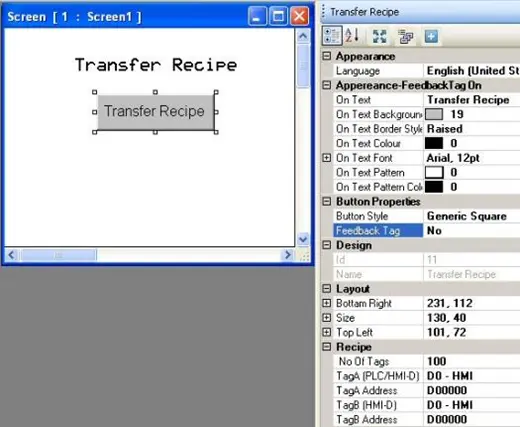
Place a Transfer Recipe button object on screen
- Use one of the following:
- Click Draw > Buttons > Recipe > Transfer Recipe from the standard menu
- Click Advanced Objects > Buttons > Recipe > Transfer Recipe from the Draw toolbar
- Move cursor to a start point for the button object. Click and hold mouse cursor.
- Drag mouse cursor to an end point for the button object and release. The button appears on screen and the Transfer Recipe Properties box displays.
Transfer Recipe Properties Options
- Visibility Animation (description) – make the object disappear or become ‘invisible’.
- Language (description) – highlight the language that must be selected to display the entered text.
- Appearance Feedback Tag On/Off (description) – select the On and/or Off labels
- Button Style (description) – selects a style or ‘look’ to the button.
- Enable Control Bit (description) – Enables and disables the Control bit for the button.
- Feedback Tag (descripotin) – Enable this feature and select the same tag for both the target tags and the feedback tags, if you wish to see the button change state (i.e. go from an ‘off’ or untouched look to an ‘on’ or touched look).
- Simulation – select ‘On/Off’ to see how button looks in that state (only available if Feedback Tag is set to ‘Yes’).
- Design (description) – identifies object..
- Layout (description) – coordinates (i.e. size and position) for the object.
- Recipe – tag of source and target registers to use.
- No of Tags – enter the number of preset constant values (registers) that are transferred from the source address to the target address. Range is 1 to 100.
- Tag A (PLC/HMC-D) – name assigned in the tag database to the target register. This is the tag of the target register(s) that the recipe preset values are transferred to.
- Note: if the value in No of Tags is greater than 1, you must make sure that there are an equivalent number of consecutive tag registers available for the transfer.
- Tag B (HMC-D) – name assigned in the tag database to the source register. This is the tag of the source register(s) that the recipe preset values transfer from.
- Note: if the value in No of Tags is greater than 1, you must make sure that there are an equivalent number of consecutive tag registers available for the transfer.
Resize a Transfer Recipe button object
Move the mouse pointer over one of the resize handles. When the pointer changes to a double-headed arrow, simply click and drag to a new location.

Upload Recipe (HMC2000 only)
The Upload Recipe button copies predefined constant values from a consecutive set of PLC memory tag addresses to a set of internal HMC memory tags. Up to 100 values can transfer per button created.
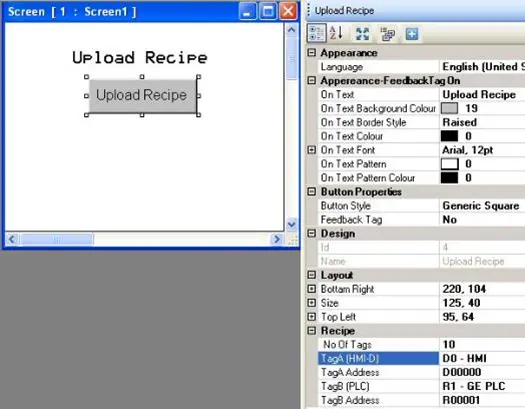
Place an Upload Recipe button object on screen
- Use one of the following:
- Click Draw > Buttons > Recipe > Upload Recipe from the standard menu
- Click Advanced Objects > Buttons > Recipe > Upload Recipe from the Draw toolbar
- Move cursor to a start point for the button object. Click and hold mouse cursor.
- Drag mouse cursor to an end point for the button object and release. The button appears on screen and the Upload Recipe Properties box displays.
Upload Recipe Properties Options
- Visibility Animation (description) – make the object disappear or become ‘invisible’.
- Language (description) – highlight the language that must be selected to display the entered text.
- Appearance Feedback Tag On/Off (description) – select the On and/or Off labels
- Button Style (description) – selects a style or ‘look’ to the button.
- Enable Control Bit (description) – Enables and disables the Control bit for the button.
- Feedback Tag (description) – Enable this feature and select the same tag for both the target tags and the feedback tags, if you wish to see the button change state (i.e. go from an ‘off’ or untouched look to an ‘on’ or touched look).
- Simulation – select ‘On/Off’ to see how button looks in that state (only available if Feedback Tag is set to ‘Yes’).
- Design (description) – identifies object..
- Layout (description) – coordinates (i.e. size and position) for the object.
- Recipe – Source and target tag registers to use.
- No of Tags – enter the number of preset constant values (registers) that are transferred from the source tag to the target tag. Range is 1 to 100.
- Tag A (PLC/HMC-D) – name assigned in the tag database to the target register. This is the tag address of the target register(s) that the recipe preset values are transferred to.
- Note: if the value in No of Tags is greater than 1, you must make sure that there are an equivalent number of consecutive tag registers available for the transfer.
- Tag B (HMC-D) – name assigned in the tag database to the source register. This is the tag address of the source register(s) that the recipe preset values transfer from.
Resize an Upload Recipe button object
Move the mouse pointer over one of the resize handles. When the pointer changes to a double-headed arrow, simply click and drag to a new location.
Recipe Database
The Recipe Database is a feature supported on the HMC2000 and HMC4000 series and is available in MAPware-7000 v2.36 and newer. This feature allows a recipe database to be configured so that recipe data can be stored locally on the HMC.
Configuring the Recipe Database
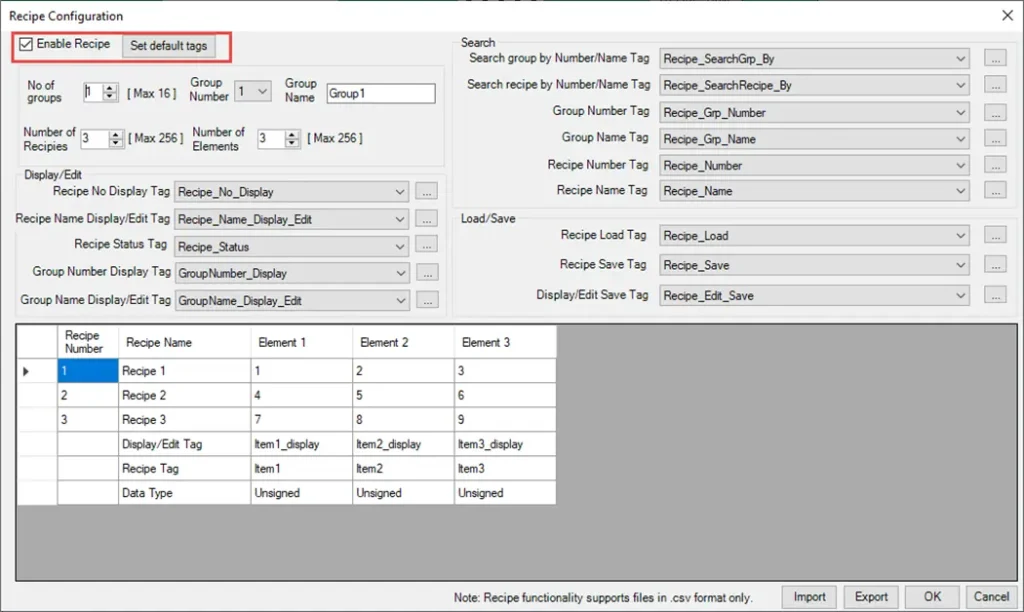
Navigate to Define > Recipe Configuration… to open the Recipe Configuration window. In the Recipe Configuration window, select “Enable Recipe” and “Set default tags” to assign the Display/Edit, Search and Load/Save fields to the default tags that currently reside in the Tag Database.
Recipe Groups
A recipe group is like a table of recipes. A maximum of 16 groups can be configured in the Recipe Database, each with their own set of recipes. Groups can be identified by their name and/or number. The number of recipes and elements can vary between groups. Add or remove groups by changing the “No of groups” value. Switch between groups by selecting a different number in the “Group Number” dropdown.
Recipes
Recipes are like the rows within a table or group. Elements are the columns or attributes that define the table. Up to 256 recipes can be defined per group, with a maximum of 256 elements per recipe. Recipes can be identified and searched for by their name or number. In the Recipe table, assign Display/Edit tags and Recipe tags as well as the datatype for each element:
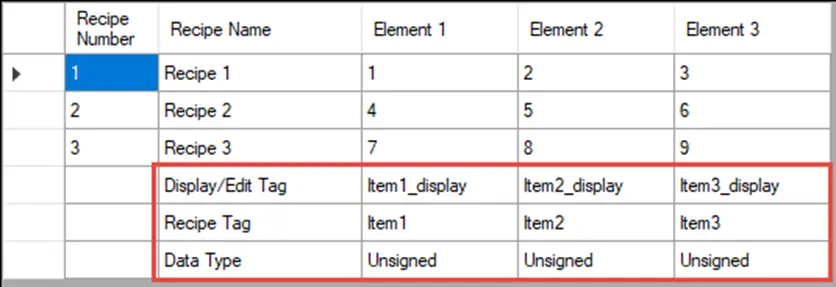
Display/Edit tags: These are the tags through which the recipe element value should be modified at runtime. Recipe Tags: These are the tags for the tags for the current recipe being used in a process.
Display/Edit Tags
The Display/Edit tags are the tags through which the recipe values should be modified, while the Recipe Tags are the tags that contain the values of the recipe currently being used in a process. The Display/Edit tags allow recipes to be modified without interfering with the current recipe that is being referenced by some process.
Recipe No Display Tag
This tag contains the number of the recipe that currently resides in the Display/Edit Tags.
Recipe Name Display/Edit Tag
This tag contains the name of the recipe that currently resides in the Display/Edit Tags.
Group No Display Tag
This tag contains the number of the group that currently resides in the Display/Edit Tags.
Group Name Display/Edit Tag
This tag contains the name of the group that currently resides in the Display/Edit Tags.
Recipe Status Tag
This tag contains a numeric value representing the status of changes made to a recipe:
- Recipe Status Codes
- 0 : Idle
- 1 : Group Not Found
- 2 : Recipe Not Found
- 3 : Recipe Found
- 4 : Load Success
- 5 : Display/Edit Save Success
- 6 : Load Fail
- 7 : Display/Edit Save Fail
- 8 : Recipe Save Success
- 9 : Recipe Save Fail
- 10 : Recipe Name Duplicate
- 11 : Group Name Duplicate
How to Search for a Recipe
Recipe feature comes with two search options
- Search by Number
- Search by Name
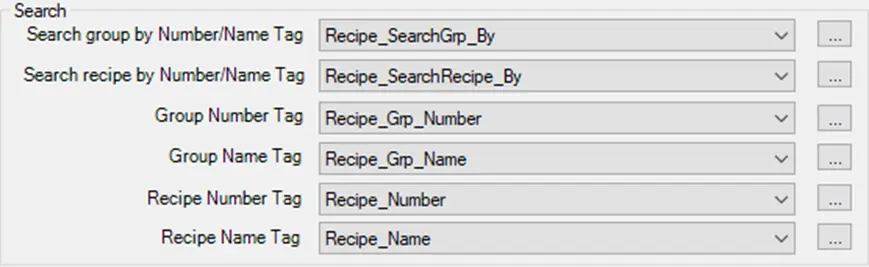
Set the binary state of the “Search Group by Number/Name Tag” to search for a recipe group by Number or Name at runtime.
- 0 : Group Search By Number
- 1 : Group Search By Name
Set the binary state of the “Search Recipe by Number/Name Tag” for searching recipe by Number or Name at runtime.
- 0 : Recipe Search By Number
- 1 : Recipe Search By Name
Now use “Group Number Tag” or “Group Name Tag” and “Recipe Number Tag” or “Recipe Name Tag” for searching particular recipe.
Once the user updates the Recipe Search tags, the respective recipe is searched for and if it is valid, the element values are updated into the Display/Edit tags.
How to Modify and Save a Recipe
Recipe values can be modified through the “Display/Edit tags” and saved back to the Recipe table by setting the “Display/Edit Save Tag” to high.
Data in the “Recipe Tags” can also be saved to the Recipe Table by setting the “Recipe Save Tag” to high.
Recipe Name Edit at Runtime
After searching for a recipe from particular group, it is possible to edit the Recipe Name in the “Recipe Name Display/Edit Tag” and can save the name by setting “Display/Edit Save Tag” or “Recipe Save Tag” to High.
Validation for duplication of a Recipe Name in a Group is implemented. If a recipe with same name is present in a group then the “Recipe Status Tag” value will be updated to “10” to indicate a recipe name duplication.
If Recipe with same name is not present in a group then a normal save operation will happen as per the saving event selected (Display/Edit Save – 5 and Recipe Save – 8).
Group Name Edit at Runtime
After searching for a particular group, it is possible to edit the Group Name in the “Group Name Display/Edit Tag” and can save the name by setting “Display/Edit Save Tag” or “Recipe Save Tag” to High.
Validation for Duplication of Group Name in Groups is implemented. If a Group with same name is present in in the Recipe Database then the “Recipe Status Tag” value will be updated to “11” to indicate a group name duplication.
If Group with same name is not present in groups then normal save operation will happen as per saving event selected (Display / Edit Save- 5 and Recipe Save- 8).
Add or Remove a Recipe/Group at Runtime
Currently it is not possible to add or remove a recipe or group at runtime, only modify the values of existing recipes and groups.
Import/Export the Recipe Database
The Recipe Database can be exported or imported as a .CSV file. If you need to make significant changes to the database, you may want to export it and make the changes in Excel, then re-import the database.
Multi-Language Feature
The multi-Language feature enables the programmer to configure the project for use in many countries around the world that may use a different language. You can configure each object or text box with multiple labels, each designed for a unique language. During operation of the HMC, display a screen that allows the operator to select which language he prefers to use. Once selected, all of the objects and text boxes immediately depict the appropriate label. Up to nine separate languages are available per project.
How to Configure Languages
To use the multi-Language feature in MAPware, you must first configure which languages are available for your project. To do this, open your project and click the Languages folder located in the Project Information Window (or click Define > Languages from the Standard menu):
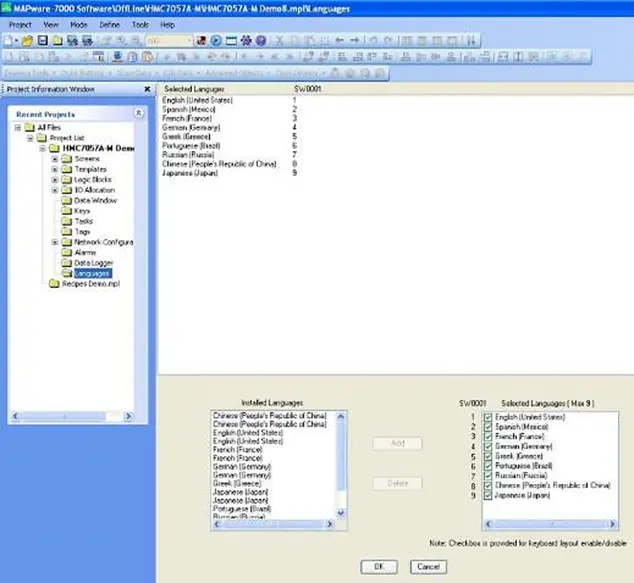
Note: if you do not see any language options in the Installed Languages options box, you must first make additional languages available using the appropriate settings in your Windows operating system. For Windows 10, follow these steps:
- Click the Start program button on the Windows Task Bar
- Click the Settings button
- Click Time & Language
- Click Region & Language or just Language
- Choose a language from the Windows display language menu or under Preferred languages.
- Select Add a language to install the one you want if it isn’t listed.
- Select the Input Languages you wish to use and configure which Keyboard Layout you wish to assign to each language
- When done, you should now see these languages listed in MAPware.
If you see several languages listed in the Installed Languages options box in the Languages folder, simply click a language and click the Add button to add the language to the Selected Languages (Max 9) options box in the right column.
Check the box associated with each language to use the keyboard layout assigned to the language in the Windows Language Options settings in Control Panel. Notice that the number assigned to the left of each language is the number to enter into control register SW0001 to make all objects use the label created for the selected language. A maximum of nine languages can be assigned. Click the OK button when you have finished creating the list of languages you wish to have supported in your project.
Displaying Multiple Languages in the HMC Unit
Once you have created your list of languages using the steps described in the last section, you can now assign/create a label for each available language for your selected object(s). The example below illustrates
How to Assign Language labels to a Multilingual text Object on a screen
Follow the steps below to assign language labels to a text object.
Instructions: How to Assign Language labels to a Multilingual text Object on a screen
Place Text Object
Place a Multilingual Text Object on a screen.Select Language Attributes
In the Multilingual Text properties box, click the Language Attribute box.Select the Language
Click the pull-down and select which language you want to editEnter the text
Click the text attribute box and enter the text for the selected languageRepeat steps 3 and 4 until you have entered the required text for the languages you want to use.
In addition to creating objects that use multiple language labels (see above), you also need to create an object on an HMC screen that displays the correct language. Do this by writing a constant value (1-9) to an internal memory register (the Language tag) in the HMC. This is done in two ways:
- Use a series of Write Value to Tag button objects, each configured to change to a specific state (i.e. English, Spanish, etc.)
- Use a single Word button object that steps through each language each time it is pressed.
How to display each language label during runtime (using Write Value to Tag button)
The steps below will allow you to create buttons that cycle between languages on the HMC unit.
Instructions: How to display each language label during runtime (using Write Value to Tag button)
Configure Languages
In the Languages Folder of the Project Information Window, configure the languages you wish to use.Configure the Objects
Configure the objects that you wish to display the various language labelsCreate a “change language” screen
Create a screen that changes the language.Add a button
Add a Write Value to Tag button on the screen.Select the Language System Tag
Select Tag Address SW0001 as the target.Enter value representing the language
Enter the value as 1 to 9, depending upon the language you wish to displayOption: create On Text label that identifies which language displays if button is pressed.
Note: Remember to copy this label for each Language state so that it displays no matter which language is currently active.
Repeat as necessary
Repeat steps 4-6 for each language that you wish to display.
How to display each language label during runtime (using Word button)
The steps below will allow you to create buttons that cycle between languages on the HMC unit.
Instructions: How to display each language label during runtime (using Word button)
Configure Languages
In the Languages Folder of the Project Information Window, configure the languages you wish to use.Configure the Objects
Configure the objects that you wish to display the various language labelsCreate a “change language” screen
Create a screen that changes the language.Add a button
Add a Word button on the screen and navigate to the properties.Select the Language System Tag
Select Tag Address SW0001 as the target.Define States
Click the State Properties (Collection) button to display the State Properties dialog box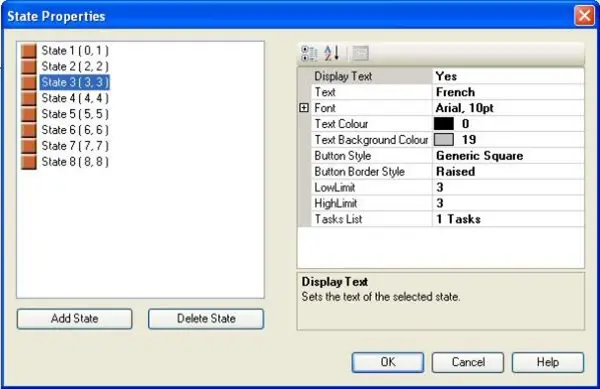
Name each state
Put the name of the language that is represented for that state (ex. State 3 language is French). Set the Low Limit and High Limit to equal the State number.Create a task
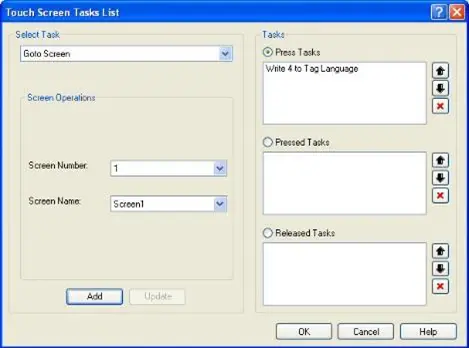
Create a “Press” task that writes the corresponding state value to the language tagClick Press Tasks
Under Select Task, click Write Value to Tag.
For Tag, select SW0001 (Language)
Under Number, enter the next number in sequence. For example, if the current State you are configuring were State 3, then you would enter 4.
Note: for the last state, you would enter 1 to cycle back to the beginning language.
Finish the Task
Click the ADD and OK buttons to finish the task for that state.Repeat steps 7 through 9 as necessary
Repeat steps 7 though 9 for each remaining language you wish to use.
List of Text Objects which use Multiple Languages
MAPware software supports the Multi-Language feature in the following objects:
- Multilingual Text
- Go To Screen, Go To Next Screen, Go To Previous Screen, and Open Popup Screen buttons
- Set Bit, Reset Bit, and Toggle Bit buttons
- Write Value to Tag, Add Value to Tag, Subtract Value from Tag, Add Tag A to Tag B, and Subtract Tag B from Tag A buttons
- Transfer and Upload Recipe buttons
- Advanced objects such as Advanced Bit, Word, Bit Lamp, Word Lamp, Multiple Bar graphs, Analog Meter, Trend Graph, and Historical Trend
- Alarm buttons – Alarm Acknowledge, Alarm Acknowledge All, Next Alarm, and Previous Alarm
Using the Import/Export Text Objects Feature
The Import Text Objects and Export Text Objects features allow you to export a listing of all objects that are capable of displaying Multilingual (Windows fonts) text. For a complete listing of all such objects, see the section above. This is particularly handy when using the Multiple Language feature. Instead of entering each language object-by-object in MAPware, you can export to a CSV (comma-separated value) file, and then edit the file using another application such as Microsoft Excel. This might save time.
How To Export Text Objects
Follow these steps to export text objects from MAPware-7000
Instructions: How To Export Text Objects
Open Project
Open a project in MAPware that has multiple text objects.Configure the languages
Configure the languages you wish to use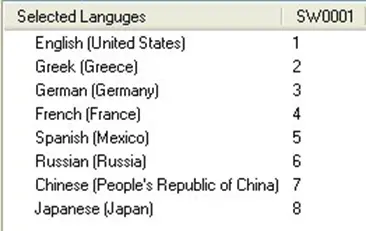
Create Export File
Click Project > Export Text Objects:Format – Use Unicode if you wish to display international characters such as characters with diacritical marks (i.e. ç, é, ñ) or other alphabets (i.e. δ, ω, β, к, й, 萨, さ) that are not represented in the standard ASCII character table.
Output Range – check Selected Screens, if you do not wish to export the entire project. Then click the screens listed, (hold down the CTRL key which clicking each screen you want).
File Name – select the target file name that you wish to create.
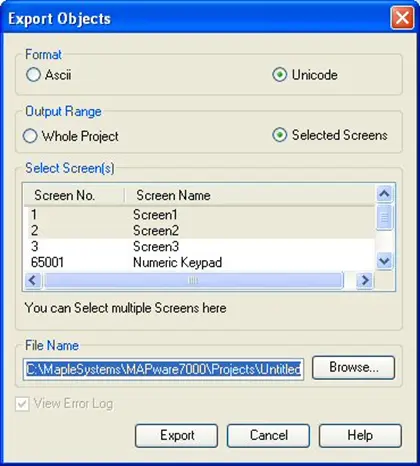
Export
Click the Export buttonThe confirmation window displays the file path to the exported document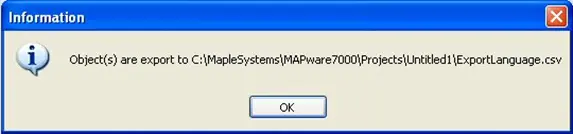
Open the file
Navigate to and open the CSV file that was just created.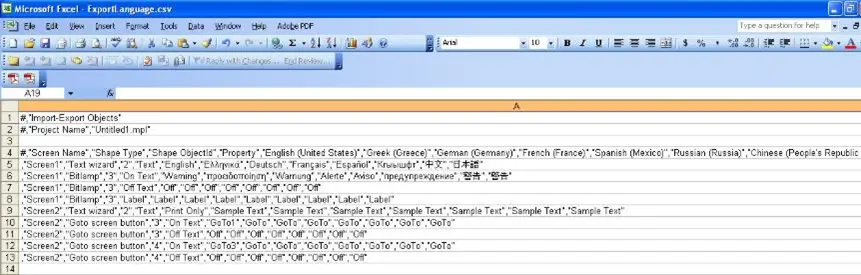
Make edits and save
Edit the file, making sure all commas and quotation marks are left in place. Save the file with the same format as it currently exists (.CSV)
How To Import Text Objects
After editing an exported text file (see steps above), you can import the file back into your project:
Instructions: How To Import Text Objects
Open Target Project
Open a project in MAPware that has multiple text objects.Select File to Import
Click Project > Import Text Objects:Select File – Use the file that you exported from MAPware.
Note: make sure that the text (including commas and quotation marks) follows the same format as was used in the export file.
Show Error Log – if checked, a text file is created by MAPware that lists any errors encountered during the import.
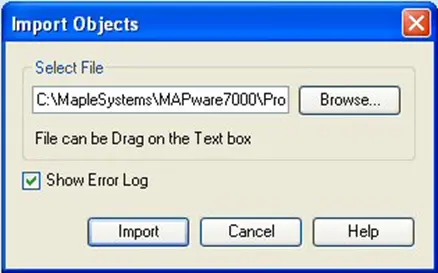
Import
Click the Import buttonThe confirmation window displays the file path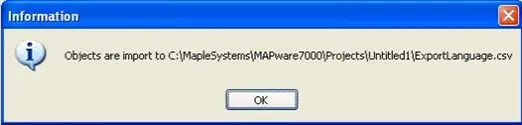
Done
If all went well you should now be able to see the changes you made by rviewing each text object.