Introduction
All Maple Systems HMIs programmed with EBPro (EasyBuilder Pro), including every cMT X Series and cMT Series model, are compatible with a Yaskawa Electric MP2300Siec (Ethernet). Configure your Controller and HMI/cMT with the following parameters to establish reliable communication.
Website: www.yaskawa.com
HMI Settings
| Parameters | Recommended | Options | Notes |
|---|---|---|---|
| PLC type | YASKAWA MP2300Siec (Ethernet) | ||
| PLC I/F | Ethernet | ||
| Port no. | 44818 | ||
| Assembly instance — Input | 101 | 101–106 | |
| Assembly instance — Output | 111 | 111–116 | |
| Multicast | Disable | Disable / Enable | |
| Electronic key | Use | Use / None | |
| Online simulator | YES | ||
| Multiple device connections | NO |
PLC Settings
MP2300Siec — Motion Works IEC Express (Yaskawa) Driver
Before the HMI can communicate with the MP2300Siec over Ethernet/IP, the Instance Input and Instance Output of the MP2300Siec device must be configured correctly. Multiple instances may be built at one time; click **Save** after setting.
Configure Assembly Instances
In Motion Works IEC, open the Hardware Configuration for the EtherNet/IP adapter. Set the Input and Output Assembly Instances and their sizes to match your EtherNet/IP Scanner configuration. Click Save after setting.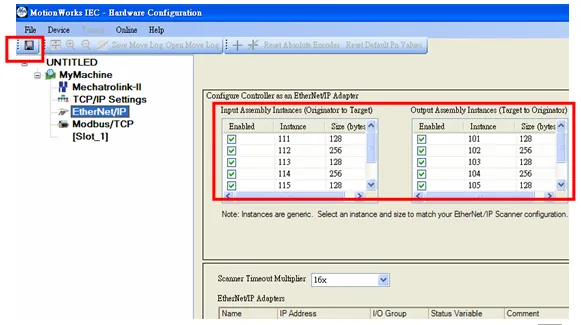
Review Global Variables
Global Variables are automatically populated with E/IP Input and Output data. The Input and Output data names and address types can be user-defined.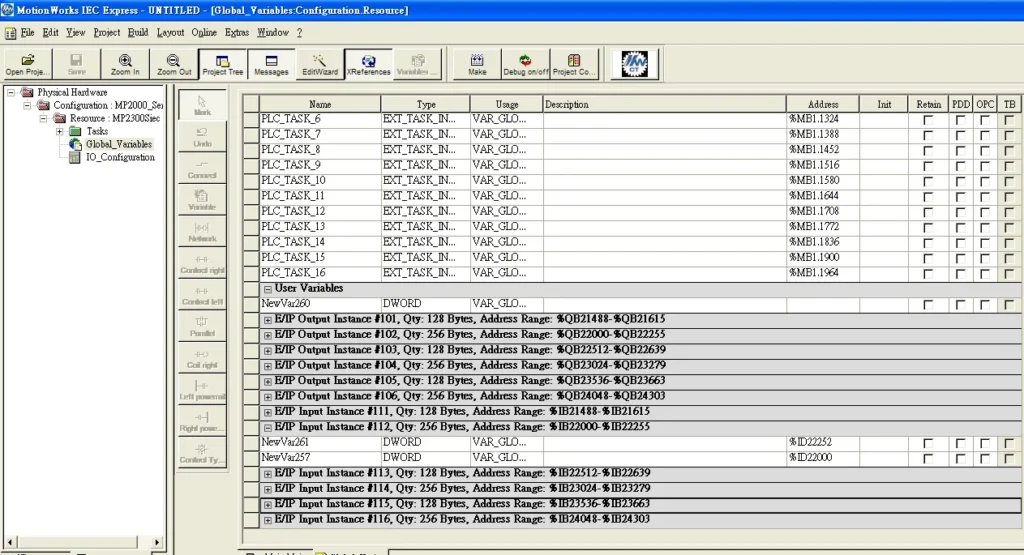
Open Resource Settings
When downloading the project to the MP2300Siec, right-click the Resource in the project tree and select Settings… to open the Resource Settings dialog for configuring the MP2300Siec IP address.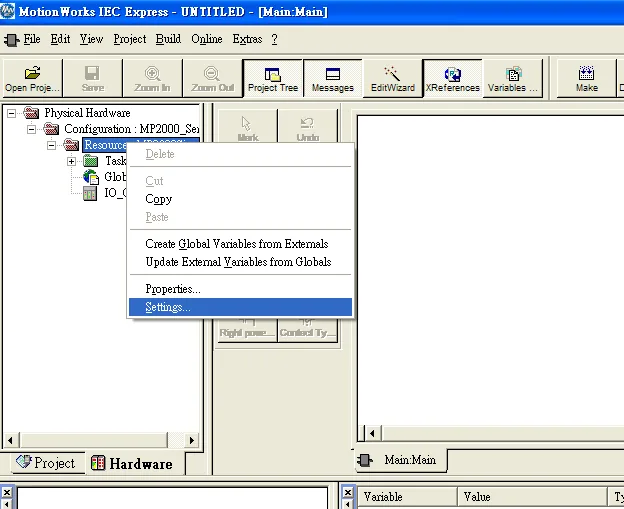
Set the MP2300Siec IP Address
In the Resource Settings dialog, set the DLL toTCP/IPand enter the MP2300Siec IP address in the Parameter field (e.g.192.168.1.1).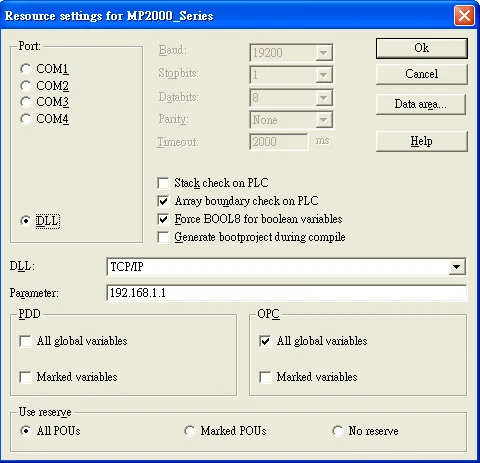
Compile the Project
Click Make to start compilation. Confirm the output log shows 0 Error(s), 0 Warning(s) before proceeding.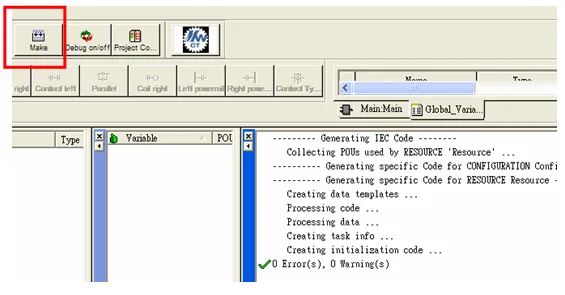
Download Project and Execute Cold Start
Download the project to the MP2300Siec device, then execute Cold to apply the new configuration.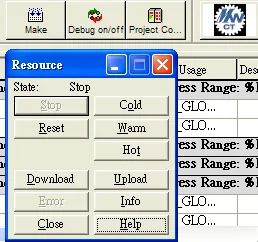
HMI Driver Options
Two drivers are available to connect a Maple Systems HMI/cMT to the Yaskawa MP2300Siec:
- Yaskawa MP2300Siec driver
- Rockwell (Allen-Bradley) EtherNet/IP (CompactLogix) – Free Tag Names driver
Option 1: Yaskawa MP2300Siec Driver
Configure System Parameter Settings
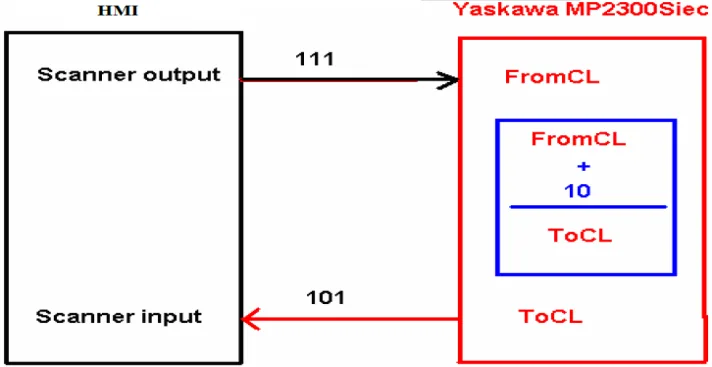
Open the EBPro (EasyBuilder) project. In the System Parameter Settings, the Assembly Instance and Size must match the MP2300Siec software default factory settings. Do not select UDP. The diagram below shows how HMI Input/Output addresses map to the MP2300Siec device: Output Instance 111 maps toFromCL(HMI Scanner output → PLC) and Input Instance 101 maps toToCL(PLC → HMI Scanner input).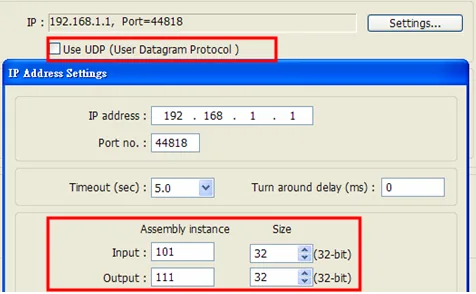
Configure Address Settings
Instance 101 and Instance 111 are defined as 128 bytes. On the project window, use WORD objects with data type set to 32-Bit Unsigned. Set Input addresses to 0, 2, 4, 6, … 62 to read Instance 101 data.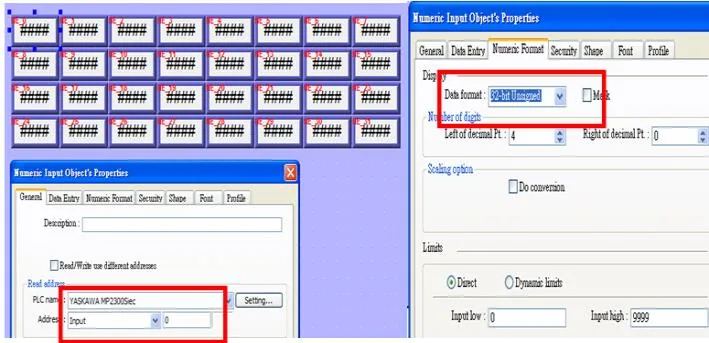
Option 2: Rockwell (Allen-Bradley) EtherNet/IP (CompactLogix) — Free Tag Names Driver
Open Structure Editor and Add New Data Type
In EBPro (EasyBuilder8000/EBPro; EasyBuilder Pro), when using the Rockwell EIP driver to import a CSV file, open the Structure Editor and right-click Module Defined to add a New Data Type.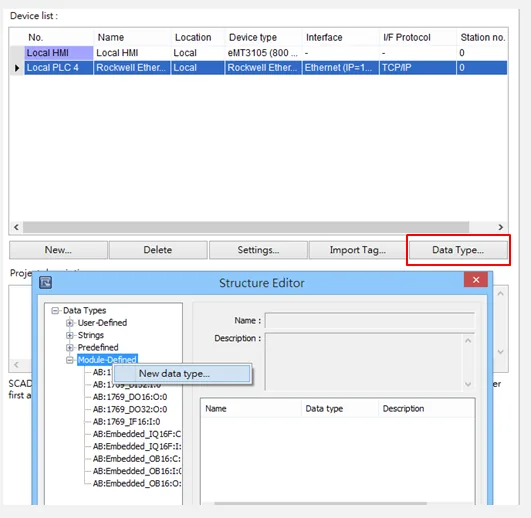
Set Data Type Name to Match CSV
In the Structure Editor, set the Name of the new data type to exactly match the Data Type value in the Free Tag CSV file (e.g.AB:ETHERNET_MODULE:C:0). The Data Member Name must also be set identically to the corresponding field in RSLogix (as shown in the Data column of the Tag Information), then click Save.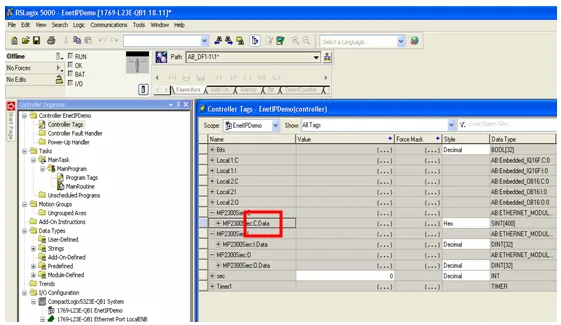
Add Data Member Name
In the Add Data Member dialog, set the Name toData— identically to the Rockwell software — and set the Data Type toSINT[40]. Click Add to confirm.![Structure Editor with Add Data Member dialog open, Name field set to Data, Data Type set to SINT[40], and AB:Embedded_IQ16F:C:0 highlighted in the type list.](https://media.maplesystems.com/wp-content/uploads/2026/06/14-structure-editor-add-data-member-name.webp "Structure Editor Add Data Member Name")
Save the Data Member
Confirm the Data member (typeSINT[40]) appears in the member list, then click Save.![Structure Editor showing Data member with type SINT[40] in the member list and the Save button highlighted at the bottom.](https://media.maplesystems.com/wp-content/uploads/2026/06/15-structure-editor-save-data-member.webp "Structure Editor Save Data Member")
Import CSV and Verify Tag Information
Import the CSV file. Tag Information can be viewed from the object address browser — select theMP2300Siec.Ctag to confirm the mapping is correct.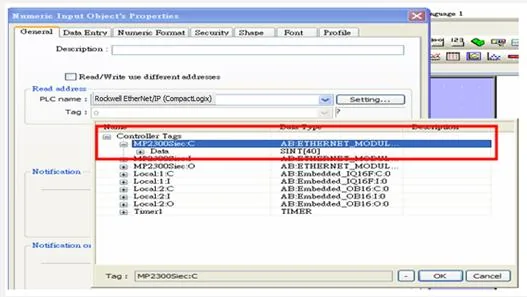
Device Address
| Bit/Word | Device Type | Format | Range | Memo |
|---|---|---|---|---|
| B | Input_Bit | DDDdd | 0 – 51215 | |
| B | Output_Bit | DDDdd | 0 – 51215 | |
| DW | Input | DDD | 0 – 512 | |
| DW | Output | DDD | 0 – 512 |
Wiring Diagram
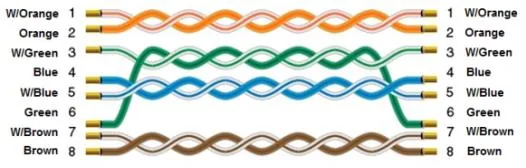
NOTE: Connect the HMI to the MP2300Siec using a standard Ethernet cable.
The diagram below shows the Ethernet cable wiring.