
Introduction
All Maple Systems HMIs programmed with EBPro (EasyBuilder Pro), including every cMT X Series and cMT Series model, are compatible with Parker Hannifin Compax3. Configure your Controller and HMI/cMT with the following parameters to establish reliable communication.
Supported Series: Parker Compax3 Servo Drive
HMI Settings
RS232
| Parameters | Recommended | Options | Notes |
|---|---|---|---|
| PLC type | Parker Compax3 | ||
| PLC I/F | RS232 | ||
| Baud rate | 115200 | ||
| Data bits | 8 | 7 or 8 | |
| Parity | None | Even, Odd, None | |
| Stop bits | 1 | 1 or 2 | |
| PLC sta. no. | 0 | 0 | Must be 0 for RS232 |
RS485
| Parameters | Recommended | Options | Notes |
|---|---|---|---|
| PLC type | Parker Compax3 | ||
| PLC I/F | RS485 2W | ||
| Baud rate | 9600 | ||
| Data bits | 8 | 7 or 8 | |
| Parity | None | Even, Odd, None | |
| Stop bits | 1 | 1 or 2 | |
| PLC sta. no. | 1 | 1–99 | Range from 1 to 99 for RS485, according to the PLC setting. |
PLC Setting
How to Set Compax3 Servo to RS485 Mode
Open C3 ServoManager2 and navigate to RS-485 Settings
Open C3 ServoManager2, select Communication u0026gt; RS-485 Settings.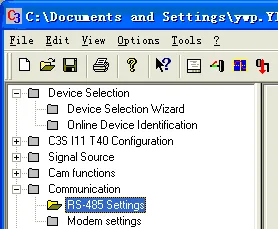
Configure RS-485/POP Settings
Click to Configure RS-485/POP Settings.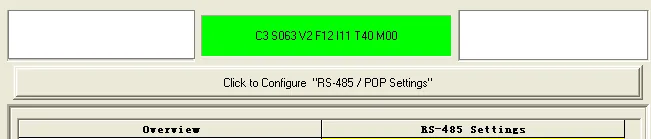
Set RS-485 parameters
Set parameters as shown: Master/General mode, Device Address 1, Baud rate 9600, Connection Type Two wire, Parity No, Stop bits 1, Data bits 8.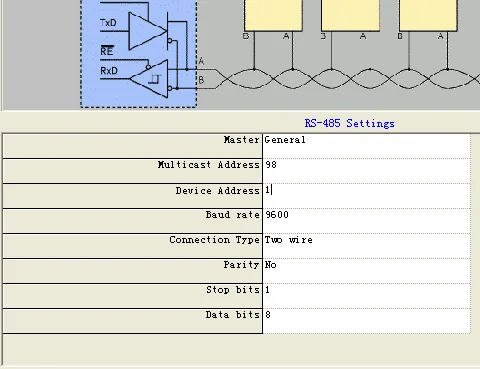
Download settings to Compax3 Servo
Download settings to Compax3 Servo.Connect HMI to Servo
Set EBPro (EasyBuilder) system parameter and connect with PLC for communication of HMI and Servo.
Device Address
| Bit/Word | Device Type | Format | Range | Memo |
|---|---|---|---|---|
| B | R_Low16bit | DDDDDDDDh | 0 ~ 99999999f | |
| B | R_High16bit | DDDDDDDDh | 0 ~ 99999999f | |
| DW | Register_Int | DDDDDD | 0 ~ 999999 | For Register INT32, U32 |
| DW | Register_float | DDDDDD | 0 ~ 999999 | For Register INT32, U32 |
| W | Register_Short | DDDDDD | 0 ~ 999999 | For Register INT16, U16 |
The range of the address that can be operated depends on the address type.
For example:
- If the read/write address is
1901.2, enter190102 - If the read/write address is
400.1, enter40001
Wiring Diagram
NOTE: The serial port pin assignments may vary between HMI models.
Diagram 1: RS-232 (Parker Compax3 PLC X10: RS232)
| HMI | Direction | PLC |
|---|---|---|
| Pin assignments | RS232 9P D-Sub Male | |
| Rx | ↔ (bidirectional) | 3 TXD |
| Tx | ↔ (bidirectional) | 2 RXD |
| GND | ↔ (bidirectional) | 5 GND |
Diagram 2: RS-485 2W (Parker Compax3 PLC X10: RS485 2W)
| HMI | Direction | PLC |
|---|---|---|
| Pin assignments | RS485 2W 9P D-Sub Male | |
| Data- | ↔ (bidirectional) | 3 Data- |
| Data+ | ↔ (bidirectional) | 7 Data+ |
| GND | ↔ (bidirectional) | 5 GND |
| ↕︎ (tie) | 1 Enable RS485 9 +5V |