
Getting Started
Unpacking The Unit
Carefully unpack the Industrial Box PC. Check all material in the container against the packing list. Maple Systems will not accept responsibility for shortages against the packing list unless notified within 30 days. The equipment and accessories were inspected and tested by Maple Systems before shipment.
Examine the equipment carefully; if any shipping damage is evident, notify the carrier immediately. Maple Systems is not responsible for claim negotiations with the carrier.
Save the shipping container and packing material in case the equipment needs to be stored, returned to Maple Systems, or transported for any reason.
Packing List – IPC2710A
- IPC2710A Series Industrial Box PC unit
- VESA Mounting Kit (VESA Mount Plate, screws for attachment to Box PC)
- DC Input Power Cable
- Warranty Statement Insert
Packing List – IPC2770A
- IPC2770A Series Industrial Box PC unit
- Mounting Bracket Kit (2 x Mounting Bracket, screws for attachment to Box PC)
- DC Input Power Cable
- Warranty Statement Insert
Safety Precautions
Please observe the following precautions when installing the Box PC Series. Failure to comply with these restrictions could result in loss of life, serious personal injury, or equipment damage.

Warning: Disconnect this equipment from any power before cleaning. Do not use liquid or spray detergents for cleaning. Use a damp cloth.
Warning: Keep this equipment away from humidity.
Warning: Before applying power the unit make sure the voltage of the power source is within the input voltage rating of the unit (+12~19VDC).
Operating the unit outside of this voltage specification can damage the unit and void your Warranty.
Warning: Never open the equipment and do not operate equipment with its heatsink cover removed- there are dangerous high voltages present inside. For safety reasons, the equipment should be opened only by a qualified service technician.
Warning: This equipment has been tested and found to comply with the limits for a Class A digital device, pursuant to part 15 of the FCC Rules. These limits are designed to provide reasonable protection against harmful interference when the equipment is operated in a commercial environment. This equipment generates, uses, and can radiate radio frequency energy and, if not installed and used in accordance with the instruction manual, may cause harmful interference to radio communications. Operation of this equipment in a residential area is likely to cause harmful interference in which case the user will be required to correct the interference at his own expense.
Warning: If any of the following situations arise, get the equipment checked by qualified service personnel.
- The power cord or plug is damaged.
- Liquid has penetrated into the equipment.
- The equipment has been exposed to moisture.
- The equipment does not work well, or you cannot get it to work according to this operations manual.
- The equipment has been dropped and damaged.
- The equipment has obvious signs of breakage.
Warning: Risk of explosion if the battery is replaced with an incorrect type.
Batteries should be recycled where possible. Disposal of used batteries must be in accordance with local environmental regulations.
Warning: Do not leave this equipment in an uncontrolled environment where the storage temperature is below -40°C (-40°F) or above 85°C (185°F). It may damage the equipment.
Overview Of IPC2700A Series
The IPC2700A Series Industrial Box PC is powerful yet fanless, powered by either the AMD® Ryzen® Embedded V2516 Hexa-Core CPU (IPC2710A) or the 12th generation Intel® Alder Lake Core™ i3-1215UE Hexa-Core CPU (IPC2770A). These powerful IPC units provide the computing power necessary for all sorts of heavy-duty applications such as HD video, SCADA monitoring, and more.
Memory options include 8 GB all the way up to 64 GB of DDR4 SODIMM RAM operating at 3200MHz. Solid State Drive options include sizes from 64 GB to 2 TB.
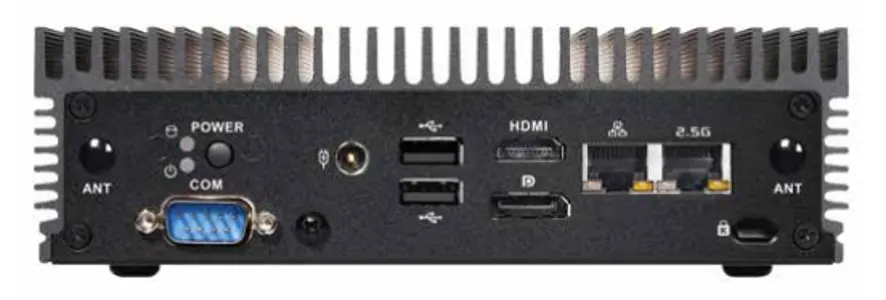
IPC2700A Series units feature I/O ports on both the front and rear panels. The front panel provides +12~19V DC input connector (barrel style jack), one DE-9P RS-232 Serial COM port, 2x USB 2.0 host ports, 1 HDMI 2.0A and one DisplayPort 1.2a connectors (each capable of providing 4K resolution @ 60Hz), one Gigabit Ethernet RJ45 and one 2.5GbE RJ45 connection.
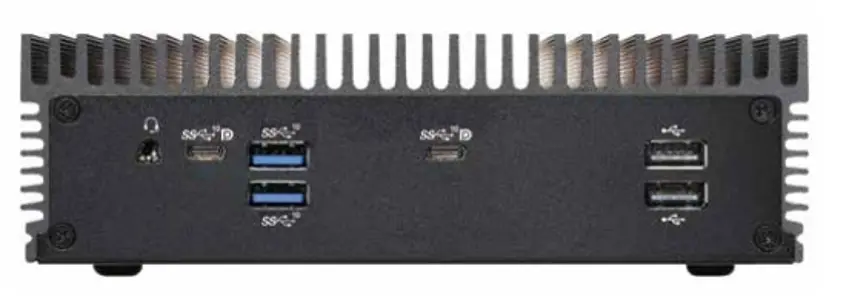
IPC2700A Series rear panels feature a 3.5mm headset jack (providing bidirectional audio), 2 USB 3.2 Type A host ports, two USB 3.2 Type C (USB-C) host ports (each supporting DisplayPort 1.2a protocol), and two USB 2.0 host ports.
All IPC2700A Series units can be equipped with an optional Wi-Fi kit, enabling access to existing 802.11 wireless networks as well as Bluetooth™ 5.2 Support. Wireless antennas are mounted to the front panel when the Wi-Fi option is chosen.
For detailed specifications for the IPC2710A and IPC2770A models, including CAD drawings, please see the datasheet posted on the unit’s product page on maplesystems.com.
Input Power
IPC2700A Series units are configured to operate with +12V~19V DC voltage, (±10%). Your Industrial Box PC comes with a DC Barrel-Style power cable. Connect the + and – cable leads to the appropriate + and – DC Output pins of your power supply and plug the other end of the cable to your unit.
Do not attempt to power your IPC2700A unit with AC Voltage, or DC voltages outside of +12~19 VDC ±10%. Doing so will damage your unit and void your warranty.
External Monitors
IPC2700A Series units operate with an external display or touch-capable monitor via DisplayPort or HDMI interface, allowing for endless user-customization options. This flexibility greatly enhances the options for usage in the field; the monitor (or monitors) can be in a completely different room than the Industrial Box PC if needed. Touch screen monitor functionality may require installation of drivers – consult your monitor’s documentation.
Since the Industrial Box PC units run the Microsoft Windows® family of Operating Systems (Linux® Ubuntu® OS options are also available – contact Maple Systems for more details), users will see a familiar operating environment and usage. Windows® allows for many customizable viewing options; multiple monitor functionality, duplicate desktop / desktop extension, desktop rotation and more.
Maple Systems offers several monitor options that seamlessly integrate with your Box PC – visit our website at www.maplesystems.com or contact your Maple Systems Sales Engineer for additional information.
Industrial Box PC Mounting
VESA Mounting
The Box PC can be mounted using the two threaded holes located on the unit’s bottom plate.
Maple Systems provides two (2) threaded bolts for installation of the IPC2700A Series PC to the VESA bracket, as well as four (4) threaded bolts for securing the VESA bracket to your intended mount. Use mounting hardware appropriate to and suitable for the application; Maple Systems is not responsible for damage to unit, mounting surface or any other components caused by improper mounting.
To install the mounting kit, attach the two larger bolts included with the mounting kit to the bottom panel. Then attach the VESA bracket to the rear of a compatible display as shown (Bracket is compatible with both VESA-75mm and VESA-100mm mounting patterns).
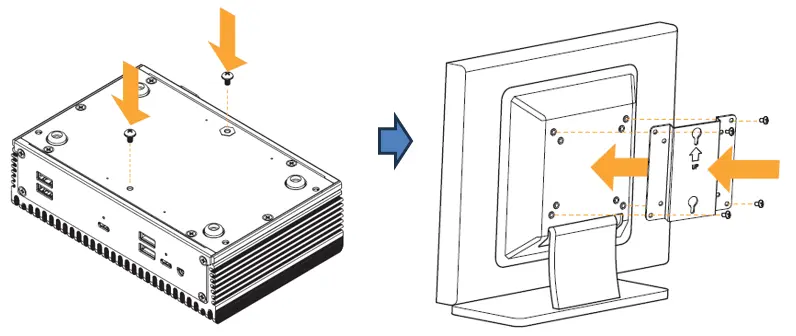
Note the proper orientation of the VESA bracket when installing. Once the bracket is secured to your VESA mounting option, you can then simply place the IPC2700A Series unit into the holes, as shown below. The IPC2700A Series can be oriented with either the front or rear panel facing upwards, depending on your application and usage needs.
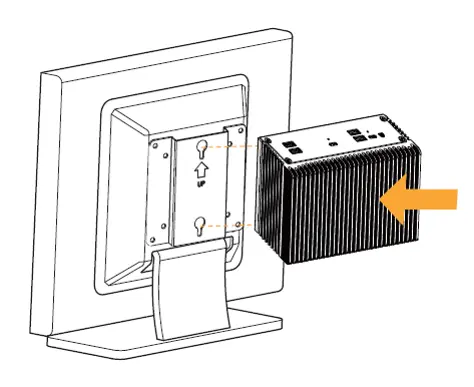
Please note that wall mounting hardware is not included. Use mounting hardware appropriate to and suitable for the application; Maple Systems is not responsible for damage to unit, mounting surface or any other components caused by improper mounting.
I/O Ports
Front Panel
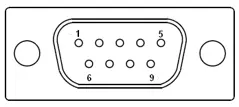
Serial DE-9P (COM1)
Pinout Configuration RS-232
| Pin # | COM1 RS232 (Default) |
|---|---|
| 1 | DCD |
| 2 | RXD |
| 3 | TXD |
| 4 | DTR |
| 5 | GND |
| 6 | DSR |
| 7 | RTS |
| 8 | CTS |
| 9 | RI |
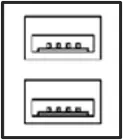
USB 2.0 x2
USB 2.0 Type A Host Ports – Maximum transfer speed 480Mbps
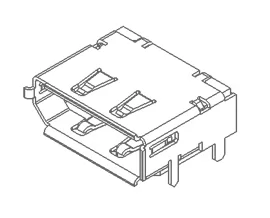
DisplayPort 1.2a
Ultra-High Definition 4K resolution output – Maximum resolution of 4096 x 2160 pixels @60 Hz
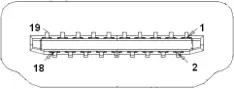
HDMI® 2.0a
Ultra-High Definition 4K resolution output – Maximum resolution of 4096 x 2160 pixels @60Hz
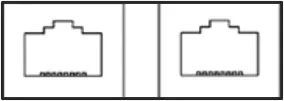
LAN1, LAN2:
LAN1: Standard Gigabit RJ-45 Ethernet port
LAN2: Standard 2.5 Gigabit RJ-45 Ethernet port
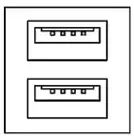
USB 3.0 x2
USB 3.0 Type A Host Ports – Maximum transfer speed 5.0Gbps
Rear Panel

Line-Out
3.5mm Audio Jack
USB 3.2 x2
USB 3.2 Type A Host Ports – Maximum transfer speed 5Gbps

USB 3.2 x2 (Type C)
USB 3.2 Type C Host Ports – Maximum transfer speed 5Gbps
Supports UHD 4K resolution output (Maximum resolution of 4096 x 2160 pixels @60 Hz) via DisplayPort 1.2a protocol
USB 2.0 x2
USB 2.0 Type A Host Ports – Maximum transfer speed 480Mbps
Operating System Options
The IPC2700A series Box PCs can be purchased with the following operating systems pre-installed:
- Windows® IoT Enterprise (Windows® 10 LTSC or Windows® 11 LTSC)
- Windows® IoT Enterprise Embedded (Windows® 10 LTSC or Windows® 11 LTSC)
- Windows® 11 Professional
- Linux® Ubuntu® Desktop LTS
- Linux® Ubuntu® Server LTS
Windows® 10 IoT Enterprise LTSC / Windows® 11 IoT Enterprise LTSC
Windows® IoT Enterprise is a full enterprise version of Windows® 10 / Windows® 11 available on all Industrial Box PC models. This powerful operating system delivers enterprise manageability and security to IoT solutions. Additionally, all of the features and functionality that customers expect to find on their desktop PC are available in this version. The Long Term Servicing Channel (LTSC – Windows® 10 & 11) version ensures long term stability that critical production systems require by updating only necessary operating system components, with significantly fewer update interruptions.
Included Apps with all Windows® OS options:
- Microsoft Edge Web Browser
- LibreOffice Suite (Compatible with the following document types:)
- MS Word
- MS Excel
- MS PowerPoint
- Adobe PDF
- Media Player
Windows® 11 Professional
Windows® 11 Professional is a full professional version of Windows®. All the features and functionality that customers expect to find on their desktop PC are available in this version. This powerful operating system lifetime security updates for the duration of Microsoft’s support timeline of the OS.
These versions are operationally identical to the Consumer operating System versions of Windows®, and as such they provide regular feature and functionality updates on a more frequent schedule than Enterprise editions of the same OS.
Linux® / Ubuntu® Server / Desktop
Linux® Ubuntu® Server is perfect for web interface and other server type applications; this option saves hard drive space by skipping the desktop.
Linux® Ubuntu® Desktop includes the intuitive Gnome desktop environment and is great for display panels, kiosk applications, or for those that prefer the ease of use of a desktop interface.
For a Quick Setup Guide outlining the initial setup process of the Ubuntu® OS equipped Box PCs, see the Linux® / Ubuntu® Quick Start section below.
Linux® / Ubuntu® Quick Start
This section is not meant as a detailed guide to the intricacies of the Linux® Operating System. The scope of this section is for initial setup purposes of your new Maple Systems Industrial Box PC unit.
Initial Setup
To complete the setup requires the following:
- Monitor (HDMI or DisplayPort connection)
- USB Keyboard
- (Server OS Only: TCP/IP network with a DHCP server)
- (Server OS Only: An external computer on the same subnet of the box pc with SSH enabled terminal emulator)
Server OS
It is recommended to create a regular user account with access to the sudo command to perform administrative tasks. Maple Systems STRONGLY RECOMMENDS at minimum changing the password from the default.
Power up and log in:
Connect the monitor, USB Keyboard, Ethernet Cable and power supply to the Box PC. Once the login prompt is displayed enter the following credentials:
Username: root
Password: 111111
This will log you in as the root user. The root user has complete access to the system. To change the root user’s password, enter:
# passwdCode language: PHP (php)Follow the prompts to complete the password change process.
Add New User:
Use the adduser command:
# adduser <username>Code language: HTML, XML (xml)Follow the prompts to give the new user a password and other information. To grant the new user sudo privileges enter:
# usermod -aG sudo <username>Code language: HTML, XML (xml)Now logout (# logout) and enter the credentials for the new user. Make sure that the new user can execute commands with sudo. Try:
$ sudo ls -laThis should prompt for the password and then print the contents of the new user’s home directory.
Access and Password Management for Root User:
For security and better tracking, disabling direct login for the root user is recommended. To do this enter:
$ sudo passwd -l rootTo retain (or re-enable) access to the root login, run:
$ sudo passwdFollow the prompts to set a new password for root. You can then logout and login as root using the new password.
Localization
By default, the system is set to Pacific Time (America/Los_Angeles). To change to a different time zone, enter:
$ sudo timedatectl set-timezone <time zone>Code language: HTML, XML (xml)Where <time zone> is the zone to use. To get a list of available zones use:
$ timedatectl list-timezonesCode language: PHP (php)After updating, the current settings can be printed with:
$ timedatectlSetting the PC Hostname
The hostname is set to bpc, to update this run:
$ sudo hostnamectl set-hostname
<new hostname>Code language: HTML, XML (xml)
To print the updated hostname run:
$ hostnamectlYou will need to logout and back in to see the new name on the terminal.
Software Updates
To install any software updates, enter:
$ sudo apt update && sudo apt upgradeUse:
$ sudo apt install <package name>Code language: HTML, XML (xml)to install new software.
SSH Access
Accessing the server can be done over the network using the preinstalled Open SSH Daemon. You will need to know what IP address has been assigned to the PC to access it. Print the network settings with:
$ ip aNote the ipv4 address (inet) for the interface you are going to use. You can then log in via SSH from any networked computer that has a terminal emulator and SSH client. Simply enter:
$ ssh <username>@<ip address>Code language: HTML, XML (xml)Where <username> is for the user created above. The system will ask for the password, display a login message and provide another prompt. Commands can be entered on the networked device as if being run locally on the server.
Desktop OS
Initial Setup
Connect the monitor, USB Keyboard, and power supply to the Industrial Box PC. The Ubuntu® Automatic Setup Wizard will begin. Follow the on-screen prompts to complete the setup process.
Display Configuration
- Right-click on the desktop and select Display Settings.
- Select Display Mode in this new window, and select the Single Display tab.
- There are two display options on this tab; select the display the PC is physically connected to and ensure the resolution settings match the monitor’s optimal settings.
- Click Apply, the screen will flicker and adjust to the new settings.
Serial Port Names
See the below table to cross reference the names of the DE-9 Serial Ports on your PC:
| PC Chassis Label | IPC2700A Series |
|---|---|
| COM1 | Ttys0 |
Touchscreen
- Capacitive touchscreen monitors are supported by Ubuntu® in single-touch configuration.
- Resistive touchscreen monitors may require touch calibration to be performed on system startup.
Troubleshooting
Technical Support
Maple Systems provides free technical support for its products. Many technical resources (Datasheets, Certifications, Installation Guides, Drivers, Technical Notes and Operation Manuals) are available on the Maple Systems website (http://www.maplesystems.com).
Technical Support Representatives are also available by phone at (425) 745-3229, or by e-mailing [email protected].
Driver Installation (Windows® OS Only)
Your Box PC comes with all necessary drivers pre-installed. As such, driver installation is not normally needed. However, there may be times when a driver requires re-installation. If a driver re-installation is required, please visit the Support Center of the Maple Systems website for driver download instructions.
Windows® Operating System Updates Or Reinstallation
In the event that you wish to update your Windows® Operating System (Non-Embedded Operating Systems only), simply connect the Box PC to the Internet and run the Windows Update utility.
In the unlikely event of a system failure requiring reinstallation of the Windows® Operating System, you can reinstall Windows® as it arrived to you from Maple Systems. For OS recovery installation media, please contact your Maple Systems Sales Engineer.
After OS reinstallation, you will need to re-activate Windows® using the Product Key located on the bottom panel of your PC, adjacent to the product label.
Embedded Operating Systems do not allow for OS reinstallation; in the extremely unlikely event the Windows® OS needs to be reinstalled, contact your Maple Systems Sales Engineer for instructions on obtaining an Return Material Authorization (RMA) form.