Introduction
All Maple Systems HMIs programmed with EBPro (EasyBuilder Pro), including every cMT X Series and cMT Series model, are compatible with Automation Direct Productivity Series. Configure your Controller and HMI/cMT with the following parameters to establish reliable communication.
Supported Series: Automation Direct Productivity Series
Website: lamonde.com
HMI Settings
| Parameters | Recommended | Options | Notes |
|---|---|---|---|
| PLC type | Automation Direct Productivity Series | ||
| PLC I/F | RS485 2W | RS232 / RS485 2W / Ethernet | |
| Baud rate | 9600 | ||
| Data bits | 8 | ||
| Parity | Even | ||
| Stop bits | 1 | ||
| PLC sta. no. | 1 |
Device Address
| Bit/Word | Device type | Format | Range | Memo |
|---|---|---|---|---|
| B | 0x | DDDDD | 1 ~ 65535 | Output bit |
| B | 0x_single_Bit | DDDDD | 1 ~ 65535 | |
| B | 0x_multi_coils | DDDDD | 1 ~ 65535 | |
| B | 0x_8bits_write | DDDDD | 1 ~ 65535 | |
| B | 1x | DDDDD | 1 ~ 65535 | Input bit (read only) |
| B | 1x_single_Bit | DDDDD | 1 ~ 65535 | |
| B | 3x_bit | DDDDDdd | 100 ~ 6553515 | Input Register bit (read only) |
| B | 4x_bit | DDDDDdd | 100 ~ 6553515 | Output Register bit |
| B | 6x_bit | DDDDDdd | 100 ~ 6553515 | Output Register bit |
| B | 0x_multi_coils | DDDDD | 1 ~ 65535 | Write multiple coils |
| W | 3x | DDDDD | 1 ~ 65535 | Input Register |
| W | 4x | DDDDD | 1 ~ 65535 | Output Register |
| DW | 5x | DDDDD | 1 ~ 65535 | 4x double word swap |
| W | 6x | DDDDD | 1 ~ 65535 | 4x single word write |
| DW | 3x_Double | DDDDD | 1 ~ 65535 | *Note1 |
| DW | 4X_Double | DDDDD | 1 ~ 65535 | *Note1 |
| W | 4x string central europe | DDDDD | 1 ~ 65535 | Convert the Central Europe ASCII to Unicode. |
| W | 4x string central europe (rev) | DDDDD | 1 ~ 65535 |
Import Tag
First write your Productivity Controller program in Productivity Suite
If you’re familiar with Productivity Suite, you no doubt know that you can define tags for your i/o, registers, timer values etc as you go making it a very intuitive controller to use. The Productivity tag database is accessed from the edit menu.Manually assign Modbus addresses
You can manually assign Modbus addresses to the required elements. Or you can select them all and Auto-assign them. Select the first line, hold down “Shift” and use the down arrow to select.
To quickly select all a useful shortcut is to use CTRL, Shift and down arrow…. or use “CTRL” + “A”
Auto Assign Modbus addresses
Right click in the “Mod Start” column and select “Auto Assign Selected Modbus Addresses”. Populated Tag address table.Export Tags
To use these in a EBPro HMI project, first export the Tags. Browse to your chosen location and assign a name. Click Export. Once exported.
Using Productivity Series Tags in the HMI. Select the Automation Direct Productivity Series driver and set up Communication parameters – RS232, RS485 or Ethernet.
Click “Import Tags”
Browse to the location of your tag csv export. Select & Open
Either “Select All” or cherry pick the required tags, click “OK”
Success message
Using Imported Tags in HMI software
Select the Automation Direct Productivity Series driver and set up Communication parameters – RS232, RS485 or Ethernet. Click ‘Import Tags’Select Tags
Browse to the location of your tag csv export. Select & Open
Either “Select All” or cherry pick the required tags, click “OK”
Success message
Using Imported Tags
To use the imported tags, select the Device and tick “User-defined tag”
The tag can be selected and used.
Wiring Diagram
NOTE: The serial port pin assignments may vary between HMI models.
Diagram 1: RS-232
| HMI | Direction | PLC |
|---|---|---|
| Pin assignments | RS232 9P D-Sub Female | |
| Rx | ↔ (bidirectional) | 2 TXD |
| Tx | ↔ (bidirectional) | 3 RXD |
| GND | ↔ (bidirectional) | 5 GND |
Diagram 2: RS-485 2W
| HMI | Direction | PLC |
|---|---|---|
| Pin assignments | RS485 2W 9P D-Sub Female | |
| Data- | ↔ (bidirectional) | 8 Data- |
| Data+ | ↔ (bidirectional) | 3 Data+ |
| GND | ↔ (bidirectional) | 5 GND |
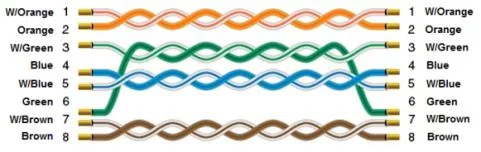
Diagram 3: Ethernet