In today’s industrial environment, seamless communication between systems is essential for improving efficiency and productivity. By following this integration guide, you will learn how to connect a Maple Systems iR-ETN to an Allen-Bradley CompactLogix or ControlLogix CPU using the EtherNet/IP protocol.
The iR-ETN firmware supports the EtherNet/IP protocol. In EasyRemote IO, you can generate an EDS file for EtherNet/IP devices. First, scan the iR-ETN devices in the software. Then, EasyRemote IO creates the EDS file based on the current I/O configuration. After that, import the EDS file into RSLogix 5000 by using the EDS Hardware Installation Tool.
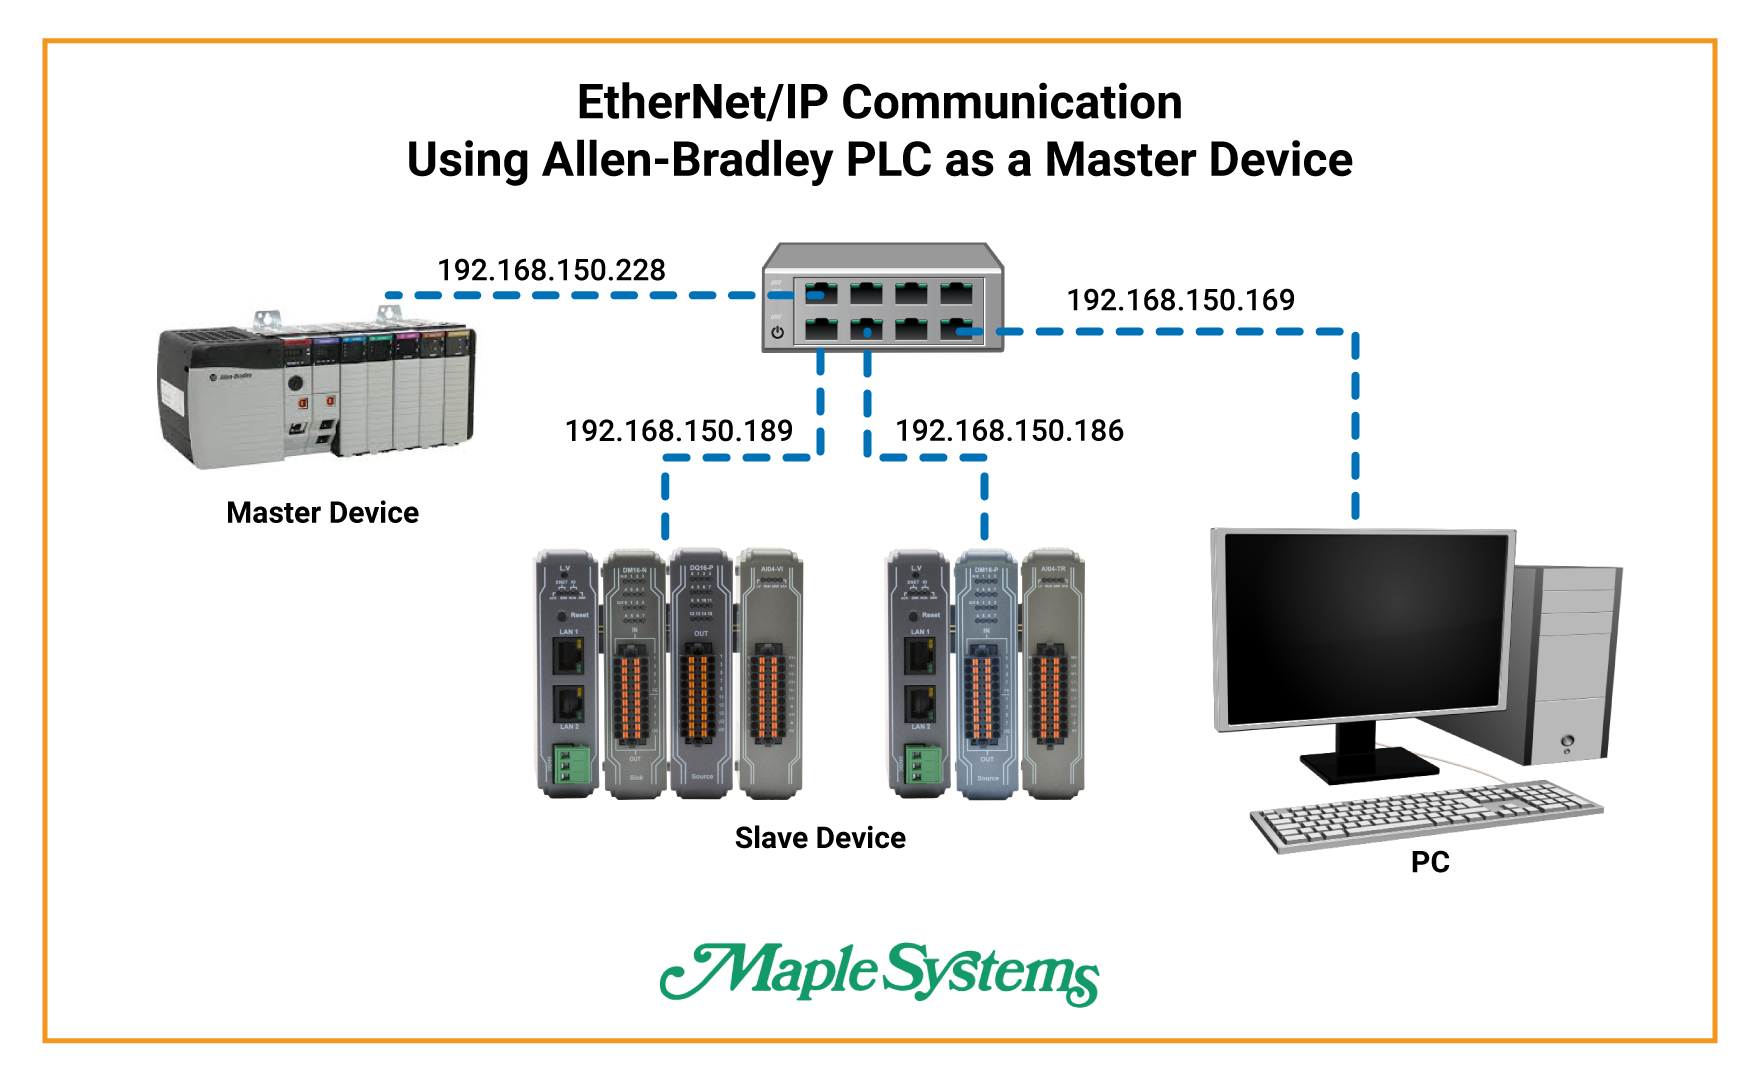
Network Topology

For more information on updating iR-ETN firmware, please reach our to Maple Systems technical support.
Generate EDS Files in EasyRemote IO
Scan the iR-ETN network configuration and export an EtherNet/IP EDS file from EasyRemote IO.
Instructions: Generate EDS Files in EasyRemote IO
Scan the Network for the iR-ETN
Open EasyRemote IO → Go to the Online tab → Click Automatic Scan to detect the iR-ETN on the network.
Add the iR-ETN Manually if Needed
If Automatic Scan does not detect the iR-ETN coupler → Go to the Edit tab → Click Add → Select Network Coupler.Use manual device entry only if the automatic scan does not find the coupler.Export the EtherNet/IP EDS File
After configuring EasyRemote IO → Click File → Select Export EtherNet/IP EDS → Choose the file used to export the tags.
Select the iR-ETN Device
In the export dialog → Select the iR-ETN device → Click OK.
Confirm the EDS File Export
Wait for the confirmation popup to appear → Confirm that the EDS file exported successfully.
Add a Single iR-ETN in RSLogix 5000
Import the iR-ETN EDS file into RSLogix 5000 and add a single Maple Systems Remote IO coupler.
Instructions: Add a Single iR-ETN in RSLogix 5000
Open the EDS Hardware Installation Tool
Open RSLogix 5000 → Go to Tools → Select EDS Hardware Installation Tool → Start the import for the iR-ETN EDS file.
Import the iR-ETN EDS File
Follow the on-screen instructions in the wizard to complete the EDS file import.
Complete the EDS Wizard Steps
Continue through each wizard screen until RSLogix 5000 finishes the EDS installation.
Finish the EDS Installation
Review the remaining wizard prompts and finish the installation process.
Confirm the EDS Installation
Proceed through the final wizard screens and confirm the EDS installation completes successfully.
Close the EDS Wizard
Finish the wizard after the iR-ETN EDS file is installed.
Verify the Import Completed
Check the completion screen to confirm the EDS file installed successfully.
Add the iR-ETN Module
In the project tree → Right-click Ethernet → Select Add Module.
Select the Module Type
Choose the appropriate installed module type for the imported iR-ETN device.
Enter the Device Name and IP Address
Type the iR-ETN IP address and device name → Use a device name that you want to appear in the controller tags.RSLogix 5000 uses the device name in the generated tags.
Review the Controller Tags
Open the controller tags and verify that the iR-ETN input and output data appears correctly.
Use the Correct Bit in Your Program
When programming the PLC → Select the corresponding input or output bit from the iR-ETN tags.
Confirm the Bit Mapping
Review the tag mapping and confirm that the correct bit addresses are used in the ladder logic.")
Add Multiple iR-ETNs in RSLogix 5000
Configure multiple Maple Systems iR-ETN Remote IO couplers in RSLogix 5000 by using exported EDS files and Generic Ethernet Modules.
Instructions: Add Multiple iR-ETNs in RSLogix 5000
Add a Generic Ethernet Module
In RSLogix 5000 → Go to Ethernet → Select Add Module → Add a Generic Ethernet Module.
Locate the Exported EDS File
Find the iR-ETN EDS file in the directory where you exported it earlier from EasyRemote IO.Each device requires its own EDS file, especially when iR-ETN units use different I/O configurations.Configure the Connection Parameters
Use the exported iR-ETN EDS file to enter the required connection parameters for the module.
Set the Correct Comm Format for Input-Only Assemblies
If the Assembly Instance contains input data only → Set Comm Format to Input Data – SINT.Use Input Data – SINT only when the Assembly Instance has input data only.
Enter the Device Information
Type the iR-ETN IP address, name, and description for the device.Set the Requested Packet Interval
Enter the RPI value → Use the default setting of 10 ms unless your application requires otherwise.The minimum supported RPI for the iR-ETN is 5 ms.
Verify the I/O Status in Controller Tags
After you finish the setup → Open the Controller Tags page → Verify that the iR-ETN I/O status appears correctly.In the example shown, the first slot is DM16-P and the second slot is AI04-TR.
Final Thoughts
In conclusion, integrating Maple Systems iR-ETN Remote IO with an Allen-Bradley PLC is an effective way to improve the flexibility and scalability of your automation project. EtherNet/IP provides a reliable connection and supports distances of up to 100 meters between the PLC and the Remote IO, which makes it suitable for many industrial applications.
In addition, you can extend that distance further by using network devices that fit your project requirements. By implementing this setup, you streamline communication and improve system efficiency. You also make future expansion and adaptation easier. Whether you are upgrading an existing system or planning a new installation, iR-ETN Remote IO offers a reliable solution for your automation infrastructure.
Sample Project
The following sample projects demonstrate the configuration shown in this tutorial and can be used as a reference when building your own application.
Resources & Documentation
The following guides and documentation are specific to the hardware used in this integration tutorial and will help you with setup, configuration, and programming:
Looking for additional learning resources? Explore our library of tutorials, example projects, and software tools to help you get the most out of your system:
Also, browse our Support Center for a complete list of installation guides, FAQs, and additional technical documentation.
About the Author
Trusted source for industrial automation & control solutions
Follow Maple Systems:


