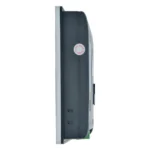
7.0" High-Resolution High Performance HMI
$679.00
The cMT3072XH2v2 features a powerful CPU, remote access capabilities, IIoT functionality, and our most advanced feature set, making this touch panel a powerful solution for your application. Pair this operator interface with our remote IO and CODESYS license for soft PLC functionality.
Try Before You Buy: Follow along to learn how EBPro, our 100% free HMI configuration software, allows you to develop and simulate your HMI program entirely free of charge.
- Compare cMT3072XH2v2 and other models.
- Volume discounts available.
- Customize product with your company logo. Minimum quantities apply.
- Connect to +400 PLCs and Controllers.
- US-based technical support.
Share the product:


- 1024 x 600 High Resolution Touch Panel
- Quad-Core RISC
- CANbus, 2 Ethernet, 1 USB, 2 Serial Ports
- MQTT, OPC UA Client / Server Built-in
- SQL Database Integration, Web Browser
- Add CODESYS and our I/O iR Modules for PLC control
System
| CPU | Quad-Core RISC |
| Memory (RAM) | 1 GB |
| Memory (Flash) | 4 GB |
| RTC | Built-in |
| Programming Software | EBPro (Latest Version) |
I/O Ports
| Ethernet/LAN | 10/100 Base-T x 2 |
| CANbus | Yes |
| Audio Output | N/A |
| SD Card Slot | N/A |
| USB Host Ports | USB 2.0 x 1 |
| USB Client Ports | N/A |
| Wi-Fi | N/A |
| COM Port | CANbus 1 x DE9S COM2: RS-485 2 or 4 wire, COM3: RS-485 2 wires 1 x DE9P COM1: RS-232, COM3: RS-232 |
| RS-485 Dual Isolation | N/A |
| Local bus | N/A |
| HDMI Port | N/A |
| Video Input | N/A |
| Serial Ports | 2 |
Display
| Display Size | 7" WVA LCD |
| Resolution | 1024 x 600 |
| Luminance (cd/m^2) | 550 |
| Contrast Ratio | 800:1 |
| Backlight Type | LED |
| Backlight Lifetime (hrs) | 30,000+ |
| Colors | 16.7 M |
| Display Type | 7" WVA |
| Viewing Angle (H°/V°) | 170/170 |
| Size (W x H) | 6.02 x 3.39 inches [153 x 86 mm] |
Touch Screen
| Type | 4-wire resistive touch |
| Accuracy | Length (X) ±2%, width (Y) ±2% |
Electrical
| Input Power | 19.7 W |
| Power Isolation | Built-in |
| Power Dissipation | N/A |
| Current for Internal Bus | N/A |
| Current Consumption | N/A |
| Isolation Resistance | Exceed 50 MO – @ 500 VDC |
| Input Voltage | 24 ± 20% VDC |
| Input Current | 820 mA @ 24 VDC |
Mechanical
| Vibration Endurance | 10 to 25 Hz (X, Y, Z direction, 2G, 30 minutes) |
| Enclosure Material | Plastic, charcoal grey |
| PCB Coating | Yes |
| Dimensions WxHxD | 7.89 x 5.77 x 1.38 inches [200.4 x 146.5 x 35 mm] |
| Panel Cutout (inches) [mm] | 7.56 x 5.43 [192 x 138] |
| Weight | Approx. 1.32 lbs. [0.6 kg] |
| Mounting | Panel mount |
Environmental
| Operating Temperature | 32° ~ 131°F (0° ~ 55°C) |
| Storage Temperature | -4° ~ 140°F (-20° ~ 60°C) |
| Relative Humidity | 10% ~ 90% (non-condensing) |
Certification
| CE UKCA | Yes |
| UL Type Rating | UL Type 4X (indoor use only) |
| NEMA Rating | NEMA4 |
| IP Rating | IP66 Compliant Front Panel |
| CE | Yes |
| UL | cULus Listed |
| Class 1 Div 2 | N/A |
| ATEX | N/A |
| RoHS | Yes |

Connect a Maple Systems HMI to a Maple Systems PLC
Whether you are new to Maple Systems or know our HMIs well, pairing one of our powerful HMIs with a low-cost PLC is easy.
Unboxing a cMT3072XH2
We'll unbox, show the I/O ports and accessories, and explore demo project and system settings
FREE User Friendly HMI Software
Download our free, full-featured HMI configuration software to create custom control applications for your industrial process. EBPro supports over 300 PLC & controller protocols, ensuring seamless integration with new or existing systems. No license or key required.

Can this HMI communicate with my PLC?
Maple Systems cMT HMIs support over +400 PLC and controller communication protocols, allowing our HMIs to communicate with most common devices. Our cMT HMIs also support protocols such as Modbus TCP/IP or Modbus RTU, opening them up for use with a wide range of devices.
If you want to see the protocols that EBPro supports, visit our Controller Information Sheets page for more information. You can also download the EBPro software from our website for free, which includes simulation features. You can use these to test connections to your other devices before buying any hardware from Maple Systems.

What kind of communication ports are available on your cMT HMIs?
Our HMIs come equipped with the standard communication ports that you would expect to find in an industrial control device. Ethernet, serial, and USB ports are present on our HMIs, allowing connections to hundreds of different devices.
As an example, the cMT3162X (V2) includes two ethernet ports, two serial ports, and a USB port for device connection. Dual-ethernet models such as the cMT3162X include two separate ethernet ports, one for local devices, and the other for internet communication.

I have pre-existing tags that I use for device communication. Can I import my tags into EBPro?
Yes. EBPro makes it easy to import your device tags, with the entire process requiring only a few clicks in most cases. Device tags can be imported into EBPro through the System Parameters, or through the Address Tag Library using formats such as CSV or XLS.
FREE User Friendly HMI Software
Download our free, full-featured HMI configuration software to create custom control applications for your industrial process. EBPro supports over 300 PLC & controller protocols, ensuring seamless integration with new or existing systems. No license or key required.
I need to use an IP camera and other peripherals in my project. Do Maple Systems HMIs support these devices?
Yes. Maple Systems HMIs are compatible with a wide range of peripheral devices such as printers, barcode scanners, cameras, keyboards, mice, flash storage drives, and more. For projects using multiple USB devices at once, a USB hub can expand a single USB port into many, allowing several devices to connect simultaneously.
Note: USB ports on Maple HMIs do not support charging for mobile phones, tablets, or unpowered speakers. The USB ports on our HMIs are for data storage or keyboard/mouse connection only. Using the ports in a manner inconsistent with their documented purpose can potentially damage the device.

Can I expand the HMI’s storage memory capacity?
Yes. Maple HMIs support storage expansion through external HDD, USB flash drive, or SD card, depending on the HMI model.
External HDD: Maple Systems products support USB 2.0 external hard disk drives, so long as the HDD is powered with its own power supply.
USB Flash Drive: Maple Systems products support a maximum capacity of 32GB. USB drives must be formatted as FAT32.
SD Card: Maple Systems products support a maximum SD card capacity of 4GB (32GB capacity with SDHC card). SD and SDHC Cards must be formatted as FAT32. SDXC cards are not supported.
I’ve never used EBPro before. How long will it take me to learn how to program my HMI?
The free EBPro software design maximizes functionality while maintaining user-friendliness. In many cases our customers are able to get up to speed and create their first project within 24 hours.
For new users who want to accelerate their learning process, our EBPro HMI Software Training Series has you covered. This series breaks down multiple topics into small, easy-to-understand sections so you can learn at your own pace. You can view individual videos based on the topic, or view the entire series in a YouTube playlist.
The EBPro Programming Manual provides full descriptions of the software’s features, and is an excellent resource for users of all skill levels. We also offer the EBPro Quick Start Guide, which contains information for new users when getting started with Maple Systems devices.
Can I automatically back up my projects in EBPro?
Yes. To turn automatic backup on in EBPro, click on the File menu and select Preferences. On the Project tab, check the “Generate backup of project file before save” option. This will create a backup of your project any time you save it with a *.bak1 extension.
Subsequent saves will rename the backup file with a *.bak2 and finally *.bak3 extension, so there will always be three backup files saved with *.bak1 the most recent and *.bak3 the oldest.
Can I access my HMI from a remote network location?
Yes. Our HMIs support remote access features via the EasyAccess 2.0 application. EasyAccess provides a simple built-in solution for creating a secure VPN connection to a remote network, which will allow you to monitor and control your HMI from anywhere in the world.
Once the VPN tunnel has been established, the HMI can be accessed using the cMT Viewer application included with EBPro, or through VNC client software.
Using the EasyAccess 2.0 application does require a one-time license activation fee, which allows for 3 GB of monthly high-speed data at no additional cost. Our HMIs can also be purchased with a pre-activated license for EasyAccess 2.0 already installed.

What EBPro Security features are available for a cMT HMI?
EBPro can help you secure your project in several ways. The EBPro software can create and manage access for user accounts, add password protection to project files, and restrict decompilation to protect your IP. Designers can add access levels to individual objects on screen, and may disable or hide these objects when the current user should not have access. Here are just a few of the other security features you can find within EBPro for our cMT HMIs:
- Centralized User Account Control (UAC) using a remote HMI
- External UAC database support
- Secure USB key generation
- TLS or SSL encryption for email notifications
- Password protection for HMI System Settings

Can this HMI withstand the conditions that exist at my worksite?
Maple Systems HMIs are certified to operate in some of the most challenging environmental conditions in the world. With models certified by UL, IP, NEMA, RoHS, CE, ATEx, C1D2, and more, there is a Maple Systems HMI for nearly any situation or environment. For more information about certifications for hazardous environments and the organizations who issue them, please visit the Certifications section of our 10 Things to Consider When Buying an HMI page.

Do I need to pay an additional license fee to activate features on my HMI?
The vast majority of features in EBPro do not need additional licensing, but a few situations may require a license fee to activate specific functions.
For features like our built-in CODESYS runtime, OPC/UA messaging, or the EasyAccess 2.0 VPN service, users must pay a one-time activation fee to enable these functions on the HMI.
For the EasyAccess 2.0 application, which enables remote access features on your Maple HMI, the standard license includes up to 3 GB of monthly high-speed data at no extra charge. If the monthly data limit has been reached, top-up cards may be purchased to add additional bandwidth as needed.
If you know that you will need one of the features mentioned above before making a purchase, Maple Systems does offer HMI options that come with pre-activated licensing.
How do I implement EasyAccess 2.0 on my Maple Systems HMI?
Implementing EasyAccess 2.0 is easy. For complete instructions, refer to the EasyAccess 2.0 Manual available in our Support Center. Step 1: Create Domain Account:An HMI must belong to a domain in order to use EasyAccess 2.0. Anyone can create a new domain for free, all you need is a valid e-mail address. The Domain Management System is the basic system used to organize and handle HMI’s under a particular domain.
An Administrator then runs the domain and adds users and HMIs to the domain. To create a new domain go to the EasyAccess 2.0 Domain Management System (DMS) website (https://account.ihmi.net). Step 2: Manage Your Domain:When you create a domain account, you become the domain’s administrator. It’s the administrator’s responsibility to create new user accounts and to assign HMIs to specific users and HMI groups. Your domain can contain multiple HMIs, groups, and users.
Step 3: Activation:In order to use EasyAccess 2.0, you must activate the HMI in the domain. Some HMIs have EasyAccess 2.0 pre-installed and some require purchasing an activation card.
For HMIs requiring an activation card: The HMI can be activated by purchasing an activation card from Maple Systems. The activation code (from the activation card) and the hardware key are required to activate EasyAccess 2.0 in these units. The HMI’s hardware key is located in the HMI’s system settings window. Select the EasyAccess 2.0 tab and locate the 30 digit hardware key. You may also find it on Window 76 – EasyAccess 2.0 Setting. Select “Add HMI” in the domain and enter the hardware key and activation code. When an HMI is activated by an activation code, it is automatically added to the domain under which it was activated. Open window 76 – “EasyAccess 2.0 Setting” on the HMI. With the HMI connected to the Internet, push the Start button to initiate the connection to the EasyAccess 2.0 server. For HMIs with EasyAccess 2.0 pre-installed: The HMI can be activated by obtaining a Session ID and Password from the domain. Open window 76 – “EasyAccess 2.0 Setting.” With the HMI connected to the Internet, push the Start button to initiate the connection to the EasyAccess 2.0 server. If the HMI has not been assigned to a domain yet, a Session ID and Password will be assigned to the HMI and appear on window 76. Select “Add HMI” in the domain and enter the Session ID and Password. It should now be added to the domain. Step 4: Download and Launch EasyAccess 2.0:Download the EasyAccess 2.0 app on your PC/ iPad/ iPhone/ Android Tablet, Launch EasyAccess 2.0, enter the User ID and password. Once logged in, the program will list all HMIs assigned to this ID including all HMIs under an HMI group. Select an HMI and establish a remote connection. You can now monitor any HMI in your HMI list.

Can I customize the Startup Screen on my Maple Systems HMI?
Yes, you can replace the default startup screen on an HMI with one of your own choosing. The graphic file must be in a bitmap format (*.bmp). For best results, size the graphic so that it is the same size as the HMI screen in pixels. You can download your custom startup screen along with the project you are downloading to the HMI by selecting the “Use user-defined startup screen” option in the Download window. See Tech Note 5056, “Startup Screen on HMI5000 Series” for more information.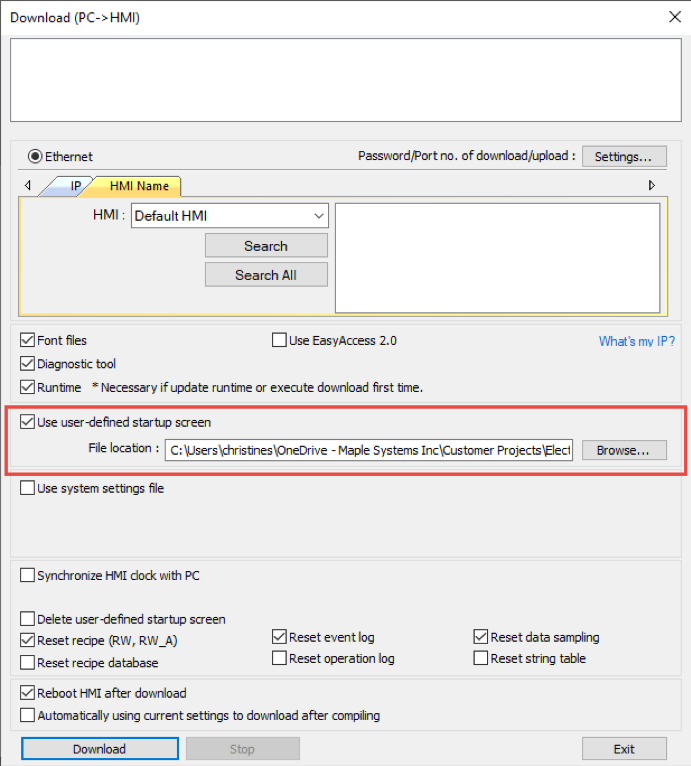
Does Maple Systems offer technical support?
Yes. Maple Systems provides 100% free, US-based technical support for all customers. Our Support Center includes extensive documentation, tutorials, and resources. However, if you’re unable to find what you need, our technical support team is ready to assist. You can reach our technicians by phone at (425) 745-3229 or by email at [email protected].
How to clean an HMI screen
Resistive touchscreen surface material is PET (polyethylene terephthalate, also called polyester). Capacitive touchscreen surface material is tempered glass. Both surfaces can be cleaned with the following method.- Using a cleaning solution of 75% alcohol or 1:100 diluted bleach, spray the solution on a dry cloth.
- Gently wipe the HMI’s screen.
Note: Avoid spraying the solution directly onto the HMI.
Documents
Manuals
- EBPro Programming Manual
- cMT3072X2v2/cMT3072XH2v2 Installation Guide
- EBPro Quick Start Guide
- EasyWeb 2.0 Operations Manual
- cMT Quick Start Guide
- cMT2000/3000X Series User Manual
- MQTT User Manual
- cMT Microsoft SQL Quick Start Guide
- cMT MySQL Quick Start Guide
- OPC-UA Set-up Overview
- CODESYS Quick-Start Guide
- AWS IoT User Manual
- Azure IoT User Manual
Certifications
- UL-cMT Series
- CE UK Declaration of Conformity – cMT2078X, cMT3072x2, cMT3072XH2
- RoHS all series
- REACH Certification
- Trade Agreement Act
- Russian Iron and Steel Declaration
- Country of Origin Certification
- EU Declaration of Conformity (Battery Regulations)
CAD Files
When you order the cMT3072XH2v2 the following items are included in the box:
- cMT3072XH2v2 Touchscreen HMI
- Warranty Statement
- Installation Instruction
- Product Flyer
- Power Connector
- Mounting Clips
- Screen Cover
- USB Stick Clamp & Tying Strap