In this tutorial, you will learn how to set up and configure a Maple Systems Lite-Managed Industrial Network Switch. We’ll start by walking through the hardware features of the switch, then guide you through the setup steps like connecting to the device, logging into the web interface, adjusting settings such as the IP address and port configuration, security settings, diagnostics and management.
Software Required
- MapleLink Lite User Interface (Enter the network switch’s IP address into a web browser to access its web interface.)
Hardware Required
- MS1-L05G01F
- MS1-L08G
- Embedded Industrial Box PC (A web browser is required. Use one of our Industrial Box PCs.)
MS1-L05G01F
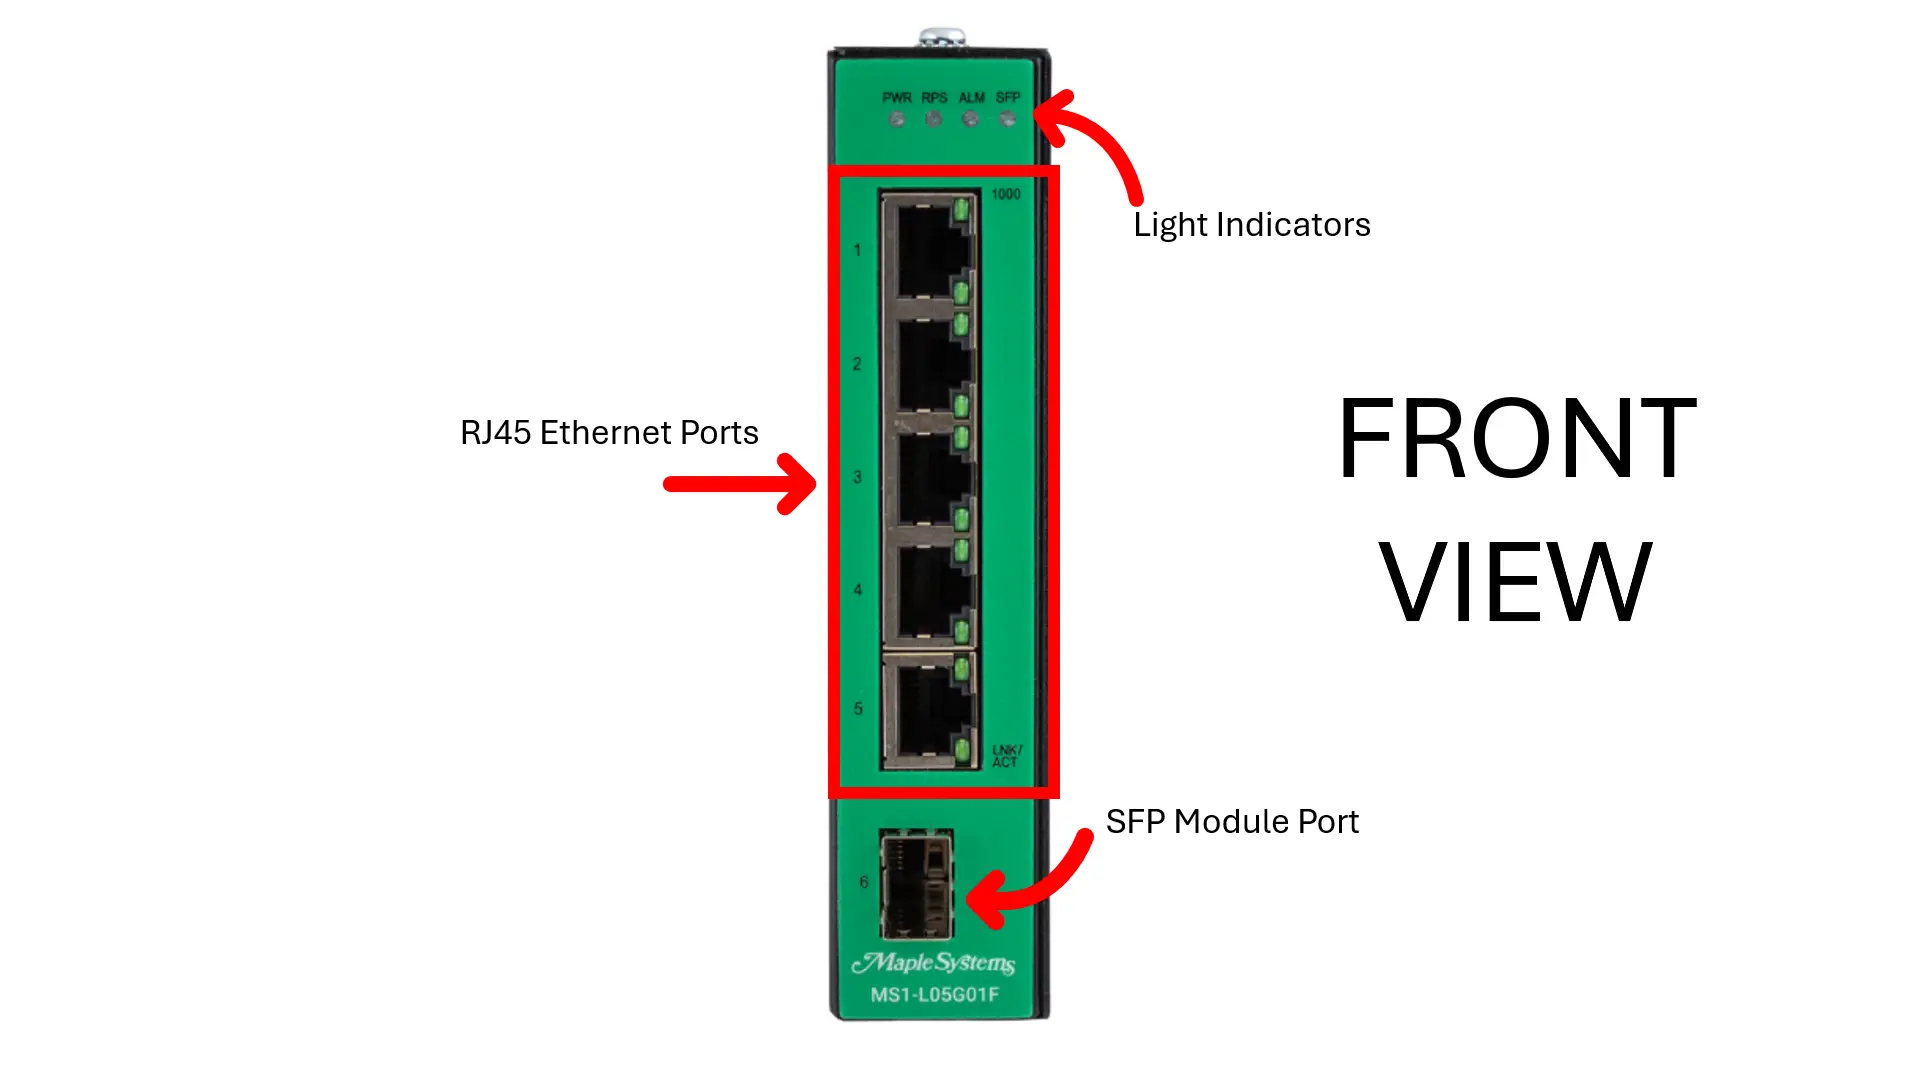
Features and Specs (Front)
RJ45 Ethernet Ports
| RJ45 Copper Ports | 5 |
| RJ45 Speed | 10/100/1000 BASE-T |
| SFP Ports | Speeds of 100/1000 Mbps |
| Switch Fabric | 12 Gbps |
| L2 Forwarding Rate | 8.9 Mpps |
The 10/100/1000Base-T ports support network speeds of 10 Mbps, 100 Mbps, or 1000 Mbps and can operate in both half- and full-duplex modes. These ports also feature automatic MDI/MDI-X crossover detection, providing true “plug-and-play” capability—just connect the network cables, and the ports will automatically adjust to the connected end-node devices. The following cabling is recommended for the RJ45 connectors:
- 10 Mbps – Cat 3 or better
- 100/1000 Mbps – Cat 5e or better
SFP Module Port
The two SFP slots are designed to accommodate 100FX or Gigabit SFP modules that support network speeds of 100 Mbps or 1000 Mbps.
LED Indicators
| System LEDs | ||
| PWR | Illuminated | Primary Power on |
| Off | Primary Power off or failure | |
| RPS | Illuminated | Redundant (secondary) Power on |
| Off | Redundant Power off or failure | |
| ALM | Illuminated | Alarm for following conditions(when the DIP switches are turned on) Primary Power lostSecondary Power lost Threshold exceedLoop detection |
| Off | Normal operation | |
| Interface LED | ||
| SFP | Illuminated | Ethernet link-up |
| Blinking | Activity (receiving or transmitting data) | |
| Off | Port disconnected or link failed | |
| Port Number 1-5 LED | ||
| 1000 | Illuminated | Link speed at 1000Mbps |
| Off | Link speed at 10/100Mbps | |
| LNK/ACT | Illuminated | Ethernet link-up |
| Blinking | Activity (receiving or transmitting data) | |
| Off | Port disconnected or link failed | |
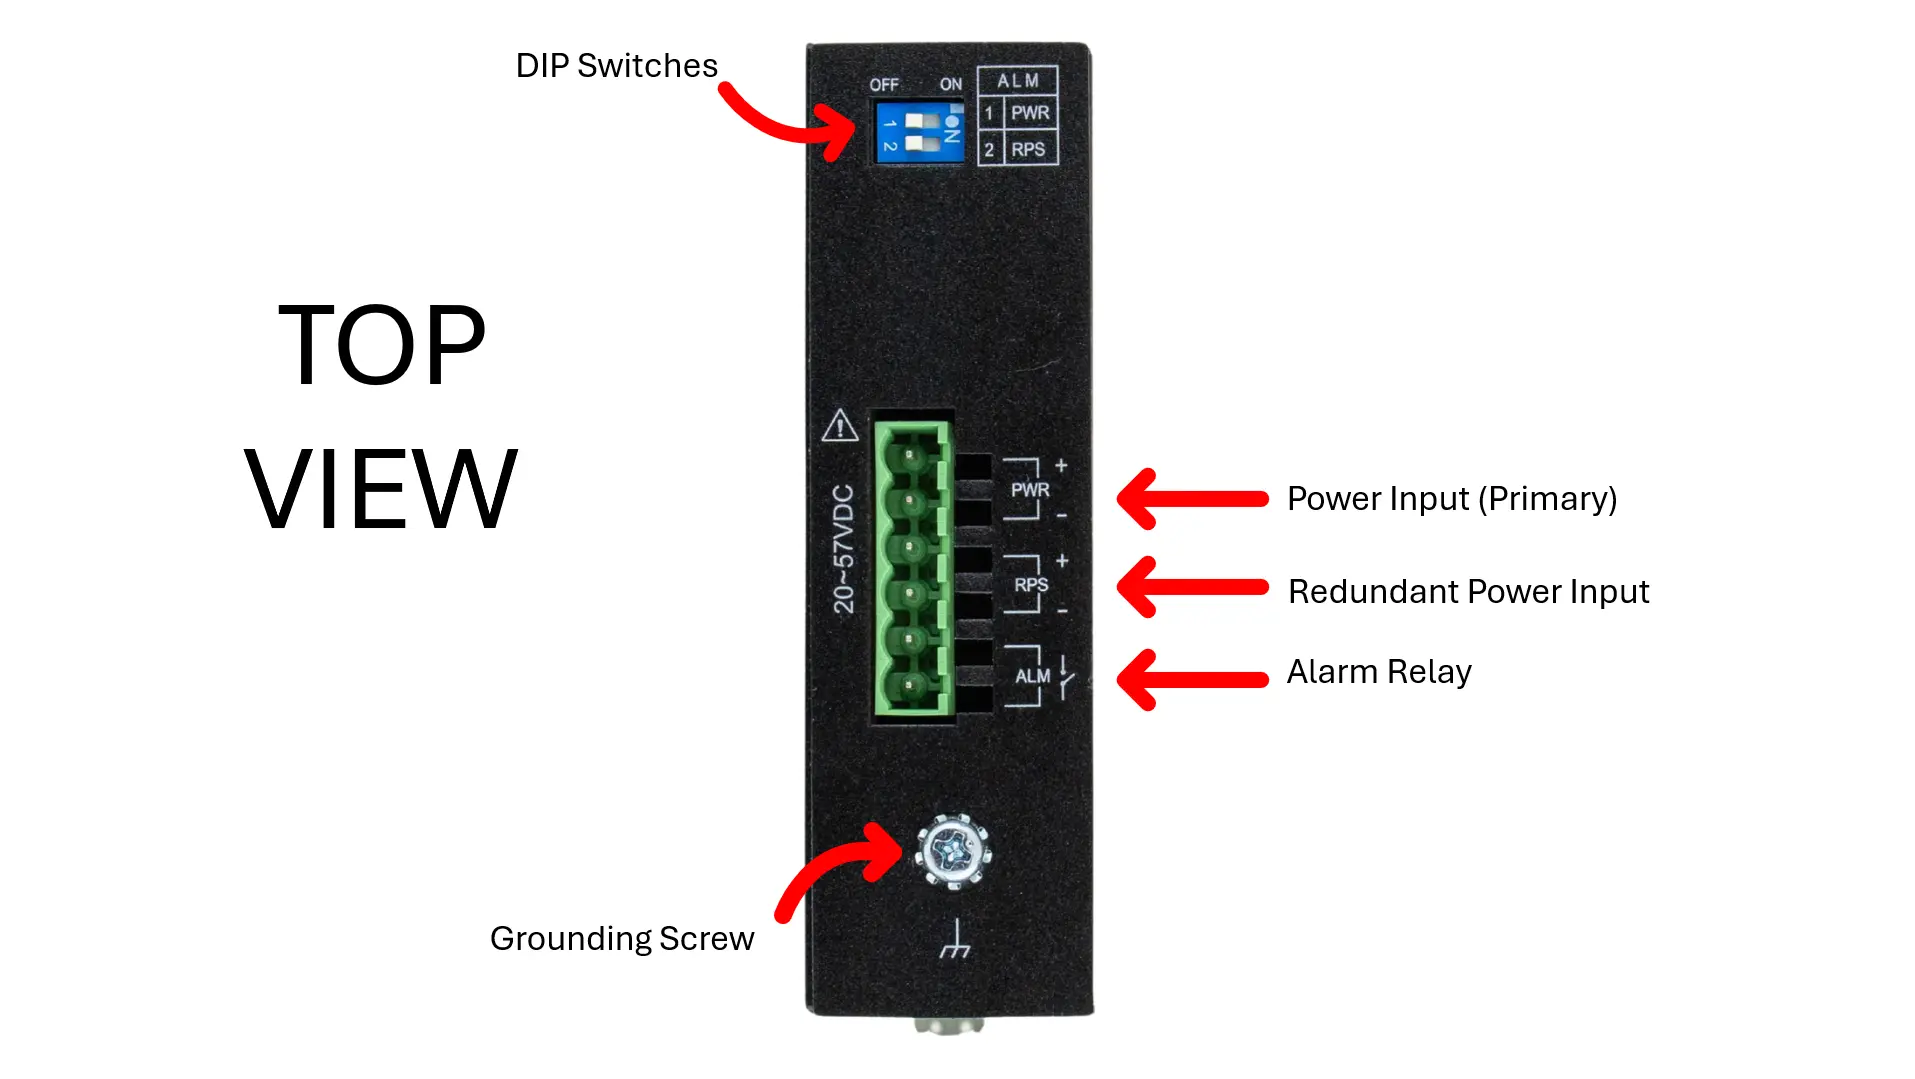
Features and Specs (Top)
DIP Switches
| DIP | Function Description |
| PWR | Primary power input from terminal block ON – Primary power alarm reporting is enabled OFF – Primary power alarm reporting is disabled |
| RPS | Redundant power input from terminal block ON – Redundant power alarm reporting is enabled OFF – Redundant power alarm reporting is disabled |
Power (Primary and Redundant)
Please refer to the “Lite-Managed Network Switch Operations Manual” for more wiring information and the DS-MS1LM
| Input Voltage (Primary) | 20-57 VDC |
| Input Voltage (Redundant) | 20-57 VDC |
| Input Connector | Terminal Block |
| Max Input Current | 0.35A @ 24 VDC without alarm (1.35A @ 24 VDC with alarm) |
| Max Power Consumption | 10W |
Alarm Relay
1 Relay Output , 1A @ 24 VDC
Please refer to the “Lite-Managed Network Switch Operations Manual” for more wiring information and the DS-MS1LM
Grounding Screw
Ground the Switch: Before powering on the switch, ground the switch to earth.
Please refer to the “Lite-Managed Network Switch Operations Manual” for more grounding information and the DS-MS1LM
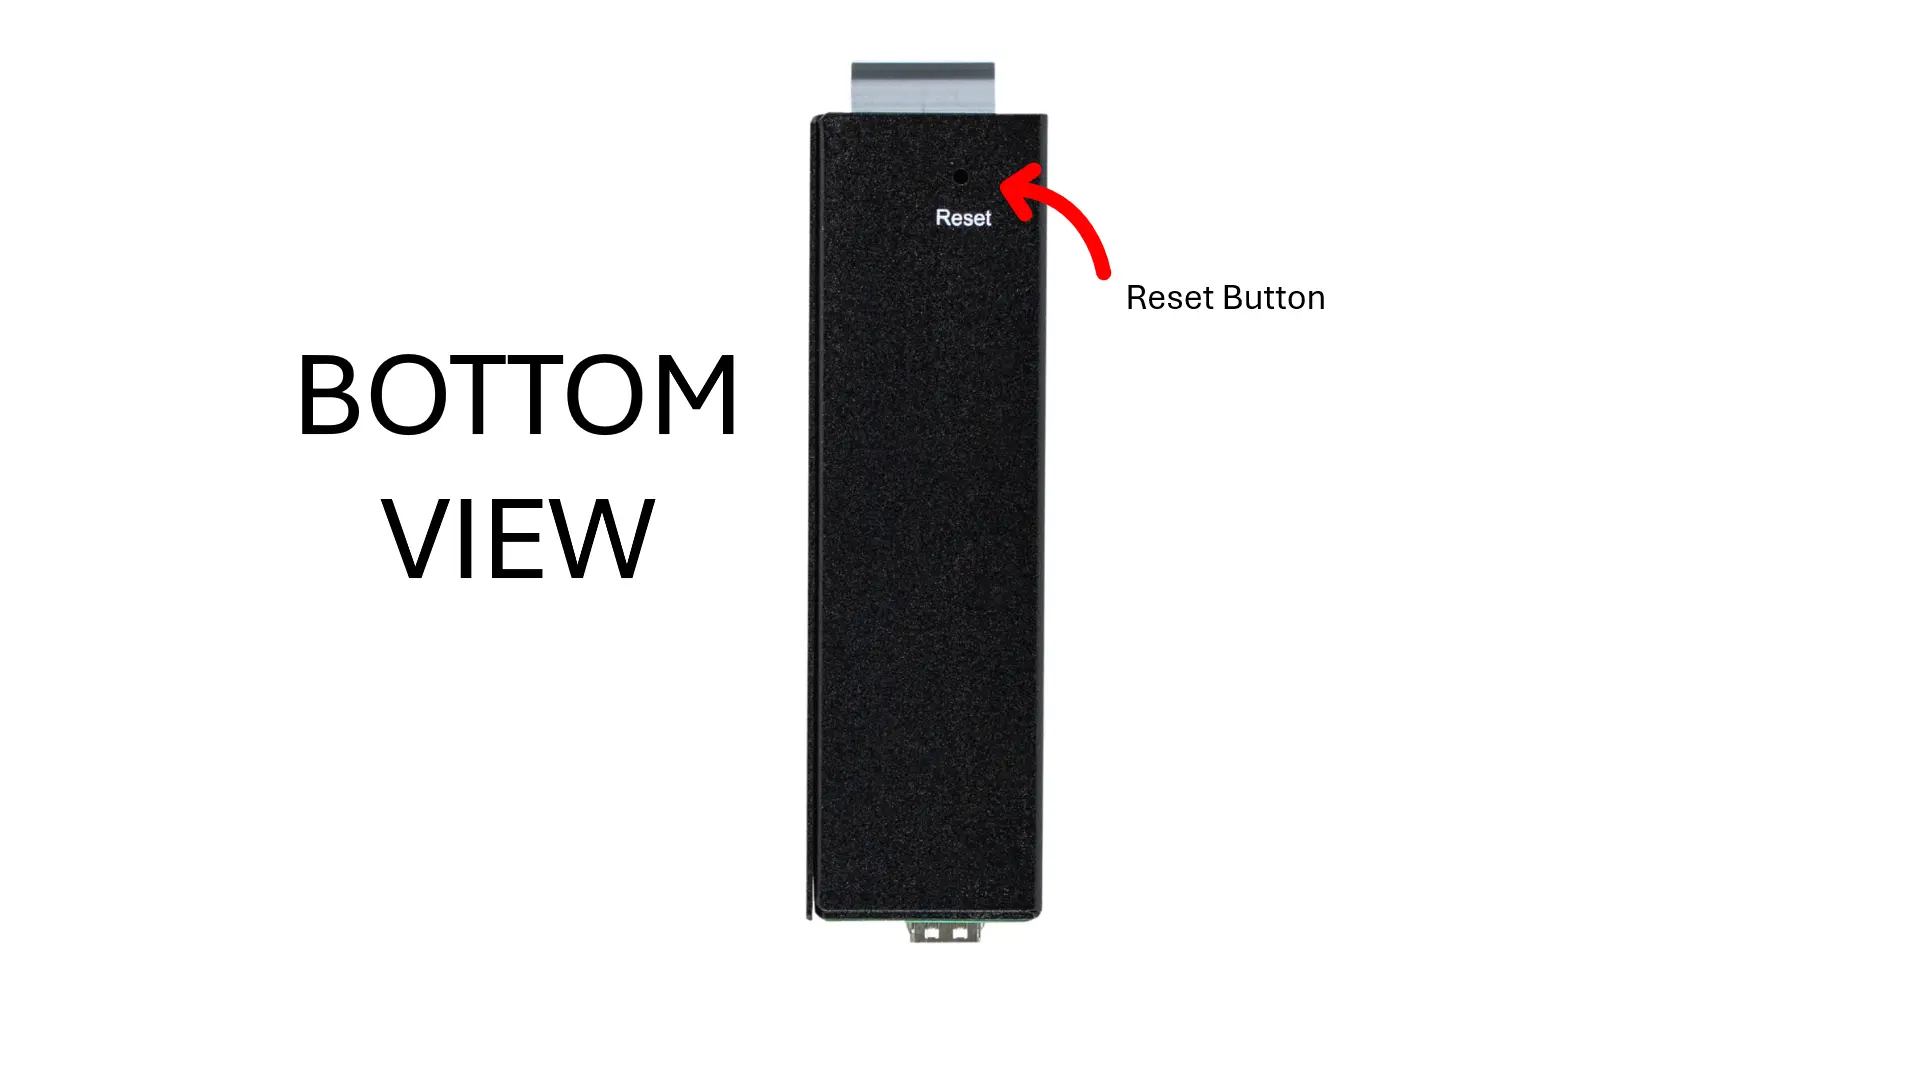
Features and Specs (Bottom)
Manual Reboot / Reset Switch
The switch includes a “Reset” button that allows you to manually reboot the device or restore it to factory default settings.
- Press the “Reset” button for more than 2 seconds to reboot the switch.
- Press the “Reset” button for more than 5 seconds to reload the factory default settings to the switch.
MS1-L08G
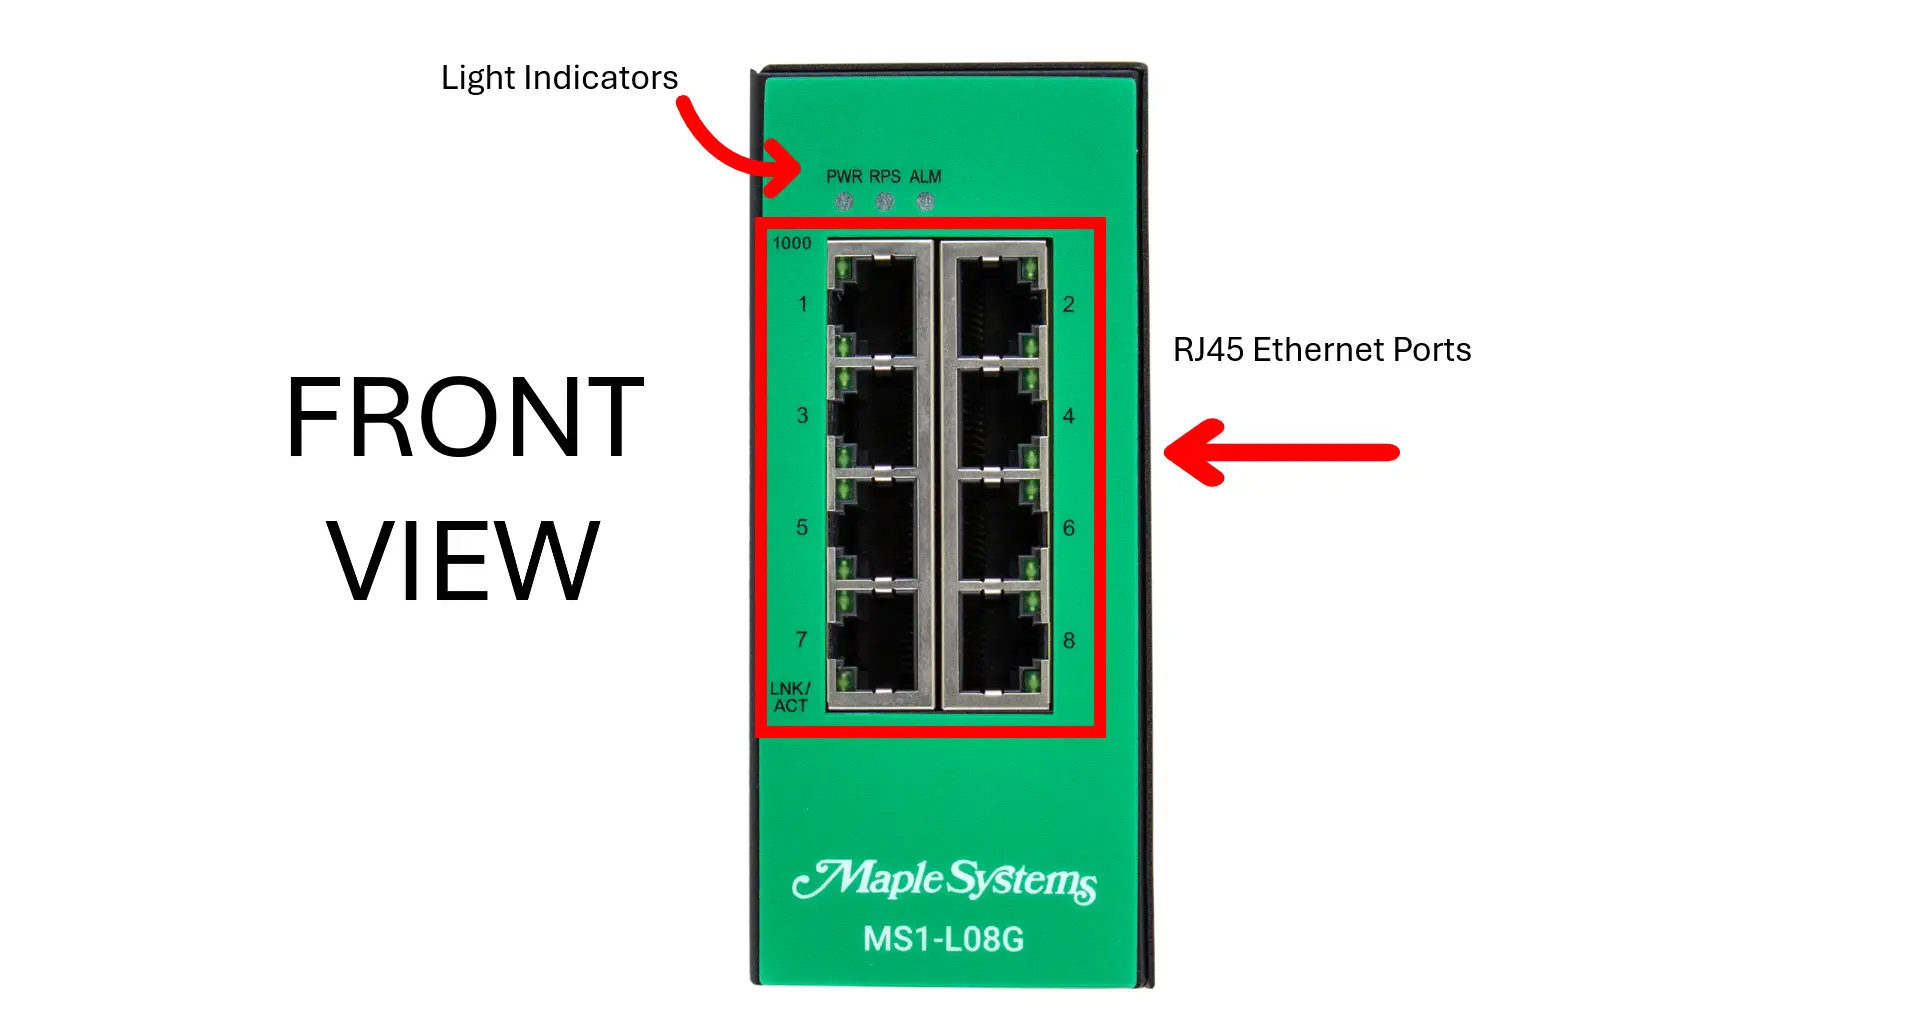
Features and Specs (Front)
RJ45 Ethernet Ports
| RJ45 Copper Ports | 8 |
| RJ45 Speed | 10/100/1000 BASE-T |
| Switch Fabric | 16 Gbps |
| L2 Forwarding Rate | 11.9 Mpps |
The 10/100/1000Base-T ports support network speeds of 10 Mbps, 100 Mbps, or 1000 Mbps and can operate in both half- and full-duplex modes. These ports also feature automatic MDI/MDI-X crossover detection, providing true “plug-and-play” capability—just connect the network cables, and the ports will automatically adjust to the connected end-node devices. The following cabling is recommended for the RJ45 connectors:
- 10 Mbps – Cat 3 or better
- 100/1000 Mbps – Cat 5e or better
LED Indicators
| System LEDs | ||
| PWR | Illuminated | Primary Power on |
| Off | Primary Power off or failure | |
| RPS | Illuminated | Redundant (secondary) Power on |
| Off | Redundant Power off or failure | |
| ALM | Illuminated | Alarm for following conditions(when the DIP switches are turned on) Primary Power lostSecondary Power lost Threshold exceedLoop detection |
| Off | Normal operation | |
| Port Number 1-8 LED | ||
| 1000 | Illuminated | Link speed at 1000Mbps |
| Off | Link speed at 10/100Mbps | |
| LNK/ACT | Illuminated | Ethernet link-up |
| Blinking | Activity (receiving or transmitting data) | |
| Off | Port disconnected or link failed | |
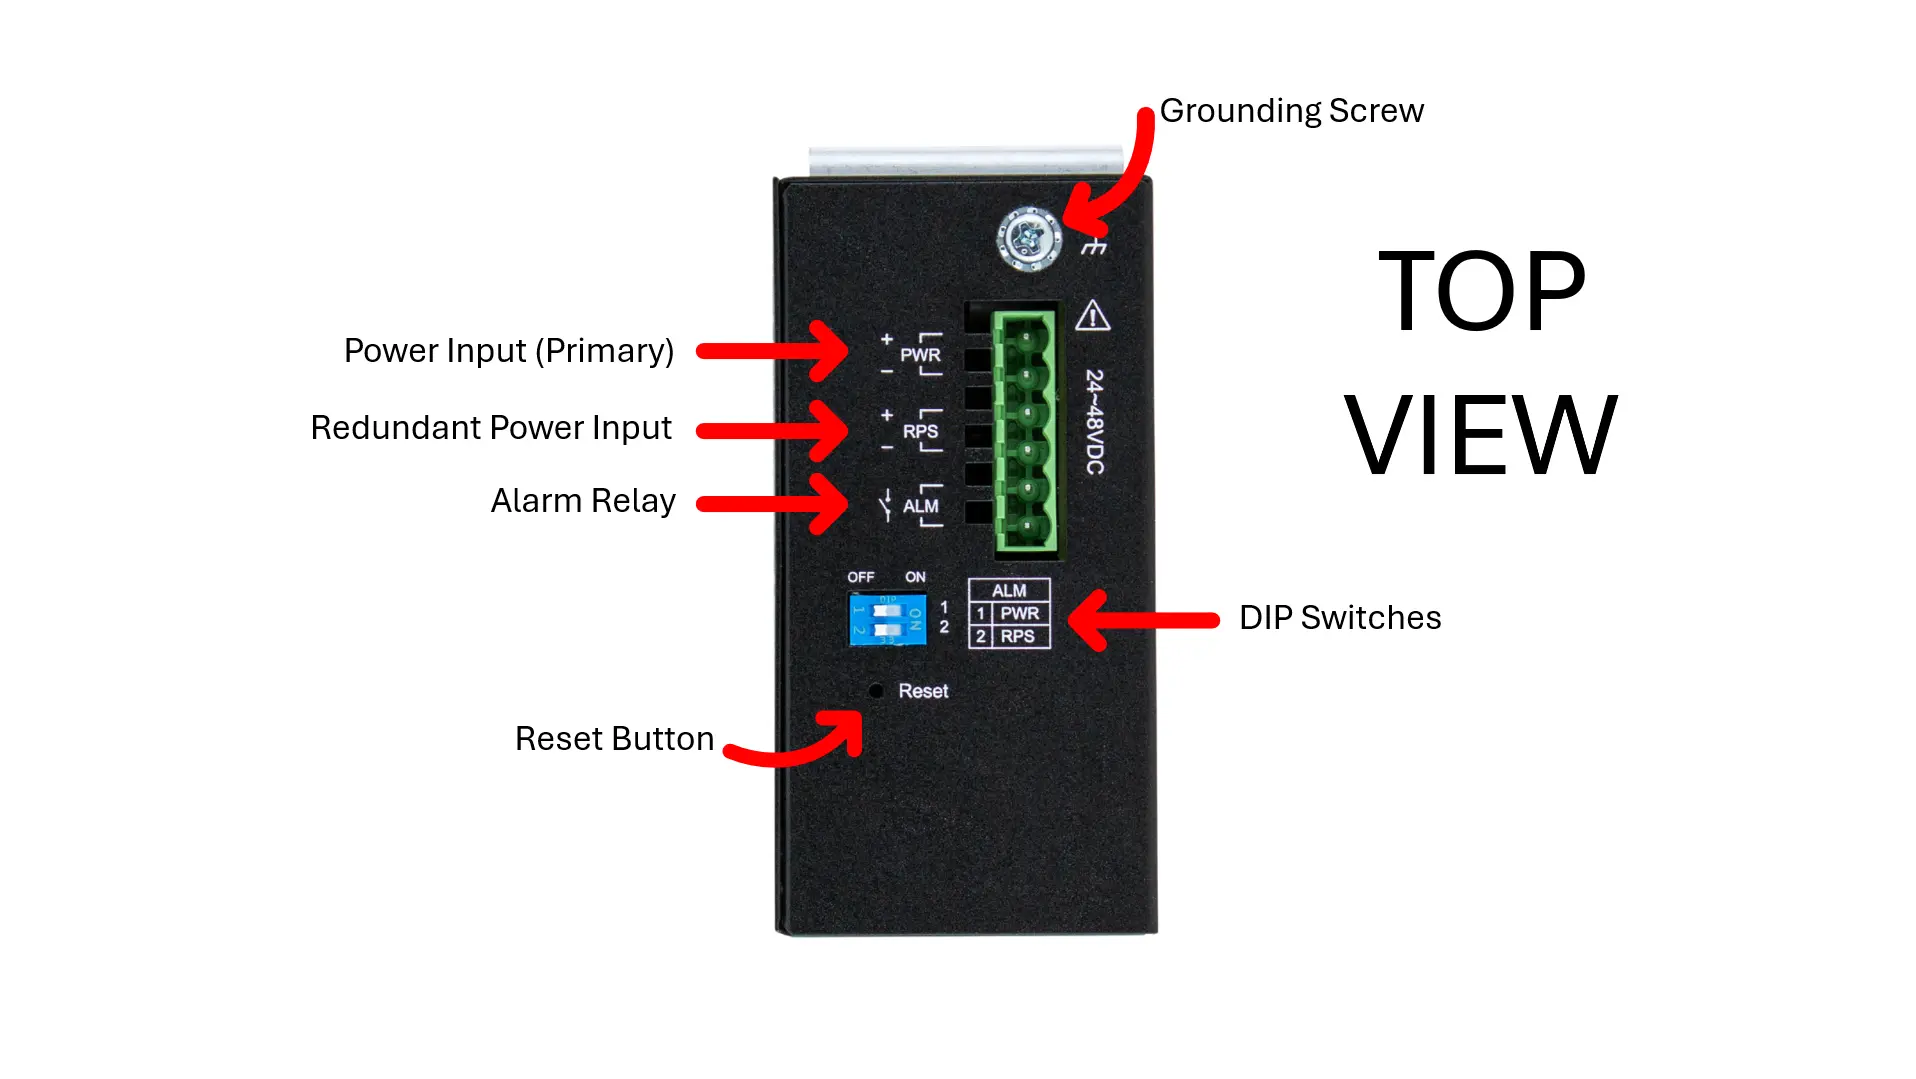
Features and Specs (Top)
DIP Switches
| DIP | Function Description |
| PWR | Primary power input from terminal block ON – Primary power alarm reporting is enabled OFF – Primary power alarm reporting is disabled |
| RPS | Redundant power input from terminal block ON – Redundant power alarm reporting is enabled OFF – Redundant power alarm reporting is disabled |
Power (Primary and Redundant)
Please refer to the “Lite-Managed Network Switch Operations Manual” for more wiring information and the DS-MS1LM
| Input Voltage (Primary) | 20-57 VDC |
| Input Voltage (Redundant) | 20-57 VDC |
| Input Connector | Terminal Block |
| Max Input Current | 0.35A @ 24 VDC without alarm (1.35A @ 24 VDC with alarm) |
| Max Power Consumption | 10W |
Alarm Relay
1 Relay Output, 1A @ 24 VDC
Please refer to the “Lite-Managed Network Switch Operations Manual” for more wiring information and the DS-MS1LM
Manual Reboot/ Reset Switch
The switch includes a “Reset” button that allows you to manually reboot the device or restore it to factory default settings.
- Press the “Reset” button for more than 2 seconds to reboot the switch.
- Press the “Reset” button for more than 5 seconds to reload the factory default settings to the switch
Grounding Screw
Ground the Switch: Before powering on the switch, ground the switch to earth.
Please refer to the “Lite-Managed Network Switch Operations Manual” for more grounding information and the DS-MS1LM
Network Configuration
Initially, the new switch connects to the network using the default IP address (192.168.100.254). Enter this IP address in a web browser to access the setup Wizard. After three seconds, the ‘Welcome’ screen will automatically transition to the setup screen, as shown below.”

UI Settings
Wizard Settings
Step 1: Account Settings – Configure user credentials to access the device. This step helps establish the strength of your device’s security.
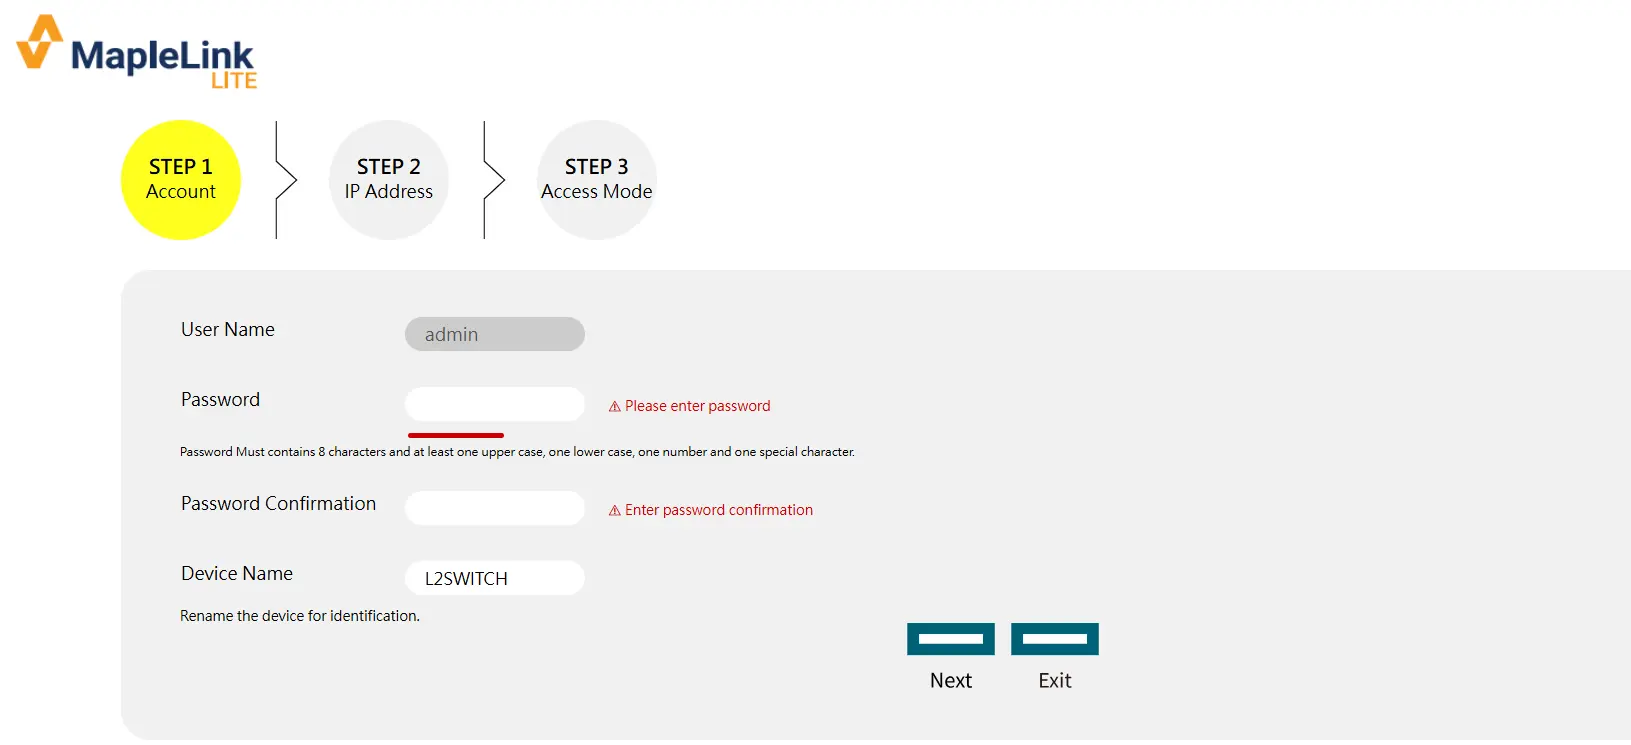
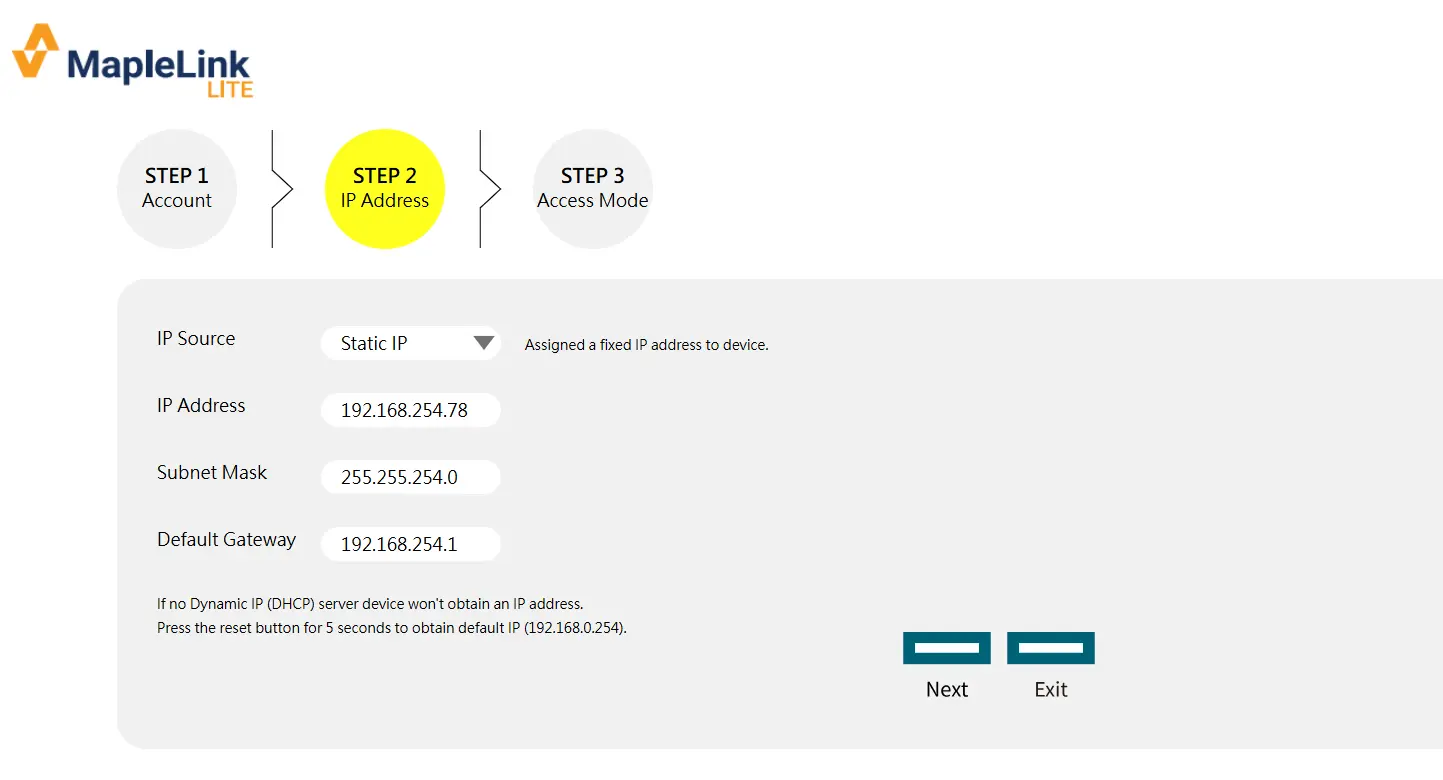
Step 2: IP Address – Configure the management IP address. The user can select either DHCP mode or Static mode to set the switch’s IP address, as shown below.
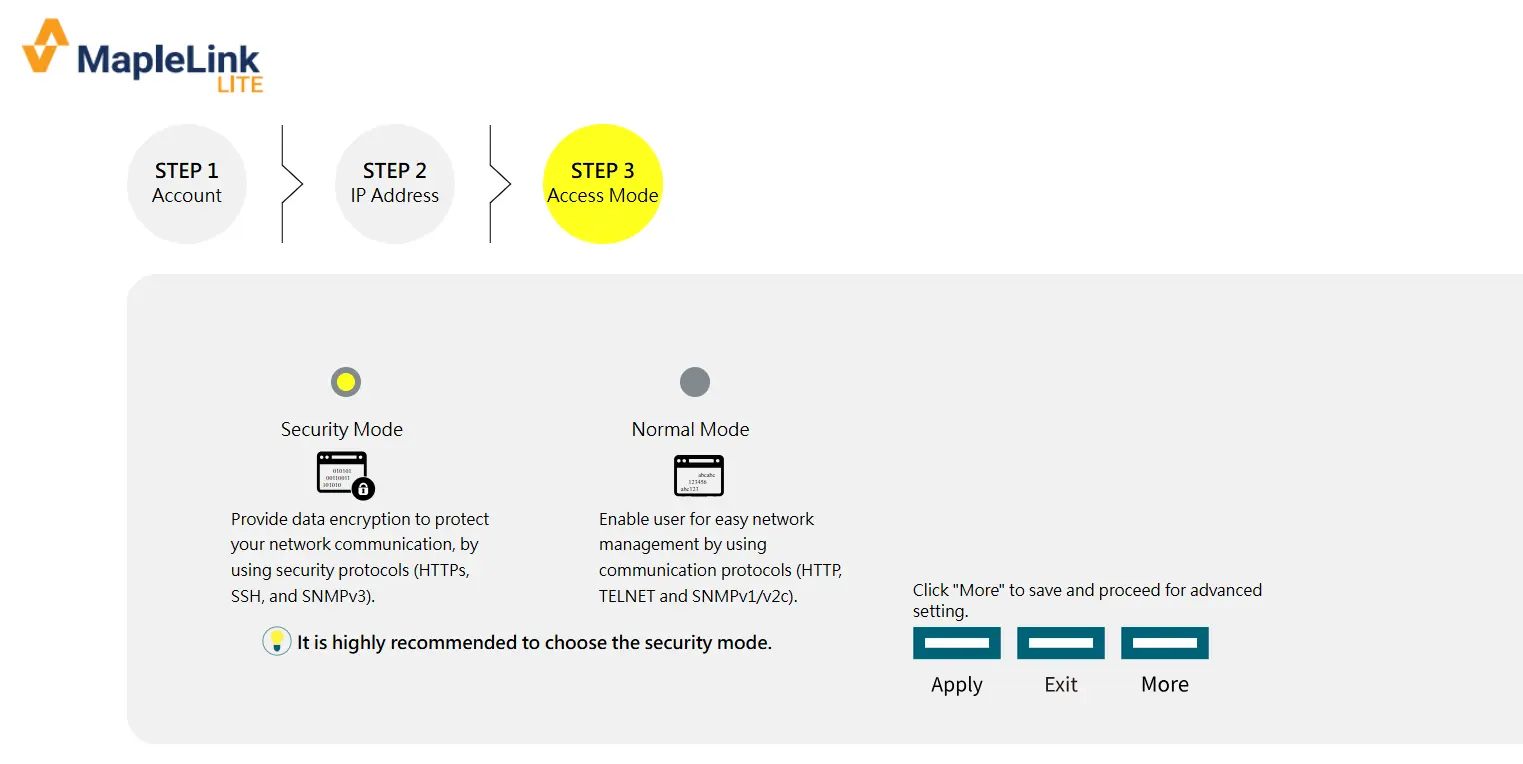
Step 3: Access Mode – Choose how to access the device. There are two options: Security Mode (HTTPS, SSH, and SNMPv3) and Normal Mode (HTTP, TELNET, and SNMPv1/v2).
Default:
User name: admin
Password: admin
Dashboard Settings
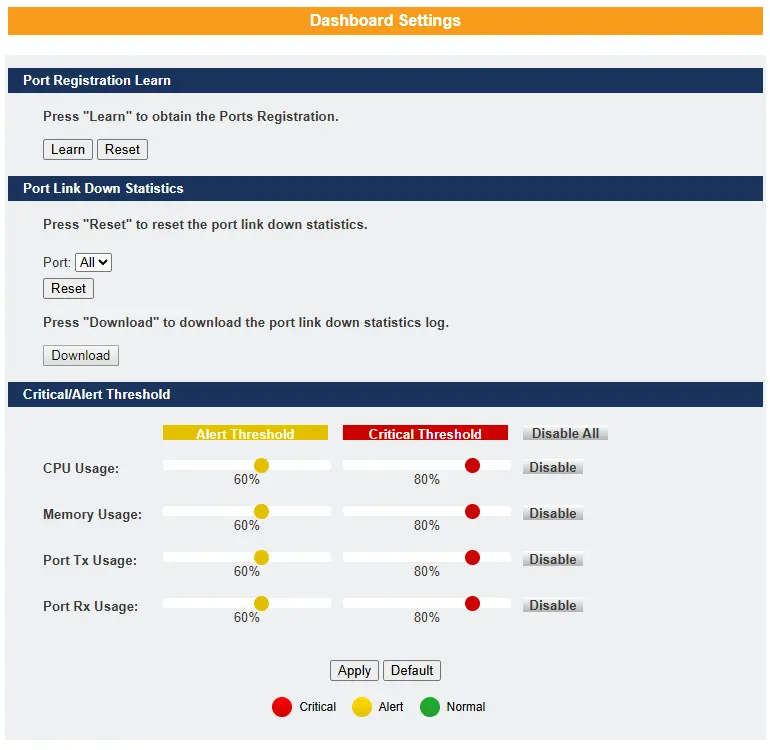
Learn:
Retrieves the current port registration information.
Reset:
Resets the port registration information.
Port:
Allows the user to select individual or all ports to reset their registration information to default values.
Download:
Downloads port-down statistics, including date and time.
CPU Usage:
Configures CPU usage thresholds—Normal, Alert, or Critical—or disables the feature.
Memory Usage:
Configures memory usage thresholds—Normal, Alert, or Critical—or disables the feature.
Port Tx Usage:
Sets threshold values for transmit (Tx) usage on the interface—Normal, Alert, or Critical—or disables the feature.
Port Rx Usage:
Sets threshold values for receive (Rx) usage on the interface—Normal, Alert, or Critical—or disables the feature.
Apply:
Applies the changes made.
Default:
Restores the switch to its default settings.
Port Settings
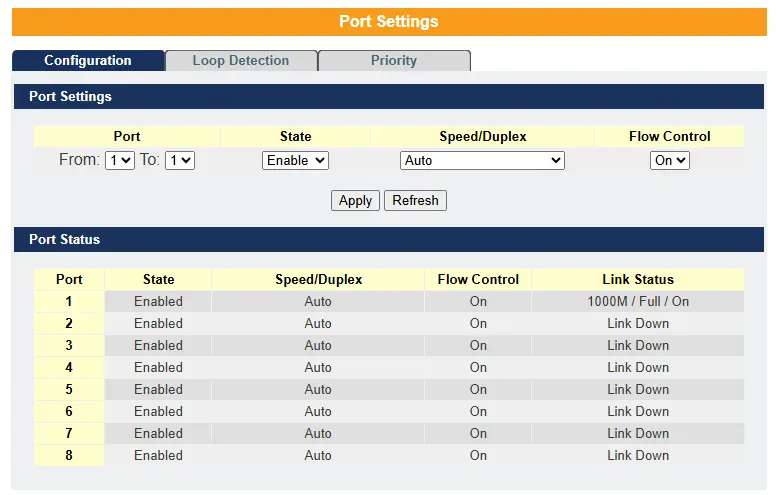
Port Settings allow administrators to manage the behavior and performance of individual switch ports. Each port can be enabled or disabled, with disabled ports remaining inactive. Speed and duplex mode settings define how fast a port operates (10, 100, or 1000 Mbps) and whether it uses half-duplex (one-way at a time) or full-duplex (simultaneous two-way) communication. Flow control, based on IEEE 802.3x, helps prevent data loss by pausing traffic when a port’s buffer is full. The link status indicates whether the port is currently active. Additionally, Port Priority settings let users assign traffic priority levels using 802.1p tagging, ensuring that critical data receives higher precedence during network congestion, which improves reliability and overall network performance.
Future Tutorial How to Configure Ports Settings and Port Priority
Loop Detection –
Loop Detection is a network feature designed to identify and prevent loop conditions, typically caused by human error such as accidentally connecting two ports with the same cable. These loops can lead to broadcast storms that degrade network performance. The switch periodically sends probe packets to detect loops; if a probe returns to the same port, the switch disables that port to stop the loop. After a preset recovery time, the port is re-enabled and monitoring resumes, allowing for automatic recovery while maintaining network stability.
Future Tutorial How to Use Loop Detection to Protect Your Network
Ring Settings
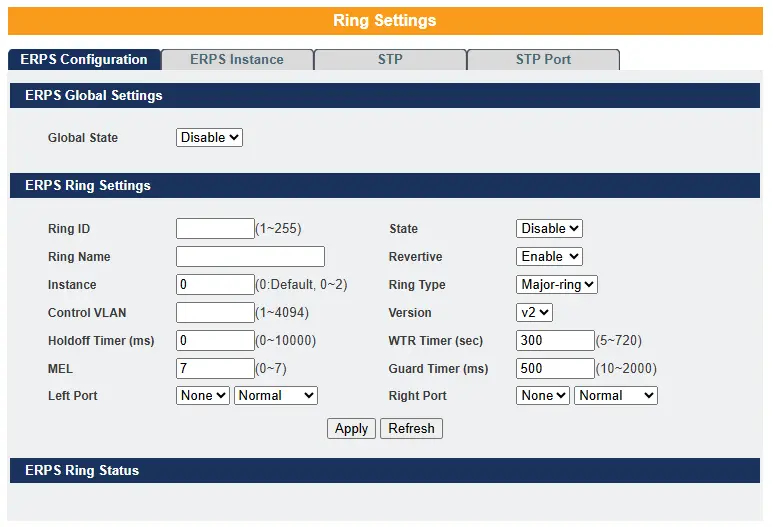
The ERPS (Ethernet Ring Protection Switching) feature provides redundancy in ring topologies by preventing loops and enabling rapid recovery from link failures. Key components include the Guard Timer, which suppresses outdated messages during switch events, and the Wait-To-Restore (WTR) Timer, which delays reverting traffic paths to prevent frequent switching. ERPS supports revertive and non-revertive modes, determining whether traffic returns to the original path after recovery. ERPS instances in version 2 allow VLAN-based traffic control, separating control and data via Control VLANs. In contrast, version 1 blocks all traffic on a blocked port. (R)STP (Rapid Spanning Tree Protocol) complements ERPS by eliminating loops and managing backup paths. Its key timers—Forward Delay, Max Age, and Hello Time—ensure proper state transitions and topology updates. STP port settings like Path Cost, Bridge/Port Priority, and protective features like BPDU Guard, BPDU Filter, and Root Guard help optimize loop prevention, root bridge selection, and enforce topology control.
Future Tutorial How to configure ERPS and RSTP/STP for Reliable Ring Network Protection
System Settings
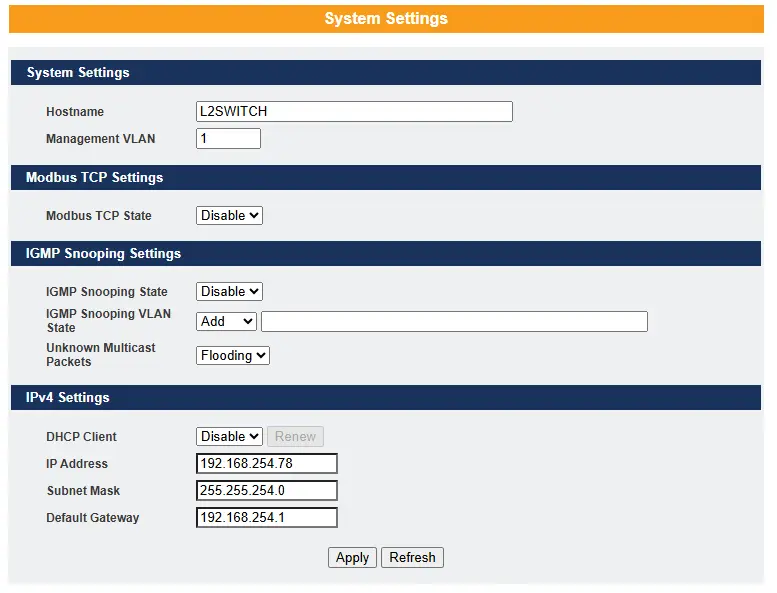
Host Name
The hostname is the same as the SNMP system name. Its length is up to 64 characters.
Management VLAN
The Management VLAN is used to configure the switch management VLAN
Modbus TCP Settings
Modbus TCP supports different types of data format for reading. The primary four types are:
| Data Access Type | Function Code | Function Name | |
| Bit access | Physical Discrete Inputs | 2 | Read Discrete Inputs |
| Internal Bits or Physical Coils | 1 | Read Coils | |
| Word access (16-bit access) | Physical Input Registers | 4 | Read Input Registers |
| Physical Output Registers | 3 | Read Holding Registers | |
Future Tutorial How to Configure a Modbus TCP Client on Your Network
IGMP Snooping
IGMP Snooping is a network feature that enables a switch to efficiently manage multicast traffic by passively monitoring IGMP packets exchanged between multicast routers/switches and hosts to learn group memberships. Based on this information, the switch forwards multicast traffic only to ports that are members of a multicast group, reducing unnecessary traffic and improving performance. IGMP Snooping can be enabled globally or per VLAN and supports up to 4094 VLANs. In automatic mode, the switch learns group memberships dynamically; in fixed mode, only specified VLANs participate. If IGMP Snooping is disabled globally, it is disabled for all VLANs regardless of individual VLAN settings.
Future Tutorial How IGMP Snooping Works and How to Enable It on VLANs
IPV4 Settings
IPv4 Settings are used to configure the switch’s management IP address, either statically or by using a DHCP client.
Example:
- The default DHCP client is disabled.
- The default Static IP is 192.168.0.254
- Subnet Mask is 255.255.255.0
- Default Gateway is 0.0.0.0
Example: The procedures to configure an IP address for the Switch.
To enter the configure node:
- L2SWITCH#configure terminal
- L2SWITCH(config)#
To enter the ETH0 interface node:
- L2SWITCH(config)#interface eth0
- L2SWITCH(config-if)#
To get an IP address from a DHCP server:
- L2SWITCH(config-if)#ip dhcp client enable
To configure a static IP address and a gateway for the Switch:
- L2SWITCH(config-if)#ip address 192.168.202.111/24
- L2SWITCH(config-if)#ip address default-gateway 192.168.202.1
Network Topology
Topology Settings
Map Settings
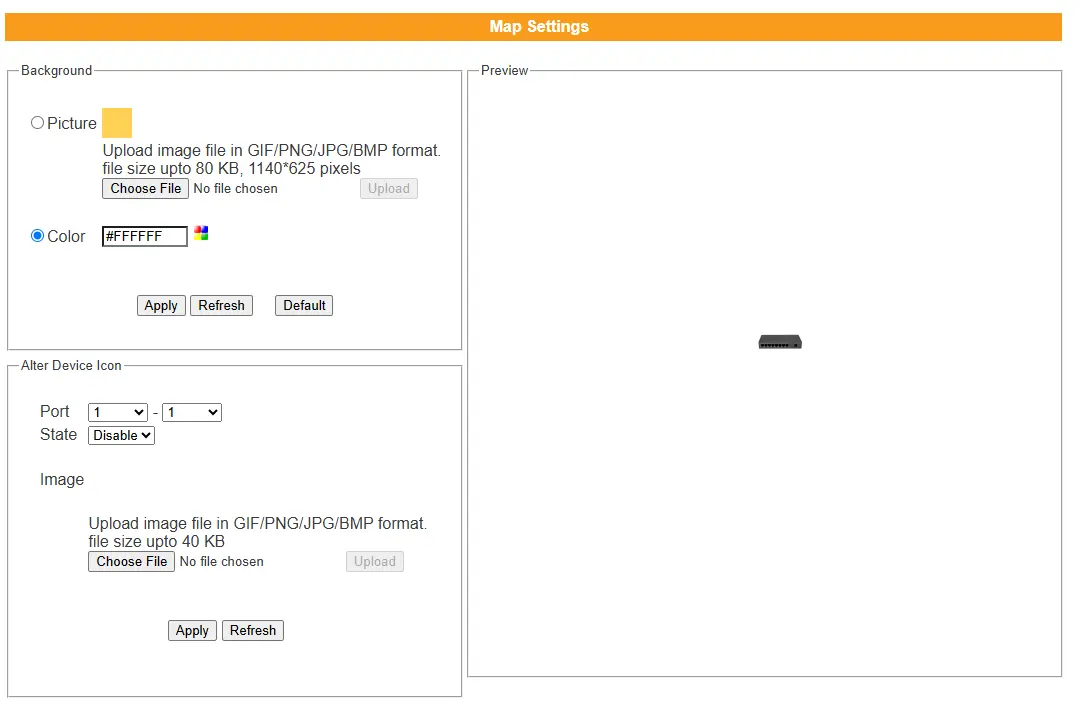
Picture – Select the file you want to display as the background. The Preview window will immediately show your selection. When you click the “Upgrade” button, the file will be downloaded to the switch and applied after the next reboot.
Color – Allows the user to select a standard background color. The Preview window will immediately display the selected color.
Neighbor Devices
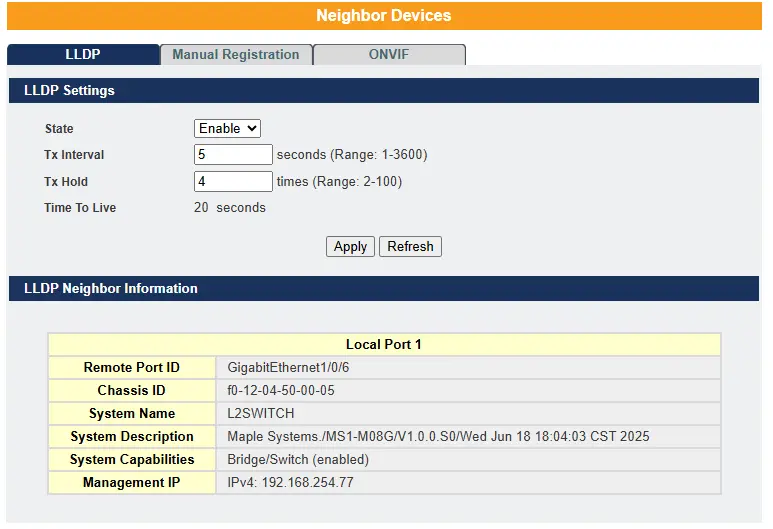
LLDP – The Link Layer Discovery Protocol (LLDP), as defined in the IEEE 802 standard, enables devices connected to the same LAN to advertise their key capabilities to each other. This includes system information such as supported features, management addresses, and details identifying the device’s connection point on the network. LLDP helps management systems discover and manage devices on the network more effectively. The information distributed by LLDP is stored by receiving devices in a standardized Management Information Base (MIB). This allows a Network Management System (NMS) to access the information using a management protocol such as Simple Network Management Protocol (SNMP).
Default Settings
The LLDP on the Switch is enabled.
Tx Interval : 30 seconds.
Tx Hold : 4 times.
Time To Live : 120 seconds.
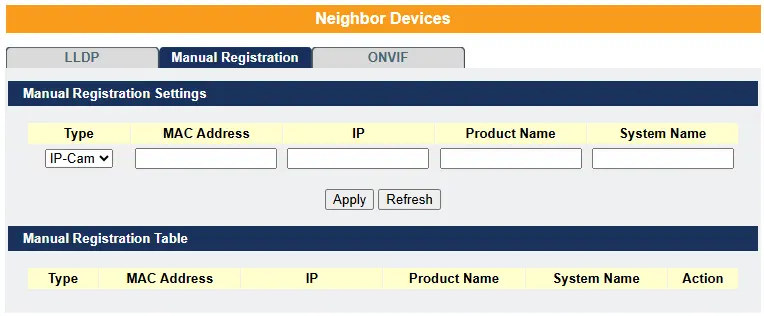
Manual Registration – If devices do not support LLDP or ONVIF, the user must manually enter their details using the manual registration feature. This function supports four device types: IP Camera, PLC, Switch, and PC.
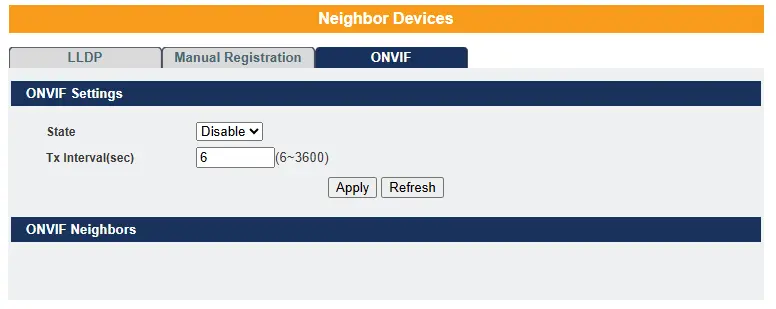
ONVIF – ONVIF is an open industry forum that promotes standardized interfaces to ensure effective interoperability of IP-based physical security products. The switch uses ONVIF to detect whether any ONVIF-compliant devices are connected to it.
Topology Map
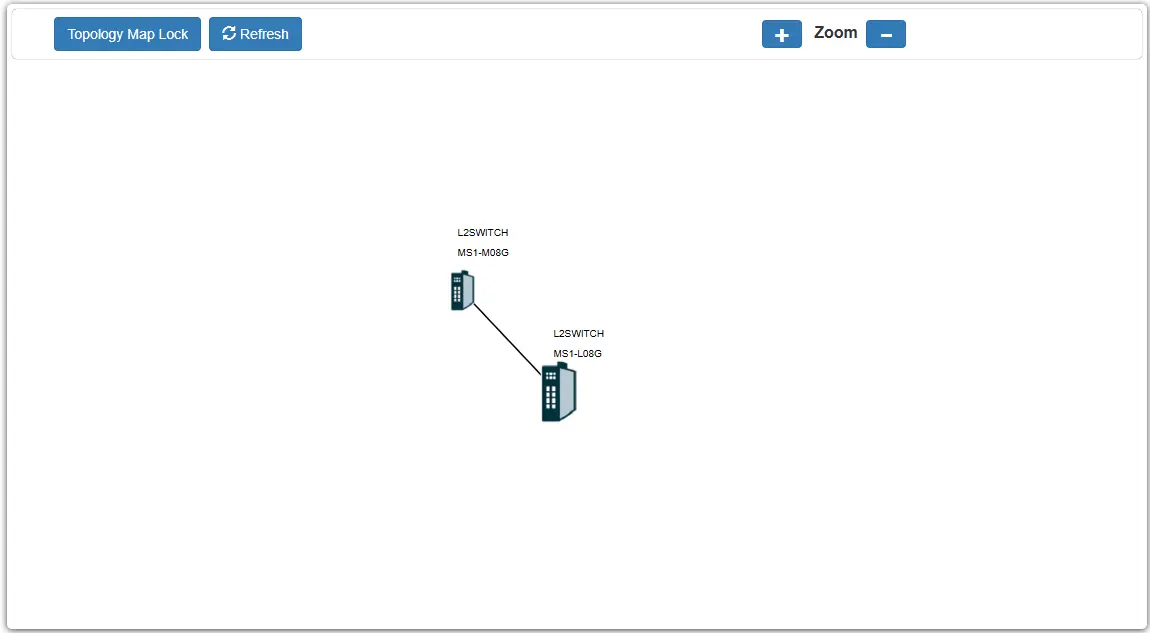
The Topology Map is a feature that allows users to view information about neighboring devices and configure them easily. When you click on “Topology Map,” the system will display a visual layout of the network. All devices directly connected to the switch and supporting LLDP will appear on the screen.
If the neighboring device is a switch that supports the Lamungan server function, you can right-click on its icon to open a context menu. From this menu, you can select configuration options for that switch.
NOTE: The Topology map can be viewed only on Google or Firefox browsers.
When you click the “Topology Map Lock”, a green circle on the devices indicates they are working normally.
Security
Security Settings
802.1x
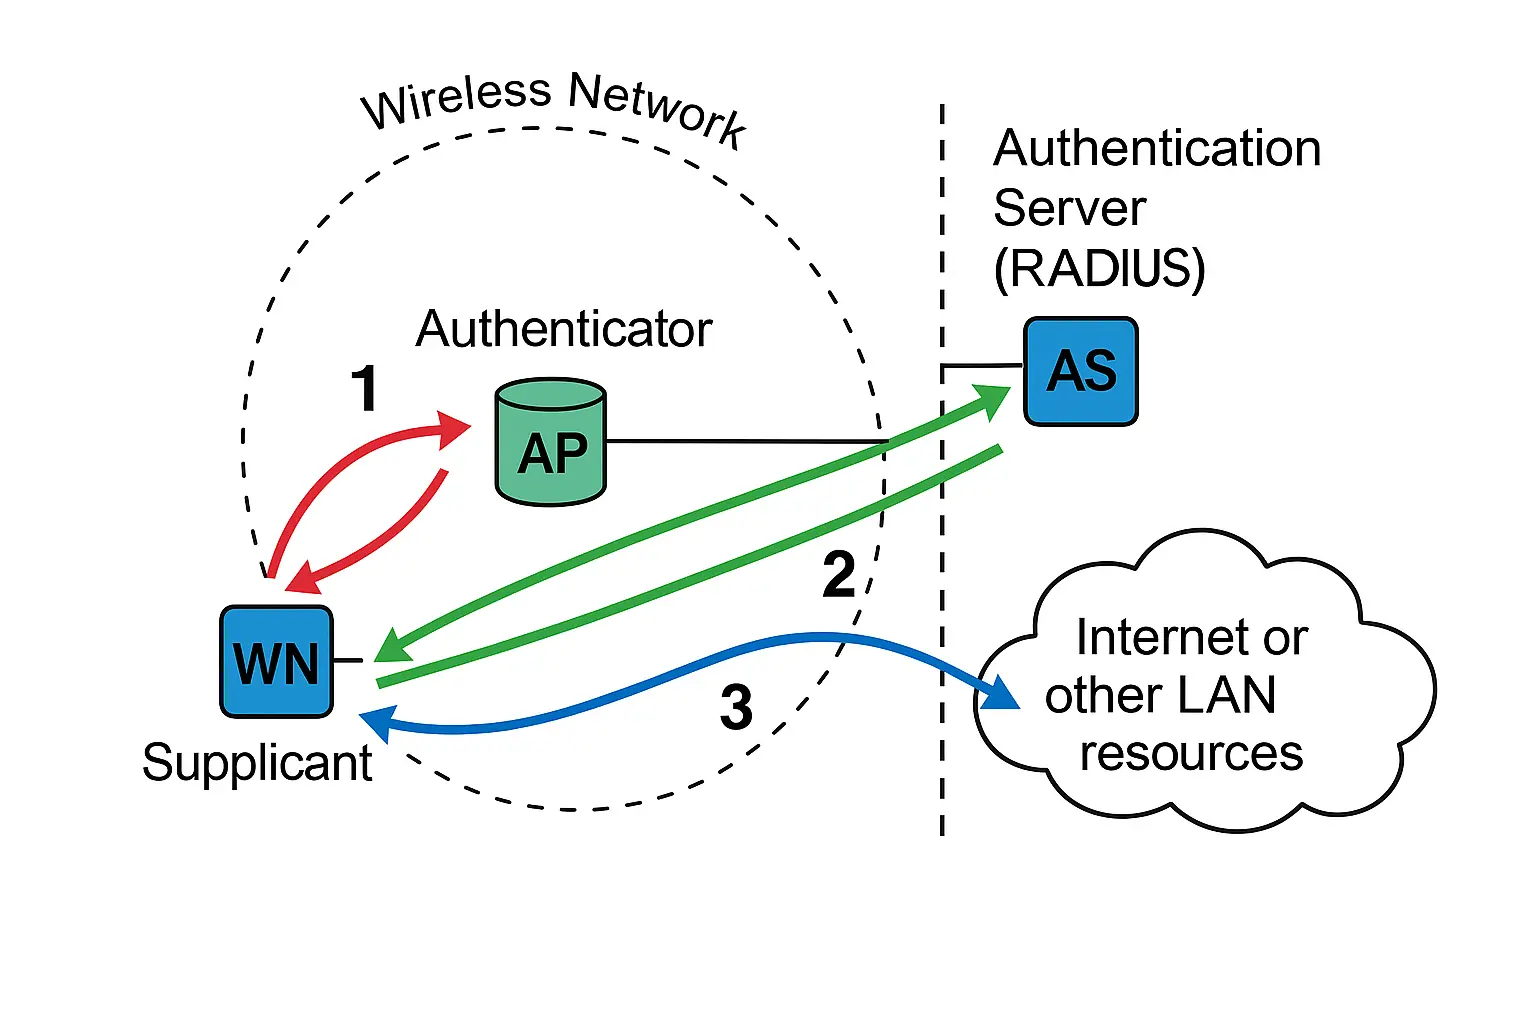
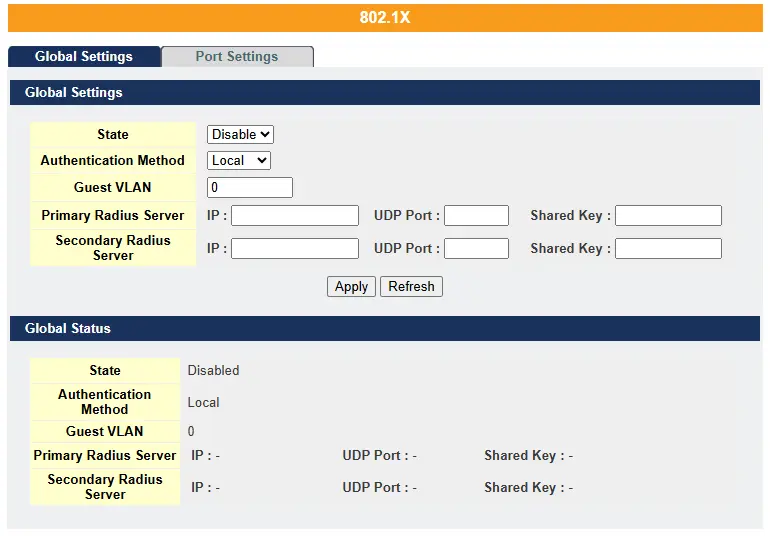
802.1X is a port-based network authentication protocol involving three entities: the supplicant (client device), the authenticator (typically a switch or access point), and the authentication server (usually a RADIUS server). The authenticator acts as a gatekeeper, allowing network access only after verifying the supplicant’s credentials, such as a username/password or digital certificate. It supports various control modes, including auto (access granted after authentication), force-authorized (access without authentication), and force-unauthorized (no access). The system includes configurable timers for re-authentication intervals, authentication timeouts, and retries to enhance security and stability. Local user accounts allow authentication without a server but have limitations. The Guest VLAN feature provides limited network access to clients needing to download or update 802.1X software when they don’t respond to authentication requests.
Future Tutorial How to Configure and Set Up 802.1X Port-Based Authentication
ACL (Access Control List)
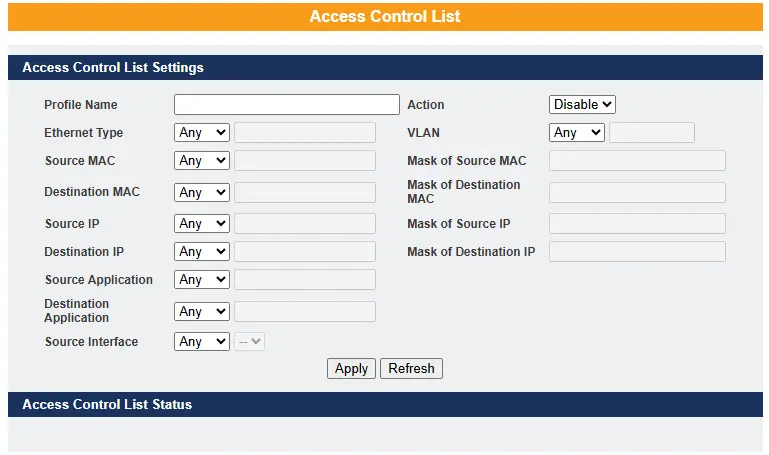
An Access Control List (ACL) is a set of rules that define which users or devices can access a network object and what actions they’re allowed to perform. In Layer 2 (L2) ACLs, rules can be configured to reject packets based on source or destination MAC addresses from specific ingress ports or all ports. When a packet matches a rule, the defined action—typically “deny”—is enforced. If multiple rules match, the system uses the Action Resolution engine to apply the action and metering results from the highest-priority matching rule.
Future Tutorial How to Use ACLs for Enhanced Network Security Port Security
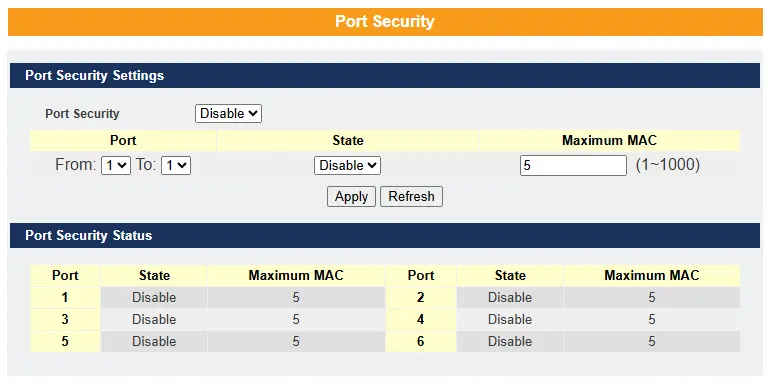
Port Security
The Switch learns the MAC address of the device directly connected to each port and allows traffic through accordingly. But how do we control who—and how many—devices can connect to a switch port? This is where port security helps. Port security allows us to control which devices can connect to a switch port and how many devices are allowed to connect, such as when a hub or another switch is connected to that port.
For example, imagine you have only one free switch port but need to connect five hosts. One solution is to connect a hub or another switch to that free port. However, connecting a hub or switch increases network traffic and can introduce risks such as network loops, especially if connected by unauthorized users. To prevent this, it’s best to restrict the number of hosts allowed to connect at the switch level.
This restriction can be configured using the port-security limit command, which sets the maximum number of MAC addresses allowed to source traffic through a port. Port security enforces a maximum number of MAC addresses per interface. When the limit is exceeded, incoming packets with new MAC addresses are dropped. The switch uses its MAC address table to enforce this limit, and static MAC addresses count toward the maximum allowed.
Default Settings:
Port security on the switch is disabled
The max number of MAC addresses allowed per port is 5
The port security state on the port is disabled
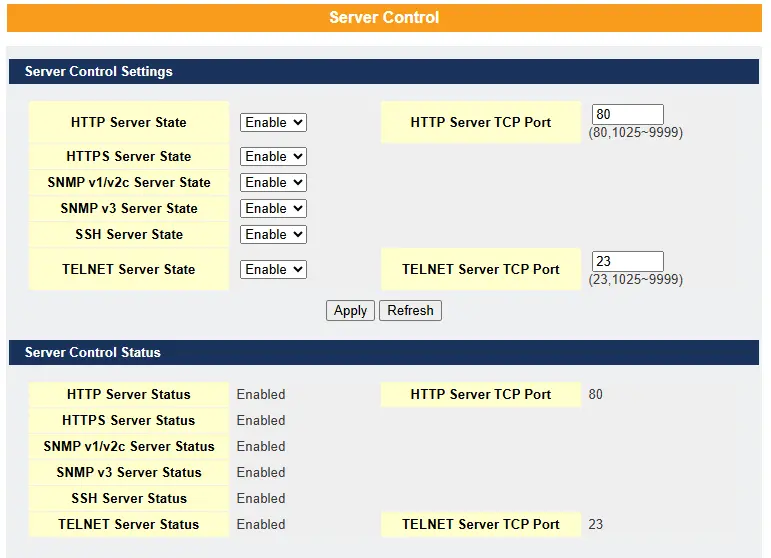
Server Control
This function allows users to enable or disable the HTTP, HTTPS, SNMPv1/v2c, SNMPv3, SSH, and Telnet services individually.
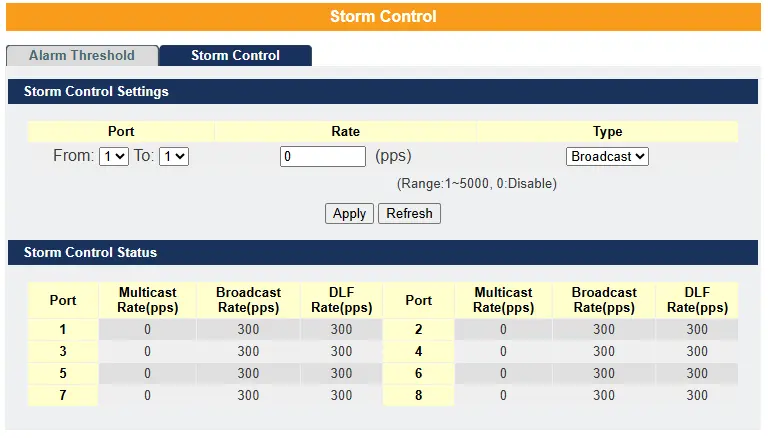
Storm Control
A broadcast storm occurs when a network is overwhelmed by continuous broadcast or multicast traffic. This can eventually cause a complete loss of network connectivity as packets multiply uncontrollably.
Storm Control protects the switch’s bandwidth from being flooded by such packets, including broadcast, multicast, and destination lookup failure (DLF) packets.
Broadcast storm control limits the number of broadcast, multicast, and unknown unicast (also called DLF) packets the switch receives per second on its ports. When the maximum allowed number of these packets per second is reached, any additional packets are discarded.
Enabling this feature helps reduce broadcast, multicast, and unknown unicast traffic in your network.
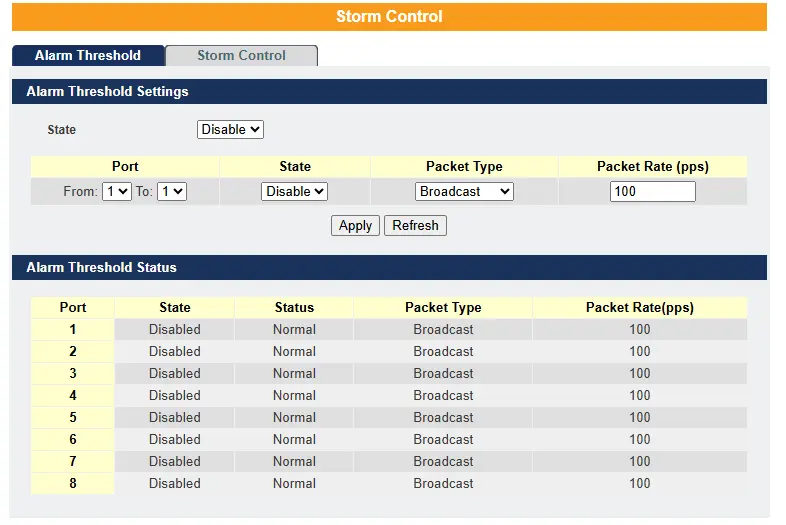
Alarm Threshold – When the selected packet rate exceeds the alarm threshold, the Switch will send a syslog alarm to the syslog server
By default, the rate limit is set to 300 packets per second (pps) for broadcast and DLF traffic. You can configure the maximum rate up to 5000 pps for multicast, broadcast, or DLF packets.
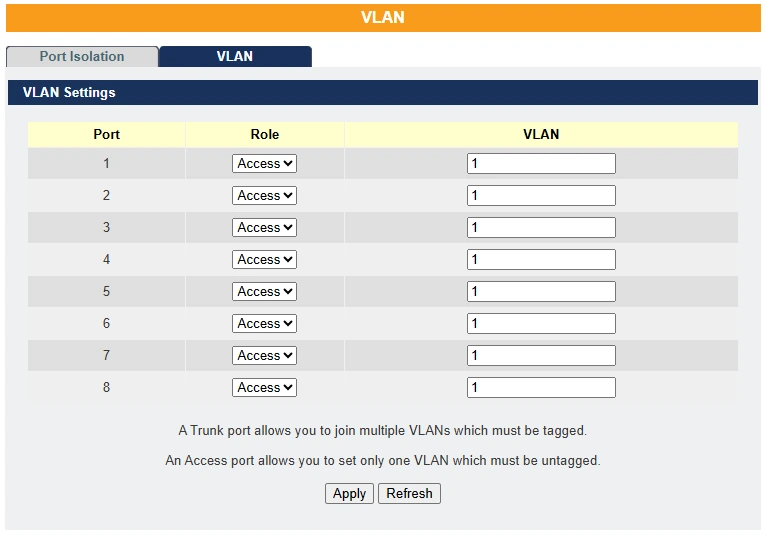
VLAN
A Virtual LAN (VLAN) is a group of hosts with a common set of requirements that communicate as if they were in the same broadcast domain, regardless of their physical location. A VLAN has the same characteristics as a physical LAN but allows end stations to be logically grouped even if they are connected to different network switches.
On the Maple Systems Lite Managed Switches, users can configure a maximum of 5 VLANs per interface, using a format such as 1, 3, 7, 10, 25.
VLANs enable flexible and efficient network reconfiguration through software, eliminating the need to physically relocate devices.
Future Tutorial What is a VLAN and How to Manage it on Your Network
Diagnostics
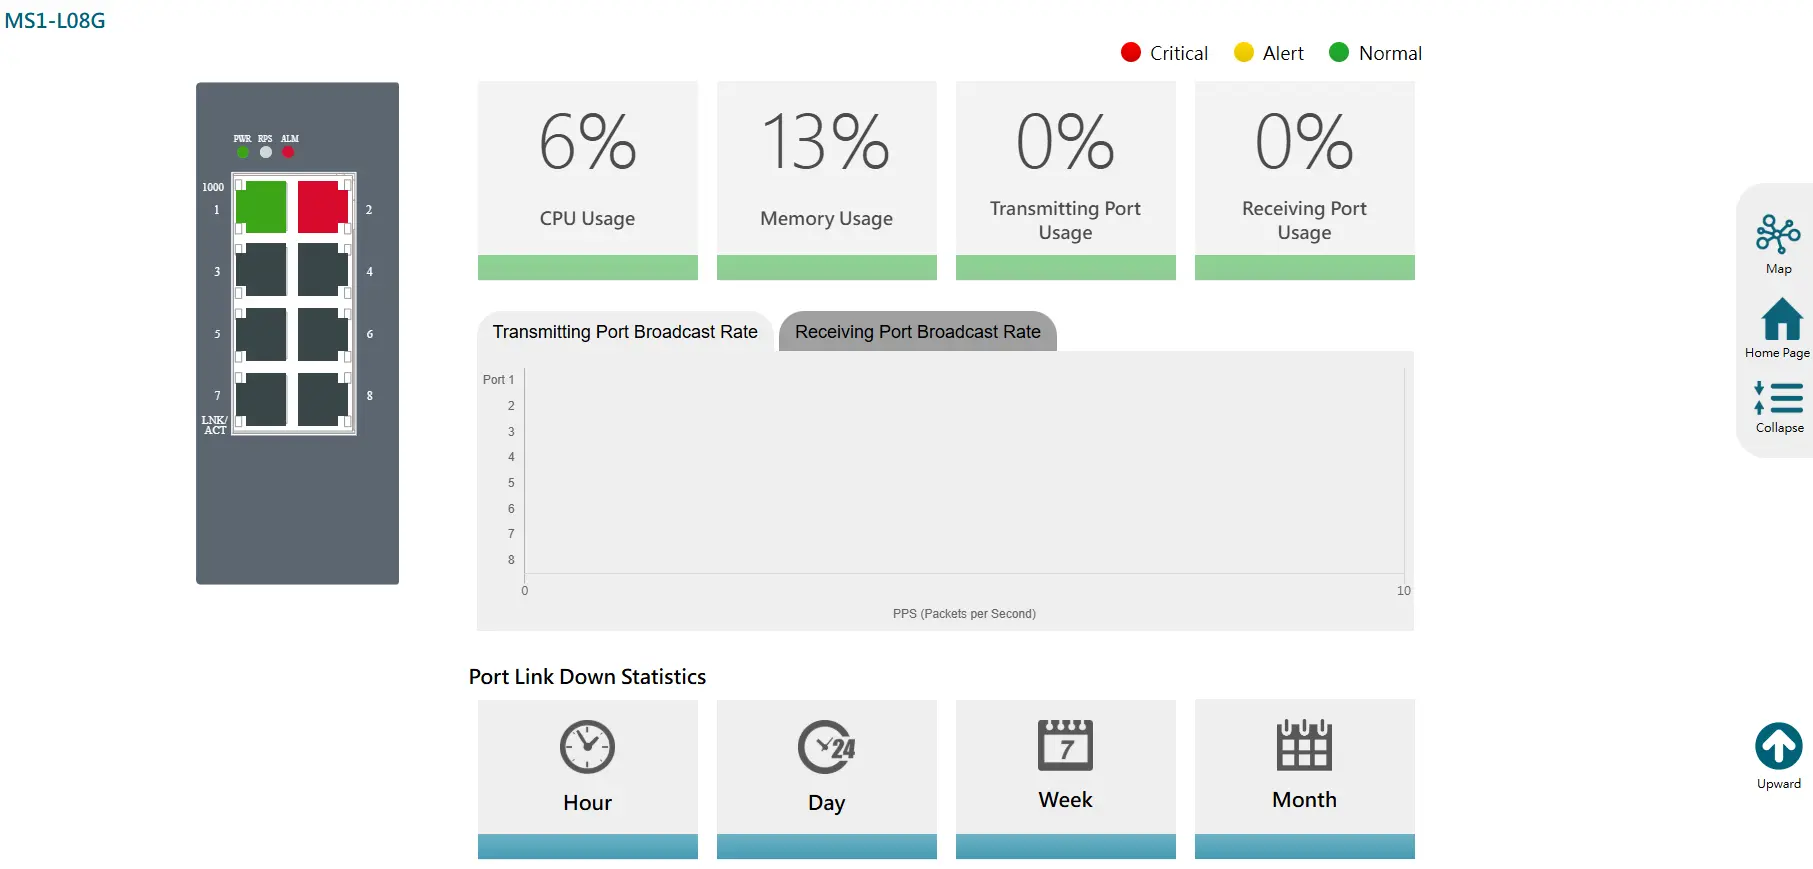
Diagnosis Information
Diagnosis
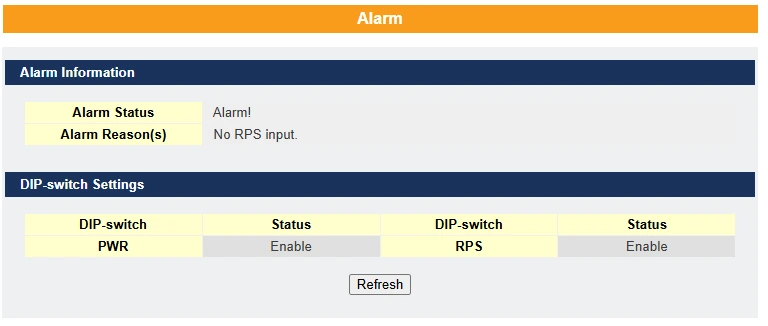
Alarm Information –
- Purpose: To alert users when critical events occur (e.g., power failure).
- Configuration: Use the Alarm DIP Switch to enable or disable alarms for specific events.
Future Tutorial How to Configure Alarms and Syslog for Effective Network Monitoring
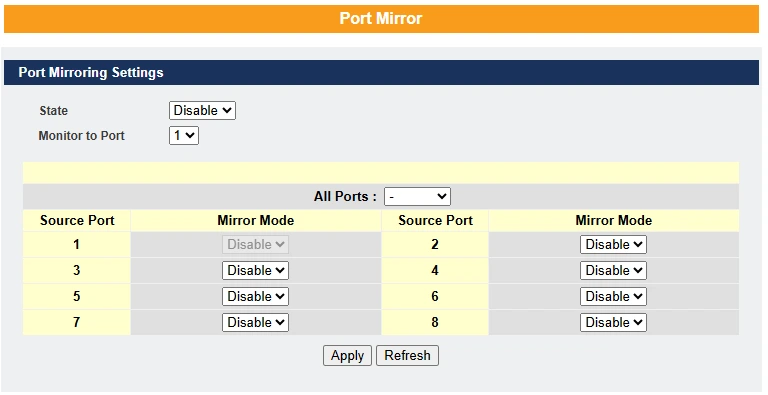
Port Mirror –
Port-Based Mirroring is used on a network switch to send a copy of network packets sent or received on one switch port to a network monitoring connection on another switch port (Destination Port). This is commonly used for network appliances that require monitoring of network traffic, such as an intrusion detection system.
Port Mirroring, together with a network traffic analyzer, helps monitor network traffic.
Default Settings
Mirror Configurations:
State – Disabled
Monitor Port – 1
Ingress port(s) – None
Egress port(s) – None

Port Statistics – This feature helps users monitor port statistics by displaying traffic utilization for link-up ports only.

Port Utilization – This feature helps users monitor the traffic utilization of ports, displaying only those that are currently link-up.
Syslog
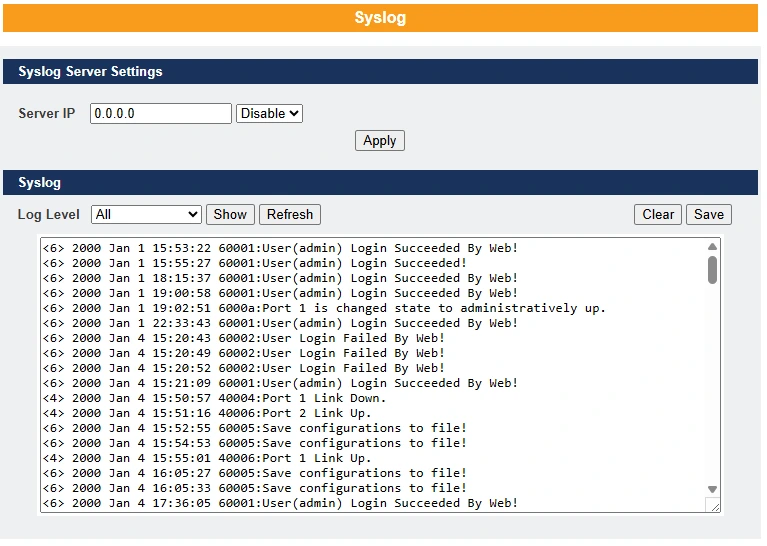
The syslog function records certain system information for debugging purposes. Each log message is recorded with one of the following levels: Alert, Critical, Error, Warning, Notice, or Information. The syslog function can be enabled or disabled; by default, it is disabled. Log messages are stored in the switch’s file system. If a syslog server IP address is configured, the switch will also send a copy of each log message to the syslog server.
The log file is limited to 2,000 entries. When the file is full, the oldest entry will be overwritten.
Future Tutorial How to Configure Alarms and Syslog for Effective Network Monitoring
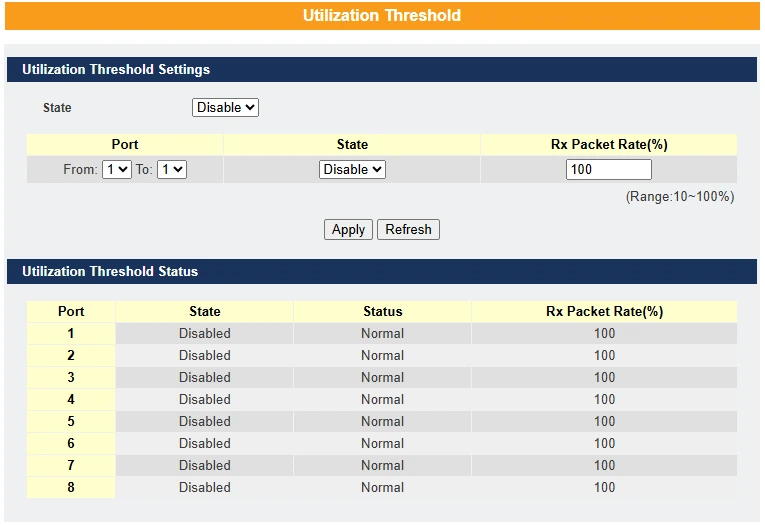
Utilization Threshold – This feature alerts the user when the packet rate on a particular port exceeds the specified threshold.
Management
SNMP, SNTP, Maintenance, User Settings
SNMP
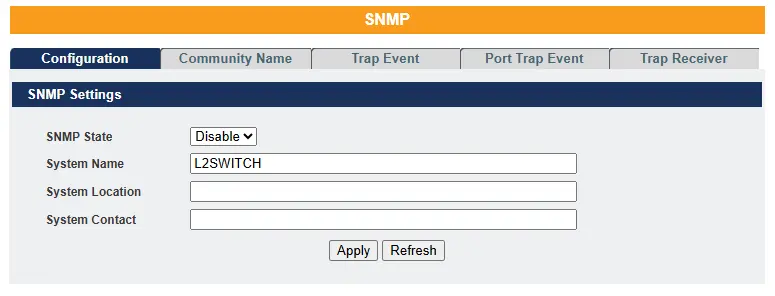
Simple Network Management Protocol (SNMP) is used in network management systems to monitor network-attached devices for conditions that require administrative attention. It is a component of the Internet Protocol Suite, as defined by the Internet Engineering Task Force (IETF). SNMP consists of a set of standards for network management, including an application-layer protocol, a database schema, and a collection of data objects.
SNMP exposes management data as variables on managed systems, which describe system configurations. These variables can be queried—and, in some cases, modified—by managing applications.
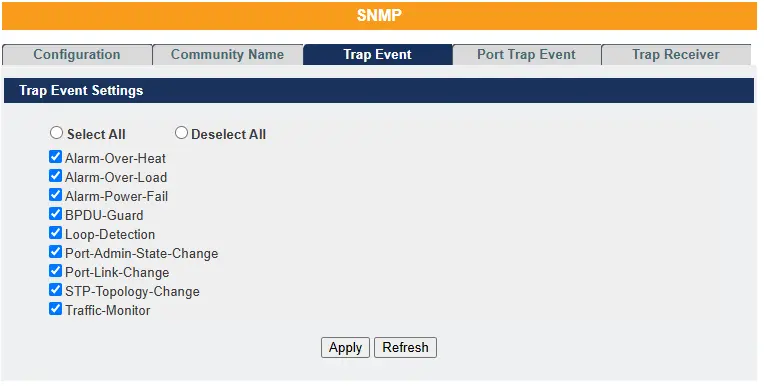
Trap Event – The features allow users to enable or disable individual trap notifications.
Future Tutorial How to Enable and Manage SNMP Trap Receivers
SNMPv3
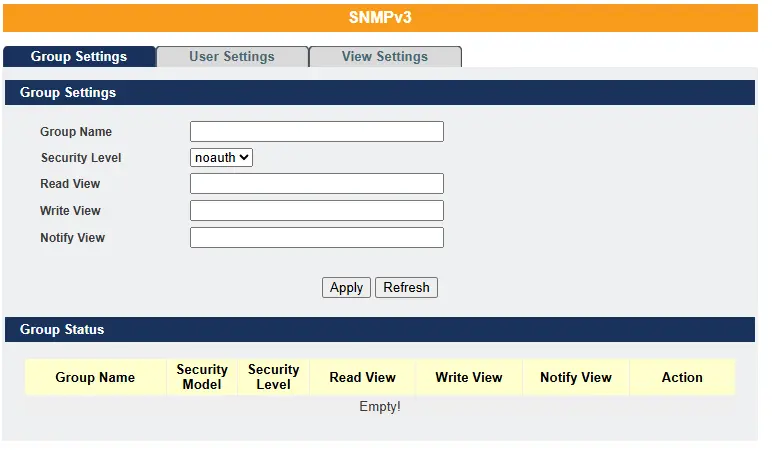
SNMP version 3 (SNMPv3) supports both authentication and encryption. It uses the User-Based Security Model (USM) for message security and the View-Based Access Control Model (VACM) for access control. USM defines mechanisms for authentication and encryption.
For more details on SNMPv3 please refer to the Lite Managed Network witch Operations Manual – 7.2
SNTP
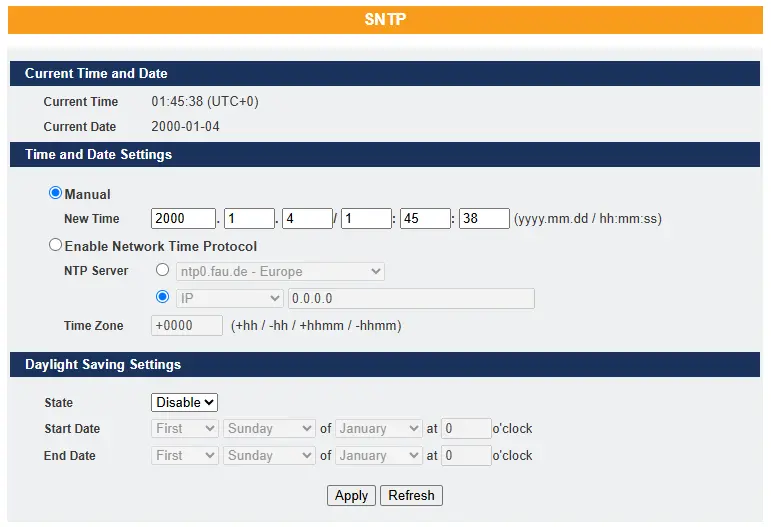
The Network Time Protocol (NTP) is used to synchronize the clocks of computer systems over packet-switched, variable-latency data networks. A simplified version of NTP, called the Simple Network Time Protocol (SNTP), uses the same protocol but does not require maintaining state information over long periods. NTP provides time in Coordinated Universal Time (UTC). It does not transmit information about time zones or daylight saving time—this data must be managed separately.
To get more detailed information on SNTP, please refer to the Lite Managed Network Switch Operations Manual – 7.3 SNTP
System Information
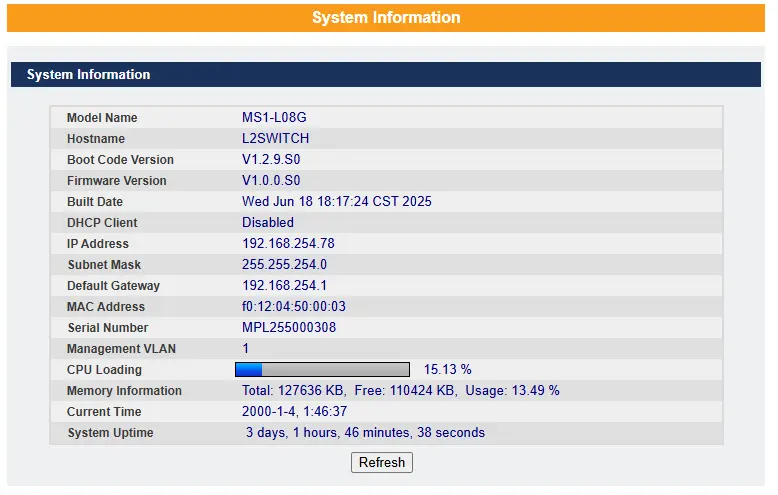
The System Information window appears automatically each time you log into the program. You can also access it manually by clicking System Information.
System Maintenance
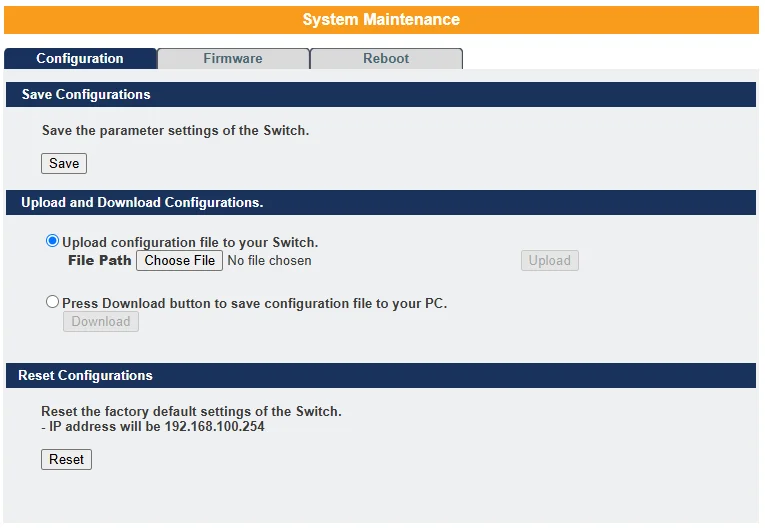
Configuration –
- Click the “Choose File” button to select the new configuration file you want to upload to the switch.
- Click the “Upload” button to begin the upgrade process.
- Click the “Download” button to download the current configuration to your local host.
Reset Configuration
Click the “Reset” button to restore the system configuration to its default values.

Firmware –
- Click the “Choose File” button to select the new firmware file you want to upload to the switch.
- Click the “Upgrade” button to begin the upgrade process.

Reboot –
Click the “Reboot” button to restart the switch.
User Account
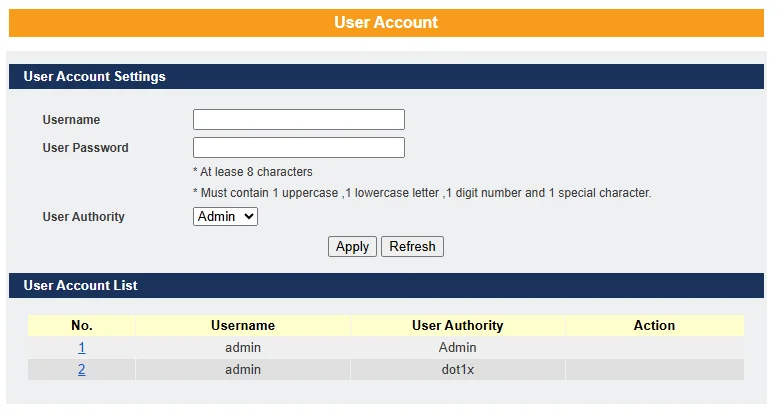
The switch allows users to create up to six user accounts. Each username and password must be a combination of letters and/or digits. The last remaining admin account cannot be deleted. A valid user account is required to log in to the CLI or web interface.
User Authority
The switch supports two types of user accounts:
- Admin – Read/Write access
- Normal – Read-only access (cannot apply any configuration changes via the web interface)
The default user account is:
Username: admin
Password: admin
The switch also supports a backdoor user account feature. If a user forgets their username or password, the switch can generate a temporary backdoor account using the system’s MAC address. This account allows access to the switch so users can create a new user account.
Default Settings
- Maximum number of user accounts: 6
- Maximum username length: 32 characters
- Maximum password length: 32 characters
- Default admin account: admin / admin
Notices
- The switch supports up to six user accounts.
- Usernames and passwords must consist of letters and/or digits.
- The last admin account cannot be deleted.
- The maximum length for both usernames and passwords is 32 characters.
Resources & Documentation
Lite-Managed Network Switches Resources:
- Industrial Network Switches
- Industrial Lite-Managed Network Switches – MS1 Series Datasheet
- MS1-L05G01F Quick Start Guide
- MS1-L08G Quick Start Guide
- What is a network switch?
- Industrial Network Switch Operations Manual – Lite-Managed Series
More
Tutorials
Sample Projects
Software Downloads
See our Support Center for a complete list of Quick Start and Installation Guides
About the Author
Trusted source for industrial automation & control solutions
Follow Maple Systems:
