How do I display international characters in the Silver (HMI500) Series?
Technical Note 1086
Applicable Model(s)
HMI500 Series
Title
How do I display international characters in the Silver (HMI500) Series?
Date
05/17/2005
Rev
03
P/N
0907-1086
Summary
If international characters are required, the project engineer can use a different font set, such as ‘European’ for the European accented characters. This requires exchanging the current standard font set with a different font set.
Solution
Display European Characters from International Keyboard
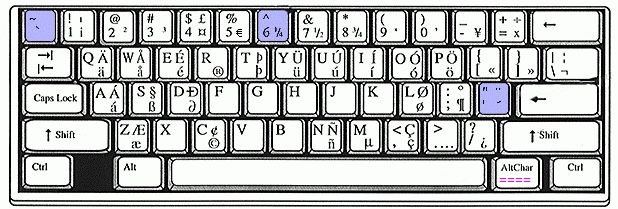
It is possible, with some font sets, to use a pre-defined keyboard that will properly utilize the new font characters instead of needing to use the ALT+KEYPAD method (Such as the European font set can utilize the “US International Keyboard”. There are three main steps to enable a new keyboard:
1.
Set up your keyboard in the Windows® operating system.
2.
Install the ASCII Font tables into the proper EZ500 directory
3.
Setup the EZware software with correct options.
Example
1.
Set up your keyboard as “US International” (instruction for Windows XP systems)
a.
Click the Windows Start menu on the lower left of your screen. Then click on the Control Panel.
b.
Click on:
i.
if Category View, then: “Date, Time, Language, and Regional Options” à “add other languages”
-OR-
ii.
if Classic View, then: “Regional and Language Options”
c.
Click on the {Languages} tab.
d.
Under “Text services and input languages” group, click the [Details] button.
e.
Under the {Settings} tab is the “Default input language” group, select “English (United States) – United States – International” as the installed input language to use when you start your computer.
i.
If the “International” option is not available from the pull –down menu, then add it to the options.
ii.
Under the “Installed Services” group, click on the [ADD] button
iii.
The input language should be already set to “English (United States). Click to enable the “Keyboard Layout/IME” box and select: “United States – International” from the pull-down menu selection, then click OK.
iv.
Now back under the “Default input language” group, select “English (United States) – United States – International” from the pull-down menu.
f.
Click the [Apply] button and then [OK] to close the “Regional and Language Options” window.
g.
Close the Date, Time, Language, and Regional Options window.
h.
Close Windows® and reset the computer.
i.
Your computer keyboard is now set up to display International Characters, as well as the standard QWERTY keyboard setup.

j.
To display international characters, hold down the right-Alt key on your keyboard (AltChar in the picture) while pressing the appropriate key. If a particular key has a capital letter, hold down the right-Alt & Shift key to display the top character. Test this in Microsoft Word or other word processor program to verify that it is working correctly.
i.
Test: {Right-ALT + a} = á
ii.
Test: {SHIFT + Right-ALT + a} = Á
2.
Install the three European ASCII Fonts into the EasyBuilder software
a.
Close EasyBuilder software if it is open.
b.
Copy the existing three fonts: “Ascfont.8”, “Ascfont.16”, and “Ascfont.24” font tables from the “C:\MapleSystems\EZ500\FontFiles\European” directory. Now paste (save) the new European fonts into the C:\MapleSystems\EZ500 subdirectory of your computer. Select “OK” if asked to overwrite the existing files.
3.
Setup the EZware software with correct options:
a.
Start up your EasyBuilder software.
b.
Click “Option” menu in EasyBuilder software.
c.
Click “Language”, and make sure it is selected for “Single Byte”.
Now you should be able to display European characters in EasyBuilder using your international keyboard setup rather than by entering a number through the ALT+ keypad + # method.
Creating a New Foreign Font Set
1.
Create a new directory off of EZ500 and call it …EZ500\FONTFILES\ENGLISH. Copy all the current ASCfont.* files from the …\EZ500 directory into the new ENGLISH directory. Now move the new language ASCfont.* files into the …\EZ500 folder. It is recommended that you also create a new directory off of …\EZ500 with the name of this new language and copy the new font files into it.
NOTE: EasyBuilder must be closed to move these files into the EZ500 folder, otherwise you will get a “sharing violation error”.
2.
Create a new font set using “EasyASCIIFontmaker.exe” program or obtain the appropriate language files from Maple Systems Tech Support or the Maple Systems web site (www.maplesystems.com). Regardless of the language, these files will always be named ASCfont.8, ASCfont.16, and ASCfont.24. If you choose to create your own font set, then do not edit the standard English set (ASCII codes 0x00 hex [0 decimal] through 0x7F hex [127 decimal]) and add your new characters in the extended ASCII range (0x80 [128] through 0xFF [255]).
3.
Open EasyBuilder and select a text object, a label library item or an object that is using a label.
4.
In the text content box for your label or text, enter standard QWERTY text characters (a-z, A-Z) using the corresponding keys on the keyboard to enter your text. For “special” characters such as accented characters (i.e. à, õ, ÿ, etc.) use the ALT+Keypad method. Typically, the “foreign” characters are extended ASCII characters (meaning you have to hold down more than one key on the keyboard to access them). To find out which key combination you’ll need, take the HEX value of the symbol (open the file in “Easy ASCII Font Maker” and look at the HEX value associated with that symbol), and convert it to a 4-digit decimal value. For example, 8B (Hex) would become 0139 (decimal). To enter this value, hold down the ALT key while you type 0139 on the right-side keypad (use of the number keys above the QWERTY letters will not work).
More Information
For more information regarding creating font files, please refer to Chapter 4, Using EZware-500, in the Silver Series Installation and Operation Manual. For more information regarding EZware’s multi-language feature please refer to Chapter 7, Creating & Using Databases & Languages.
