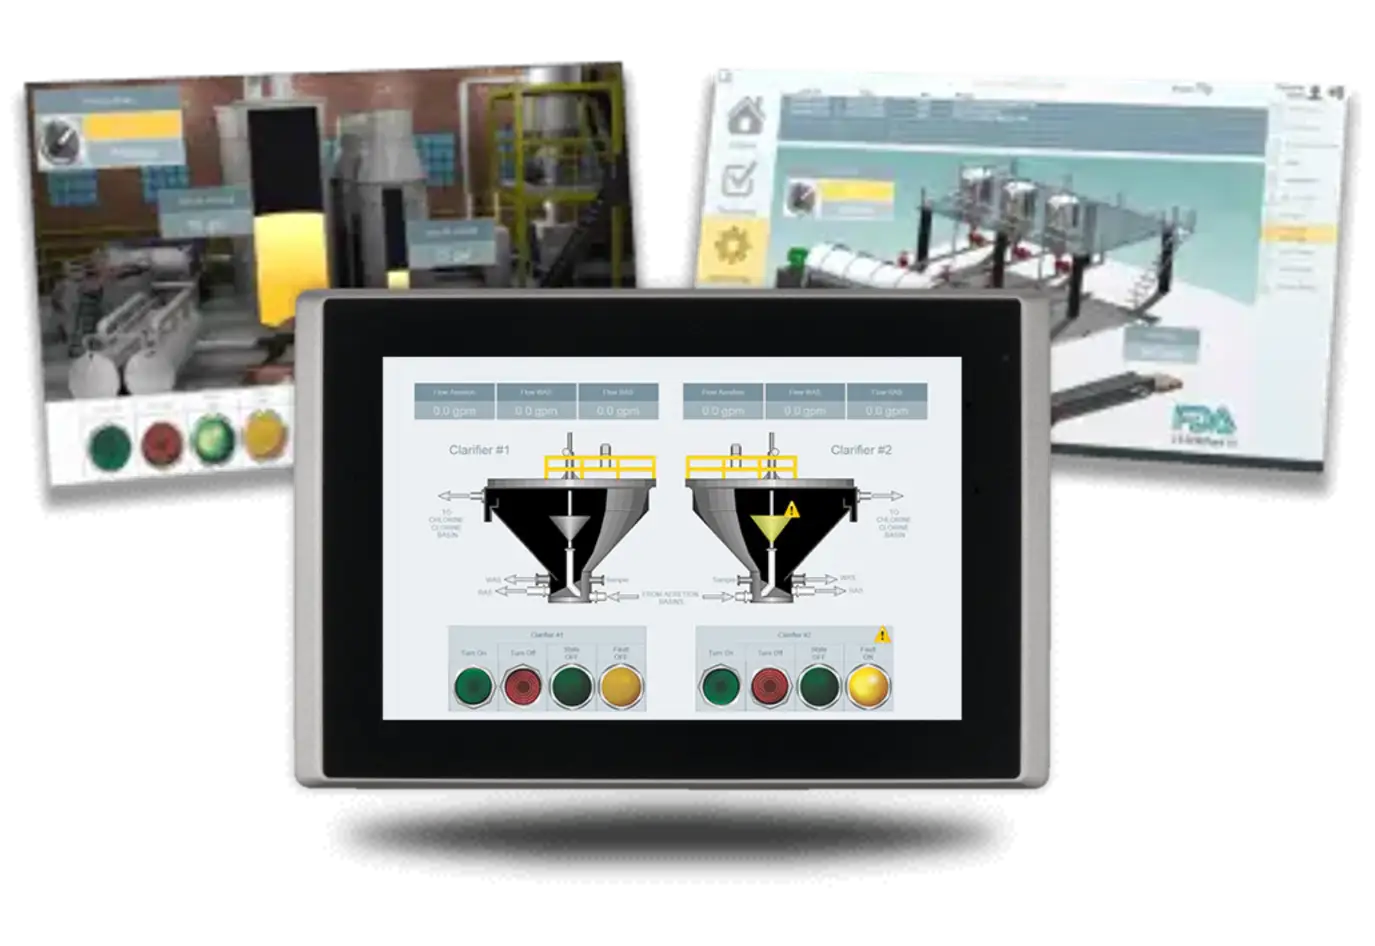
AVEVA Edge is an industrial software platform designed to create HMI and SCADA applications for PCs. It can run on anything from a high-performance Windows machine, to a lightweight embedded Linux device. AVEVA Edge is also able to connect to many different PLC Brands, and SCADA dashboards can be seen from any HTML5-compliant browser, like a Web HMI or a Rugged Tablet.
Imagine you have an existing AVEVA project that you’d like to connect to one of your new PLCs to help you monitor your machine. But you’d like to display this AVEVA project on a single screen local to the machine, like an HMI. A Maple Systems Panel PC may therefore serve as a good solution.
Now imagine we expand out to 10 machines all with different PLC tag structures that we’d also want to monitor and control in real time. Ideally we’d also want to access this central server with our current fleet of laptops and rugged tablets. A Maple Systems Box PC could work for this as well.

Software Required
Hardware Required
Installing and Running AVEVA Edge
This section walks through installing AVEVA Edge, activating the runtime license, and launching your application on the runtime machine. You’ll download and install the software, register the license, connect from the development environment, and deploy the project. It also shows how to enable the built-in HTML5 web client so the application can be accessed from other devices on your network.
Installing the Runtime
We’ll start with the initial installation of the AVEVA Edge software
Instructions: Installing the Runtime
Download the AVEVA Edge installer from their website
We’ll start by downloading the installer for AVEVA Edge from Maple Systems’ website.
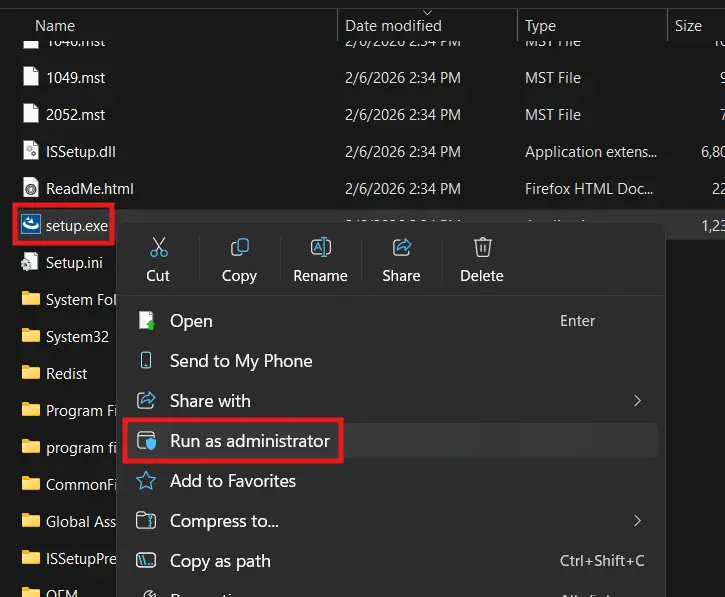
Run the Installer as an Admin
Once you download and extract the AVEVA installer, you’ll want to run “Setup.exe” as an administrator.
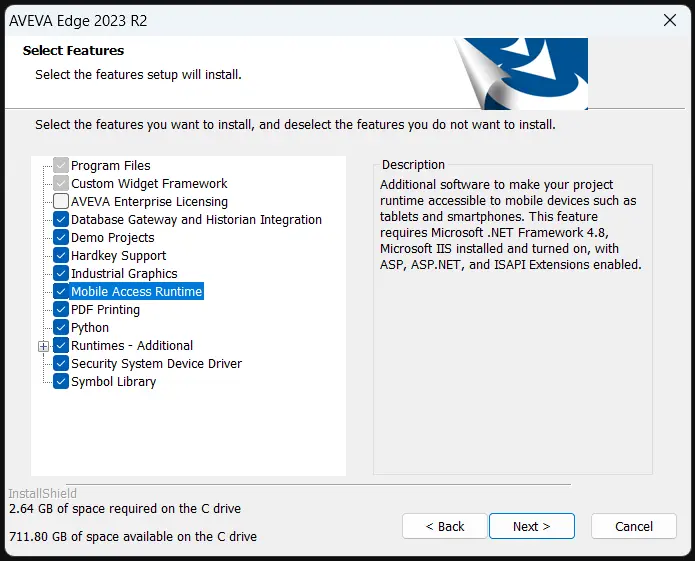
Select Which Features You Want
We’ll be sure to install as many features as we need for our application. Be sure to add the “Mobile Access Runtime” if you’d like to access your SCADA system from remote web browsers.
Activating your AVEVA Edge License
Next, you’d want to install and apply your AVEVA Edge license to your runtime machine. This will be done through the “AVEVA Edge Register” tool on your IPC, and it will automatically detect your software or hardware key.
Launch and Test the Application
Now we’ll send the Application from our Development machine to our runtime machine and test it.
Instructions: Launch and Test the Application
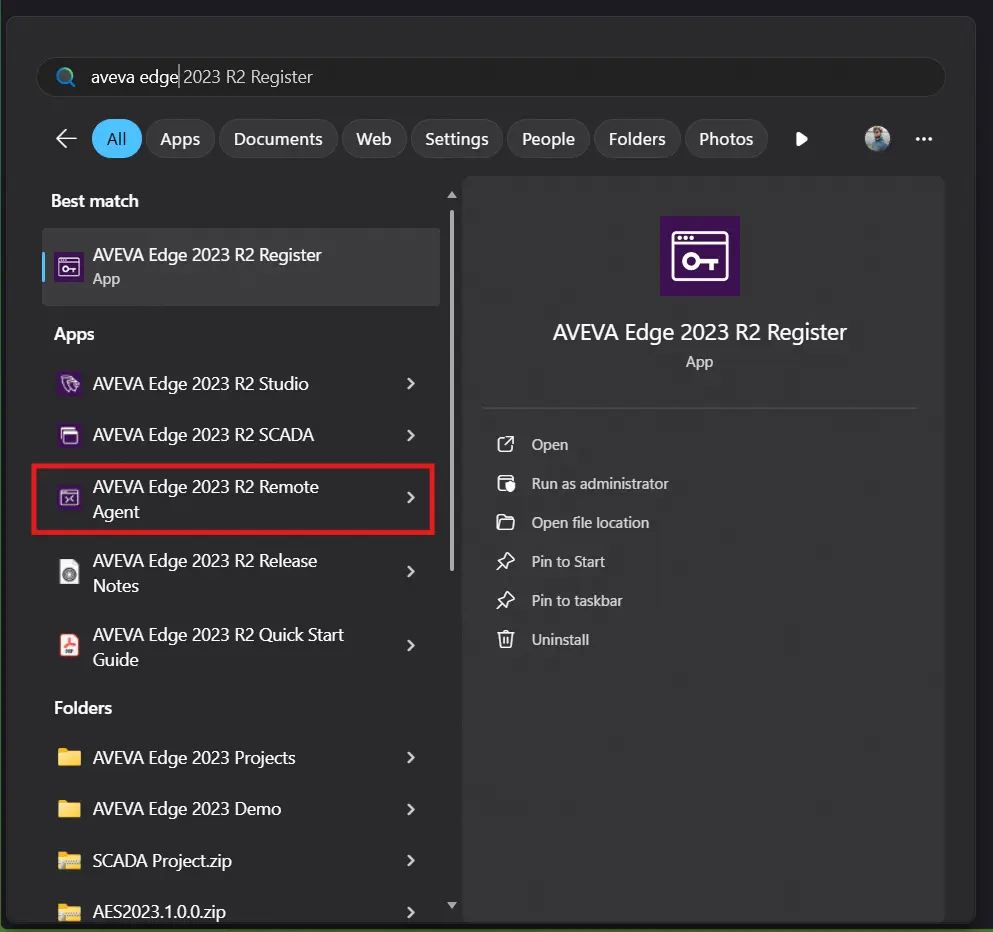
Launch the Remote Station
On your runtime machine, you’ll want to start the AVEVA Edge Remote Agent. If it’s your first time running it, you’ll need to set up a user for the remote agent.
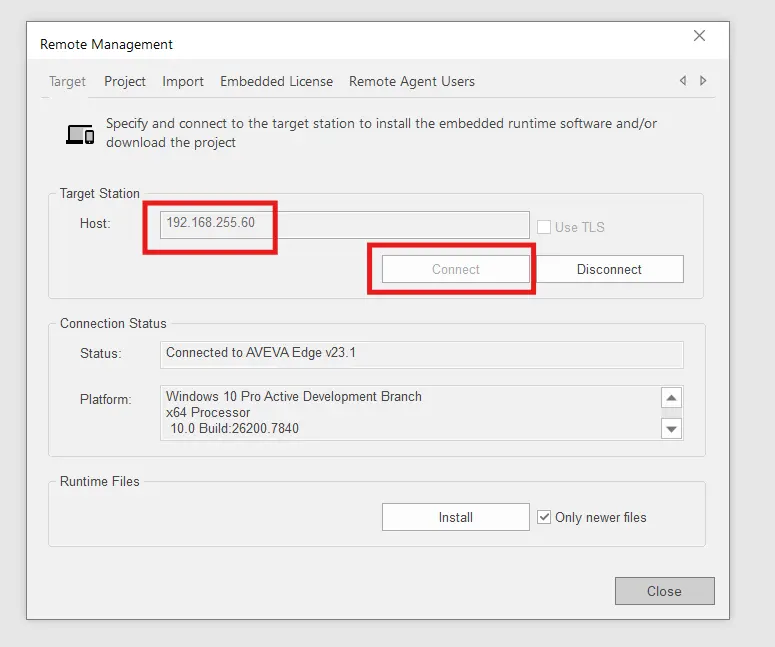
Connect to the Runtime machine
From your Development machine, you’ll want to run AVEVA Studio, and click “Connect” in the “Home” tag, you’ll enter your Runtime Machine’s IP address and click “Connect”. You’ll then want to log in as the user you set up on the runtime machine’s remote agent.
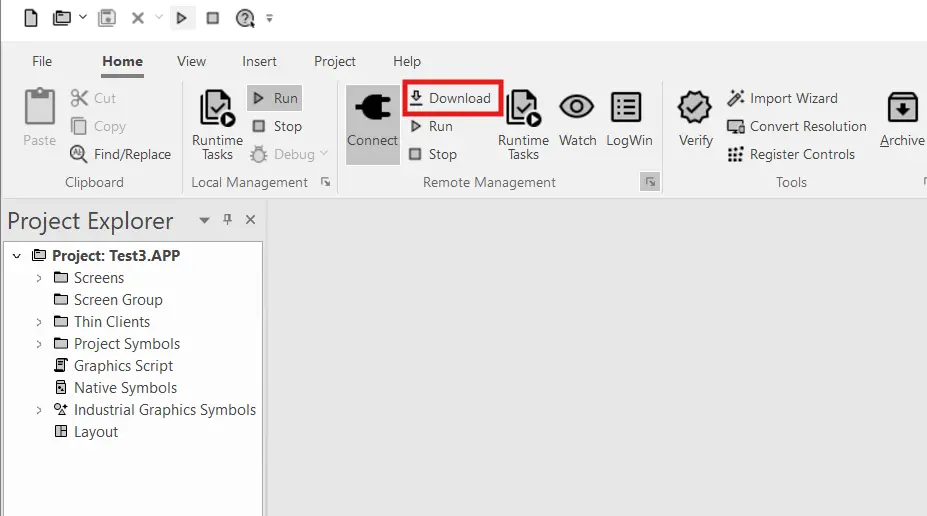
Download the Project
Now that we’re connected, we can click “Download” in the AVEVA Studio. On your runtime machine, you should see the log for the Remote agent start to react.
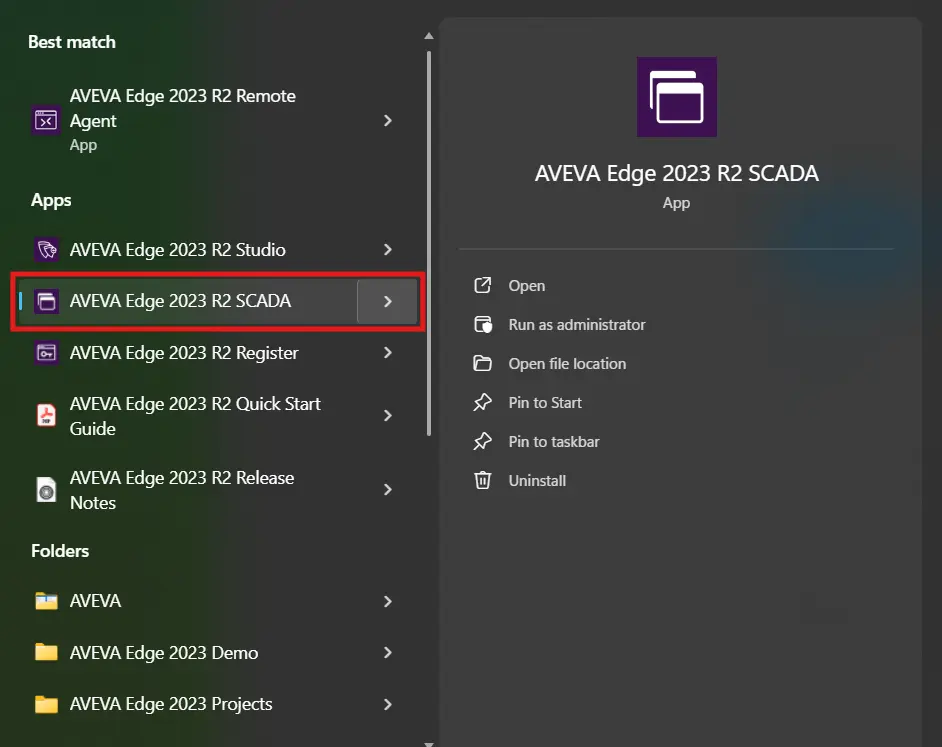
Running the Project
From here, all you’ll need to do is start the “AVEVA Edge SCADA” application installed alongside AVEVA Edge on your runtime device.
From here, you should be all set! You can also configure windows to launch AVEVA SCADA on boot, and you’ll have an automatic AVEVA Edge project running on your Maple Systems Industrial Panel PC.
Using the Built-in HTML5 Web Client
Now that we have our AVEVA Edge project running on one device. We’ll connect to this project from remote devices on our network via a web browser.
Instructions: Using the Built-in HTML5 Web Client
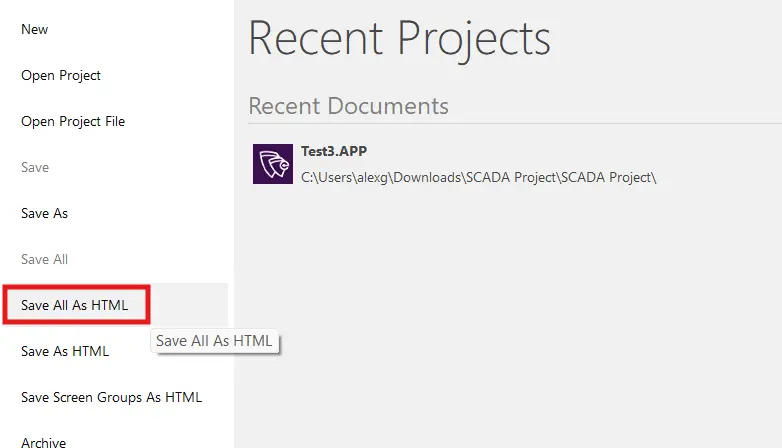
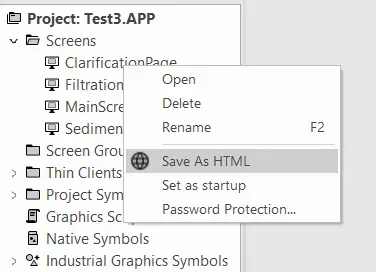
Enable Web-Based Screens in the Project
We’ll go back into our AVEVA project on the development screen, navigate to the “File” tab and select “Save All as HTML” to enable all of the screens of our project for web viewing.
Save All your Screens as HTML
Alternatively, if you only want access to certain screens from the web, you can right-click those particular screens in your project and select “Save as HTML”.
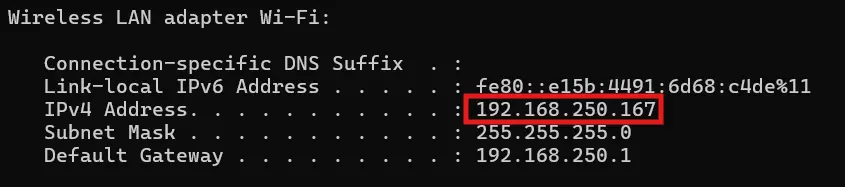
Get Your Runtime Device’s IP address
Once you’ve downloaded your project back to your runtime device and started the project like before, you’ll want to open your windows command prompt and type “ipconfig” to get your runtime device’s IP address.
Deploy the Runtime and Access from a Browser
From here you’ll then open a web browser on your remote device and enter the following URL: “http://<runtime device IP address>/avevaedge2023/index.html?screen=<the name of the project screen you want to access>”. As an example, my project url will be “http://192.168.250.167/avevaedge2023/index.html?screen=MainScreen”.

Then from here you have a centralized server for your AVEVA project, and you’ll be able to access it from anywhere in your local network, with any HTML5-compatible device. Whether it’s a Rugged Tablet, a Web HMI, or even a regular laptop or desktop.
Final Thoughts
If we return to our Machine setup above, embedding a Maple Systems panel PC will allow us to run our AVEVA Edge project on a machine local to the PLC, and have it act as our HMI. From there we’ll be able to further expand our our SCADA system from this one machine to more AVEVA Edge projects and overarching SCADA dashboards as well.
Resources & Documentation
The following guides and documentation are specific to the hardware used in this integration tutorial and will help you with setup, configuration, and programming:
Looking for additional learning resources? Explore our library of tutorials, example projects, and software tools to help you get the most out of your system:
Also, browse our Support Center for a complete list of installation guides, FAQs, and additional technical documentation.
About the Author
Trusted source for industrial automation & control solutions
Follow Maple Systems:
Share:


