AVEVA Edge is an industrial software platform designed to create HMI and SCADA applications for PCs. It can run on anything from a high-performance Windows machine, to a lightweight embedded Linux device. AVEVA Edge is also able to connect to many different PLC Brands, and SCADA dashboards can be seen from any HTML5-compliant browser, like a Web HMI or a Rugged Tablet.
Imagine you have an existing AVEVA project that you have running on a Maple Systems IPC. This IPC running AVEVA can either serve as an isolated HMI for a single machine, or as a centralized server that allows you insight into multiple machines. If you’d want a way to easily view your project, either as an isolated screen tied to one machine, or spread this information to multiple parts of your plant, the built in HTML5 client and Maple Systems Web HMIs can serve you well.
If you’d rather have a one-device setup that can do it all, you could alternatively use a Maple Systems Panel PC, and integrate your AVEVA project as an isolated HMI

Software Required
Hardware Required
Installing and Running AVEVA Edge
Installing the Runtime
We’ll start with the initial installation of the AVEVA Edge software
Instructions: Installing the Runtime
Download the AVEVA Edge installer from their website
We’ll start by downloading the installer for AVEVA Edge from Maple Systems’ website.
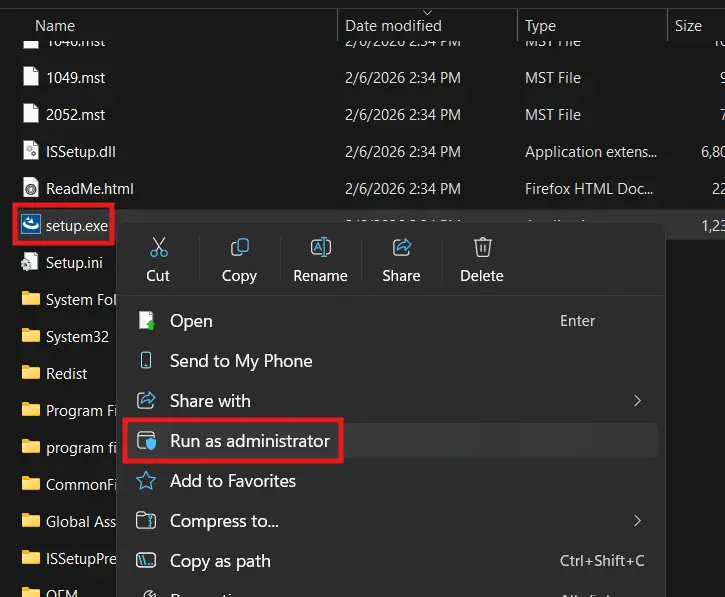
Run the Installer as an Admin
Once you download and extract the AVEVA installer, you’ll want to run “Setup.exe” as an administrator.
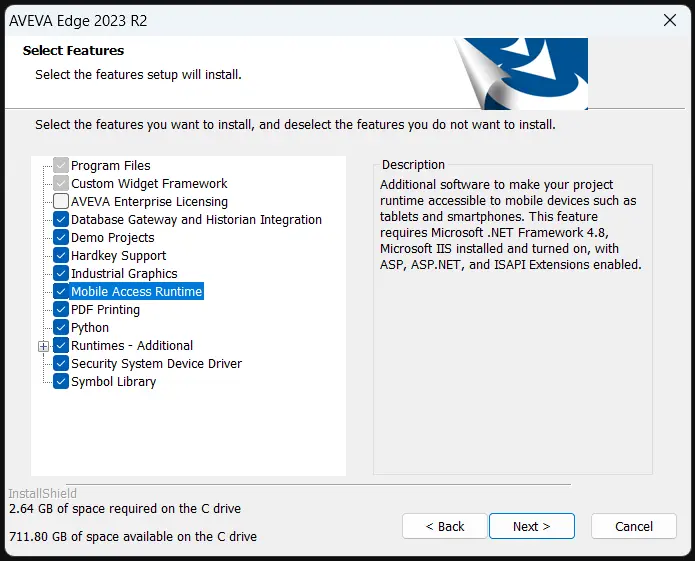
Select Which Features You Want
We’ll be sure to install as many features as we need for our application. Be sure to add the “Mobile Access Runtime” if you’d like to access your SCADA system from remote web browsers.
Activating your AVEVA Edge License
Then, you’d want to install and apply your AVEVA Edge license to your runtime machine. This will be done through the “AVEVA Edge Register” tool on your IPC, and it will also automatically detect your software or hardware key.
Connecting to the Built-in HTML5 Web Client With a Web HMI
Now that we have our AVEVA Edge project running on one device. We’ll connect to this project from our Maple Systems Web HMI.
Instructions: Connecting to the Built-in HTML5 Web Client With a Web HMI
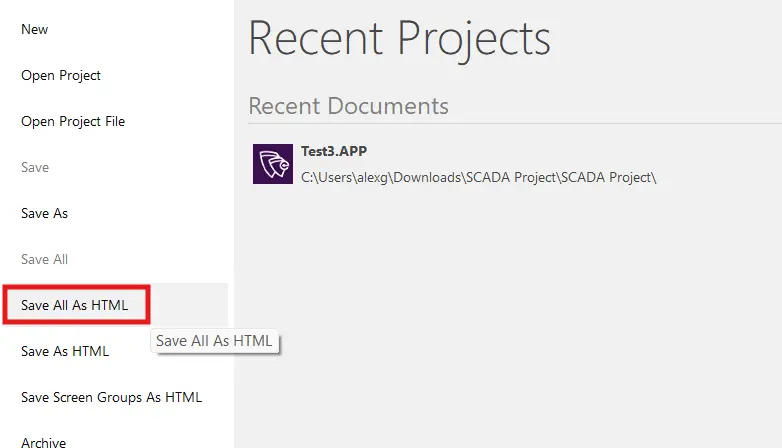
Enable Web-Based Screens in the Project
We’ll go back into our AVEVA project on the development screen, navigate to the “File” tab and select “Save All as HTML” to enable all of the screens of our project for web viewing.
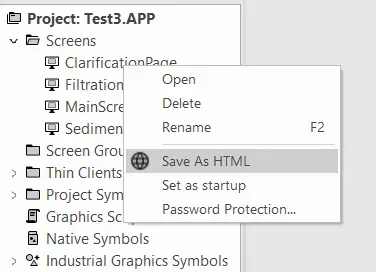
Save All your Screens as HTML
Alternatively, if we only want access to certain screens from the web, we can right-click those particular screens in the project and select “Save as HTML”.
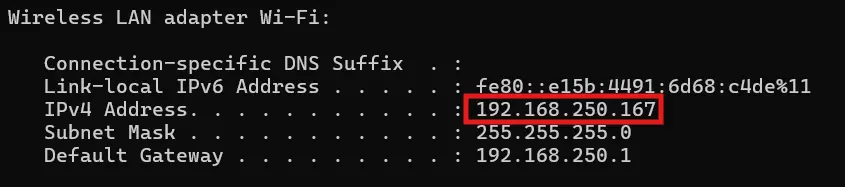
Get Your Runtime Device’s IP address
Once we’ve downloaded our project back to the runtime device and started the project like before, We’ll want to open a windows command prompt and type “ipconfig” to get our runtime device’s IP address.
Ensure your Network is set up properly
We’ll also want to make sure that our web HMI and our IPC are connected to the same network, and that their IP addresses line up with each other’s subnet masks as well.

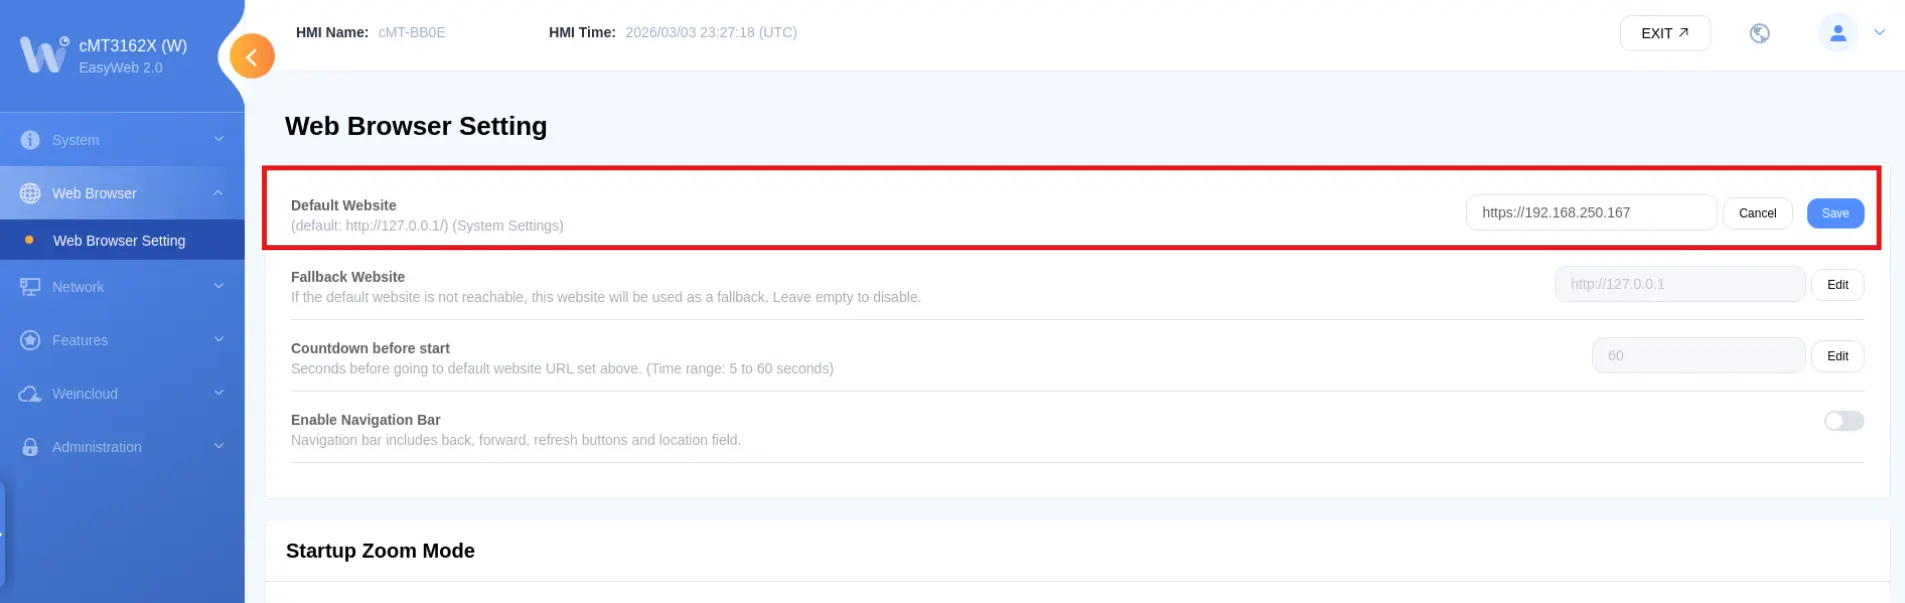
Set the AVEVA Edge Runtime IP Address as the Default
Now we’ll go into the settings of our web HMI, and set our default website to “http://<The IP address of your AVEVA Edge Runtime device>avevaedge2023/index.html?screen=<The name of the project screen saved as an HMTL document>”. As an example, my project url will be “http://192.168.250.167/avevaedge2023/index.html?screen=MainScreen”. This ensures that whenever we turn on our web HMI, it automatically connects to our AVEVA Edge project.
From here, you not only have a centralized AVEVA Edge project that you can access from any HMTL5-based device in your plant, but you also can set up any Maple Systems Web HMI to automatically connect to it.
Final Thoughts
If we leverage AVEVA Edge’s built-in HTML5 client, we’re easily able to connect to our AVEVA Edge SCADA system from any web HMI we install around our plant. Consequently giving us easy access to our birds-eye view of the entire production line from anywhere in the plant.
Resources & Documentation
The following guides and documentation are specific to the hardware used in this integration tutorial and will help you with setup, configuration, and programming:
Looking for additional learning resources? Explore our library of tutorials, example projects, and software tools to help you get the most out of your system:
Also, browse our Support Center for a complete list of installation guides, FAQs, and additional technical documentation.
About the Author
Trusted source for industrial automation & control solutions
Follow Maple Systems:
Share:


