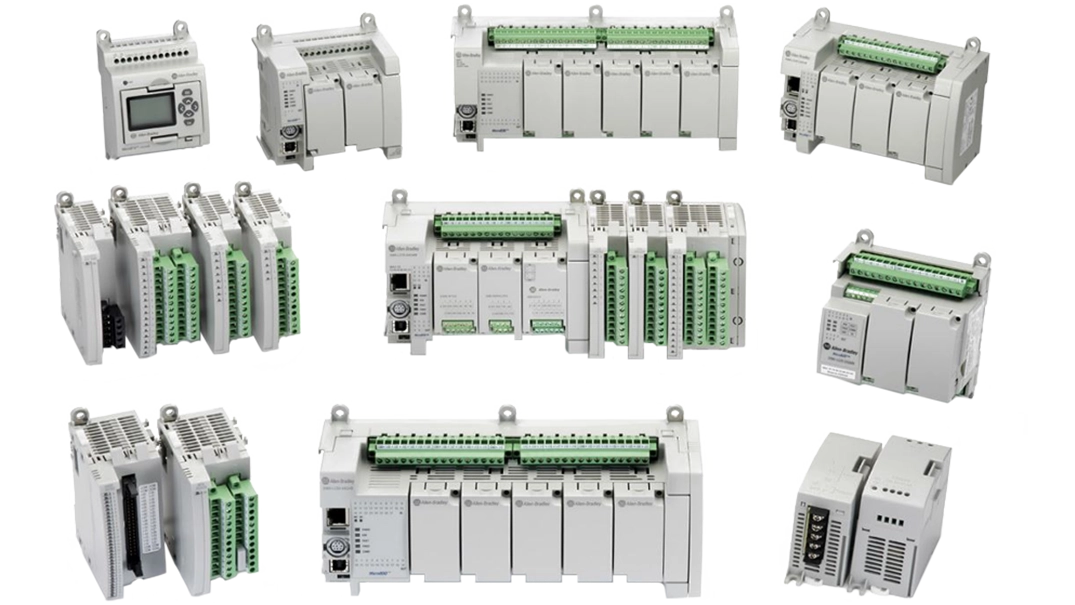
The Micro800 PLC family is Allen-Bradley’s line of capable, low-cost PLCs. These range from fixed IO models without an Ethernet port (Micro830) to the highly expandable Micro870. These PLCs can be made even more capable by combining them with an HMI from Maple Systems.
Our HMIs support all of the communication options available on the Micro800 series. This combination brings all of the features of the EBPro HMI software to your Micro800 based control system. Follow our Micro800 series connection guide below to learn how easy it is to get connected.

Quick Start Guides
Our Quick Start guides are here to help you get your HMI and PLC talking to each other as quickly and painlessly as possible. Click on the button below to show more details for the protocol you are using, and learn how to connect your devices in a few easy steps.
Modbus TCP/IP
This guide walks you through connecting a PLC to EBPro using the Modbus TCP/IP Master driver, configuring the device IP address, and assigning Modbus addresses to objects in your HMI project. Follow these steps to establish communication and begin building and testing your screens with confidence.
Instructions: Modbus TCP/IP
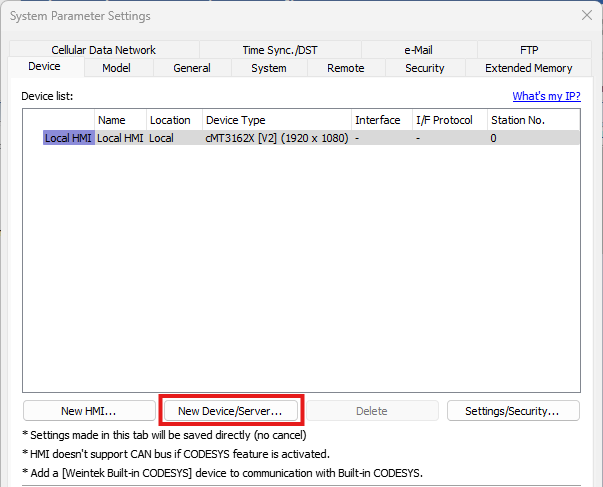
Start a New EBPro Project and Add a Device
Create a new EBPro project for your HMI. In the System Parameter Settings window, click on the New Device/Server button.
Select the Modbus TCP/IP Master Driver
Select Modbus TCP/IP Master for the Device type.
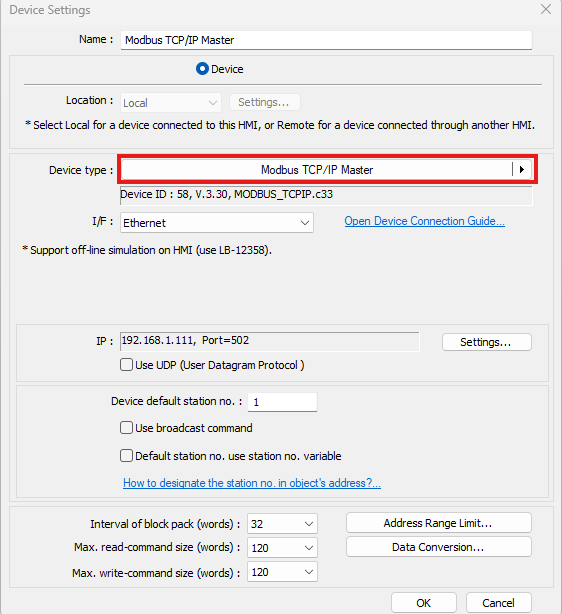
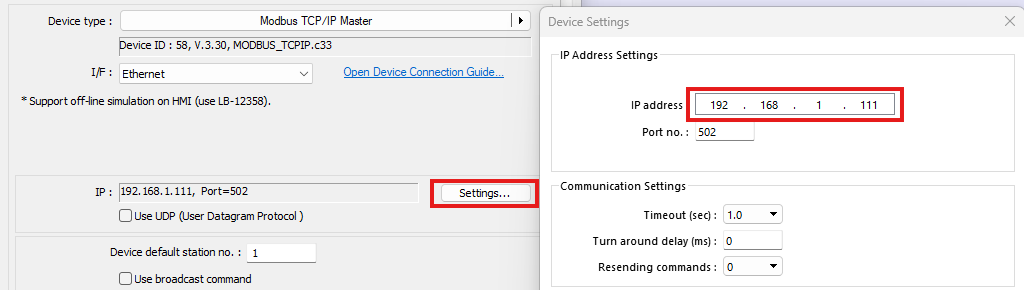
Enter the PLC IP Address
Click on the Settings button and configure the IP address of your PLC.
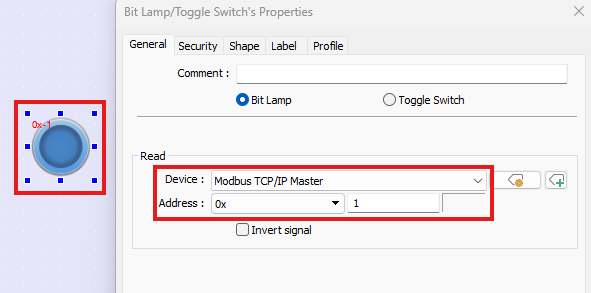
Place an Object and Link It to a Modbus Address
Add objects to your EBPro project. In the object properties window, assign an address from the Modbus TCP/IP Master device.
Run the Project in Simulation or Go Live
Your devices are now ready to communicate. You can test project behavior using the Online or Offline Simulation modes in EBPro, or install your projects and go live with your devices.
Modbus RTU / RTU over TCP
This guide walks you through connecting a PLC to EBPro using Modbus RTU (Serial) or RTU over TCP, configuring communication settings, and assigning Modbus addresses to objects in your HMI project. Follow these steps to set up communication correctly and begin controlling or monitoring your PLC from your HMI.
Instructions: Modbus RTU / RTU over TCP
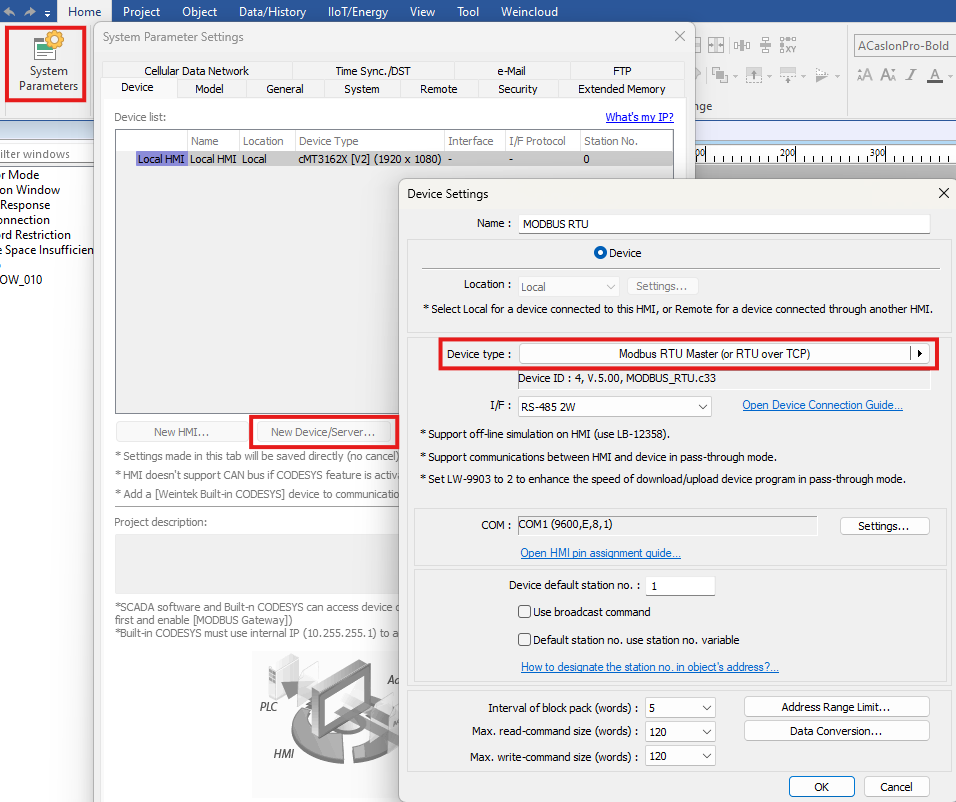
Start a New EBPro Project and Add a Device
Create a new EBPro project for your HMI model. In the System Parameter Settings window, click on the New Device/Server button.
Select the Modbus RTU Master Driver
For a Modbus RTU connection, select Modbus RTU Master(or RTU over TCP).
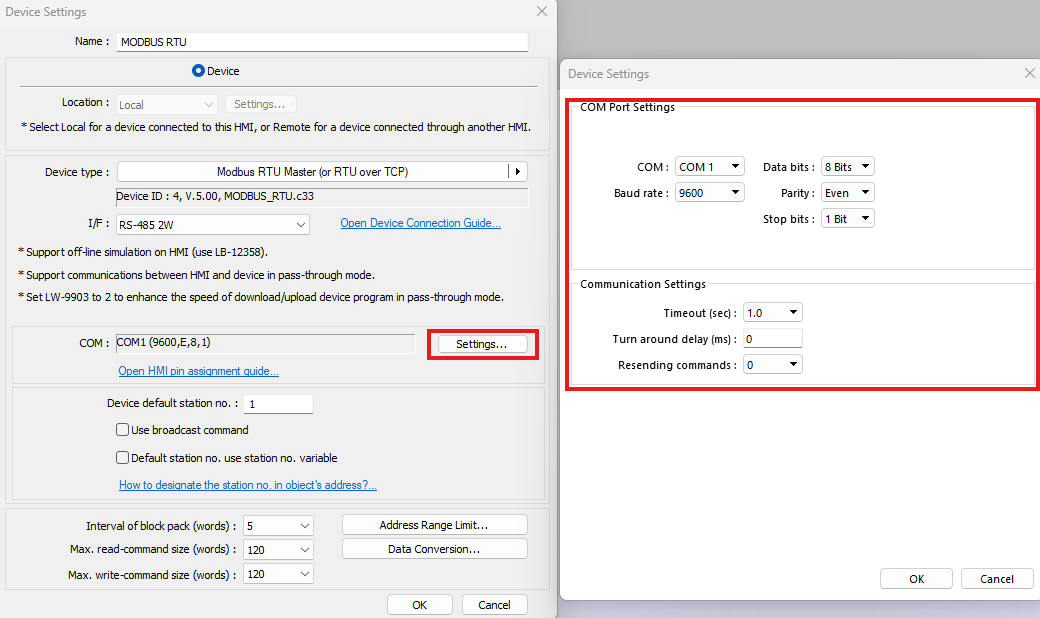
Configure the Serial or IP Communication Settings
Click on the Settings button and configure the COM port settings to match the settings in the PLC, or for Modbus TCP connections and configure the IP address of your PLC.
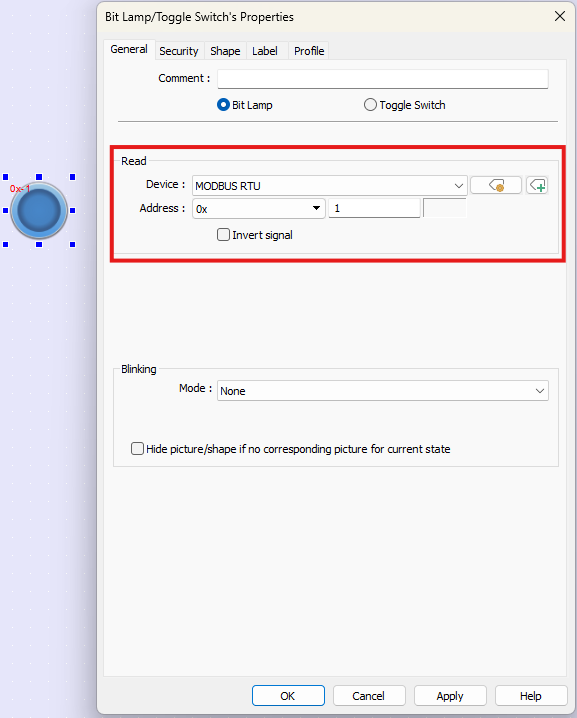
Place an Object and Link It to a Modbus Register
Configure your screens using the objects available in EBPro. Configure the address in the objects by setting the Device to your PLC and configuring the address for the register you want to control/display in the PLC.
Download the Project to the HMI and Connect to the PLC
Once your EBPro project has been configured, download it to your HMI using either an Ethernet connection to your PC or a USB flash drive. Use the appropriate communication cable to connect the serial ports of the HMI and PLC. To find the correct cable for your devices, check out our Cable Configurator.
CIP – Serial
This guide walks you through connecting an Allen-Bradley Micro850 PLC to EBPro, configuring communication settings, importing PLC tags, and using those tags in your HMI project. Follow these steps to establish communication and begin building and testing your screens with confidence.
Instructions: CIP – Serial
Start a New EBPro Project and Add a Device
Create a new EBPro project for your HMI model. In the System Parameter Settings window, click on the New Device/Server button.
Select the Allen-Bradley Micro850 Driver
Select the Allen-Bradley Micro850 driver from the driver list of available drivers.
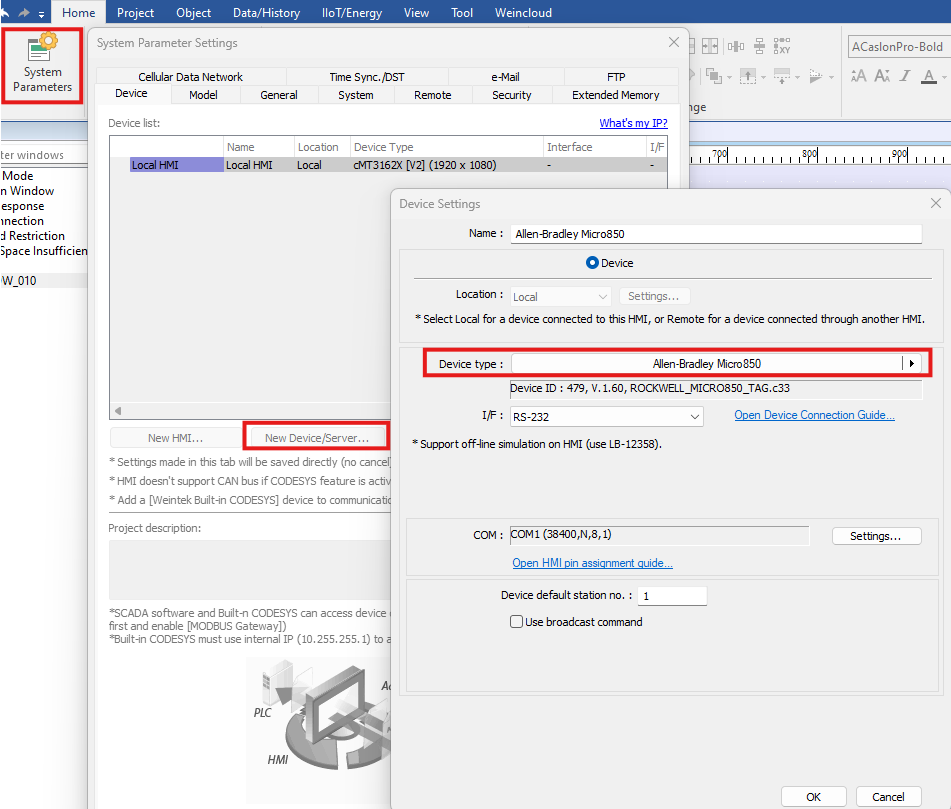
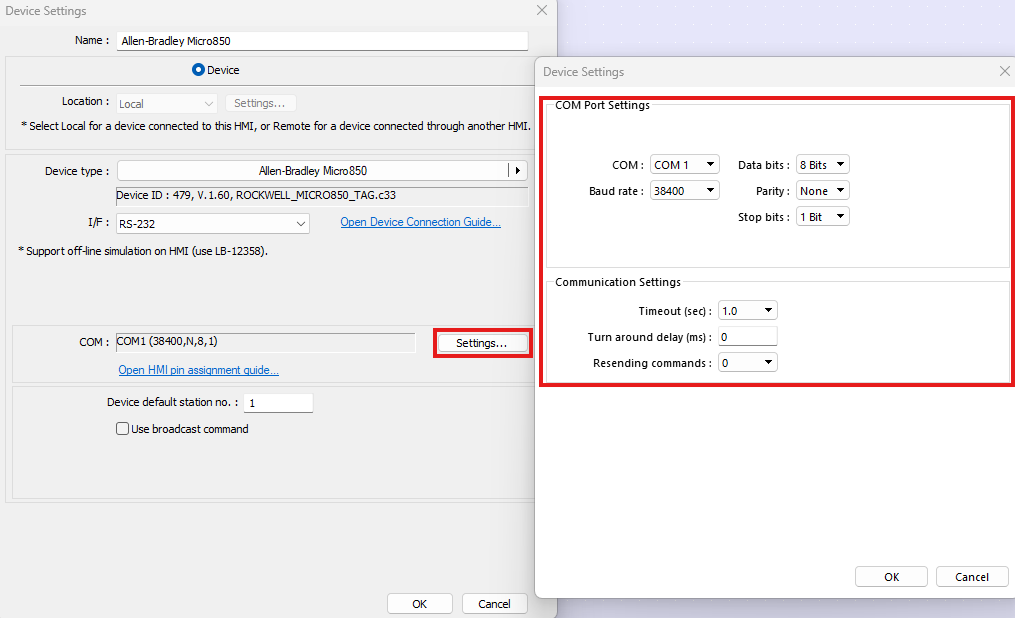
Configure the Communication Settings
Click on the Settings button and configure the COM port settings to match the settings in the PLC.
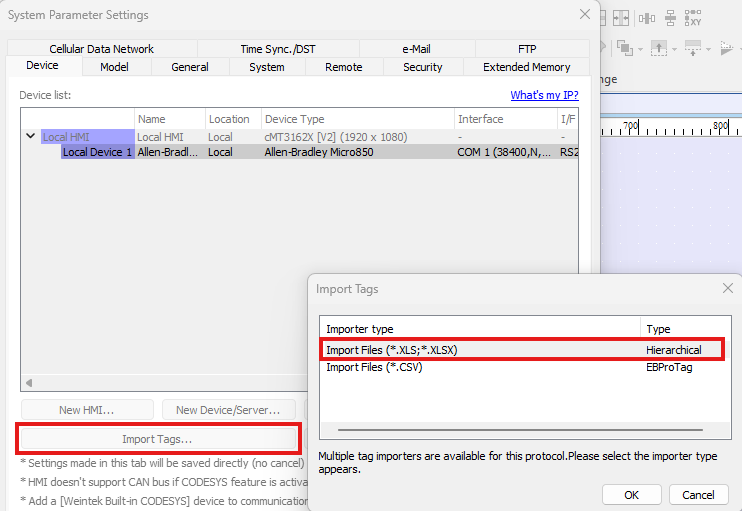
Import PLC Tags into EBPro
Once the driver for the Micro850 series device has been added to your EBPro project, click the Import Tags button to bring your communication tags for your PLC into EBPro. We recommend using the .xls or .xlsx option for tag import, but tags may be imported into the EBPro tag library using a .csv file as well.
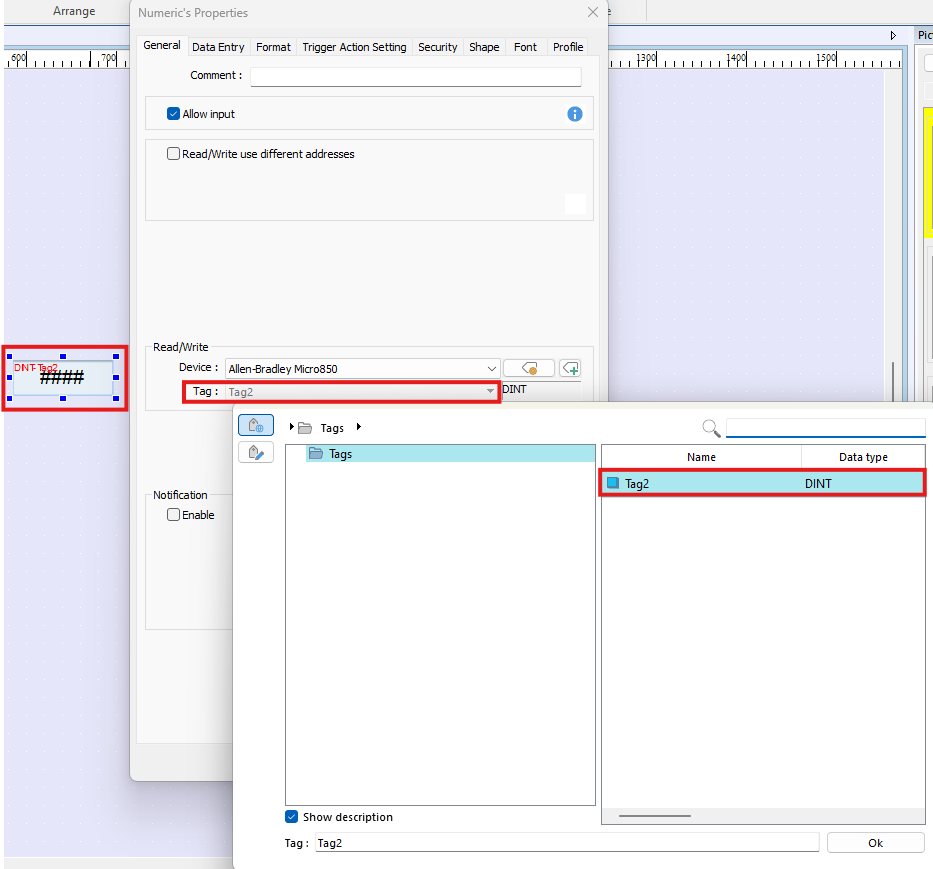
Place an Object and Link It to a PLC Tag
Configure your screens using the objects available in EBPro. Configure the address in the objects by setting the device to your PLC and configuring the address for the register you want to control/display in the PLC.
Download the Project to the HMI and Connect to the PLC
Once your EBPro project has been configured, download it to your HMI using either an Ethernet connection to your PC or a USB flash drive. Use the appropriate communication cable to connect the serial ports of the HMI and PLC. To find the correct cable for your devices, check out our Cable Configurator.
Demo Project
To see a prebuilt project for a ControlLogix PLC, check out our Micro850 Demo Project for EBPro. This demo is configured to communicate with a Micro850 PLC using the EtherNet/IP – CIP protocol, and demonstrates the usage of multiple EBPro features. Play the following video to see a preview of this demo project in action, then follow the instructions below to install and run the project on your development PC.
Follow the steps below to open this demo project in EBPro:
- Download the compressed Micro850 Demo Project folder.
- Extract the files from the zipped folder and save them to a local drive on your PC.
- Open the EBPro configuration software.
- Open the File menu and select Compress/Uncompress.
- In the Uncompress section of the window, click Browse, then select the “Micro850_Pump_Project.ccmp” file that was just extracted from the zipped folder in step two. Click Uncompress.
- The uncompressed project file will now be in the same location as the .ccmp file with a *.cmtp file extension.
- Use File > Open in EBPro to open the uncompressed project file.
Controller Information Sheets
Controller Information Sheets provide information to help connect to an Allen-Bradley PLC, including connection tips, tag imports, and more. If you’re experiencing connection issues, download and review the info sheet for your device using the buttons below.
Micro800 (Modbus RTU)

Controller information and connection guide for Micro800 Series PLCs using Modbus RTU protocol.
Micro820/830/850 (CIP Serial)

Controller information and connection guide for Micro820/830/850 PLCs using the CIP Serial protocol.
Micro820/850
(Ethernet)

Controller information and connection guide for Micro820/850 PLCs using the Ethernet protocol.
Communication Cables
Selecting the correct communication cable is essential for establishing reliable communication between a Maple Systems HMI and an Allen-Bradley PLC. Different PLC models and communication protocols require specific cable types to ensure proper signal compatibility and data transfer.
Maple Systems HMIs connect directly to Allen-Bradley PLCs. Cable requirements may vary depending on the PLC model, communication method, and physical connection type used in your system.
To determine the correct cable for your specific HMI and PLC combination, use the HMI/cMT Cable Configurator.
Additional Resources
For answers to common questions about Maple Systems HMIs, PLCs, and general product usage, visit our FAQ page. This resource covers frequently asked topics related to hardware, software, and system configuration.
For a complete list of Allen-Bradley controllers, including the Micro800, available from Rockwell Automation, refer to the manufacturer’s official website for the most up-to-date product information.
Would you like to know more? Our friendly and knowledgeable sales team can connect you to the resources you need.
About the Author
Trusted source for industrial automation & control solutions
Follow Maple Systems:
Share:


