Installing API Package for IPC2410A with Windows
Technical Note 1147
Applicable Model(s)
IPC2410A
Title
Installing API Package for IPC2410A with Windows
Date
04/02/2024
Rev
00
P/N
0907-1147
Summary
This document describes the method used to install the API package for an IPC2410A using the Windows operating system.
NOTE: The following method was tested on an IPC2410A running Windows 10.
Solution
1.
Download the API package installer for the IPC2410A from the Software and Upgrades section of the Maple Systems website.
2.
Once the download is complete, unzip the folder and save the files to a local memory location.
3.
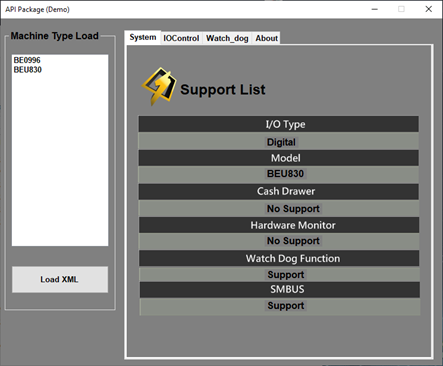
Open the extracted folder, then open the “ProxAPI Standard” subdirectory. Find and run the “ProxAP.exe” application within this folder. The following window will be displayed:

4.
In the “Machine Type Load” section, select the IPC2410A from the list.
5.
Press “Load XML” to load the IPC2410A information into the program. The value shown in the Hardware Monitor field should change from “No Support” to “0x00”.
6.
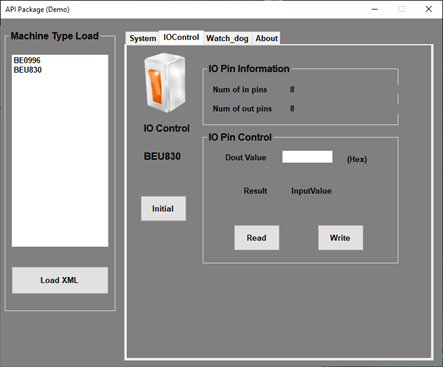
Navigate to the IOControl tab at the top of the window. The following window will be displayed:

7.
The IOControl window will show IO Pin Information that includes the number of input and output pins present on the DIO port.
8.
Press the “Initial” button to initialize the DIO port. The button will display the text “Initial OK!” when the process is complete.
9.
In the IO Pin Control section, the “Dout Value” field will accept user input to interact with the DIO pins. This field will accept values of “00”, “0F”, “F0”, and “FF”, with each character controlling the state of four output pins. The following list details the commands used and the effect they will have on the output:
a.
“00”: All outputs OFF
b.
“0F”: Pins 1-4 OFF, pins 4-8 ON
c.
“F0”: Pins 1-4 ON, pins 4-8 OFF
d.
“FF”: All outputs ON
10.
Once the above steps have been completed, the DIO pins can be tested using a multimeter or LED indicators to confirm that the output states are changing as expected.
