Ferrite Coil Installation for the MAP460C OIT
Technical Note 1053
Applicable Model(s)
MAP460C
Title
Ferrite Coil Installation for the MAP460C OIT
Date
10/23/2023
Rev
00
P/N
0907-1053
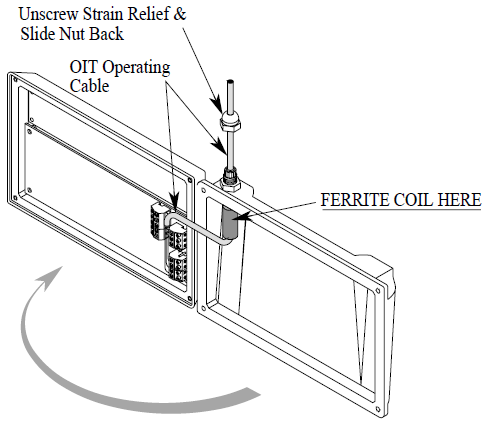
Installation of a Ferrite Coil around the OIT Operating Cable reduces electrical noise picked up on the serial and power wires. To install the ferrite coil onto the operating cable of the MAP460C, perform the following steps (for already installed units):
1.
Remove the four screws from the back of the OIT enclosure and open the two halves.
2.
Disconnect the OIT operating cable wires from the terminal block connectors. Take note of the wire locations for rewiring.
3.
Loosen the cable strain relief nut and slide it back. This allows the OIT operating cable to slide back and forth through the wall of the OIT enclosure.
4.
Remove the black heatshrink tubing from the end of the OIT operating cable.
5.
Slide the ferrite coil over the OIT operating cable. This usually requires rotating the ferrite coil back and forth while simultaneously pulling on the OIT operating cable.
6.
Slide the ferrite coil up against the inside wall of the OIT enclosure and pull through enough additional cable to reconnect the OIT operating cable wires.
7.
Reconnect the OIT operating cable wires to the terminal block connectors in their original positions.
8.
Pull out any slack from the OIT operating cable.
9.
Rotate the rear of the OIT enclosure back into position while gently pulling out the new slack generated in the cable as you proceed.
CAUTION: Due to the large size of the ferrite coil, it must be positioned very carefully. Make
sure that when the OIT enclosure halves are brought together, the ferrite coil is positioned so
there is no internal interference. The ferrite coil must be positioned up against the inside wall of
the OIT enclosure with the protruding OIT operating cable kept short.

