ASCII Serial Communication
Technical Note 5126
Applicable Model(s)
HMI5000 Series
cMT Series
Title
ASCII Serial Communication
Date
01/30/2019
Rev
00
P/N
0907-5126
Summary
Use our Sample Project, ASCII Serial Communication (refer to our Sample Projects in the Support Center), along with the instructions below to learn how to send and receive ASCII strings between your HMI and a Windows PC.
The OUTPORT macro function is used to send an ASCII string out of your HMI’s serial port, and the INPORT macro function allows you to receive an ASCII string to your HMI.
Examples of both of these macro functions are included in the Sample Project and are also explained below.
This project utilizes the Free Protocol driver.
Using the Sample Project
Requirements
- Maple Systems HMI5000 or cMT Series (This project uses an HMI5070NLv2 by default)
- EasyBuilder Pro Configuration Software v6.02.01.209 or later
- Windows 7 or later
- USB-to-Serial cable
Download the Sample Project from our website
- Visit the Maple Systems Sample Projects page.
- Search for ASCII Serial Communication sample project.
- Click on the link to download and save the project to your PC.
Set up your USB-to-Serial cable on your Windows PC
- Plug a USB-to-Serial cable into your PC’s USB port.
- Do not plug the cable into your HMI’s serial port until you have confirmed that the Windows driver has been installed successfully.
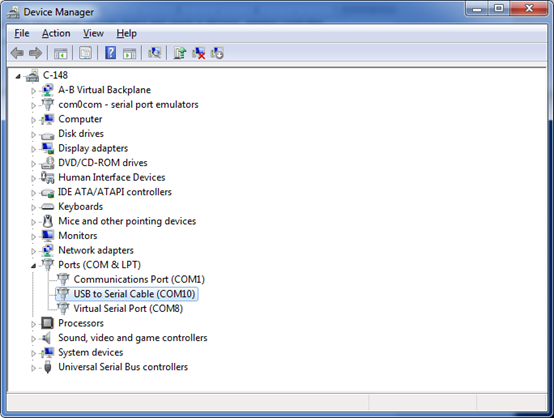
- After plugging in the USB-to-Serial cable, in Windows, go to your Control Panel > Device manager and look under ‘Ports (COM & LPT)’ for a device called ‘USB to Serial Cable (COM#)’.
- Note the COM port number that is assigned to the cable. If you don’t see such a device, please visit the website of the manufacturer of the cable and attempt to download and install the appropriate Windows driver.
- If this still doesn’t work, or if you see a yellow ‘yield’ icon with an exclamation point over the device, please try a different USB port on your PC.
Example of functioning USB-to-Serial cable with drivers installed as seen in Windows Device Manager:
Connect the USB-to-Serial cable to your HMI
- Locate the RS-232 serial communications port on your HMI.
- Add a Null Modem (pins 2-3) to the end of it.
- Connect the USB-to-Serial cable with Null Modem to the RS-232 port.
Download the Sample Project onto your HMI
- If you have not already done, so please download the project, ASCII Serial Communication, from our Sample Projects page.
- Open EasyBuilder Pro
- Browse to and open the file for the project, “ASCIISerialCommunication.emtp”
- If you have an HMI model other than the HMI5070NLv2 used in the Sample Project, please change the model accordingly, as follows:
- Click on ‘Home’ > ‘System Parameters’.
- Click on the ‘Model’ tab
- From the ‘HMI Model’ drop-down menu, select the HMI or cMT model that you are using
- Click OK, and accept the default settings for ‘Resize pop-up windows objects’ if you are prompted to do so
- Next, from ‘Project’, select ‘Download (PC -> HMI)’ and download the project to your HMI using whichever method you choose: Ethernet, USB, etc.
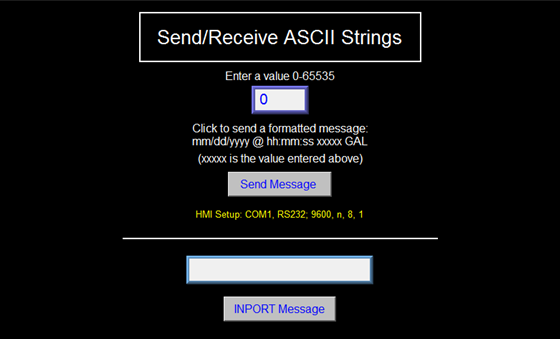
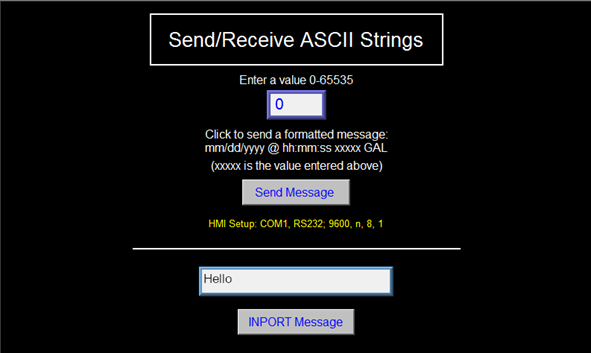
- Once the project has been downloaded and the HMI has rebooted, you should see the Initial window appear, as shown below:
Prepare to send and receive ASCII strings
In order to interact with the HMI over your USB-to-Serial cable from your Windows PC, you will need to have a terminal emulator such as PuTTY or HyperTerminal installed. The screenshots and examples below will use PuTTY. (Click here to download PuTTY. For HyperTerminal, you can download a free trial by clicking here.)
How to Use PuTTY
- Open PuTTY through your Windows Start menu.
- In the PuTTY Configuration window (as seen below), click on the radio button for ‘Serial’.
- As seen in the screenshot below, you will need to specify a COM port number.
- Change COM1 to the appropriate COM port number for your USB-to-Serial cable.
- If you don’t know which COM port number to use, please check under Windows > Control Panel > Device Manager, and expand the category labeled ‘Ports (COM & LPT)’.
- Look for a device called USB-to-Serial cable there and note the COM number.
- Enter the appropriate COM number in the ‘Serial line’ field, e.g. “COM10”.
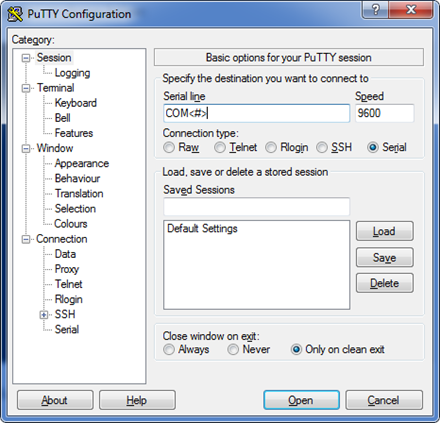
- Once you have set the appropriate COM port number, click Open.
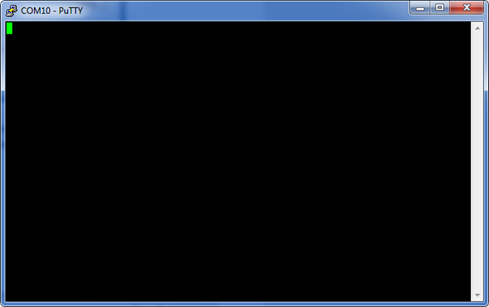
- You should see a black terminal window such as shown in the screenshot below.
Send an ASCII string to the HMI from your PC
From your PuTTY Terminal window (pictured above), type a short message, such as “Hello” and hit ENTER.
On your HMI screen, click on the “INPORT Message” button.
If your cable and devices are configured correctly, you should see the message you typed appear in the text field just above the “INPORT Message” button.
Send an ASCII string to your PC from the HMI
- On your HMI screen, click on the numeric input object under the text “Enter a value: 0-65535”.
- On the keypad, enter an integer. For example, 100. Then click ‘Enter’.
- Next, click the ‘Send Message’ button.
- Check your PuTTY Terminal window on your PC. You should see a message such as this: “1/30/2019 @ 17:01:21 00100 GAL”.
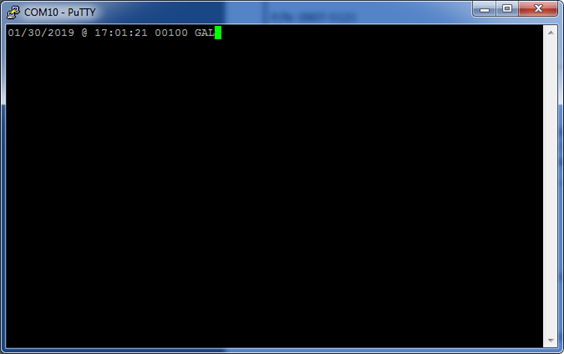
- If you wish, you can enter in new numbers in the numeric object, and click ‘Send Message’ again. This will append lines to the Terminal window in your PuTTY session.
- At any time, you may also type in a string in PuTTY and hit ENTER. To see the new message in your HMI, simply click on ‘INPORT Message’ again.
- Once you are finished testing the ASCII string send and receive functions, feel free to close the PuTTY terminal window. When prompted, click OK to indicate you wish to close this session.
Examining the Sample Project and Macro Functions
The ASCII Serial Communication sample project uses two different macro functions, one to send an ASCII string from the HMI, and one to receive an ASCII string to the HMI.
The macro titled “INPORT” is used to receive an ASCII string.
The macro titled “SendSerialMessage”, with its OUTPORT function, is used to send an ASCII string out from the HMI.
In our Sample Project, Function Keys are used to execute each of these macros: Send Message (FK_0) executes the “SendSerialMessage” macro, and INPORT Message (FK_1) executes the “INPORT” macro.
Feel free to modify these macros to suit your own projects.
For further information on the INPORT and OUTPORT macro functions used, please refer to the EBPro Programming Manual found on our Manuals & Guides page.
